
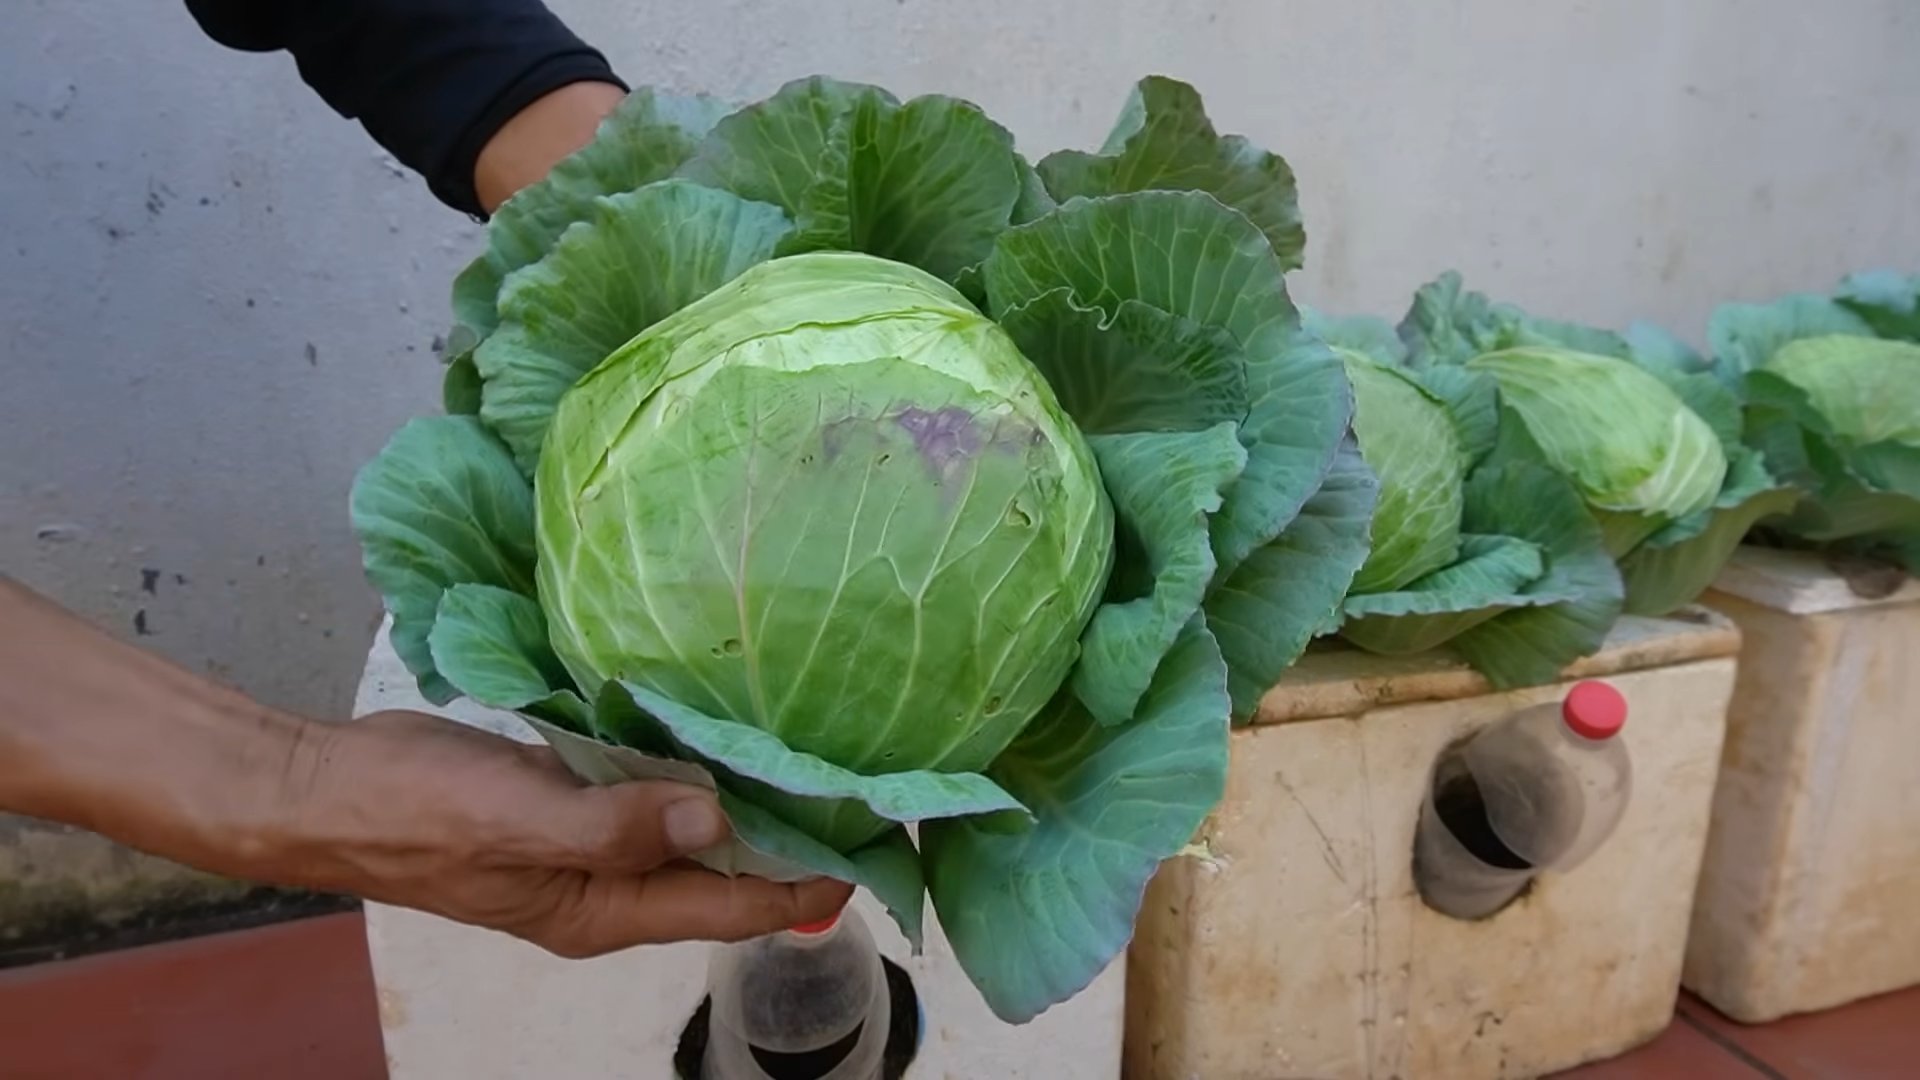
Grow Cabbage at Home? Absolutely! Imagine stepping into your backyard and harvesting crisp, vibrant cabbage heads, ready to be transformed into delicious coleslaw, hearty soups, or tangy sauerkraut. Forget those bland, mass-produced cabbages from the grocery store. With a little know-how, you can cultivate your own organic, flavorful cabbages right in your own backyard.
For centuries, cabbage has been a staple in diets around the world. From the humble peasant dishes of Europe to the vibrant kimchi of Korea, this versatile vegetable has nourished communities and cultures. Its resilience and adaptability have made it a vital crop throughout history. But you don’t need to be a seasoned farmer to enjoy the fruits (or rather, vegetables!) of your labor.
In today’s world, where we’re increasingly conscious of where our food comes from, learning to grow cabbage at home offers a rewarding and sustainable alternative. Not only will you have access to fresh, healthy produce, but you’ll also reduce your carbon footprint and connect with nature in a meaningful way. Plus, let’s be honest, there’s something incredibly satisfying about nurturing a plant from seed to harvest. This DIY guide will provide you with simple, effective tricks and hacks to ensure a bountiful cabbage crop, even if you’re a complete beginner. So, grab your gardening gloves, and let’s get started!
Growing Cabbage at Home: A Beginner’s Guide
Hey there, fellow gardening enthusiasts! Ever thought about growing your own cabbage? It’s surprisingly rewarding, and nothing beats the taste of fresh, homegrown veggies. I’m going to walk you through everything you need to know to successfully cultivate these leafy greens right in your backyard (or even in containers!).
Choosing Your Cabbage Variety
Before we get our hands dirty, let’s talk cabbage varieties. There’s a whole world beyond the standard green cabbage you see in the grocery store!
* Early Varieties: These mature quickly (around 50-60 days) and are great for a spring or fall harvest. Examples include ‘Golden Acre’ and ‘Early Jersey Wakefield’.
* Mid-Season Varieties: These take a bit longer (70-80 days) and offer good storage potential. ‘Copenhagen Market’ is a popular choice.
* Late Varieties: These are the longest to mature (80-100+ days) and are ideal for winter storage. Think ‘Danish Ballhead’ or ‘January King’.
* Specialty Cabbages: Don’t forget about red cabbage (‘Red Acre’), Savoy cabbage (with its crinkled leaves), and Napa cabbage (used in Asian cuisine).
Consider your climate and the time of year you want to harvest when making your selection. I personally love growing ‘Golden Acre’ for a quick spring harvest and ‘Danish Ballhead’ for storing over the winter.
Getting Started: Seeds vs. Transplants
You have two options for starting your cabbage: seeds or transplants.
* Seeds: Starting from seed gives you more control over the entire process and is generally cheaper. However, it requires more time and effort.
* Transplants: Buying transplants from a nursery is quicker and easier, but you’ll have fewer variety choices.
I usually start my cabbage from seed indoors about 6-8 weeks before the last expected frost. This gives them a head start and ensures I have healthy seedlings ready to go when the weather warms up.
Starting Cabbage Seeds Indoors (Optional)
If you’re opting for seeds, here’s how to get them started indoors:
1. Gather Your Supplies: You’ll need seed starting trays or small pots, seed starting mix (a light, sterile soil), cabbage seeds, a spray bottle, and a grow light (optional, but highly recommended).
2. Sow the Seeds: Fill your trays or pots with seed starting mix. Moisten the mix thoroughly. Sow 2-3 seeds per cell or pot, about ¼ inch deep. Gently cover the seeds with more mix.
3. Water Carefully: Use a spray bottle to gently water the seeds. Avoid overwatering, as this can lead to damping off (a fungal disease that kills seedlings).
4. Provide Light and Warmth: Place the trays or pots in a warm location (around 70-75°F) and under a grow light. If you don’t have a grow light, a sunny windowsill will work, but be sure to rotate the trays regularly to prevent the seedlings from leaning towards the light.
5. Keep the Soil Moist: Check the soil moisture daily and water as needed to keep it consistently moist, but not soggy.
6. Thin the Seedlings: Once the seedlings have emerged and have a couple of true leaves (the second set of leaves), thin them to one seedling per cell or pot. Choose the strongest, healthiest-looking seedling and snip off the others at the soil line.
7. Harden Off the Seedlings: About a week before you plan to transplant the seedlings outdoors, you’ll need to “harden them off.” This means gradually exposing them to outdoor conditions to acclimate them to the sun, wind, and temperature changes. Start by placing the trays or pots outdoors in a sheltered location for a few hours each day, gradually increasing the amount of time they spend outside.
Preparing the Garden Bed
Cabbage needs a sunny spot with well-drained soil. Here’s how to prepare your garden bed:
1. Choose a Sunny Location: Cabbage needs at least 6 hours of sunlight per day.
2. Amend the Soil: Cabbage prefers rich, fertile soil with a pH between 6.0 and 7.5. Amend the soil with compost or well-rotted manure to improve drainage and fertility. I usually add a generous amount of compost to my cabbage bed.
3. Remove Weeds: Clear the area of any weeds or grass. Weeds compete with cabbage for nutrients and water.
4. Loosen the Soil: Use a garden fork or tiller to loosen the soil to a depth of at least 12 inches. This will allow the cabbage roots to penetrate easily.
5. Consider Raised Beds: If your soil is heavy clay or poorly drained, consider growing cabbage in raised beds. Raised beds provide better drainage and warmer soil.
Transplanting Cabbage Seedlings or Purchased Transplants
Now comes the exciting part – getting those cabbage plants into the ground!
1. Choose a Cloudy Day: Transplanting on a cloudy day will help prevent the seedlings from getting stressed by the sun.
2. Dig Holes: Dig holes that are slightly larger than the root ball of the seedlings or transplants. Space the holes according to the variety you’re growing. Early varieties can be spaced 12-18 inches apart, while larger varieties need 18-24 inches of space.
3. Gently Remove the Seedlings or Transplants: Carefully remove the seedlings from their trays or pots. If the roots are tightly bound, gently loosen them before planting.
4. Plant the Seedlings or Transplants: Place the seedlings or transplants in the holes, making sure the top of the root ball is level with the soil surface.
5. Backfill with Soil: Fill the holes with soil and gently firm the soil around the plants.
6. Water Thoroughly: Water the plants thoroughly after transplanting. This will help settle the soil and encourage root growth.
7. Mulch: Apply a layer of mulch around the plants to help retain moisture, suppress weeds, and regulate soil temperature. I like to use straw or shredded leaves.
Caring for Your Cabbage Plants
Once your cabbage plants are in the ground, it’s important to provide them with proper care to ensure a healthy and bountiful harvest.
* Watering: Cabbage needs consistent moisture, especially during head formation. Water deeply and regularly, especially during dry spells. Aim for about 1 inch of water per week.
* Fertilizing: Cabbage is a heavy feeder, so it needs regular fertilization. Apply a balanced fertilizer (such as 10-10-10) every 2-3 weeks. You can also side-dress with compost or well-rotted manure.
* Weeding: Keep the area around your cabbage plants free of weeds. Weeds compete with cabbage for nutrients and water.
* Pest Control: Cabbage is susceptible to several pests, including cabbage worms, cabbage loopers, and aphids. Inspect your plants regularly for signs of pests and take action promptly. I’ll cover pest control in more detail below.
* Disease Control: Cabbage can also be affected by diseases such as black rot and clubroot. Choose disease-resistant varieties and practice good sanitation to prevent disease problems.
Dealing with Pests and Diseases
Unfortunately, cabbage can attract its fair share of pests and diseases. Here’s how to deal with some common problems:
* Cabbage Worms and Cabbage Loopers: These caterpillars can quickly devour cabbage leaves. Handpicking them off the plants is effective for small infestations. For larger infestations, you can use Bacillus thuringiensis (Bt), a natural insecticide that is safe for humans and pets.
* Aphids: These tiny insects suck sap from cabbage leaves, causing them to curl and distort. Spraying the plants with a strong stream of water can dislodge aphids. You can also use insecticidal soap or neem oil.
* Black Rot: This bacterial disease causes yellowing and blackening of cabbage leaves. Choose disease-resistant varieties and avoid overhead watering to prevent black rot. Remove and destroy any infected plants.
* Clubroot: This fungal disease causes swollen and distorted roots. Raise the soil pH to 7.0 or higher by adding lime to the soil. Choose disease-resistant varieties and practice crop rotation.
I’ve found that covering my cabbage plants with row covers early in the season can help prevent many pest problems. Row covers are lightweight fabric covers that allow sunlight and water to reach the plants but keep pests out.
Harvesting Your Cabbage
The moment you’ve been waiting for! Here’s how to harvest your cabbage:
1. Check for Firmness: Cabbage is ready to harvest when the head is firm and solid.
2. Cut the Head: Use a sharp knife to cut the head from the stem, leaving a few outer leaves attached.
3.
Conclusion
Growing your own cabbage at home is more than just a gardening project; it’s a gateway to fresher, tastier, and more sustainable meals. This DIY approach empowers you to control exactly what goes into your food, from the soil it’s grown in to the pesticides (or lack thereof) used. Forget those bland, store-bought cabbages that have traveled miles and lost their vibrancy. Imagine crisp, flavorful cabbage, harvested straight from your garden and ready to be transformed into delicious dishes.
This guide has provided you with the essential knowledge to successfully cultivate cabbage in your own backyard, balcony, or even a sunny windowsill. From selecting the right variety for your climate to understanding the importance of soil preparation and pest control, you’re now equipped to nurture your cabbage plants from seed to harvest.
But the journey doesn’t end here! Experiment with different cabbage varieties to discover your personal favorites. Try growing red cabbage for vibrant salads, savoy cabbage for hearty stews, or Chinese cabbage (Napa cabbage) for delicious stir-fries and kimchi. Consider companion planting to deter pests and improve soil health. Marigolds, for example, are known to repel cabbage moths, while dill attracts beneficial insects that prey on aphids.
Don’t be afraid to get your hands dirty and embrace the learning process. Gardening is a journey of discovery, and every season brings new challenges and rewards. Even if you encounter setbacks, remember that each experience is an opportunity to learn and improve your skills.
The satisfaction of harvesting your own home-grown cabbage is unparalleled. The taste is noticeably superior, the texture is crisper, and the knowledge that you nurtured it from seed to table adds a special ingredient of pride and accomplishment. Plus, growing your own food is a fantastic way to reduce your carbon footprint and connect with nature.
So, what are you waiting for? Grab your seeds, prepare your soil, and embark on this rewarding gardening adventure. We encourage you to try this DIY trick and experience the joy of growing your own cabbage. And most importantly, share your experiences with us! Tell us about your successes, your challenges, and your favorite ways to enjoy your home-grown cabbage. Your insights can inspire and help other aspiring gardeners on their own cabbage-growing journeys. Let’s build a community of cabbage enthusiasts, sharing tips, tricks, and delicious recipes. Happy gardening!
Frequently Asked Questions (FAQ)
Q: What is the best time of year to plant cabbage?
A: The best time to plant cabbage depends on your climate and the specific variety you’re growing. Cabbage is a cool-season crop, so it thrives in temperatures between 60°F and 70°F (15°C and 21°C). In general, you can plant cabbage in early spring for a summer harvest or in late summer for a fall or winter harvest. For spring planting, start seeds indoors 6-8 weeks before the last expected frost. For fall planting, sow seeds directly into the garden in mid-summer. Check the specific recommendations for your chosen cabbage variety, as some are better suited for certain seasons.
Q: What kind of soil does cabbage need?
A: Cabbage prefers well-drained, fertile soil that is rich in organic matter. The ideal soil pH is between 6.0 and 7.0. Before planting, amend your soil with compost, aged manure, or other organic materials to improve drainage, fertility, and water retention. Cabbage is a heavy feeder, so it’s also beneficial to incorporate a slow-release fertilizer into the soil at planting time. If your soil is heavy clay, consider adding sand or perlite to improve drainage.
Q: How much sunlight does cabbage need?
A: Cabbage needs at least 6 hours of direct sunlight per day to thrive. Choose a planting location that receives full sun for optimal growth and head development. If you live in a particularly hot climate, some afternoon shade may be beneficial to prevent the plants from bolting (going to seed prematurely).
Q: How often should I water my cabbage plants?
A: Cabbage plants need consistent moisture to grow well. Water deeply and regularly, especially during dry periods. Aim to keep the soil consistently moist but not waterlogged. A good rule of thumb is to water when the top inch of soil feels dry to the touch. Mulching around the plants can help retain moisture and suppress weeds.
Q: What are some common pests and diseases that affect cabbage?
A: Cabbage is susceptible to several pests and diseases, including cabbage worms, cabbage loopers, aphids, flea beetles, and clubroot. Cabbage worms and loopers can be controlled with Bacillus thuringiensis (Bt), a natural insecticide. Aphids can be washed off with a strong stream of water or treated with insecticidal soap. Flea beetles can be deterred with row covers. Clubroot is a soilborne disease that can be prevented by practicing crop rotation and maintaining a soil pH above 7.0. Regularly inspect your plants for signs of pests and diseases and take action promptly to prevent them from spreading.
Q: How do I know when my cabbage is ready to harvest?
A: Cabbage is ready to harvest when the head is firm and solid to the touch. The size of the head will vary depending on the variety, but generally, a mature cabbage head will be about 6-12 inches in diameter. To harvest, use a sharp knife to cut the head from the stem, leaving a few outer leaves attached.
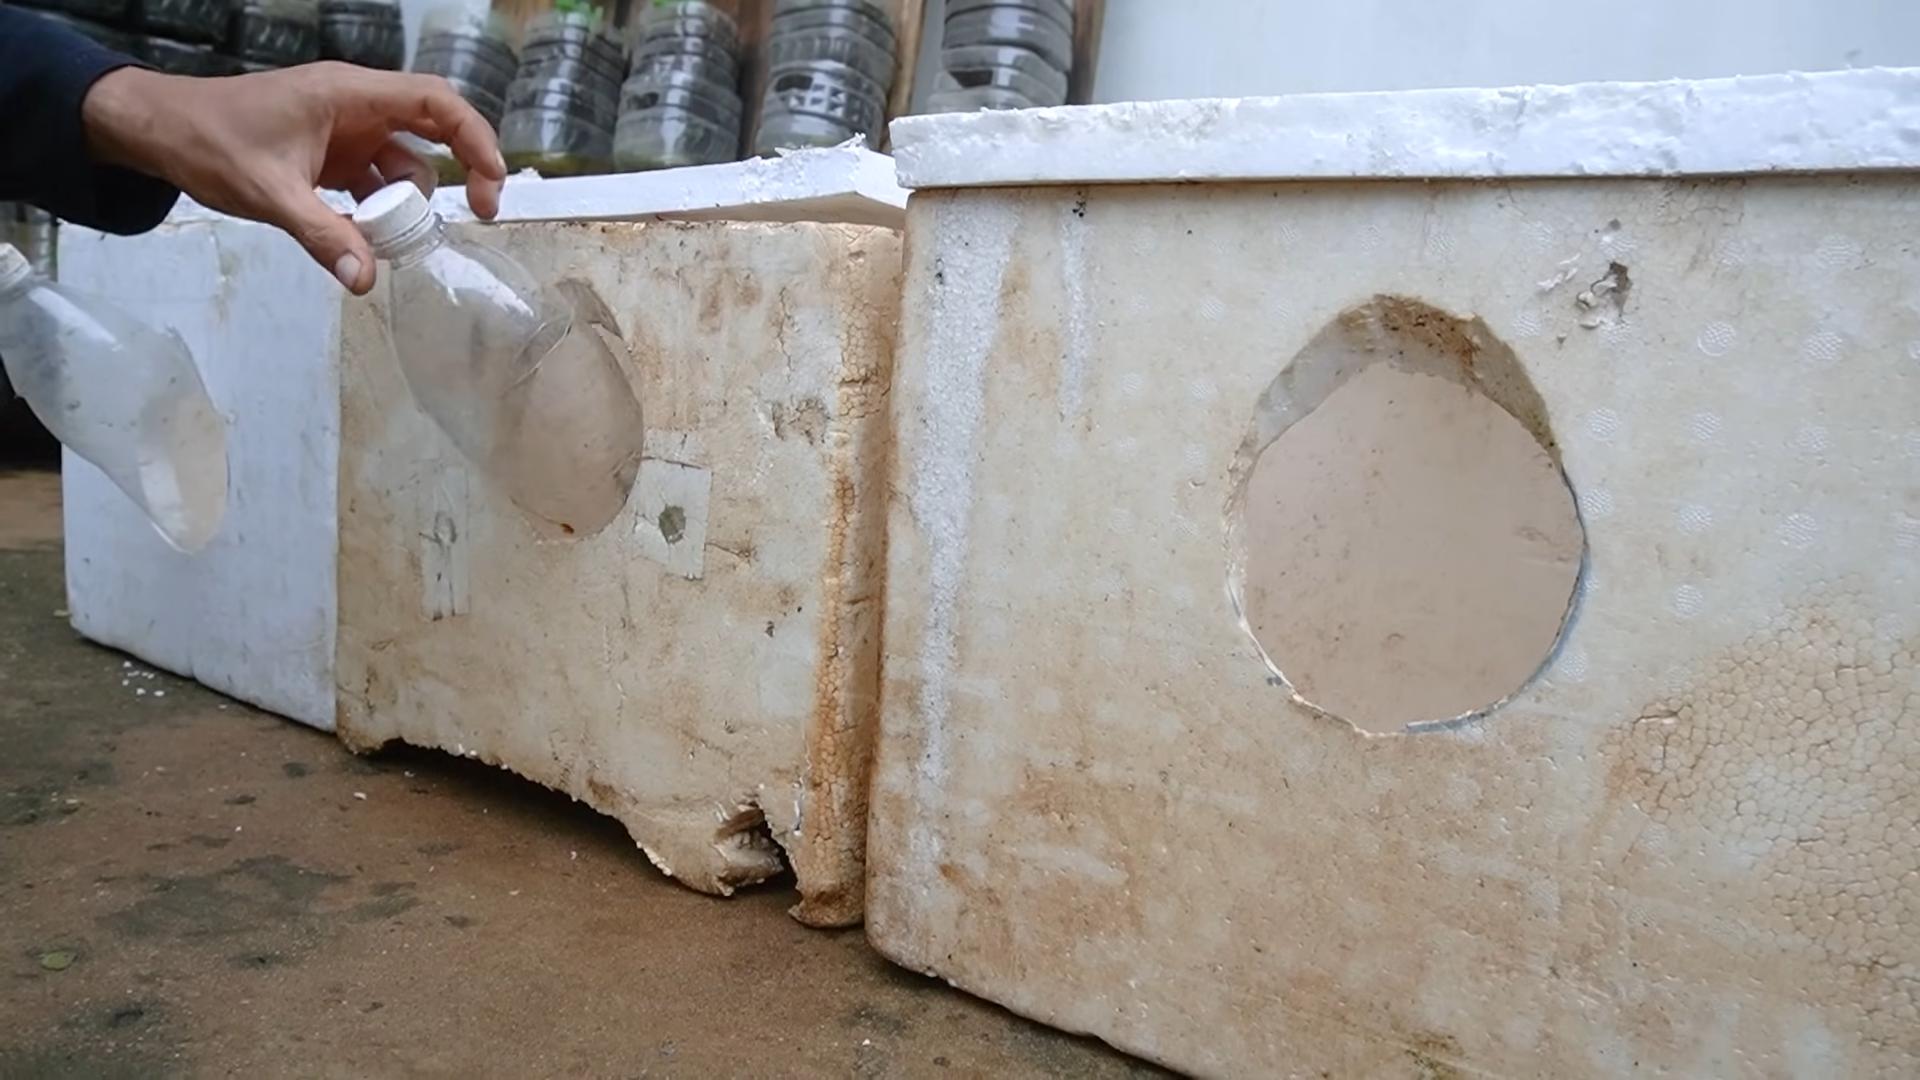
Q: Can I grow cabbage in containers?
A: Yes, you can grow cabbage in containers, but you’ll need to choose a large container (at least 12 inches in diameter) to accommodate the plant’s root system. Use a well-draining potting mix and provide regular watering and fertilization. Container-grown cabbage may require more frequent watering than cabbage grown in the ground.
Q: What are some good companion plants for cabbage?
A: Several plants can be beneficial companions for cabbage, including:
* **Marigolds:** Repel cabbage moths and other pests.
* **Dill:** Attracts beneficial insects that prey on aphids.
* **Nasturtiums:** Trap aphids and other pests.
* **Rosemary:** Deters cabbage moths.
* **Thyme:** Repels cabbage white butterflies.
* **Onions and Garlic:** Repel various pests.
Q: How can I store my harvested cabbage?
A: Cabbage can be stored in the refrigerator for several weeks. Wrap the head tightly in plastic wrap or store it in a plastic bag to prevent it from drying out. You can also store cabbage in a root cellar or cool, dark place for several months.
Q: Can I grow cabbage from scraps?
A: While you can’t grow a full head of cabbage from scraps, you can regrow the root end to produce cabbage greens. Place the root end in a shallow dish of water, and new leaves will start to sprout. You can then transplant the root end into soil and continue to grow it for a supply of fresh greens. This is a fun and easy way to reduce food waste and enjoy a continuous harvest of cabbage leaves.

Leave a Comment