
Water Potato Styrofoam Growing: Ever dreamt of a bountiful potato harvest without acres of land or back-breaking digging? I know I have! Forget the traditional garden plot; we’re diving into a revolutionary, space-saving, and frankly, quite fun method: water potato styrofoam growing!
Potatoes, a staple in diets worldwide, have a rich history, dating back thousands of years to the Andes Mountains. From humble peasant fare to gourmet delicacies, they’ve nourished civilizations. But let’s face it, growing them can be a chore. That’s where this DIY trick comes in.
Imagine this: no more wrestling with heavy soil, battling weeds, or worrying about pests lurking beneath the surface. With water potato styrofoam growing, you can cultivate delicious potatoes right on your balcony, patio, or even indoors! This method is perfect for apartment dwellers, urban gardeners, or anyone looking for a low-maintenance, high-yield approach to growing their own food. I’m going to show you how to create a simple, effective system using readily available materials, turning styrofoam and water into a potato-producing powerhouse. Get ready to ditch the dirt and embrace a cleaner, easier, and more rewarding way to grow your own spuds!
Grow Potatoes in Water with Styrofoam: A Fun DIY Project!
Hey there, fellow gardening enthusiasts! Ever thought about growing potatoes without soil? It sounds a bit crazy, right? But trust me, it’s totally doable and a super fun experiment. I’m going to walk you through how to grow potatoes in water using a simple styrofoam setup. It’s a great way to observe root development, save space, and impress your friends with your gardening skills!
What You’ll Need
Before we dive in, let’s gather our supplies. This project is pretty low-cost and uses readily available materials.
* **Potatoes:** You’ll need seed potatoes or potatoes that have already started sprouting “eyes.” Organic potatoes are best to avoid any growth inhibitors.
* Styrofoam Sheet: A sheet of styrofoam, at least 1 inch thick, is crucial. You can often find these at craft stores or repurpose packaging material.
* Container:** A large, opaque container like a bucket, storage bin, or even a repurposed plastic tub. Opaque is important to prevent algae growth.
* Drill or Knife:** To create holes in the styrofoam.
* Water:** Tap water is fine, but dechlorinated water is even better.
* Nutrient Solution (Optional):** A hydroponic nutrient solution can boost growth, but it’s not strictly necessary.
* Net Pots (Optional):** These can help support the potato plants, but they’re not essential.
* Clay Pebbles or Hydroton (Optional):** If using net pots, these provide support and aeration for the roots.
* Dark Cloth or Tape (Optional):** To further block light from the container.
Choosing Your Potatoes
The key to success starts with selecting the right potatoes.
* Seed Potatoes:** These are specifically grown for planting and are certified disease-free. You can find them at garden centers.
* Sprouted Potatoes:** If you’re using potatoes from the grocery store, make sure they have “eyes” or sprouts. Let them sit in a bright, warm place until the sprouts are about 1/2 inch long.
* Organic is Best:** Opt for organic potatoes to avoid any potential growth inhibitors that might have been used.
* Size Matters (Sort Of): Smaller potatoes or potato pieces with at least one eye are ideal. You can cut larger potatoes into pieces, ensuring each piece has at least one eye. Let the cut pieces callous over for a day or two before planting to prevent rot.
Step-by-Step Instructions
Alright, let’s get our hands dirty (well, not really, since we’re growing in water!). Here’s the step-by-step guide to setting up your potato water garden.
1. Prepare the Container:
* Clean your container thoroughly with soap and water. Rinse it well to remove any residue.
* If your container isn’t already opaque, wrap it with dark cloth or tape to block light. This will prevent algae growth, which can compete with your potatoes for nutrients.
2. Prepare the Styrofoam:
* Measure the diameter of your container’s opening.
* Cut the styrofoam sheet to fit snugly inside the container’s opening. It should rest on the rim of the container.
* Decide how many potato plants you want to grow in your container. Space them out evenly.
* For each potato plant, cut a hole in the styrofoam. The size of the hole will depend on whether you’re using net pots.
* Without Net Pots: Cut a hole just large enough to hold the potato piece, about 1-2 inches in diameter.
* With Net Pots: Cut a hole large enough to accommodate the net pot, allowing the bottom of the pot to sit in the water.
3. Prepare the Potatoes:
* If you’re using sprouted potatoes, gently handle them to avoid breaking off the sprouts.
* If you’re using seed potatoes or cutting potatoes, make sure each piece has at least one eye. Let the cut surfaces callous over for a day or two before proceeding.
4. Assemble the System:
* Place the styrofoam sheet on top of the container.
* If you’re using net pots, place them into the holes in the styrofoam. Fill the net pots with clay pebbles or hydroton.
* Carefully place the potato pieces into the holes in the styrofoam (or into the net pots, if using them). The sprouts should be pointing upwards.
5. Add Water and Nutrients:
* Fill the container with water until it reaches the bottom of the potatoes (or the bottom of the net pots). You don’t want the potatoes completely submerged, just the roots.
* If you’re using a nutrient solution, add it to the water according to the manufacturer’s instructions. Start with a diluted solution to avoid burning the roots.
6. Provide Light and Warmth:
* Place your potato water garden in a location that receives plenty of sunlight (at least 6-8 hours per day). A south-facing window is ideal.
* Potatoes prefer temperatures between 60-70°F (15-21°C).
Maintaining Your Potato Water Garden
Now that your system is set up, it’s time to monitor and maintain it.
* Water Level: Check the water level regularly and add more water as needed to keep the roots moist.
* Nutrient Solution: If you’re using a nutrient solution, replenish it every 1-2 weeks according to the manufacturer’s instructions.
* Algae Control: If you notice algae growth, clean the container and styrofoam with a mild bleach solution (1 part bleach to 9 parts water). Rinse thoroughly before reassembling the system.
* Root Health: Monitor the roots for signs of rot or disease. Healthy roots should be white or light brown. If you see any dark or slimy roots, remove them immediately.
* Support: As the potato plants grow, they may need support. You can use stakes or trellises to keep them upright.
Troubleshooting
Even with the best planning, things can sometimes go wrong. Here are a few common issues and how to address them.
* No Sprouts: If your potatoes aren’t sprouting, make sure they’re getting enough light and warmth. You can also try gently scratching the skin of the potato to encourage sprouting.
* Yellowing Leaves: Yellowing leaves can indicate a nutrient deficiency. Try adding a balanced nutrient solution to the water.
* Root Rot: Root rot is caused by overwatering or poor drainage. Make sure the roots aren’t completely submerged in water. You can also add an air stone to the water to improve aeration.
* Pests: While less common in water gardens, pests can still be a problem. Inspect your plants regularly for aphids, spider mites, or other pests. Treat them with an appropriate insecticide or insecticidal soap.
Harvesting Your Potatoes
The best part of growing potatoes is, of course, harvesting them!
* Timing: Potatoes typically take 70-100 days to mature. You’ll know they’re ready to harvest when the foliage starts to die back.
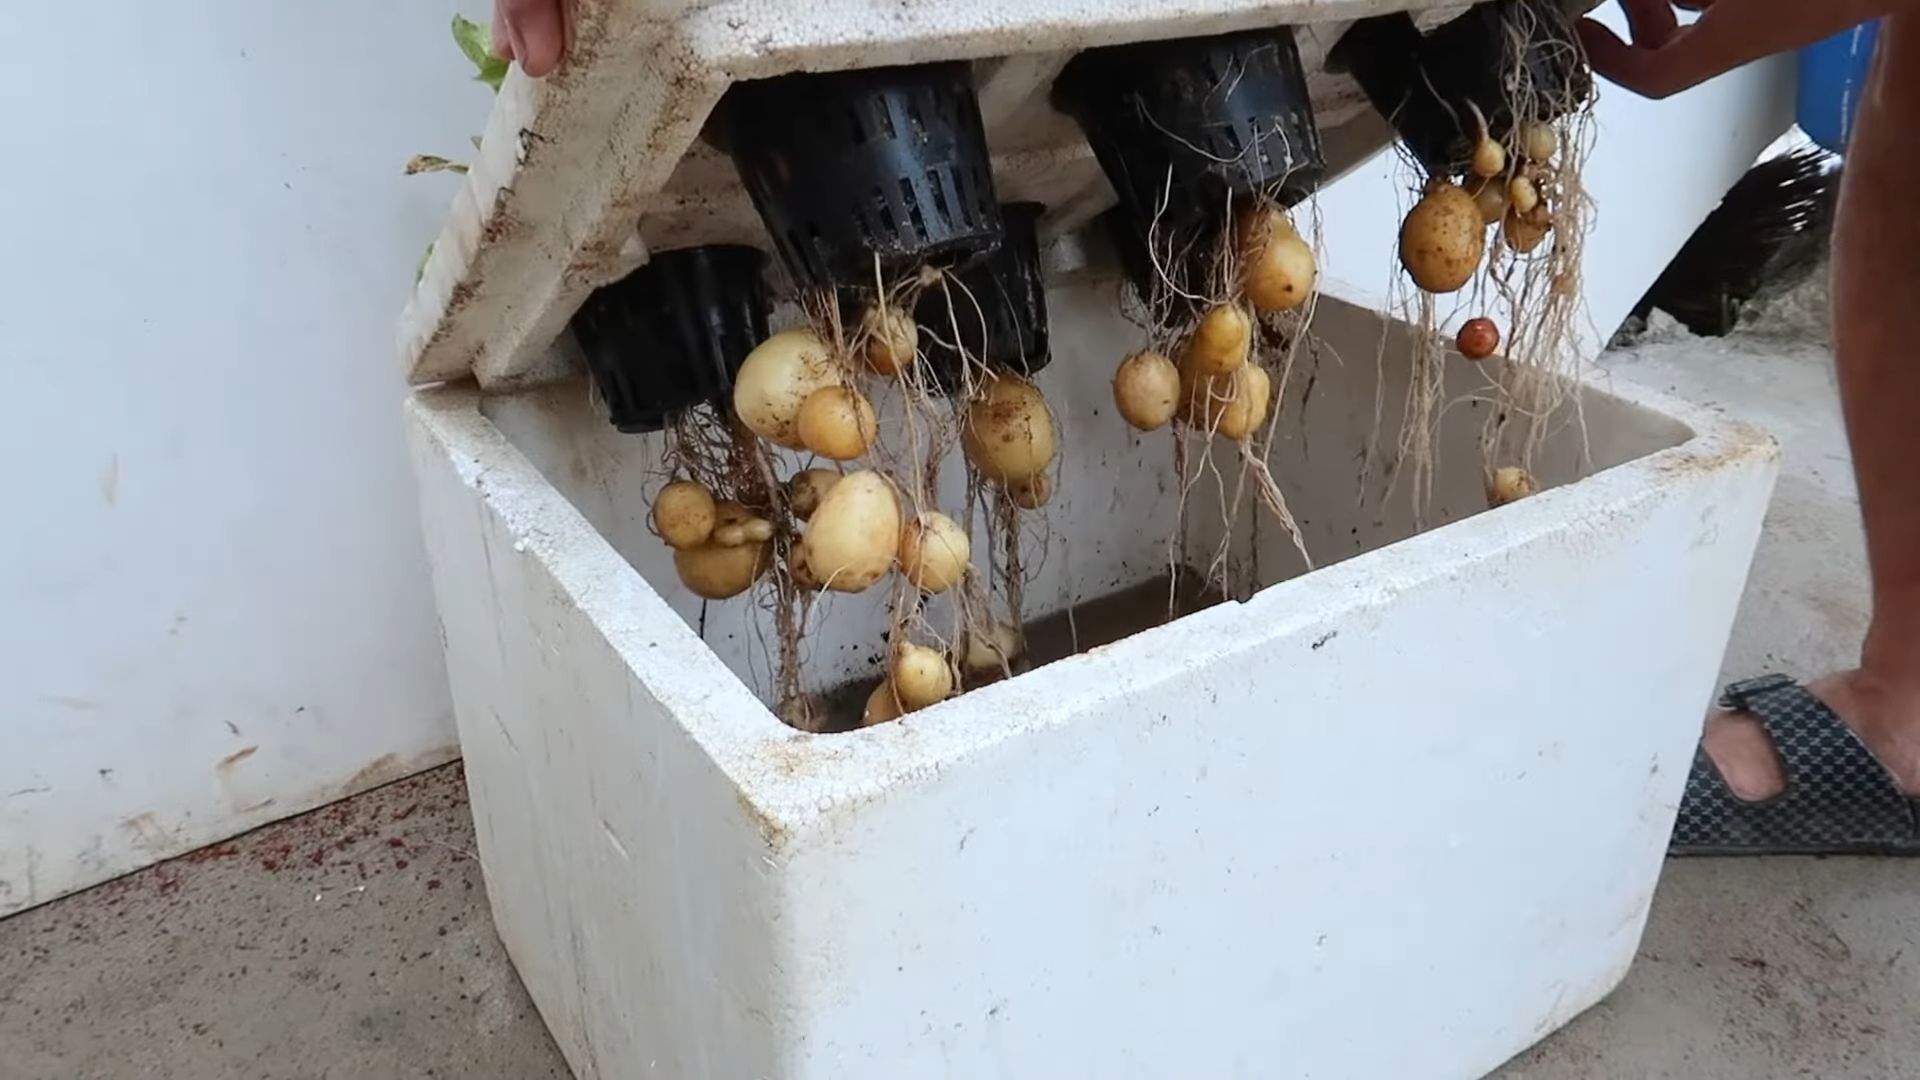
* Harvesting: Carefully remove the potato plants from the water. You should find small potatoes forming along the roots.
* Curing: After harvesting, cure the potatoes by letting them dry in a cool, dark place for a week or two. This will help them develop a thicker skin and improve their storage life.
Advanced Techniques (Optional)
Want to take your potato water garden to the next level? Here are a few advanced techniques to try.
* Aeroponics: Instead of submerging the roots in water, you can suspend them in the air and mist them with nutrient solution. This provides excellent aeration and can lead to faster growth.
* Deep Water Culture (DWC): In DWC, the roots are submerged in a highly oxygenated nutrient solution. This requires an air pump and air stone to provide adequate aeration.
* Vertical Growing: You can train your potato plants to grow vertically on a trellis. This saves space and can increase yields.
Why This Works
You might be wondering, “Why does this even work?” Well, potatoes are tubers, which are modified stems that store food. They have the ability to grow roots and shoots from their “eyes.” By providing them with water, nutrients, and light, we’re essentially creating a hydroponic system that allows them to thrive without soil. The styrofoam acts as a support structure and helps to keep the potatoes from sinking into the water.
Final Thoughts
Growing potatoes in water with styrofoam is a fun and rewarding project that’s perfect for beginners and experienced gardeners alike. It’s a great way to learn about plant growth, save space, and enjoy fresh, homegrown potatoes. So

Conclusion
So, there you have it! Transforming a humble potato, some water, and a bit of styrofoam into a thriving green spectacle is not just a fun experiment; it’s a rewarding way to connect with nature, even in the smallest of spaces. This simple DIY potato growing trick offers a unique opportunity to witness the miracle of plant life unfold before your eyes. Forget complicated gardening setups and expensive equipment. This method is accessible to everyone, regardless of their gardening experience or living situation.
Why is this a must-try? Because it’s incredibly easy, budget-friendly, and visually captivating. It’s a fantastic educational tool for kids (and adults!), demonstrating the power of propagation and the resilience of plants. Plus, it’s a conversation starter! Imagine the delight of your guests when they see a potato sprouting leaves in a glass of water. It’s a testament to your resourcefulness and your appreciation for the natural world.
But the fun doesn’t stop there! Feel free to experiment with different types of potatoes. Russets, Yukon Golds, or even sweet potatoes can all be used. You can also add a touch of liquid fertilizer to the water every few weeks to give your potato plant an extra boost. Consider placing your potato in a decorative glass container to enhance its visual appeal. And if you’re feeling adventurous, try transplanting your sprouted potato into a pot of soil once it has developed a strong root system. This will allow it to grow even larger and potentially produce potatoes!
This DIY potato growing method is more than just a gardening hack; it’s a way to bring a little bit of nature into your home and experience the joy of watching something grow. It’s a reminder that even the simplest things can be extraordinary.
We wholeheartedly encourage you to try this DIY potato growing trick. It’s a simple, satisfying, and educational project that will bring a touch of green into your life. Don’t be afraid to get your hands dirty (or, in this case, wet!). Embrace the process, observe the changes, and marvel at the power of nature.
And most importantly, we want to hear about your experience! Share your photos and stories with us in the comments below. Let us know what type of potato you used, what challenges you encountered, and what successes you celebrated. Your feedback will not only inspire others but also help us refine this DIY potato growing method and make it even better. So, go ahead, give it a try, and let’s grow together! Let’s see how many amazing potato plants we can cultivate using this simple and effective technique. We are confident that you will be amazed by the results.
Frequently Asked Questions (FAQ)
What kind of potato should I use?
You can use almost any type of potato for this project! Russet potatoes, Yukon Gold potatoes, red potatoes, and even sweet potatoes can all be used. Older potatoes that have already started to sprout “eyes” are ideal, as they will sprout more quickly. However, even potatoes that haven’t sprouted yet can still be used; they may just take a little longer to get going. Organic potatoes are a great choice if you are concerned about pesticides. Avoid using potatoes that are rotten or have soft spots.
How much of the potato should be submerged in water?
Only the bottom portion of the potato should be submerged in water. The styrofoam platform should be cut to a size that allows the potato to sit comfortably with the bottom quarter to third of the potato in the water. The top portion of the potato should remain dry to prevent rot. Make sure to change the water every few days to keep it fresh and clean.
How long will it take for the potato to sprout?
The time it takes for a potato to sprout varies depending on the type of potato, the temperature, and the amount of light it receives. Generally, you can expect to see sprouts within one to three weeks. Be patient, and make sure the potato is getting enough light and fresh water. If you don’t see any sprouts after three weeks, try using a different potato.
What kind of light does the potato need?
The potato needs bright, indirect light to sprout and grow. Avoid placing it in direct sunlight, as this can scorch the leaves. A spot near a window that receives morning or afternoon sun is ideal. If you don’t have a sunny window, you can use a grow light to provide the potato with the light it needs.
How often should I change the water?
You should change the water every two to three days to keep it fresh and prevent the growth of bacteria and mold. Use clean, room-temperature water. When you change the water, gently rinse the potato to remove any debris.
Can I transplant the potato into soil?
Yes, you can transplant the potato into soil once it has developed a strong root system and several leaves. Choose a pot that is at least 12 inches in diameter and fill it with well-draining potting soil. Gently remove the potato from the water and plant it in the pot, covering the roots with soil. Water thoroughly and place the pot in a sunny location.
Will the potato produce more potatoes?
While it’s possible for the potato to produce more potatoes, it’s not the primary goal of this project. The main focus is on observing the sprouting process and enjoying the greenery. If you want to grow potatoes for harvesting, it’s best to plant seed potatoes directly in the ground or in a large container.
Can I use fertilizer?
Yes, you can add a touch of liquid fertilizer to the water every few weeks to give your potato plant an extra boost. Use a balanced fertilizer diluted to half strength. Be careful not to over-fertilize, as this can damage the plant.
What if my potato starts to rot?
If your potato starts to rot, it’s important to remove it from the water immediately. Rotting can be caused by overwatering, poor ventilation, or using a potato that was already damaged. Try again with a fresh potato and make sure to follow the instructions carefully.
Is this project safe for children?
Yes, this project is generally safe for children, but adult supervision is recommended. Make sure children understand not to eat the potato sprouts or the water. Also, be careful when using sharp objects to cut the styrofoam.
What do I do with the potato plant once it gets too big?
If your potato plant gets too big for its container, you can either transplant it into a larger pot or prune it back. Pruning will encourage the plant to bush out and stay more compact. You can also take cuttings from the plant and propagate them in water to create new potato plants.
Can I grow other vegetables using this method?
While this method is specifically designed for potatoes, you can experiment with growing other vegetables in water. Sweet potatoes, onions, and garlic are all good candidates. However, keep in mind that not all vegetables will thrive in water, so it’s important to do your research before you start.
What is the purpose of the styrofoam?
The styrofoam acts as a support system for the potato, preventing it from sinking completely into the water. It also helps to keep the top portion of the potato dry, which prevents rot. You can use other materials, such as toothpicks or skewers, to support the potato if you don’t have styrofoam.
How can I prevent mold from growing in the water?
To prevent mold from growing in the water, change the water every two to three days and make sure the potato is getting enough light and ventilation. You can also add a few drops of hydrogen peroxide to the water to help kill any mold spores.
What if my potato doesn’t sprout at all?
If your potato doesn’t sprout at all, it could be due to several factors, such as using a potato that is too old, not providing enough light, or using water that is too cold. Try again with a fresh potato, make sure it’s getting enough light, and use room-temperature water. If you still don’t see any sprouts after a few weeks, it’s possible that the potato is not viable.

Leave a Comment