
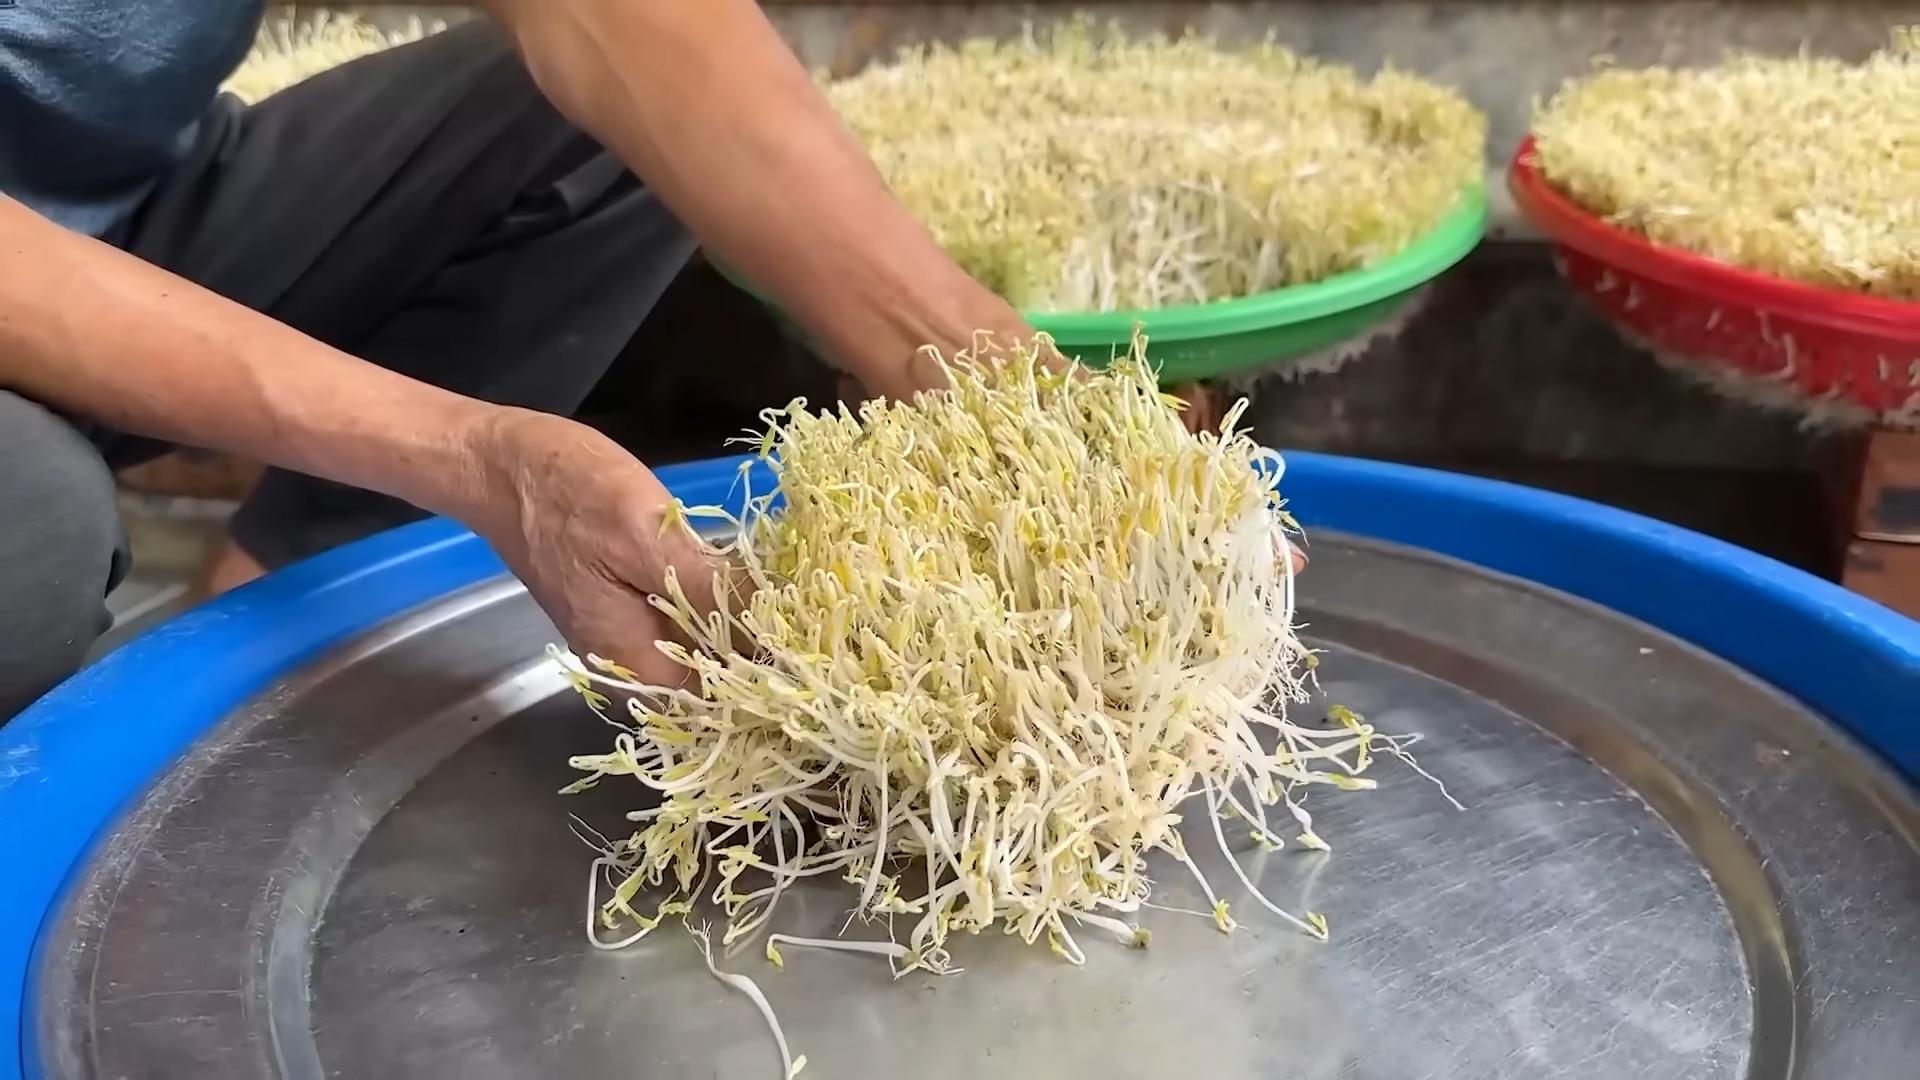
Bean Sprouts DIY Home: Ever dreamt of having fresh, crunchy bean sprouts right at your fingertips, ready to add a burst of flavor to your salads, stir-fries, or sandwiches? I know I have! Forget those limp, pre-packaged sprouts from the grocery store. We’re diving into the wonderful world of growing your own bean sprouts, and trust me, it’s easier than you think!
Sprouting beans has a rich history, dating back thousands of years in Asian cultures. They were, and still are, a vital source of nutrients, especially during times when fresh produce was scarce. Think of it – a tiny seed transforming into a vitamin-packed powerhouse in just a few days! That’s the magic we’re about to unlock.
Why should you bother with this Bean Sprouts DIY Home project? Well, for starters, it’s incredibly cost-effective. A handful of beans can yield a surprisingly large harvest of sprouts. Plus, you have complete control over the growing process, ensuring they’re free from harmful chemicals and pesticides. But most importantly, it’s incredibly satisfying to nurture something from seed to sprout and then enjoy the fruits (or rather, sprouts!) of your labor. So, let’s get sprouting!
Grow Your Own Celery: A Beginner’s Guide
Hey there, fellow gardening enthusiasts! Ever thought about growing your own celery? It’s easier than you might think, and nothing beats the fresh, crisp taste of homegrown celery. I’m going to walk you through the whole process, from starting with scraps to harvesting your own stalks. Let’s get started!
Starting from Celery Base: The Regrowth Method
This is probably the coolest and easiest way to get started. Instead of buying seeds, we’re going to use the base of a celery bunch you bought from the store. It’s like magic!
What You’ll Need:
* The base of a celery bunch (about 2 inches from the bottom)
* A shallow dish or bowl
* Water
* Potting soil
* A pot (at least 6 inches in diameter)
Step-by-Step Instructions:
1. Prepare the Celery Base: After you’ve used the celery stalks, don’t throw away the base! Carefully cut off the bottom 2 inches of the celery bunch. Make sure the base is relatively intact.
2. Place in Water: Put the celery base in a shallow dish or bowl. Add about an inch of water, making sure the cut end of the celery is submerged.
3. Find a Sunny Spot: Place the dish in a sunny windowsill or another location that receives plenty of indirect sunlight. Celery loves light!
4. Change the Water Regularly: Change the water every 1-2 days to keep it fresh and prevent mold growth. This is super important!
5. Watch for Growth: Within a few days, you should start to see small leaves sprouting from the center of the celery base. This is so exciting!
6. Wait for Roots: Continue to change the water and watch as roots begin to emerge from the bottom of the celery base. You’ll want to wait until the roots are about 1-2 inches long before transplanting.
7. Prepare the Pot: Fill your pot with good-quality potting soil. Make a small hole in the center large enough to accommodate the celery base and its roots.
8. Transplant the Celery: Carefully remove the celery base from the water and gently place it in the hole you made in the potting soil. Cover the roots with soil, leaving the top of the celery base exposed.
9. Water Thoroughly: Water the newly transplanted celery thoroughly, making sure the soil is moist but not waterlogged.
10. Continue to Care: Place the pot in a sunny location and water regularly, keeping the soil consistently moist. You’ll start to see the celery grow taller and produce more stalks.
Starting from Seeds: The Traditional Method
If you’re feeling a bit more adventurous, or you want a specific variety of celery, starting from seeds is the way to go. It takes a little more patience, but it’s definitely rewarding.
What You’ll Need:
* Celery seeds
* Seed starting trays or small pots
* Seed starting mix
* Water
* A spray bottle
* A sunny windowsill or grow lights
* Potting soil
* A larger pot or garden bed
Step-by-Step Instructions:
1. Sow the Seeds: Celery seeds are tiny, so handle them with care. Fill your seed starting trays or small pots with seed starting mix. Moisten the mix with water using a spray bottle. Sprinkle a few celery seeds on top of the soil in each cell or pot. Gently press the seeds into the soil, but don’t bury them too deep. Celery seeds need light to germinate.
2. Provide Light: Celery seeds need light to germinate, so place the seed starting trays or pots in a sunny windowsill or under grow lights. If using grow lights, keep them on for about 14-16 hours per day.
3. Keep the Soil Moist: Keep the soil consistently moist by misting it with water using a spray bottle. Don’t let the soil dry out, but also avoid overwatering.
4. Maintain Warmth: Celery seeds germinate best in warm temperatures (around 70-75°F). You can use a heat mat to help maintain the ideal temperature.
5. Wait for Germination: Celery seeds can take up to 2-3 weeks to germinate, so be patient. Once the seedlings emerge, continue to provide them with plenty of light and moisture.
6. Thin the Seedlings: Once the seedlings have developed a few sets of true leaves, thin them out, leaving only the strongest seedling in each cell or pot.
7. Harden Off the Seedlings: Before transplanting the seedlings outdoors, you’ll need to harden them off. This means gradually exposing them to outdoor conditions over a period of 1-2 weeks. Start by placing the seedlings outdoors in a sheltered location for a few hours each day, gradually increasing the amount of time they spend outdoors.
8. Prepare the Soil: Celery prefers rich, well-drained soil. Amend your garden soil with compost or other organic matter to improve its fertility and drainage.
9. Transplant the Seedlings: Once the seedlings have been hardened off, transplant them into your garden bed or a larger pot. Space the seedlings about 6-8 inches apart.
10. Water Thoroughly: Water the newly transplanted seedlings thoroughly, making sure the soil is moist but not waterlogged.
11. Continue to Care: Water regularly, especially during dry periods. Celery needs consistent moisture to thrive. Fertilize every few weeks with a balanced fertilizer.
Caring for Your Celery Plants
Whether you started from a base or from seeds, the ongoing care is pretty much the same. Here’s what you need to know to keep your celery happy and healthy:
Sunlight: Celery loves sunlight! Aim for at least 6 hours of direct sunlight per day. If you’re growing indoors, a sunny windowsill or grow lights are essential.
Watering: Celery needs consistent moisture. Water deeply whenever the top inch of soil feels dry to the touch. Avoid letting the soil dry out completely, as this can cause the stalks to become tough and bitter.
Soil: Celery prefers rich, well-drained soil. Amend your soil with compost or other organic matter to improve its fertility and drainage. A slightly acidic soil pH (around 6.0-6.8) is ideal.
Fertilizing: Celery is a heavy feeder, so it benefits from regular fertilization. Fertilize every few weeks with a balanced fertilizer, following the instructions on the package. You can also use a liquid fertilizer diluted to half strength.
Pest and Disease Control: Celery can be susceptible to certain pests and diseases, such as aphids, celery leaf tiers, and fungal diseases. Inspect your plants regularly for signs of pests or diseases. If you spot any problems, take action promptly. You can use insecticidal soap or neem oil to control pests, and fungicides to control fungal diseases. Make sure to follow the instructions on the product label.
Blanching (Optional): Blanching is the process of excluding light from the celery stalks to make them more tender and less bitter. This is optional, but it can improve the flavor and texture of your celery. To blanch celery, you can mound soil around the stalks, wrap them in newspaper, or use blanching collars. Start blanching about 2-3 weeks before you plan to harvest.
Harvesting Your Celery
The moment we’ve all been waiting for! Harvesting your own celery is so satisfying.
When to Harvest: Celery is typically ready to harvest about 80-100 days after planting. The stalks should be at least 6-8 inches long and about 1 inch in diameter.
How to Harvest: You can harvest individual stalks as needed, or you can harvest the entire plant at once. To harvest individual stalks, simply cut them off at the base of the plant with a sharp knife. To harvest the entire plant, cut it off at the base of the plant.
Storing Your Celery: Freshly harvested celery can be stored in the refrigerator for up to 1-2 weeks. Wrap the celery in a damp paper towel and place it in a plastic bag. You can also freeze celery for longer storage. Chop the celery into small pieces and blanch it in boiling water for 2-3 minutes. Then, transfer the celery to an ice bath to stop the cooking process. Drain the celery and freeze it in freezer bags or containers.
Troubleshooting
Even with the best care, sometimes things don’t go exactly as planned. Here are a few common problems you might encounter and how to fix them:
* Celery stalks are tough and bitter: This can be caused by inconsistent watering, lack of fertilizer, or hot weather. Make sure to water regularly, fertilize every few weeks, and provide shade during the hottest part of the day. Blanching can also help to improve the flavor and texture of the stalks.
*
Conclusion
So, there you have it! Cultivating your own bean sprouts at home is not only surprisingly simple, but it’s also incredibly rewarding. Forget those limp, often flavorless sprouts you find at the grocery store. With this easy DIY method, you can enjoy crisp, fresh, and vibrant bean sprouts bursting with flavor, all grown right in your own kitchen.
Why is this DIY trick a must-try? Because it puts you in control. You control the quality of the beans, the cleanliness of the environment, and ultimately, the taste and nutritional value of your sprouts. You’ll be amazed at how much better homemade bean sprouts taste compared to store-bought ones. They’re crunchier, fresher, and have a more pronounced, nutty flavor. Plus, you’ll avoid any potential additives or preservatives that might be lurking in commercially produced sprouts.
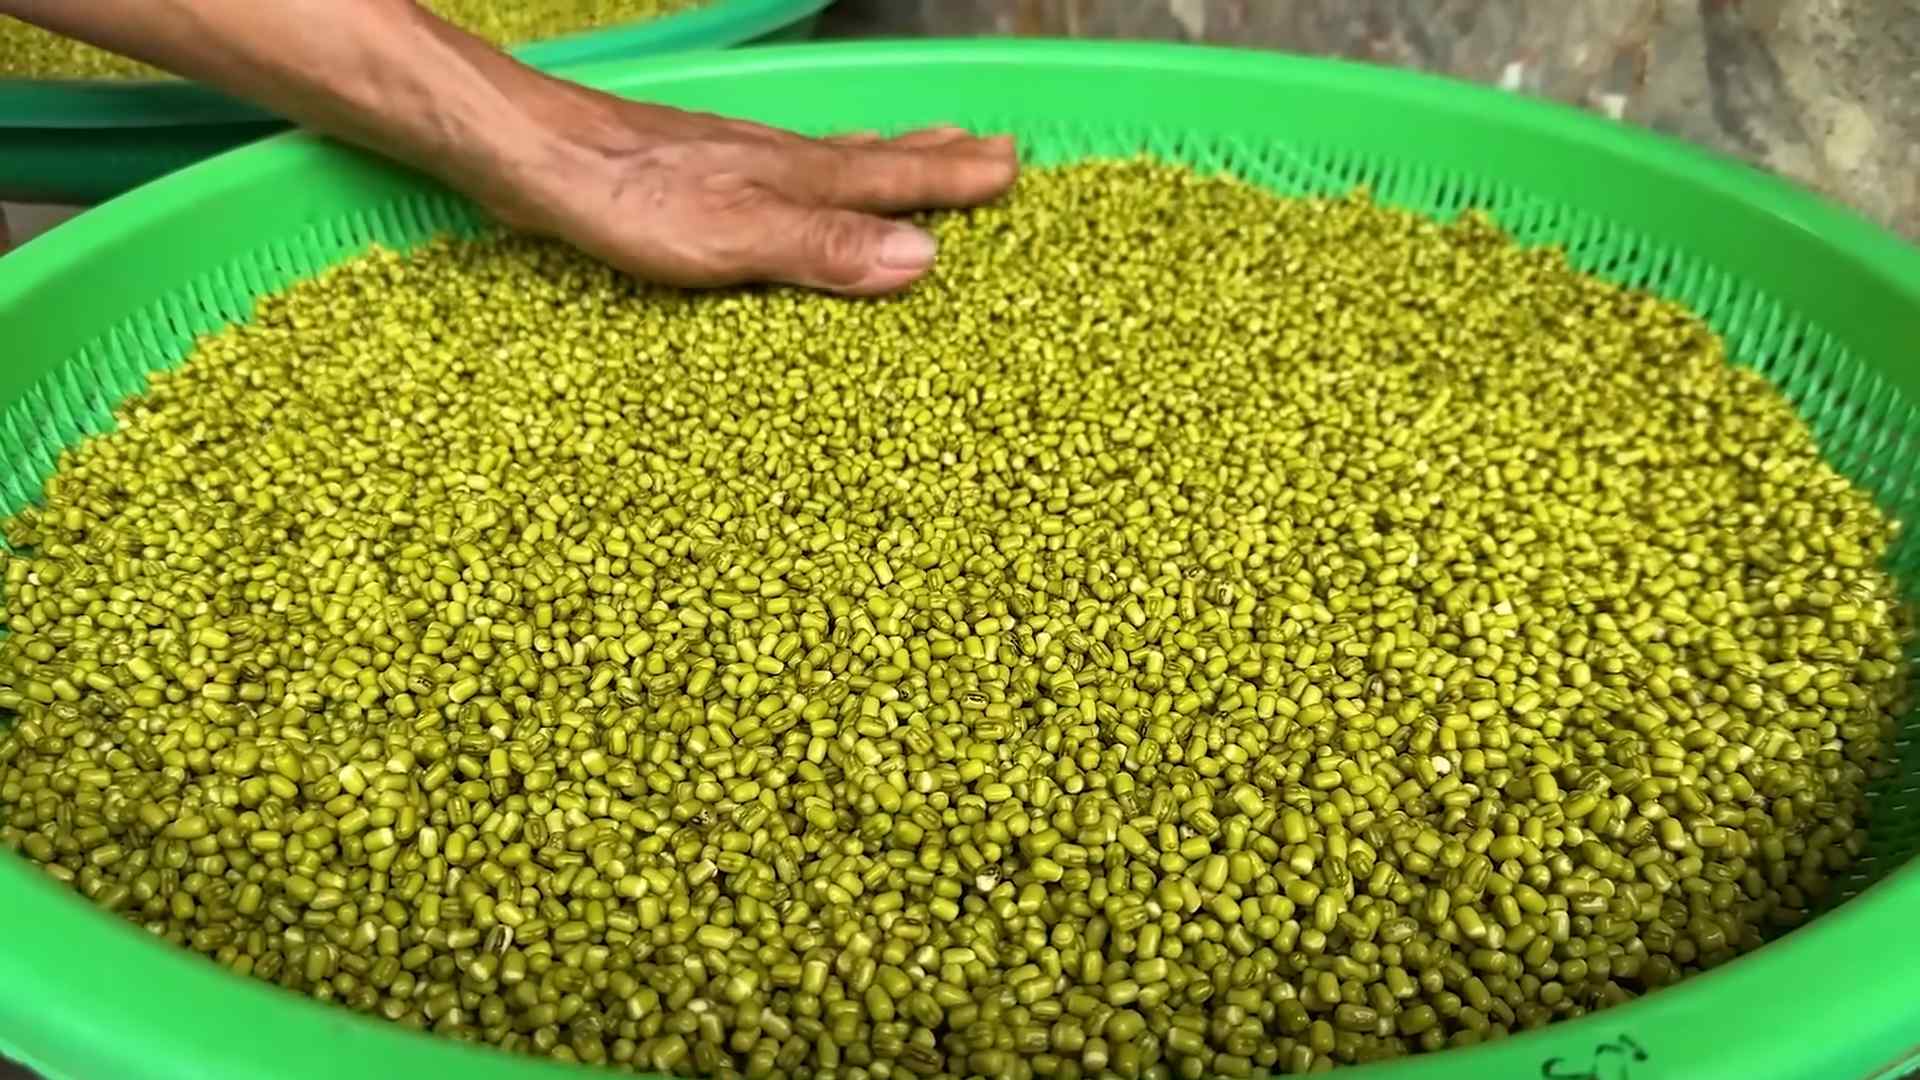
Beyond the superior taste and quality, growing your own bean sprouts is also incredibly economical. A small bag of dried beans yields a surprisingly large quantity of sprouts, making it a budget-friendly way to add a healthy and delicious ingredient to your meals. Think about all the stir-fries, salads, and sandwiches you can enhance with your homegrown bounty!
Ready to get creative? There are plenty of variations you can explore once you’ve mastered the basic technique. Try experimenting with different types of beans, such as mung beans (the most common for bean sprouts), adzuki beans, or even lentils. Each type of bean will offer a slightly different flavor and texture profile. You can also adjust the sprouting time to achieve your desired level of sprout length and crispness. Some people prefer shorter, stubbier sprouts, while others prefer longer, more developed ones. The choice is yours!
Another fun variation is to add a touch of flavor during the rinsing process. A splash of lemon juice or a pinch of sea salt can subtly enhance the taste of your sprouts. You can even try adding a small amount of seaweed extract to boost their nutritional content.
But the most important thing is to just give it a try! Don’t be intimidated by the process. It’s much easier than you might think, and the results are well worth the effort. We’re confident that once you taste your own homemade bean sprouts, you’ll never go back to store-bought again.
So, grab a jar, some beans, and get sprouting! We encourage you to try this simple and satisfying DIY trick and share your experience with us. Let us know what kind of beans you used, what variations you tried, and how your sprouts turned out. Share your photos and recipes on social media using [Your Hashtag Here] so we can all learn from each other and celebrate the joy of growing our own food. Happy sprouting! This method is the best way to get fresh **bean sprouts DIY** at home.
FAQ
What kind of beans can I use to make bean sprouts?
The most common type of bean used for sprouting is the mung bean. These are readily available in most grocery stores and Asian markets. However, you can also experiment with other types of beans, such as adzuki beans, lentils, and even chickpeas. Keep in mind that different beans will have different sprouting times and flavor profiles. Mung beans typically sprout the fastest and have a mild, slightly nutty flavor. Adzuki beans have a slightly sweeter taste, while lentils have a more earthy flavor. Chickpeas can be a bit more challenging to sprout, but they offer a unique, nutty flavor and a satisfyingly crunchy texture. Always ensure you are using beans intended for sprouting or cooking, and avoid using beans that are labeled as “ornamental” as they may be treated with chemicals.
How long does it take to grow bean sprouts?
The sprouting time will vary depending on the type of bean, the temperature, and the humidity. Generally, mung beans will sprout in about 3-5 days. Adzuki beans may take a day or two longer. Lentils typically sprout in 2-4 days. The ideal temperature for sprouting is between 70-75°F (21-24°C). Warmer temperatures will speed up the sprouting process, while cooler temperatures will slow it down. It’s important to keep the sprouts consistently moist but not waterlogged. Overwatering can lead to mold growth, while underwatering can cause the sprouts to dry out and die. Check the sprouts twice a day and rinse them thoroughly with fresh water each time.
How do I prevent mold from growing on my bean sprouts?
Mold growth is a common concern when sprouting beans, but it can be easily prevented with proper hygiene and ventilation. The most important thing is to use clean equipment. Wash your jar, lid, and any other utensils you use with hot, soapy water before starting. Also, be sure to use fresh, clean water for rinsing the sprouts. Rinse the sprouts thoroughly at least twice a day to remove any accumulated bacteria or debris. Good ventilation is also crucial. Make sure the jar is not completely sealed, allowing air to circulate around the sprouts. If you live in a humid environment, you may need to rinse the sprouts more frequently. If you notice any signs of mold growth, such as a fuzzy white or gray substance, discard the entire batch of sprouts immediately.
How do I store bean sprouts?
Once your bean sprouts have reached your desired length, it’s time to harvest and store them. Rinse the sprouts thoroughly one last time and remove any remaining bean hulls. Gently pat the sprouts dry with a clean towel or paper towel. Store the sprouts in an airtight container lined with a paper towel in the refrigerator. The paper towel will help absorb any excess moisture and prevent the sprouts from becoming soggy. Properly stored bean sprouts will last for up to a week in the refrigerator.
Can I eat the bean hulls?
While the bean hulls are technically edible, they can be a bit tough and bitter. Most people prefer to remove them before eating the sprouts. To remove the hulls, gently rub the sprouts between your hands under running water. The hulls should easily separate from the sprouts. You can also use a colander to help separate the hulls from the sprouts.
Are bean sprouts safe to eat?
Bean sprouts are generally safe to eat, but it’s important to take precautions to minimize the risk of foodborne illness. Raw sprouts have been linked to outbreaks of Salmonella and E. coli, so it’s crucial to follow proper hygiene practices when growing and handling them. Always use clean equipment, rinse the sprouts thoroughly, and store them properly. If you are pregnant, elderly, or have a weakened immune system, it’s best to cook the sprouts before eating them to kill any potential bacteria.
What are some ways to use bean sprouts?
Bean sprouts are a versatile ingredient that can be used in a variety of dishes. They are a popular addition to stir-fries, salads, sandwiches, and soups. They can also be eaten raw as a snack or added to smoothies. Bean sprouts add a crunchy texture and a mild, slightly nutty flavor to any dish. They are also a good source of vitamins, minerals, and fiber. Try adding them to your next stir-fry for a healthy and delicious boost!
Can I grow bean sprouts without a jar?
Yes, you can grow bean sprouts without a jar. You can use a sprouting bag, a colander, or even a clean kitchen towel. The key is to keep the beans consistently moist and well-ventilated. If using a sprouting bag, simply soak the beans, place them in the bag, and hang the bag in a well-ventilated area. Rinse the beans twice a day. If using a colander, place the beans in the colander and set it over a bowl of water. Rinse the beans twice a day. If using a kitchen towel, soak the beans, wrap them in the towel, and place the towel in a bowl. Rinse the towel twice a day.
What if my bean sprouts don’t sprout?
If your bean sprouts don’t sprout, there could be several reasons why. First, make sure you are using fresh beans that are intended for sprouting. Old beans may not germinate properly. Second, make sure the beans are getting enough moisture. They should be consistently moist but not waterlogged. Third, make sure the beans are getting enough ventilation. They need air to breathe. Fourth, make sure the temperature is warm enough. The ideal temperature for sprouting is between 70-75°F (21-24°C). If you have tried all of these things and your beans still don’t sprout, try using a different type of bean. Some beans are simply more difficult to sprout than others.

Leave a Comment