
Grow Microgreens at Home – imagine transforming your kitchen countertop into a vibrant, miniature farm, bursting with flavor and nutrients! Forget those sad, wilted greens from the grocery store; we’re diving headfirst into the wonderful world of microgreens, and I’m so excited to show you how easy it is to cultivate these tiny powerhouses yourself.
For centuries, cultures around the globe have recognized the value of sprouts and young greens. From ancient Chinese medicine to modern-day health food trends, the appreciation for these concentrated sources of vitamins and minerals has endured. But why should you bother with growing your own? Well, besides the sheer joy of nurturing something from seed to harvest, grow microgreens at home offers a fantastic way to boost your diet, reduce your grocery bills, and add a touch of freshness to your meals, even in the dead of winter!
Let’s face it, healthy eating can sometimes feel like a chore. But with this DIY guide, I’m going to show you how to make it fun, affordable, and incredibly rewarding. We’ll cover everything from choosing the right seeds and containers to mastering the art of watering and harvesting. Get ready to unleash your inner gardener and enjoy a constant supply of delicious, nutritious microgreens right at your fingertips!
Growing Butternut Squash: A Beginner’s Guide to a Bountiful Harvest
Hey there, fellow gardening enthusiasts! I’m so excited to share my experience growing butternut squash at home. It’s surprisingly easy, incredibly rewarding, and nothing beats the taste of homegrown squash in your favorite fall recipes. This guide will walk you through every step, from seed to table, ensuring you have a successful and delicious harvest.
Choosing the Right Butternut Squash Variety
Before we even think about planting, let’s talk varieties. While “butternut squash” is a pretty specific term, there are still subtle differences between cultivars. Some are more compact, perfect for smaller gardens, while others produce larger fruits.
* Waltham Butternut: This is a classic, reliable variety known for its consistent size and excellent flavor. It’s a great choice for beginners.
* Butterscotch PMR: If you’re short on space, this semi-bush variety is a fantastic option. It’s also powdery mildew resistant, which is a huge plus!
* Early Butternut: As the name suggests, this variety matures earlier than others, making it ideal for gardeners in cooler climates with shorter growing seasons.
* Honey Nut: A smaller, sweeter butternut squash that’s perfect for single servings. It’s also known for its rich, nutty flavor.
I personally prefer Waltham Butternut because of its consistent performance and versatility in the kitchen. But feel free to experiment and find the variety that best suits your needs and taste!
Starting Butternut Squash Seeds
Butternut squash needs a long growing season, typically 90-100 days. In cooler climates, starting seeds indoors is highly recommended.
* Timing is Key: Start your seeds about 3-4 weeks before the last expected frost in your area.
* Seed Starting Supplies: You’ll need seed starting trays or small pots, seed starting mix (not regular potting soil!), and a heat mat (optional, but helpful).
* Soaking the Seeds: To speed up germination, soak the seeds in lukewarm water for 24 hours before planting. This softens the seed coat and helps the seedlings emerge faster.
Step-by-Step Seed Starting Instructions:
1. Fill Your Containers: Fill your seed starting trays or pots with seed starting mix, leaving about half an inch of space at the top.
2. Plant the Seeds: Make a small hole about 1 inch deep in the center of each container. Place one or two seeds in each hole. Planting two seeds increases your chances of at least one germinating.
3. Cover and Water: Gently cover the seeds with seed starting mix and water thoroughly. Make sure the soil is moist but not soggy.
4. Provide Warmth: Place the trays or pots on a heat mat or in a warm location. Butternut squash seeds germinate best at temperatures between 70-80°F (21-27°C).
5. Maintain Moisture: Keep the soil consistently moist by misting it regularly with a spray bottle.
6. Provide Light: Once the seedlings emerge (usually within 7-10 days), move them to a sunny location or under grow lights. They need at least 6 hours of sunlight per day.
7. Thin if Necessary: If both seeds in a container germinate, thin out the weaker seedling by snipping it off at the soil line with scissors. Don’t pull it out, as this can disturb the roots of the remaining seedling.
Preparing the Garden Bed
Butternut squash are heavy feeders, meaning they need nutrient-rich soil to thrive. Proper soil preparation is crucial for a successful harvest.
* Sunlight is Essential: Choose a location that receives at least 6-8 hours of direct sunlight per day.
* Soil Testing: Ideally, you should test your soil to determine its pH and nutrient levels. Butternut squash prefers a slightly acidic to neutral soil pH (6.0-7.0).
* Amend the Soil: Amend the soil with plenty of compost or well-rotted manure. This will improve drainage, aeration, and nutrient content. I like to add a generous amount of compost – at least 4-6 inches – and work it into the top 12 inches of soil.
* Consider Raised Beds: If your soil is heavy clay or poorly drained, consider planting in raised beds. This will improve drainage and warm the soil faster in the spring.
Step-by-Step Garden Bed Preparation:
1. Clear the Area: Remove any weeds, rocks, or debris from the planting area.
2. Till or Dig: Till the soil to a depth of at least 12 inches. If you prefer not to till, you can use a garden fork or shovel to loosen the soil.
3. Amend the Soil: Spread a generous layer of compost or well-rotted manure over the soil surface.
4. Incorporate Amendments: Use a tiller, garden fork, or shovel to incorporate the compost or manure into the soil.
5. Smooth the Surface: Rake the soil smooth and level.
6. Optional: Add Fertilizer: If your soil test indicates a nutrient deficiency, add a balanced fertilizer according to the package instructions. I often use a slow-release organic fertilizer.
Transplanting Butternut Squash Seedlings
Once the danger of frost has passed and the soil has warmed up, it’s time to transplant your butternut squash seedlings into the garden.
* Harden Off Seedlings: Before transplanting, you need to “harden off” your seedlings. This means gradually exposing them to outdoor conditions over a period of 7-10 days. Start by placing them in a sheltered location for a few hours each day, gradually increasing the amount of time they spend outdoors.
* Spacing: Butternut squash vines can spread quite a bit, so give them plenty of room. Space plants 2-3 feet apart in rows that are 6-8 feet apart.
* Watering: Water the seedlings thoroughly before transplanting.
Step-by-Step Transplanting Instructions:
1. Dig Holes: Dig holes that are slightly larger than the root balls of your seedlings.
2. Remove Seedlings: Gently remove the seedlings from their containers. Be careful not to damage the roots.
3. Place Seedlings: Place the seedlings in the holes, making sure the top of the root ball is level with the surrounding soil.
4. Fill and Water: Fill the holes with soil and gently firm it around the base of the plants. Water thoroughly.
5. Mulch: Apply a layer of mulch around the plants to help retain moisture, suppress weeds, and regulate soil temperature. I like to use straw or shredded leaves.
Caring for Butternut Squash Plants
Once your butternut squash plants are in the ground, they’ll need regular care to thrive.
* Watering: Butternut squash needs consistent moisture, especially during fruit development. Water deeply and regularly, especially during dry spells. Aim for about 1 inch of water per week. Avoid overhead watering, as this can promote fungal diseases. Drip irrigation or soaker hoses are ideal.
* Fertilizing: Side-dress the plants with compost tea or a balanced fertilizer every 2-3 weeks. This will provide them with the nutrients they need to produce a bountiful harvest.
* Weeding: Keep the area around the plants free of weeds. Weeds compete with the squash for water and nutrients.
* Pest Control: Keep an eye out for common squash pests like squash bugs, squash vine borers, and cucumber beetles. Handpicking pests, using row covers, and applying organic insecticides like neem oil can help control infestations.
* Pollination: Butternut squash plants have separate male and female flowers. Bees and other pollinators are essential for transferring pollen from the male flowers to the female flowers. If you’re not seeing many bees in your garden, you may need to hand-pollinate the flowers.
Hand-Pollination Instructions:
1. Identify Male and Female Flowers: Male flowers have a long, thin stem, while female flowers have a small, immature squash at the base of the flower.
2. Collect Pollen: In the early morning, use a small paintbrush or cotton swab to collect pollen from the male flower.
3. Transfer Pollen: Gently transfer the pollen to the stigma (the center part) of the female flower.
4. Repeat: Repeat this process for several female flowers.
Harvesting Butternut Squash
Knowing when to harvest butternut squash is crucial for getting the best flavor and storage life.
* Maturity: Butternut squash is typically ready to harvest 90-100 days after planting.
* Visual Cues: The skin should be hard and tough, and the color should be a deep tan. The stem should be dry and corky.
* The Thumb Test: Press your thumbnail into
Conclusion
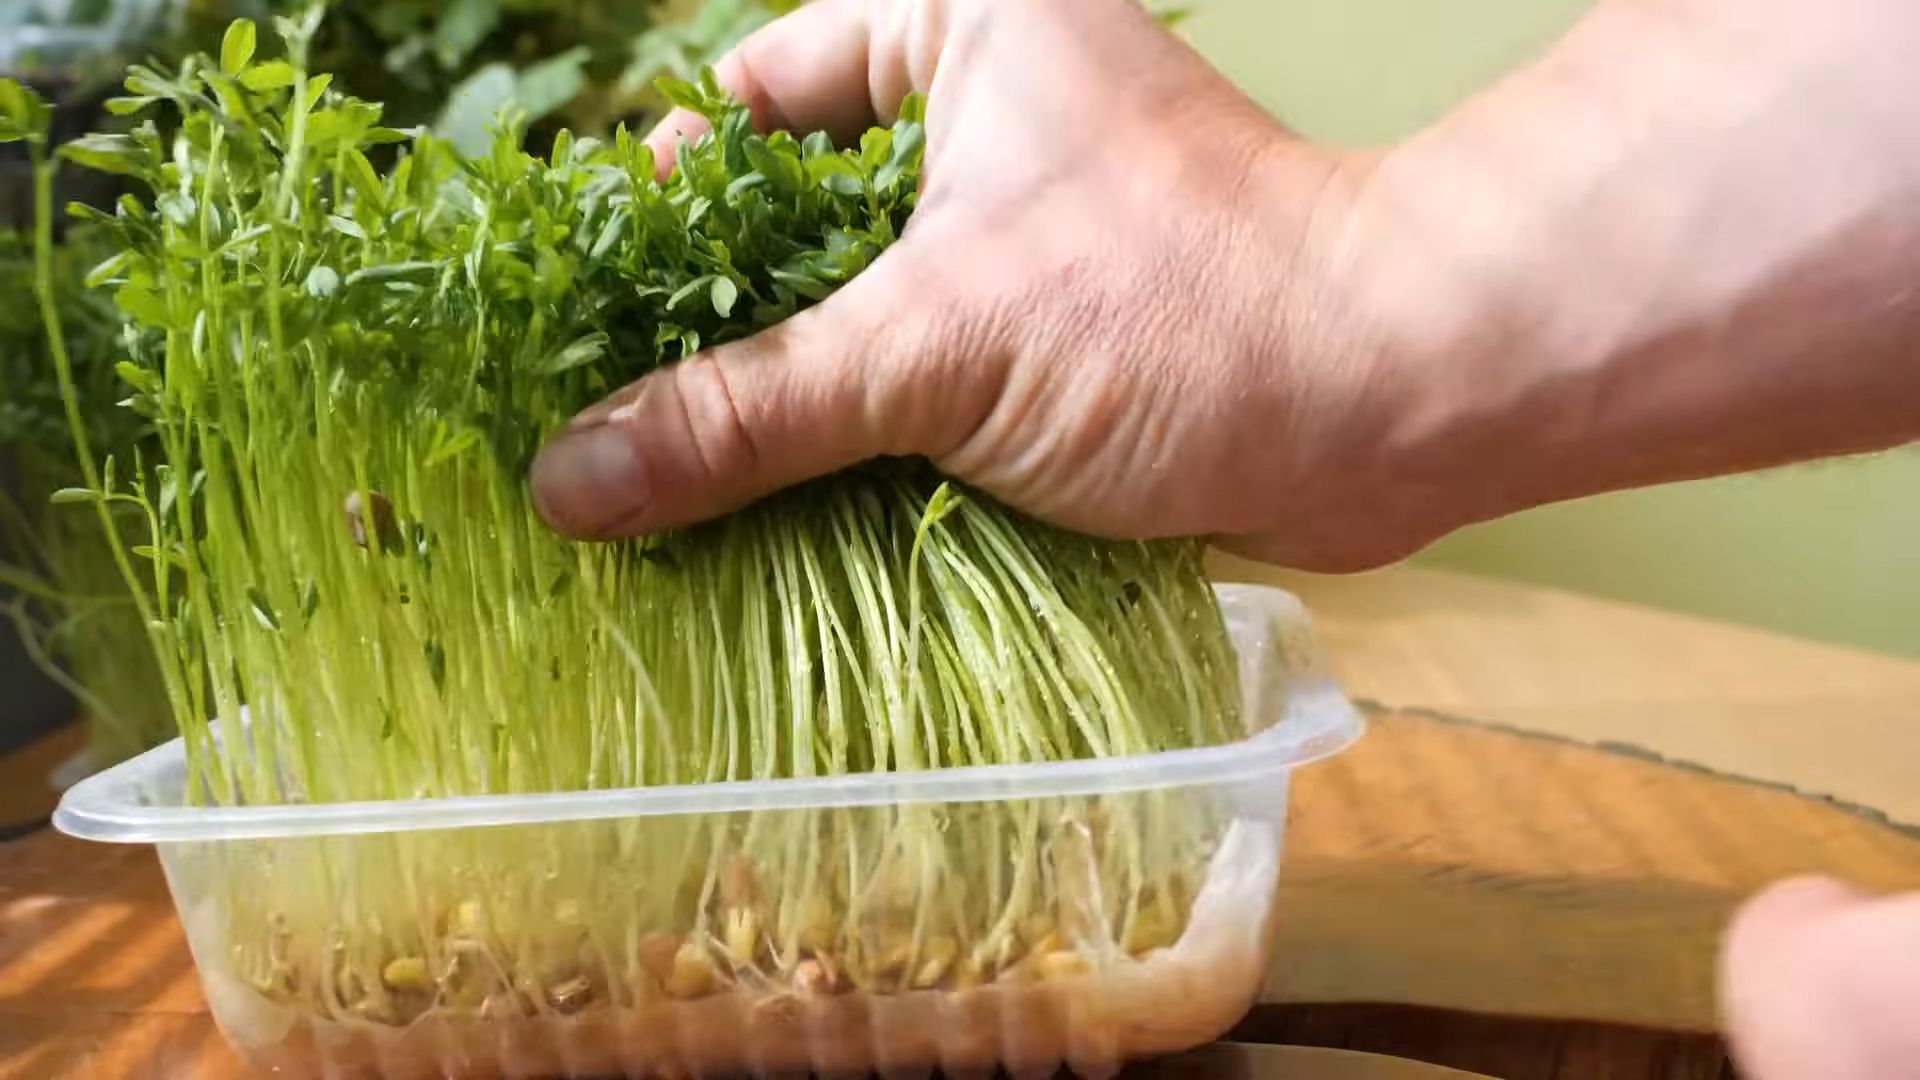
So, there you have it! Growing microgreens at home is not only surprisingly simple, but it’s also an incredibly rewarding experience that brings a burst of fresh flavor and vital nutrients right to your kitchen counter. Forget those expensive, pre-packaged containers from the grocery store. With minimal effort and just a few readily available supplies, you can cultivate your own vibrant, miniature garden, ready to elevate your meals with a touch of homegrown goodness.
Why is this DIY trick a must-try? Because it empowers you to take control of your food source, ensuring you’re consuming the freshest, most nutrient-dense greens possible. You’ll avoid the preservatives and transportation costs associated with store-bought options, and you’ll significantly reduce your environmental footprint. Plus, let’s be honest, there’s something deeply satisfying about nurturing life from a tiny seed to a flavorful sprout.
But the beauty of growing microgreens at home lies in its versatility. Feel free to experiment with different seed varieties to discover your personal favorites. Radish microgreens offer a peppery kick, while broccoli microgreens provide a mild, earthy flavor. Sunflower microgreens are delightfully nutty, and pea shoots bring a sweet, tender crunch. Don’t be afraid to mix and match different varieties in the same tray for a colorful and flavorful blend.
Consider using different growing mediums as well. While soil is a classic choice, you can also explore soilless options like coconut coir or hemp mats. Each medium offers its own unique benefits in terms of water retention and nutrient delivery. You can even try hydroponic systems for a truly hands-off approach.
Another variation to consider is the lighting. While a sunny windowsill can work well, especially for certain varieties, supplementing with a grow light can significantly improve your yields and ensure consistent growth, especially during the darker months. LED grow lights are energy-efficient and provide the ideal spectrum of light for optimal microgreen development.
And finally, think about the containers you use. While shallow trays are the most common choice, you can also repurpose plastic containers, yogurt cups, or even egg cartons. Just make sure they have adequate drainage to prevent waterlogging.
We wholeheartedly encourage you to give this DIY trick a try. It’s a fantastic way to add a healthy and delicious boost to your diet, connect with nature, and discover the joy of growing your own food. Once you experience the satisfaction of harvesting your own homegrown microgreens, you’ll never look at salad the same way again.
So, grab some seeds, gather your supplies, and get ready to embark on your microgreen growing adventure. And most importantly, don’t forget to share your experiences with us! We’d love to hear about your successes, your challenges, and your favorite microgreen varieties. Share your photos and tips in the comments below, and let’s create a community of passionate microgreen growers! Let us know how you are using your **grow microgreens at home** to enhance your meals.
Frequently Asked Questions (FAQs)
What exactly are microgreens?
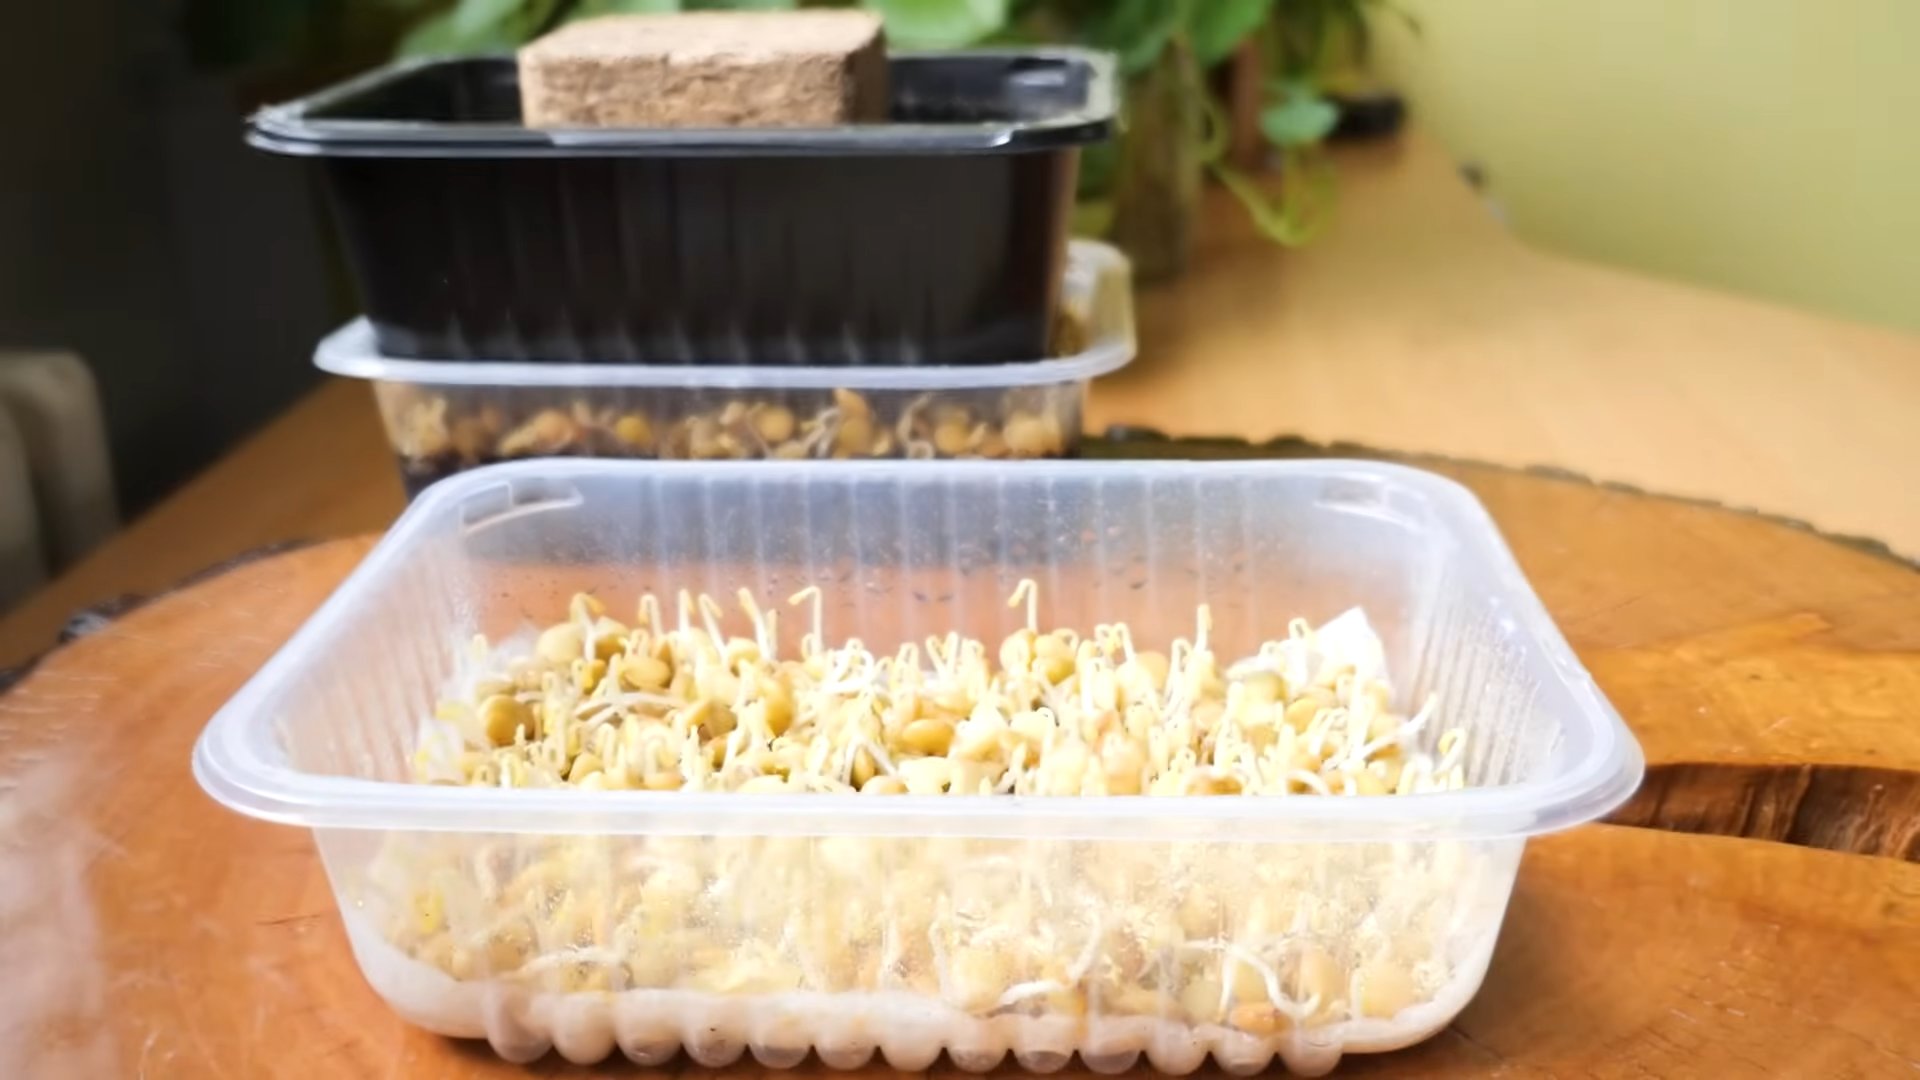
Microgreens are essentially young vegetable greens that are harvested just after the cotyledon leaves (the first leaves that emerge from the seed) have developed, and often after the first true leaves have appeared. They are typically harvested within 7-21 days of germination, depending on the variety. They are smaller than baby greens but larger than sprouts. Microgreens are packed with nutrients and offer intense flavors, making them a popular addition to salads, sandwiches, soups, and other dishes.
What types of seeds can I use to grow microgreens?
The possibilities are vast! Some of the most popular and easy-to-grow microgreens include:
* Radish: Offers a peppery, spicy flavor.
* Broccoli: Provides a mild, earthy taste.
* Sunflower: Delivers a nutty, slightly sweet flavor.
* Pea Shoots: Have a sweet, tender, and slightly grassy flavor.
* Mustard: Offers a pungent, spicy kick.
* Arugula: Provides a peppery, slightly bitter flavor.
* Kale: Delivers a mild, earthy flavor.
* Beet: Offers a sweet, earthy flavor and vibrant color.
* Cilantro: Provides a fresh, citrusy flavor.
You can also experiment with other vegetable, herb, and even flower seeds. Just make sure to use seeds that are specifically intended for sprouting or growing, and avoid using seeds that have been treated with chemicals.
What kind of soil should I use for growing microgreens?
A good quality seed starting mix is ideal. This type of soil is typically lightweight, well-draining, and free of large particles that can hinder germination. You can also use a soilless medium like coconut coir or hemp mats. Avoid using garden soil, as it can be too dense and may contain pests or diseases.
How much light do microgreens need?
Microgreens need adequate light to thrive. A sunny windowsill that receives at least 4-6 hours of direct sunlight per day can work well, especially for certain varieties. However, supplementing with a grow light is highly recommended, especially during the darker months or if you don’t have access to a sunny windowsill. LED grow lights are energy-efficient and provide the ideal spectrum of light for optimal microgreen development. Position the grow light a few inches above the microgreens.
How often should I water my microgreens?
Keep the soil consistently moist, but not waterlogged. Water gently from the bottom by placing the tray in a shallow dish of water and allowing the soil to absorb the moisture. You can also use a spray bottle to mist the microgreens from above. Avoid overwatering, as this can lead to mold or fungal growth.
How do I prevent mold from growing on my microgreens?
Proper ventilation is key to preventing mold growth. Ensure that your microgreens have adequate airflow by placing them in a well-ventilated area. Avoid overcrowding the seeds, as this can restrict airflow. If you notice any mold, remove the affected areas immediately. You can also spray the microgreens with a diluted solution of hydrogen peroxide and water (1 part hydrogen peroxide to 10 parts water).
When are microgreens ready to harvest?
Microgreens are typically ready to harvest within 7-21 days of germination, depending on the variety. They are ready when the cotyledon leaves are fully developed and the first true leaves have emerged. Use scissors or a sharp knife to cut the microgreens just above the soil line.
How long do microgreens last after harvesting?
Microgreens are best consumed immediately after harvesting. However, you can store them in the refrigerator for up to a week. To store them, gently rinse the microgreens and pat them dry with a paper towel. Place them in a sealed container or bag lined with a paper towel to absorb excess moisture.
Can I regrow microgreens after harvesting?
Unfortunately, microgreens cannot be regrown after harvesting. Once you cut them, they will not regenerate. However, you can start a new batch of seeds to continue enjoying fresh microgreens.
Are there any microgreens I should avoid growing?
Avoid growing microgreens from the nightshade family (tomatoes, peppers, eggplants), as their leaves can contain toxic alkaloids. Also, avoid growing microgreens from beans (except for peas), as they can contain toxins that are only deactivated when cooked. Always research the specific seed variety before growing it as a microgreen to ensure it is safe for consumption.

Leave a Comment