
Romanesco Cauliflower Gardening Guide: Ready to grow something truly spectacular in your garden? I’m talking about a vegetable that looks like it belongs in a sci-fi movie, but tastes absolutely divine! We’re diving deep into the world of Romanesco cauliflower, a fractal masterpiece that’s as rewarding to grow as it is to eat.
For centuries, this unique vegetable has captivated gardeners and chefs alike. Originating in Italy, Romanesco cauliflower boasts a striking visual appeal, with its spiraling florets forming a mesmerizing pattern. It’s not just a pretty face, though! Romanesco is packed with nutrients and offers a milder, nuttier flavor compared to regular cauliflower.
But let’s be honest, growing Romanesco can seem intimidating. That’s where this Romanesco Cauliflower Gardening Guide comes in! I’m going to share all my secrets and tips to help you successfully cultivate this extraordinary vegetable in your own backyard. From choosing the right seeds to battling common pests, I’ll walk you through every step of the process. Imagine the satisfaction of harvesting your own perfectly formed Romanesco heads – it’s an experience you won’t soon forget. Plus, you’ll impress all your friends and neighbors with your gardening prowess! So, grab your gardening gloves, and let’s get started!
Growing Romanesco Cauliflower: A Step-by-Step DIY Guide
Hey there, fellow gardening enthusiasts! Today, I’m super excited to share my experience and guide you through growing your very own Romanesco cauliflower. This isn’t your average cauliflower; its fractal, spiraling florets are as stunning as they are delicious. While it might seem intimidating, trust me, with a little patience and the right steps, you can absolutely cultivate this architectural marvel in your backyard. Let’s dive in!
Understanding Romanesco Cauliflower
Before we get our hands dirty, let’s understand what makes Romanesco so special. It’s a variant of cauliflower, known for its unique geometric pattern. The florets form a natural approximation of a fractal, where each floret is a miniature version of the whole head. It’s not just pretty; it also has a milder, nuttier flavor than regular cauliflower.
Key Considerations:
* Timing is Crucial: Romanesco thrives in cool weather, so timing your planting is essential.
* Soil Preparation: Rich, well-draining soil is a must.
* Sunlight: Romanesco needs at least 6 hours of sunlight per day.
* Pest Control: Be vigilant about pests, especially cabbage worms and aphids.
Phase 1: Starting Your Romanesco Seeds
I always prefer starting my Romanesco seeds indoors. This gives them a head start and protects them from early-season pests and unpredictable weather.
1. Gather Your Supplies: You’ll need Romanesco cauliflower seeds, seed starting trays or small pots, seed starting mix, a spray bottle, and a heat mat (optional, but recommended).
2. Prepare the Seed Starting Mix: Moisten the seed starting mix with water. It should be damp but not soggy. I usually mix it in a large bowl to ensure even moisture distribution.
3. Sow the Seeds: Fill your seed starting trays or pots with the moistened mix. Make a small indentation (about ¼ inch deep) in each cell or pot. Place one or two seeds in each indentation and gently cover them with the mix.
4. Water Gently: Use a spray bottle to gently water the seeds. Avoid overwatering, as this can lead to damping off (a fungal disease that kills seedlings).
5. Provide Warmth: Place the seed starting trays or pots on a heat mat, if using. This will help the seeds germinate faster. The ideal temperature for germination is around 70-75°F (21-24°C).
6. Maintain Moisture: Cover the trays or pots with a humidity dome or plastic wrap to help retain moisture. Check the soil daily and mist with water as needed to keep it consistently damp.
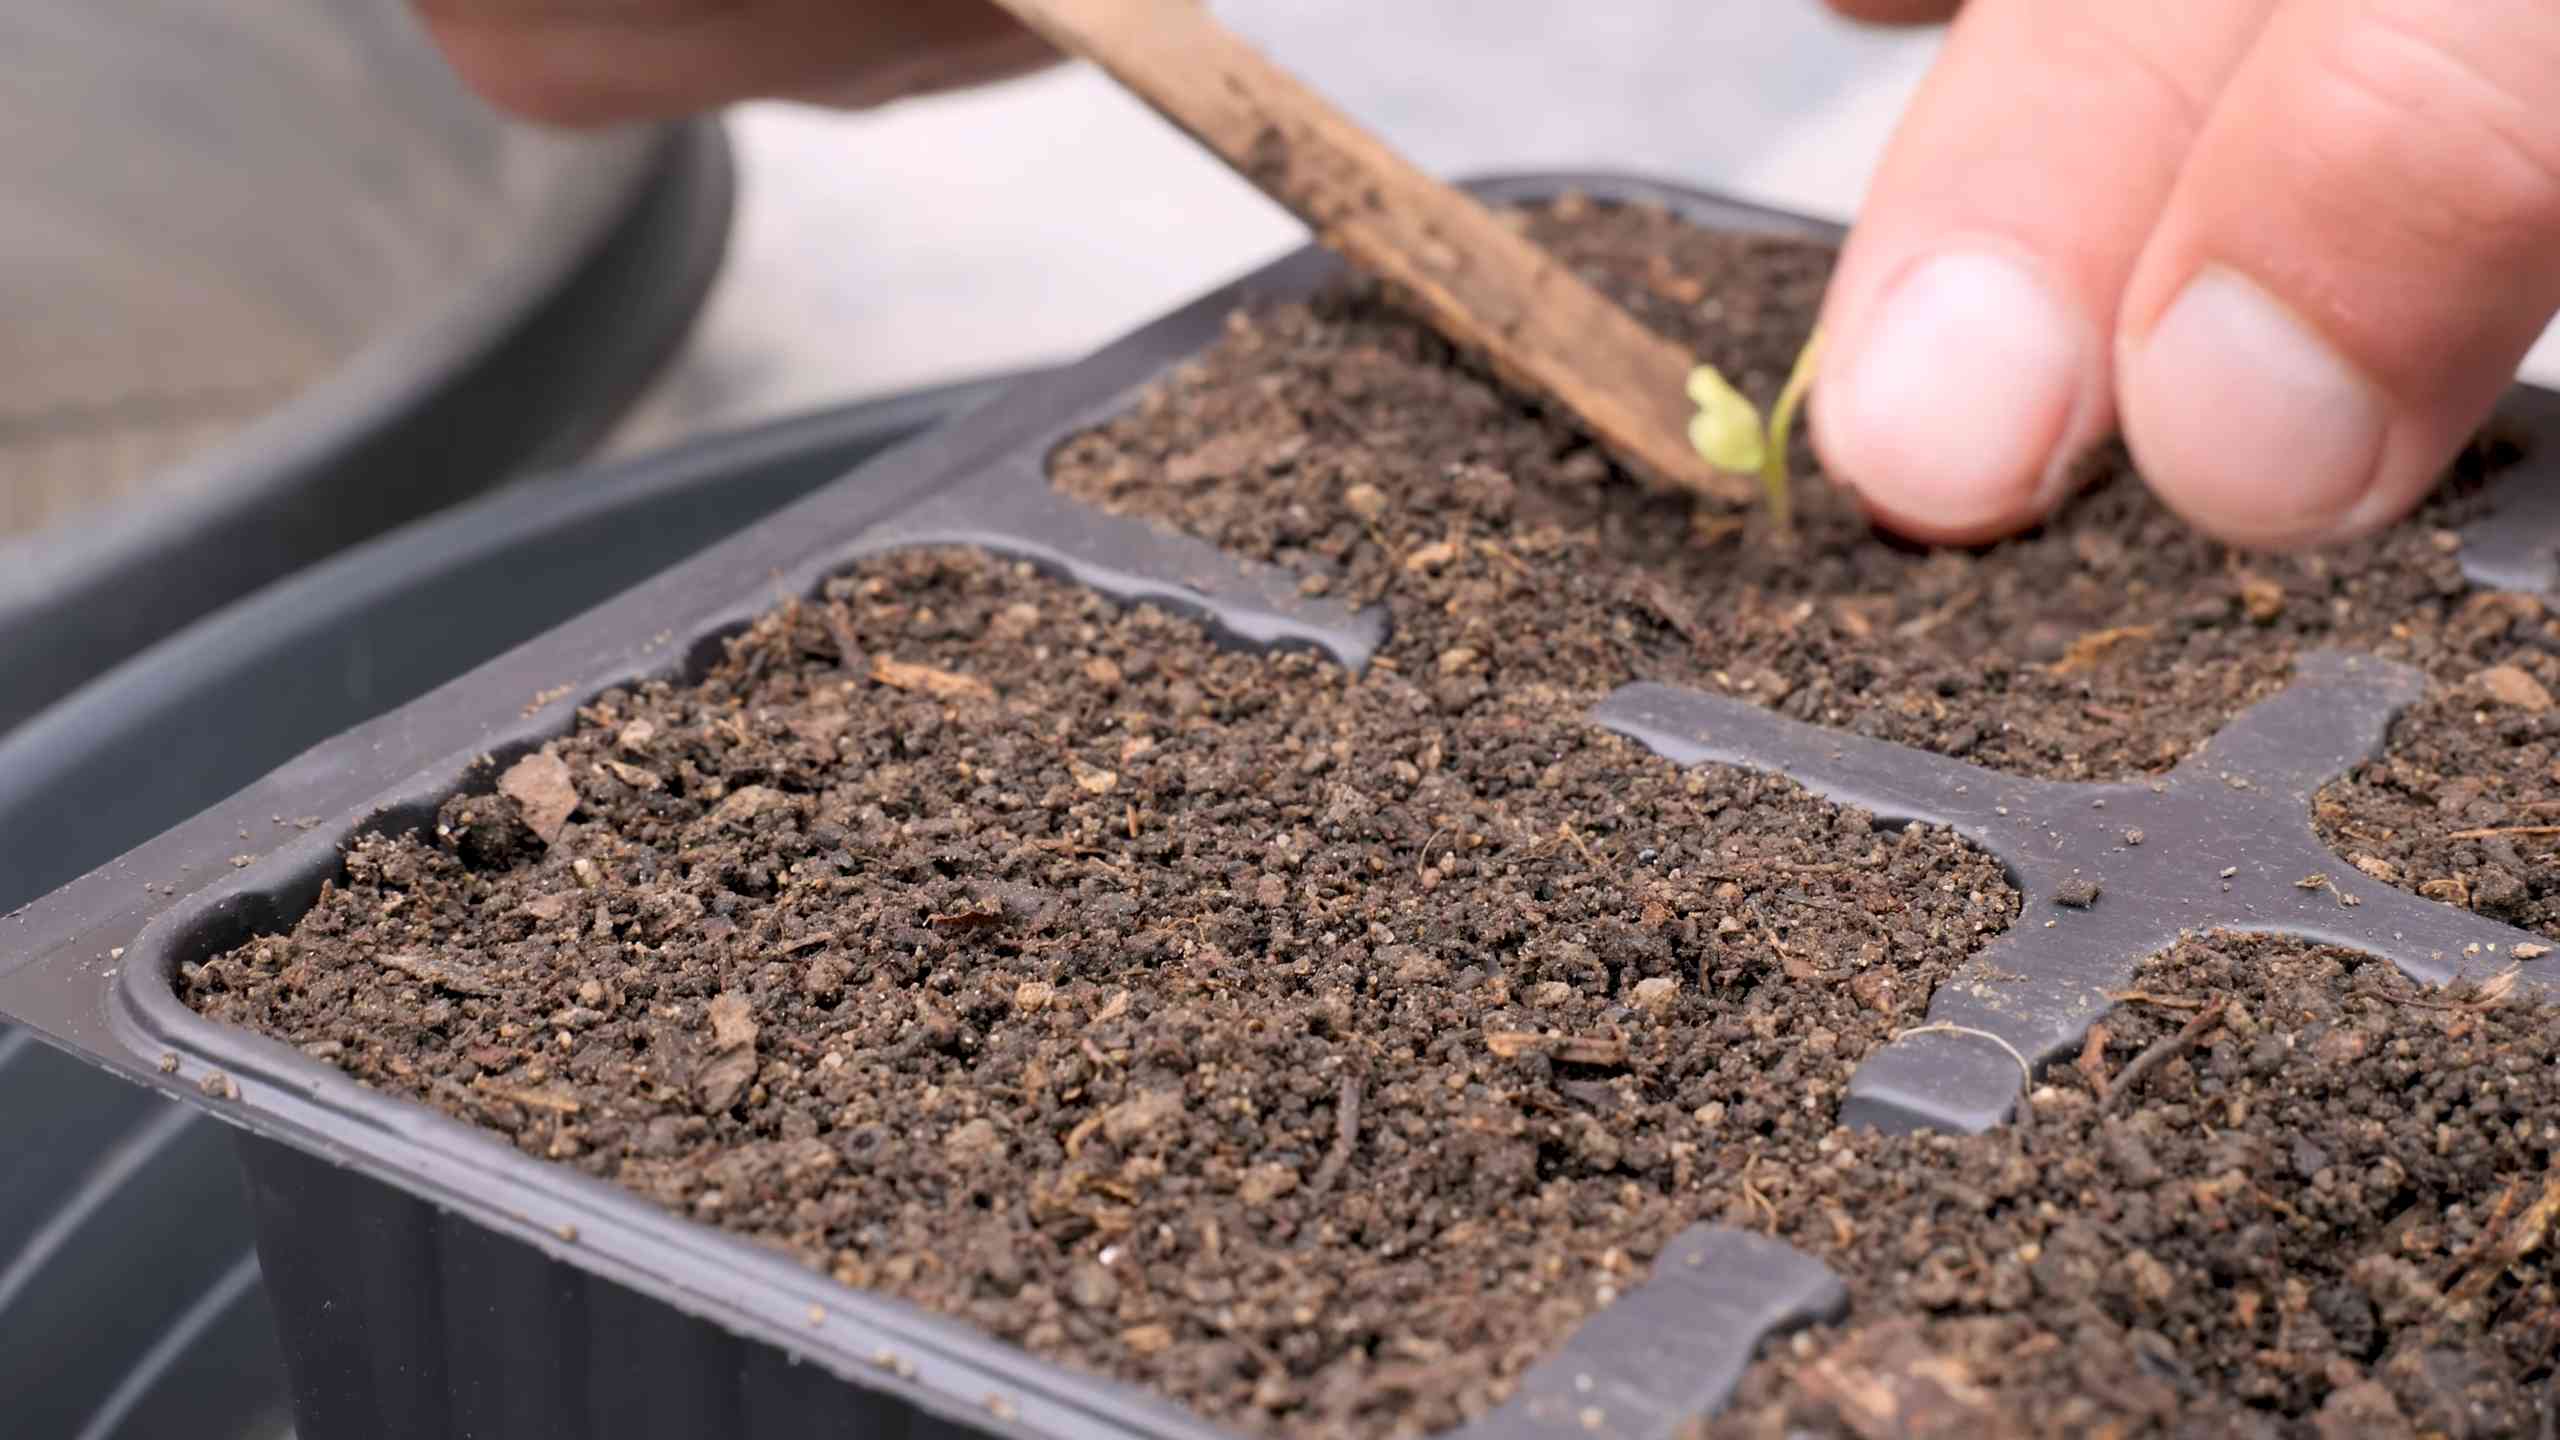
7. Wait for Germination: Romanesco seeds typically germinate in 5-10 days. Once the seedlings emerge, remove the humidity dome or plastic wrap and move the trays or pots to a sunny location or under grow lights.
8. Provide Light: If you’re using grow lights, keep them on for 14-16 hours per day. If you’re using natural sunlight, make sure the seedlings get at least 6 hours of direct sunlight.
9. Thin the Seedlings: Once the seedlings have developed their first true leaves (the second set of leaves), thin them to one seedling per cell or pot. Snip off the weaker seedling at the soil line with scissors.
Phase 2: Preparing Your Garden Bed
While your seedlings are growing indoors, it’s time to prepare your garden bed. Romanesco needs a nutrient-rich, well-draining soil to thrive.
1. Choose a Sunny Location: Select a spot in your garden that receives at least 6 hours of direct sunlight per day.
2. Test Your Soil: I highly recommend testing your soil to determine its pH and nutrient levels. You can purchase a soil testing kit at most garden centers or send a sample to your local agricultural extension office. Romanesco prefers a soil pH of 6.0 to 7.0.
3. Amend the Soil: Based on your soil test results, amend the soil as needed. If your soil is acidic (pH below 6.0), add lime to raise the pH. If your soil is alkaline (pH above 7.0), add sulfur to lower the pH.
4. Add Organic Matter: Incorporate plenty of organic matter into the soil, such as compost, well-rotted manure, or leaf mold. This will improve drainage, aeration, and nutrient content. I usually add a 2-3 inch layer of compost to the bed.
5. Till or Dig the Soil: Till or dig the soil to a depth of at least 12 inches. This will loosen the soil and make it easier for the roots to grow.
6. Create Raised Beds (Optional): Consider creating raised beds if your soil is poorly drained. Raised beds improve drainage and warm up faster in the spring.
7. Fertilize the Soil: Before planting, apply a balanced fertilizer to the soil. I like to use a slow-release organic fertilizer. Follow the instructions on the fertilizer package for application rates.
Phase 3: Transplanting Your Romanesco Seedlings
Once your seedlings are about 4-6 weeks old and have developed several sets of true leaves, they’re ready to be transplanted into the garden.
1. Harden Off the Seedlings: Before transplanting, you need to harden off the seedlings. This process gradually acclimates them to outdoor conditions. Start by placing the seedlings outdoors in a sheltered location for a few hours each day, gradually increasing the amount of time they spend outdoors over the course of a week.
2. Choose a Cloudy Day: Transplant your seedlings on a cloudy day or in the late afternoon to minimize stress.
3. Dig Holes: Dig holes in the prepared garden bed, spacing them about 18-24 inches apart. The holes should be deep enough to accommodate the root balls of the seedlings.
4. Remove Seedlings from Trays: Gently remove the seedlings from their seed starting trays or pots. Be careful not to damage the roots.
5. Plant the Seedlings: Place the seedlings in the holes and backfill with soil. Gently firm the soil around the base of the plants.
6. Water Thoroughly: Water the seedlings thoroughly after planting.
7. Mulch Around the Plants: Apply a layer of mulch around the plants to help retain moisture, suppress weeds, and regulate soil temperature. I like to use straw or wood chips.
8. Protect from Pests: Cover the seedlings with row covers to protect them from pests, such as cabbage moths and flea beetles.
Phase 4: Caring for Your Romanesco Plants
Now that your Romanesco plants are in the ground, it’s important to provide them with the care they need to thrive.
1. Water Regularly: Water your Romanesco plants regularly, especially during dry periods. Aim to keep the soil consistently moist but not waterlogged. I usually water deeply once or twice a week, depending on the weather.
2. Fertilize Regularly: Fertilize your Romanesco plants every 2-3 weeks with a balanced fertilizer. You can use a liquid fertilizer or a slow-release granular fertilizer.
3. Weed Regularly: Keep the garden bed free of weeds. Weeds compete with your Romanesco plants for water and nutrients.
4. Monitor for Pests: Regularly inspect your Romanesco plants for pests, such as cabbage worms, aphids, and flea beetles. If you find any pests, take action immediately.
* Cabbage Worms: Handpick cabbage worms off the plants or spray them with Bacillus thuringiensis (Bt), a biological insecticide.
* Aphids: Spray aphids with insecticidal soap or neem oil.
* Flea Beetles: Cover the plants with row covers or spray them with pyrethrin.
5. Protect from Extreme Weather: If you experience extreme weather, such as frost or heat waves, take steps to protect your Romanesco plants.
* Frost: Cover the plants with blankets or tarps to protect them from frost.
* Heat Waves: Provide shade for the plants during the hottest part of the day.
Phase 5: Harvesting Your Romanesco Cauliflower
Harvest time is the most rewarding part of gardening! Romanesco cauliflower is typically ready to harvest 75-85 days after transplanting.
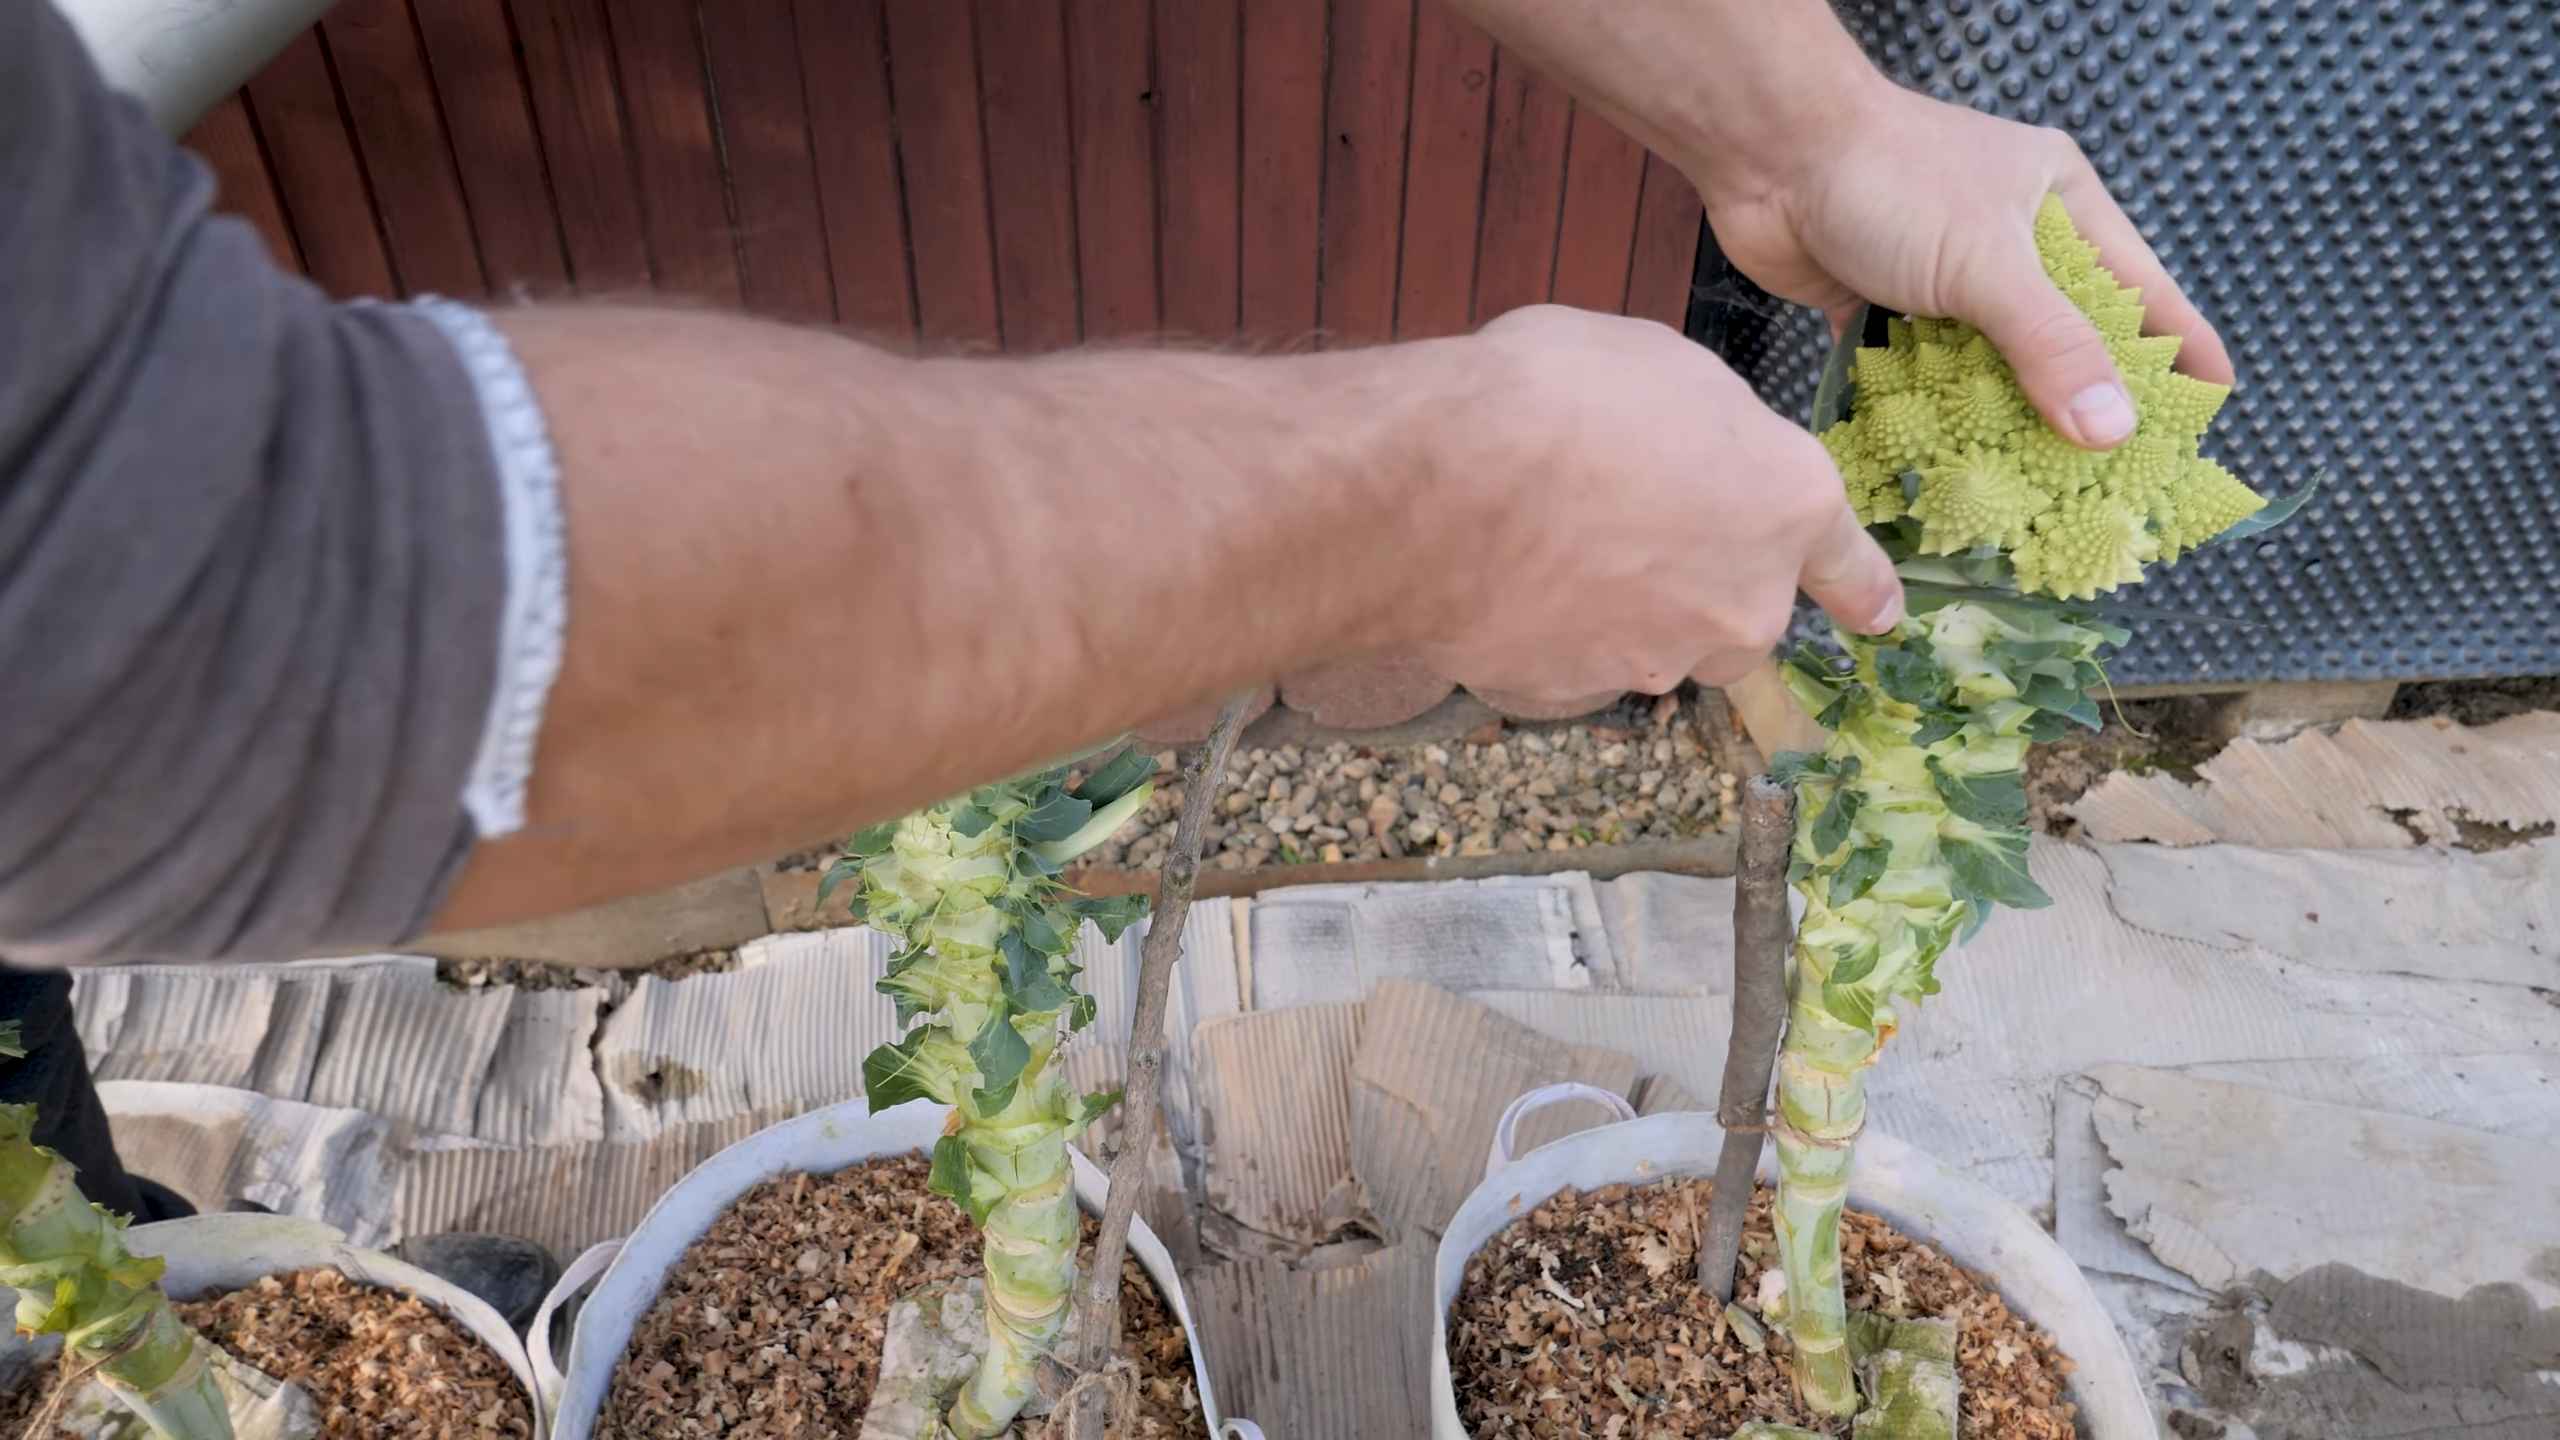
1. Check for Maturity: The head of the Romanesco cauliflower should be firm and compact, with tightly closed florets. The head should be about 6-8 inches in diameter.
2. Cut the Head: Use a sharp knife to cut the head of the Romanesco cauliflower from the plant. Leave a few inches of stem attached to the head.
3. Harvest in the Morning: Harvest your Romanesco cauliflower in the morning, when the temperatures are cooler.
4. Store Properly: Store your Romanesco cauliflower in the
Conclusion
So, there you have it! Mastering the art of growing your own Romanesco cauliflower isn’t just about cultivating a vegetable; it’s about embarking on a rewarding journey that culminates in a stunning, fractal masterpiece gracing your dinner table. We’ve covered everything from selecting the perfect seeds and preparing your soil to warding off pests and harvesting your prize.
Why is this DIY gardening trick a must-try? Because store-bought Romanesco simply can’t compare to the vibrant flavor and unparalleled freshness of a head you’ve nurtured from seed. Plus, the satisfaction of watching those intricate spirals unfurl is a unique reward in itself. It’s a conversation starter, a culinary adventure, and a testament to your green thumb all rolled into one.
But the fun doesn’t stop there! Feel free to experiment with different varieties of Romanesco. While the classic lime green is a showstopper, you can find cultivars with hints of purple or even orange, adding a splash of color to your garden and your plate. Consider companion planting to naturally deter pests and improve soil health. Marigolds, for example, are excellent at repelling nematodes, while herbs like rosemary and thyme can help keep cabbage moths at bay.
Another variation to consider is succession planting. By staggering your planting dates, you can enjoy a continuous harvest of Romanesco throughout the growing season. Start a new batch of seeds every few weeks to ensure a steady supply of this delectable vegetable.
Don’t be afraid to get your hands dirty and embrace the challenges that come with gardening. Remember, even experienced gardeners face setbacks. The key is to learn from your mistakes and keep experimenting. The more you observe your plants and adapt your approach, the more successful you’ll become.
We’ve armed you with the knowledge and the inspiration; now it’s time to put it into practice. We wholeheartedly encourage you to try this DIY Romanesco cauliflower gardening trick. Imagine the pride you’ll feel when you harvest your first head, knowing that you nurtured it from a tiny seed to a magnificent, edible work of art.
And most importantly, we want to hear about your experience! Share your successes, your challenges, and your tips with us in the comments below. Post pictures of your Romanesco creations on social media and tag us. Let’s build a community of Romanesco enthusiasts and inspire others to discover the joy of growing their own food. Your insights could be invaluable to fellow gardeners, and we’re eager to learn from your journey. Happy gardening!
Frequently Asked Questions (FAQ)
What is the ideal soil pH for growing Romanesco cauliflower?
Romanesco cauliflower thrives in slightly acidic to neutral soil, with a pH range of 6.0 to 7.0 being optimal. You can test your soil pH using a home testing kit or by sending a sample to your local agricultural extension office. If your soil is too acidic, you can amend it with lime. If it’s too alkaline, you can add sulfur or organic matter like compost.
How much sunlight does Romanesco cauliflower need?
Romanesco cauliflower requires at least 6 hours of direct sunlight per day to produce healthy heads. Choose a planting location that receives full sun throughout the growing season. If you live in a particularly hot climate, providing some afternoon shade can help prevent the heads from bolting (prematurely flowering).
What are some common pests and diseases that affect Romanesco cauliflower, and how can I control them?
Common pests include cabbage worms, aphids, flea beetles, and root maggots. Diseases include clubroot, black rot, and downy mildew. To control pests, you can use row covers to protect your plants, handpick pests off the leaves, or apply organic insecticides like Bacillus thuringiensis (Bt) for cabbage worms or insecticidal soap for aphids. To prevent diseases, ensure good soil drainage, practice crop rotation, and use disease-resistant varieties. If you suspect a disease, remove infected plants immediately to prevent it from spreading.
How often should I water my Romanesco cauliflower plants?
Romanesco cauliflower needs consistent moisture, especially during head formation. Water deeply and regularly, aiming for about 1-1.5 inches of water per week. Avoid overhead watering, as this can promote fungal diseases. Instead, water at the base of the plants. Mulching around the plants can help retain moisture and suppress weeds.
When is the best time to harvest Romanesco cauliflower?
Harvest Romanesco cauliflower when the head is firm, compact, and has reached its desired size. The exact size will depend on the variety, but generally, heads are ready for harvest when they are about 6-8 inches in diameter. Check the head regularly, as it can mature quickly. Use a sharp knife to cut the head from the plant, leaving a few leaves attached.
Can I grow Romanesco cauliflower in containers?
Yes, you can grow Romanesco cauliflower in containers, but you’ll need a large container (at least 15-20 gallons) to accommodate the plant’s root system. Use a well-draining potting mix and ensure the container receives plenty of sunlight. Water regularly and fertilize every few weeks with a balanced fertilizer.
How do I prevent Romanesco cauliflower from bolting?
Bolting, or premature flowering, can be caused by stress factors such as heat, drought, or inconsistent watering. To prevent bolting, choose heat-tolerant varieties, provide consistent moisture, and protect plants from extreme temperatures. Mulching can help regulate soil temperature and retain moisture.
What are some good companion plants for Romanesco cauliflower?
Good companion plants for Romanesco cauliflower include:
* **Marigolds:** Repel nematodes and other soil pests.
* **Rosemary and Thyme:** Deter cabbage moths.
* **Nasturtiums:** Attract aphids away from the cauliflower.
* **Garlic and Onions:** Repel various pests.
* **Clover:** Fixes nitrogen in the soil.
How do I store Romanesco cauliflower after harvesting?
After harvesting, store Romanesco cauliflower in the refrigerator. Wrap the head in a damp paper towel and place it in a plastic bag. It will keep for about 1-2 weeks. You can also blanch and freeze Romanesco cauliflower for longer storage.
What are some delicious ways to prepare Romanesco cauliflower?
Romanesco cauliflower can be prepared in many ways, including:
* **Roasted:** Toss with olive oil, salt, and pepper, and roast until tender and slightly browned.
* **Steamed:** Steam until tender-crisp and serve with butter or a sauce.
* **Sautéed:** Sauté with garlic, onions, and other vegetables.
* **Grilled:** Grill until slightly charred and tender.
* **In soups and stews:** Add to soups and stews for added flavor and texture.
* **Raw:** Enjoy raw in salads or with dips.
Don’t be afraid to experiment and find your favorite way to enjoy this unique and delicious vegetable! Remember, growing your own Romanesco cauliflower is a rewarding experience that will bring joy to your garden and your table.
Leave a Comment