
Clorox cleaning hacks are about to revolutionize your cleaning routine! Are you tired of spending hours scrubbing, only to be left with lingering grime and stubborn stains? I know I was! For generations, Clorox bleach has been a staple in households, known for its powerful disinfecting properties. But did you know its uses extend far beyond just laundry and bathroom cleaning?
From tackling tough kitchen messes to revitalizing outdoor spaces, Clorox can be your secret weapon. Think of it as unlocking a hidden level in the cleaning game – a level where efficiency meets effectiveness. In the past, people relied on harsh chemicals and elbow grease, but now, with these simple yet ingenious Clorox cleaning hacks, you can achieve sparkling results with minimal effort.
This article is your ultimate guide to mastering the art of Clorox cleaning. I’ll share my favorite DIY tricks and hacks that will not only save you time and money but also leave your home feeling fresh and revitalized. Get ready to discover the surprising versatility of Clorox and transform the way you clean forever!
Unlock the Cleaning Power of Clorox: DIY Hacks You Need to Know!
Hey there, fellow cleaning enthusiasts! I’m always on the lookout for ways to make my cleaning routine more efficient and, let’s be honest, a little less dreadful. And guess what? I’ve discovered some amazing DIY hacks using good old Clorox bleach that I just have to share with you. These aren’t your grandma’s cleaning tips (well, maybe some are!), but they’re definitely effective and will save you time and money. So, grab your rubber gloves and let’s get started!
Hack 1: Revive Dingy White Laundry
Is your white laundry looking a little…blah? Don’t despair! Clorox can work wonders to brighten those whites and get rid of stubborn stains.
What You’ll Need:
* Clorox Bleach (Regular, not splash-less for best results)
* Laundry Detergent
* Washing Machine
* Measuring Cup
Step-by-Step Instructions:
1. Sort Your Laundry: First things first, separate your white clothes from your colored clothes. This is crucial to avoid any unwanted color bleeding. I know, it’s tempting to throw everything in together, but trust me, it’s not worth the risk!
2. Pre-Treat Stains: If you have any particularly stubborn stains, pre-treat them before washing. You can use a stain remover or even a diluted bleach solution (1 tablespoon of bleach per cup of water). Apply the solution to the stain, let it sit for a few minutes, and then gently rub it in.
3. Add Detergent: Add your regular laundry detergent to the washing machine as usual. Follow the instructions on the detergent bottle for the correct amount.
4. Add Clorox Bleach: Now for the magic ingredient! Add Clorox bleach to the bleach dispenser in your washing machine. The amount of bleach you need will depend on the size of your load and the level of dinginess. A good rule of thumb is to use about ¾ cup for a standard load. Always check the garment care label to ensure bleach is safe to use.
5. Wash as Usual: Start the washing machine and let it run through its normal cycle.
6. Dry Your Clothes: Once the wash cycle is complete, dry your clothes as usual. I prefer to hang my white clothes outside to dry in the sun, as the sun’s rays can help to further brighten them.
Hack 2: Deep Clean Your Cutting Boards
Cutting boards can harbor bacteria and odors, especially after cutting raw meat or poultry. Clorox is a great way to disinfect and deodorize your cutting boards.
What You’ll Need:
* Clorox Bleach
* Water
* Spray Bottle
* Clean Cloth or Sponge
* Gloves (optional, but recommended)
Step-by-Step Instructions:
1. Wash the Cutting Board: Before you disinfect, wash the cutting board thoroughly with soap and water to remove any food particles.
2. Prepare the Bleach Solution: In a spray bottle, mix 1 tablespoon of Clorox bleach with 1 quart of water. This is the recommended dilution for disinfecting surfaces.
3. Spray the Cutting Board: Spray the cutting board with the bleach solution, making sure to cover all surfaces.
4. Let it Sit: Let the bleach solution sit on the cutting board for at least 10 minutes to allow it to disinfect properly.
5. Rinse Thoroughly: After 10 minutes, rinse the cutting board thoroughly with clean water.
6. Air Dry: Allow the cutting board to air dry completely before using it again.
Hack 3: Sanitize Your Sponges and Dishcloths
Sponges and dishcloths are breeding grounds for bacteria. Sanitize them regularly with Clorox to keep your kitchen clean and healthy.
What You’ll Need:
* Clorox Bleach
* Water
* Bowl or Sink
* Gloves (optional, but recommended)
Step-by-Step Instructions:
1. Prepare the Bleach Solution: In a bowl or sink, mix ¾ teaspoon of Clorox bleach with 1 quart of water.
2. Soak the Sponges and Dishcloths: Submerge the sponges and dishcloths in the bleach solution, making sure they are completely covered.
3. Let it Soak: Let the sponges and dishcloths soak in the bleach solution for at least 5 minutes.
4. Rinse Thoroughly: After 5 minutes, rinse the sponges and dishcloths thoroughly with clean water.
5. Wring Out Excess Water: Wring out as much excess water as possible from the sponges and dishcloths.
6. Air Dry: Allow the sponges and dishcloths to air dry completely before using them again. You can also microwave a damp sponge for 1-2 minutes to further sanitize it (be careful, it will be hot!).
Hack 4: Clean and Deodorize Your Toilet
Clorox is a classic for a reason! It’s a powerful disinfectant and deodorizer that can keep your toilet sparkling clean.
What You’ll Need:
* Clorox Bleach
* Toilet Brush
* Gloves (essential!)
Step-by-Step Instructions:
1. Pour Bleach into the Bowl: Pour about 1 cup of Clorox bleach directly into the toilet bowl.
2. Let it Sit: Let the bleach sit in the bowl for at least 10 minutes to allow it to disinfect and deodorize.
3. Scrub the Bowl: Use a toilet brush to scrub the inside of the bowl, paying attention to any stains or buildup.
4. Flush the Toilet: Flush the toilet to rinse away the bleach and any debris.
5. Clean the Exterior: For the exterior of the toilet, you can use a diluted bleach solution (1 tablespoon of bleach per quart of water) to wipe down the seat, lid, and base. Be sure to rinse with clean water after wiping with the bleach solution.
Hack 5: Remove Mold and Mildew from Your Bathroom
Mold and mildew can be a common problem in bathrooms due to the high humidity. Clorox can help to remove and prevent mold and mildew growth.
What You’ll Need:
* Clorox Bleach
* Water
* Spray Bottle
* Scrub Brush or Sponge
* Gloves (essential!)
* Eye Protection (recommended)
Step-by-Step Instructions:
1. Prepare the Bleach Solution: In a spray bottle, mix 1 part Clorox bleach with 10 parts water. Always dilute bleach properly to avoid damaging surfaces and creating harmful fumes.
2. Spray the Affected Area: Spray the bleach solution onto the mold or mildew-affected area, making sure to saturate the surface.
3. Let it Sit: Let the bleach solution sit on the surface for at least 10 minutes to allow it to kill the mold and mildew.
4. Scrub the Surface: Use a scrub brush or sponge to scrub the surface, removing any remaining mold or mildew.
5. Rinse Thoroughly: Rinse the surface thoroughly with clean water.
6. Ventilate the Area: Open windows and doors to ventilate the area and allow it to dry completely.
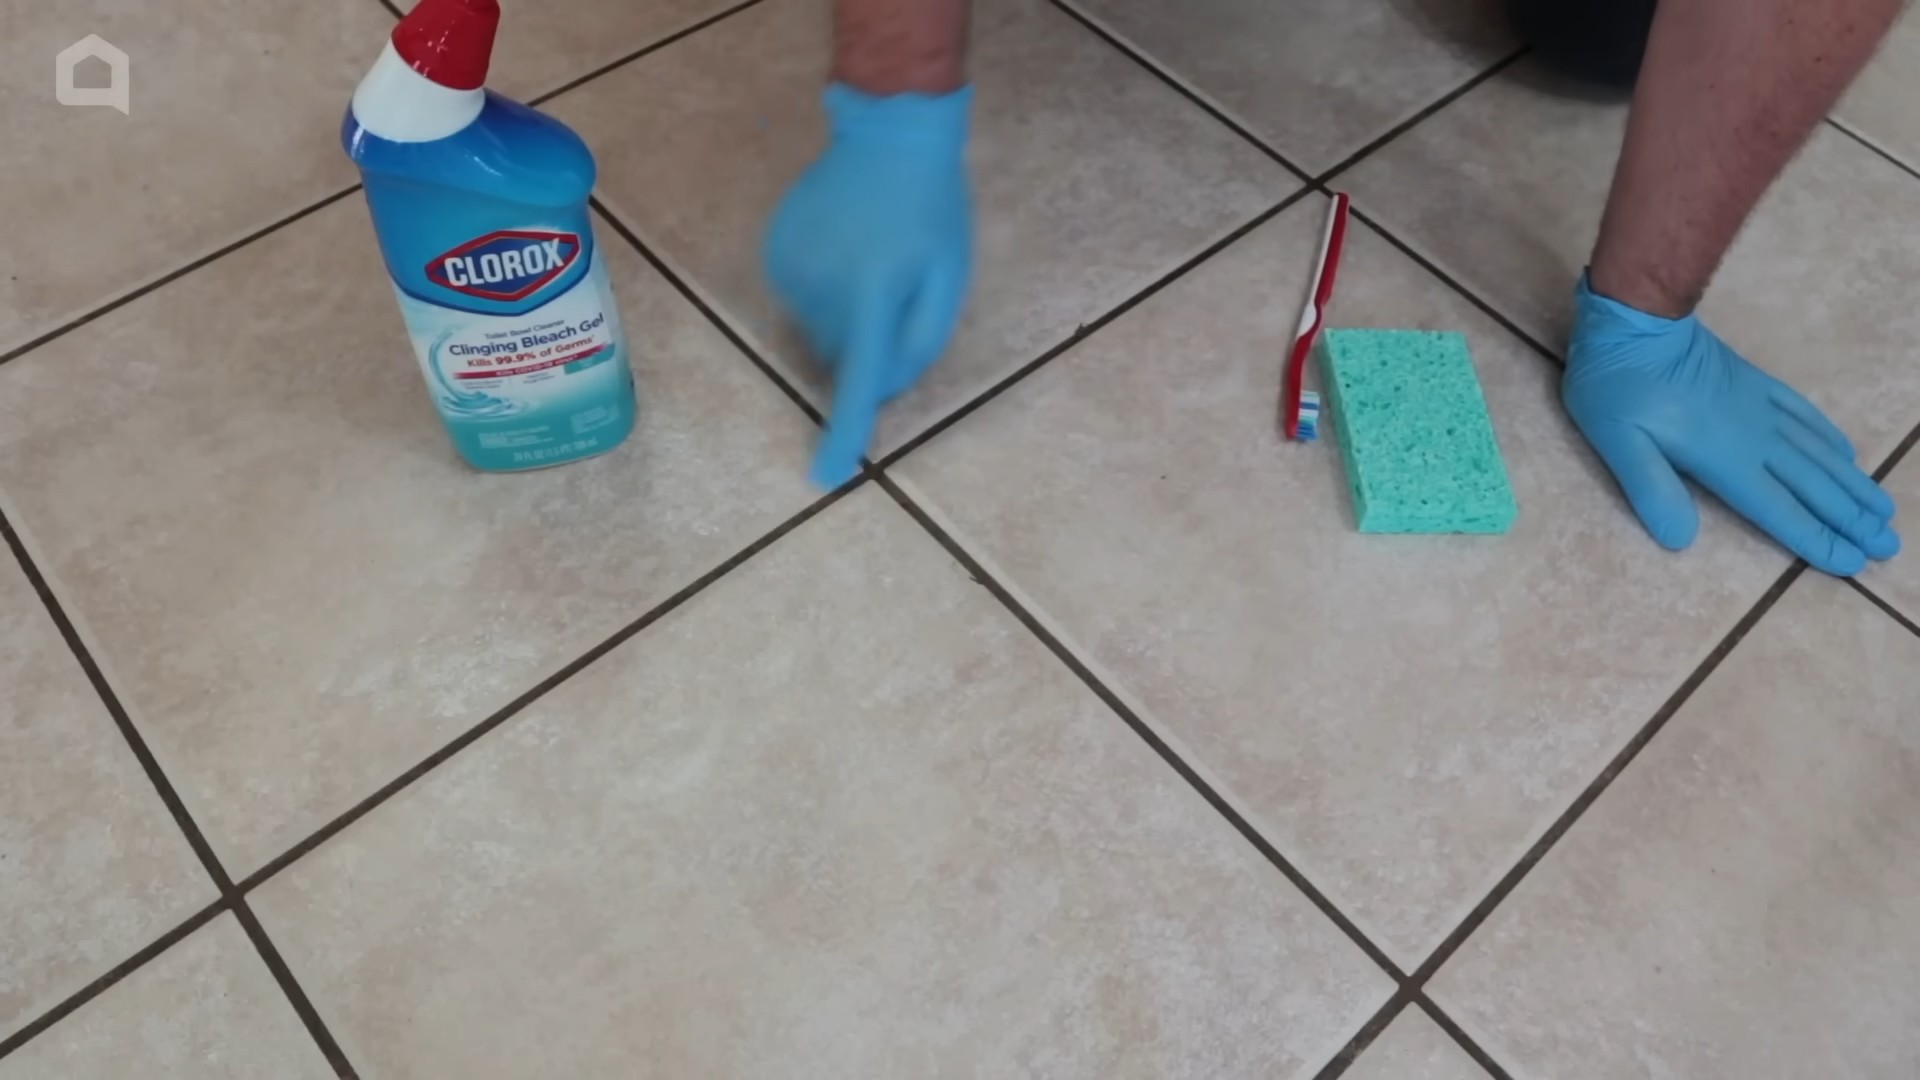
Hack 6: Brighten Grout Lines
Dirty grout lines can make your tile look dull and dingy. Clorox can help to brighten grout lines and restore their original color.
What You’ll Need:
* Clorox Bleach
* Water
* Spray Bottle or Small Bowl
* Old Toothbrush or Grout Brush
* Gloves (recommended)
Step-by-Step Instructions:
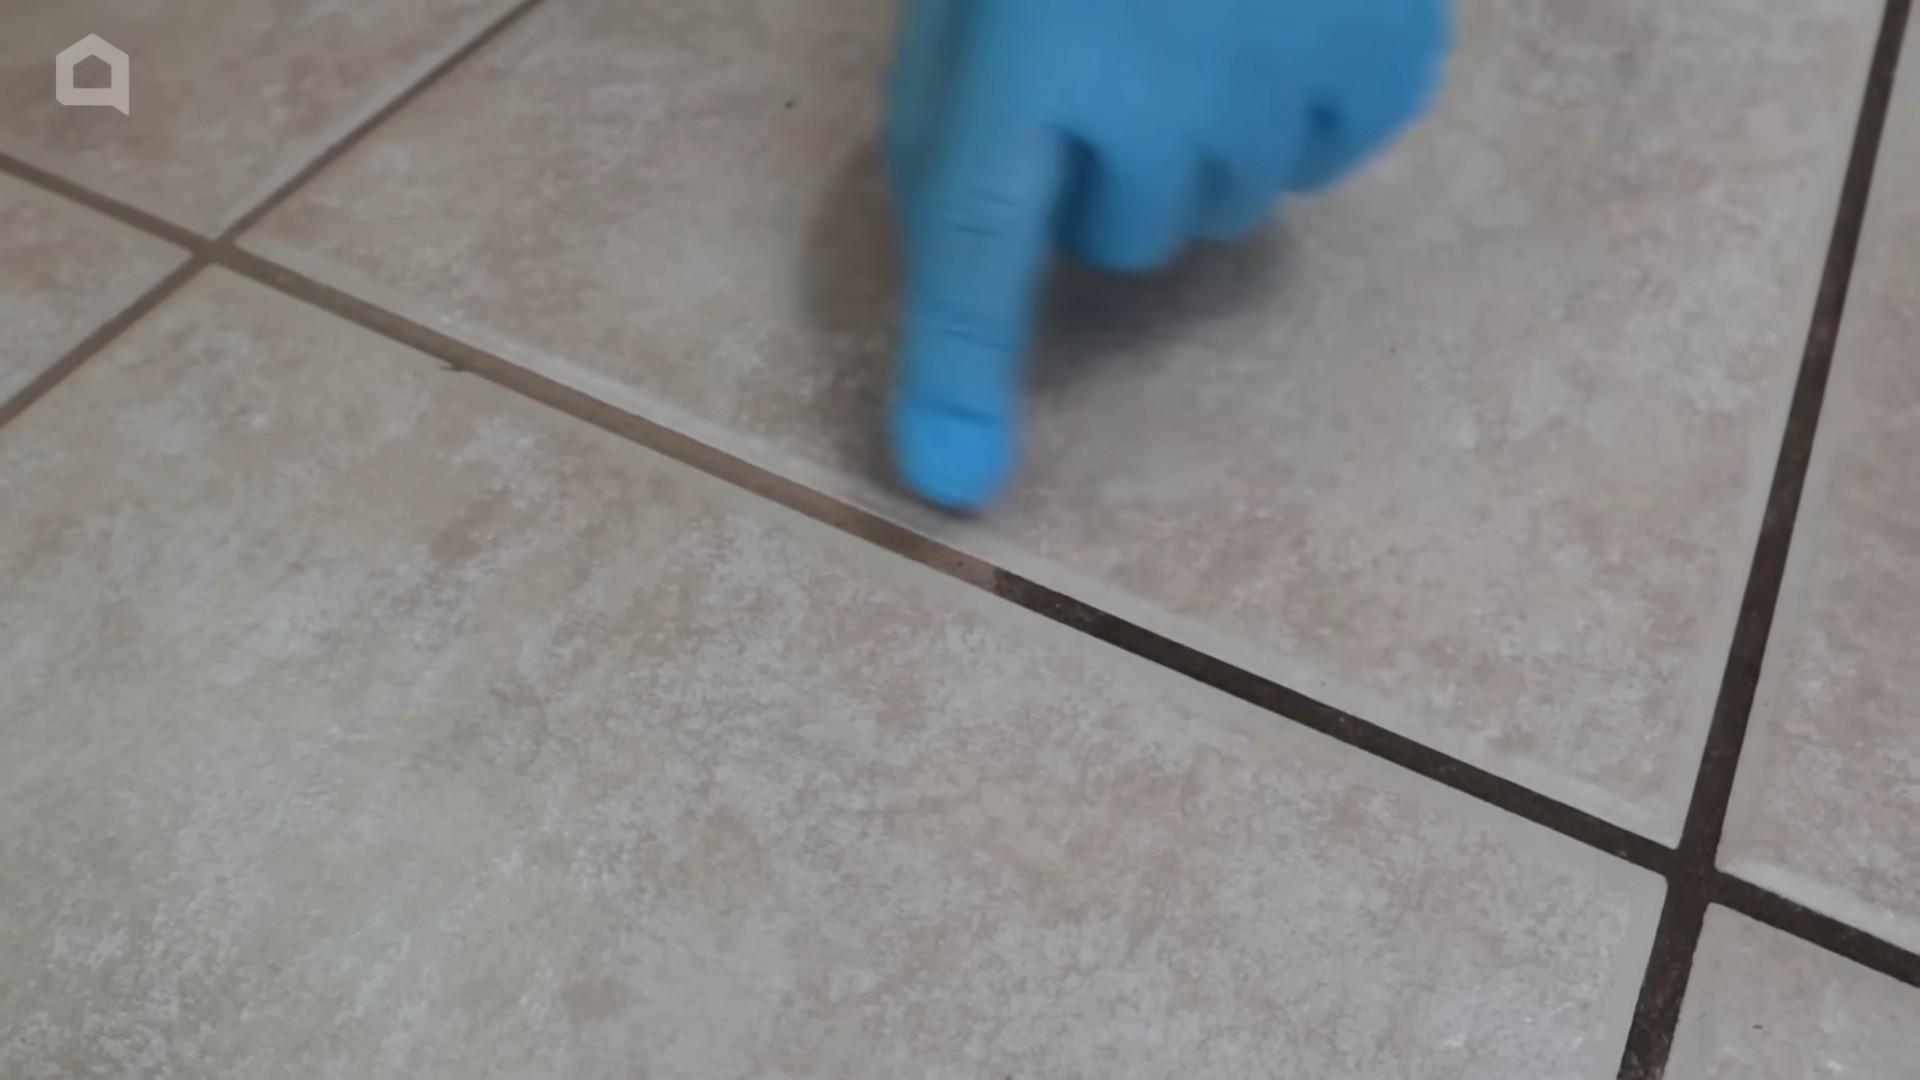
1. Prepare the Bleach Solution: In a spray bottle or small bowl, mix equal parts Clorox bleach and water.
2. Apply the Solution to the Grout Lines: Apply the bleach solution to the grout lines, either by spraying it on or using an old toothbrush or grout brush to apply it directly.
3. Let it Sit: Let the bleach solution sit on the grout lines for at least 10 minutes to allow it to penetrate and loosen the dirt and grime.
4. Scrub the Grout Lines: Use an old toothbrush or grout brush to scrub the grout lines, removing any remaining dirt and grime.
5. Rinse Thoroughly: Rinse the grout lines thoroughly with clean water.
6. Dry the Area: Dry the area with a clean cloth or towel.
Hack 7: Disinfect Toys
Kids’ toys can be a breeding ground for germs, especially if they’re shared with other children.
Conclusion
So, there you have it! This simple yet incredibly effective DIY Clorox cleaning hack is a game-changer for anyone looking to streamline their cleaning routine and achieve sparkling results without breaking the bank. We’ve shown you how to harness the power of Clorox in a new and innovative way, extending its utility beyond the bottle and tackling those stubborn cleaning challenges with ease.
Why is this a must-try? Because it’s efficient, cost-effective, and versatile. It simplifies your cleaning process, saving you time and effort while delivering exceptional results. Forget about juggling multiple cleaning products for different surfaces; this hack offers a comprehensive solution for a variety of household cleaning needs. Plus, it’s a fantastic way to reduce your reliance on harsh chemicals and pre-packaged cleaning solutions, making it a more environmentally conscious choice.
But the beauty of this DIY Clorox cleaning hack lies in its adaptability. Feel free to experiment with variations to suit your specific needs and preferences. For instance, if you’re dealing with particularly stubborn stains, consider adding a tablespoon of baking soda to the mixture for extra scrubbing power. Or, if you prefer a more fragrant cleaning experience, a few drops of your favorite essential oil (lemon, lavender, or tea tree oil work particularly well) can be added to the solution. Just be sure to test any variations on an inconspicuous area first to ensure compatibility with the surface you’re cleaning.
Another great variation is to adjust the concentration of Clorox depending on the task at hand. For light cleaning and disinfecting, a weaker solution will suffice. For tougher jobs like mold removal or deep cleaning grout, you can increase the Clorox concentration slightly. Always remember to exercise caution and wear gloves when working with Clorox, regardless of the concentration.
We’re confident that once you try this DIY Clorox cleaning hack, you’ll wonder how you ever cleaned without it. It’s a simple, effective, and affordable way to keep your home sparkling clean and germ-free.
Now, it’s your turn! We encourage you to give this DIY Clorox cleaning hack a try and see the amazing results for yourself. Don’t be afraid to experiment with variations and find what works best for your home and your cleaning style.
Most importantly, we want to hear about your experience! Share your before-and-after photos, your favorite variations, and any tips or tricks you discover along the way. Let us know how this DIY Clorox cleaning hack has transformed your cleaning routine and helped you achieve a cleaner, healthier home. Your feedback is invaluable and will help us continue to refine and improve this cleaning solution for everyone. So, get cleaning, get creative, and get sharing! We can’t wait to see your sparkling results!
Frequently Asked Questions (FAQ)
Is this DIY Clorox cleaning hack safe for all surfaces?
While this DIY Clorox cleaning hack is generally safe for many surfaces, it’s crucial to exercise caution and test it on an inconspicuous area first. Avoid using it on delicate surfaces like marble, granite, or unfinished wood, as Clorox can potentially damage or discolor these materials. Always refer to the manufacturer’s instructions for your specific surfaces before using any cleaning product, including this DIY solution. If you are unsure, err on the side of caution and use a cleaner specifically designed for that surface.
What safety precautions should I take when using Clorox?
Safety is paramount when working with Clorox. Always wear gloves to protect your skin from irritation. Ensure adequate ventilation by opening windows or using a fan to avoid inhaling fumes. Avoid mixing Clorox with other cleaning products, especially ammonia, as this can create dangerous and potentially deadly gases. Keep Clorox out of reach of children and pets. If Clorox comes into contact with your skin or eyes, rinse immediately with plenty of water and seek medical attention if irritation persists.
Can I use this DIY Clorox cleaning hack to clean my bathroom?
Yes, this DIY Clorox cleaning hack is excellent for cleaning bathrooms. It’s effective at removing soap scum, mildew, and grime from surfaces like tiles, grout, sinks, and toilets. However, be mindful of the surfaces you’re cleaning and test the solution on an inconspicuous area first, especially on delicate surfaces like marble countertops. For toilet cleaning, you can pour the solution directly into the bowl, let it sit for a few minutes, and then scrub and flush.
How often should I use this DIY Clorox cleaning hack?
The frequency of use depends on your cleaning needs and the level of dirt and grime in your home. For general cleaning and disinfecting, using this solution once or twice a week is usually sufficient. For areas prone to mold and mildew, like bathrooms, you may need to use it more frequently. Avoid overusing Clorox, as it can be harsh on surfaces and potentially cause damage over time.
Can I use this DIY Clorox cleaning hack to clean my kitchen?
Absolutely! This DIY Clorox cleaning hack is a great option for cleaning kitchen surfaces like countertops, sinks, and stovetops. It’s effective at removing grease, food stains, and bacteria. However, avoid using it on food preparation surfaces directly. After cleaning with the Clorox solution, be sure to thoroughly rinse the surface with clean water to remove any residue. Also, avoid using it on porous surfaces like unsealed granite or marble.
How long does the DIY Clorox cleaning solution last?
It’s best to use the DIY Clorox cleaning solution immediately after mixing it. Clorox can degrade over time, especially when diluted with water, which can reduce its effectiveness. If you have any leftover solution, store it in a tightly sealed container in a cool, dark place, and use it within a few days. However, for optimal results, we recommend mixing a fresh batch each time you clean.
Can I add essential oils to this DIY Clorox cleaning hack?
Yes, adding essential oils to this DIY Clorox cleaning hack can enhance the cleaning experience and provide a pleasant fragrance. Lemon, lavender, and tea tree oil are popular choices for their antibacterial and antifungal properties. However, be sure to use essential oils sparingly, as too much can potentially damage surfaces or cause irritation. A few drops are usually sufficient. Always test the solution on an inconspicuous area first to ensure compatibility.
What is the best way to store the DIY Clorox cleaning solution?
If you need to store the DIY Clorox cleaning solution, use a tightly sealed, opaque container to prevent light from degrading the Clorox. Label the container clearly with the contents and the date it was mixed. Store it in a cool, dark place, away from direct sunlight and heat. Keep it out of reach of children and pets. However, as mentioned earlier, it’s best to use the solution immediately after mixing for optimal results.
What should I do if I accidentally ingest the DIY Clorox cleaning solution?
If you accidentally ingest the DIY Clorox cleaning solution, seek immediate medical attention. Do not induce vomiting. Call your local poison control center or emergency services for guidance. Provide them with information about the solution you ingested, including the concentration of Clorox.
Is this DIY Clorox cleaning hack environmentally friendly?
While Clorox is effective at cleaning and disinfecting, it’s not the most environmentally friendly option. Consider using it sparingly and opting for more eco-friendly cleaning alternatives whenever possible. You can also dilute the solution further to reduce the amount of Clorox used. Dispose of any leftover solution properly according to local regulations.
Leave a Comment