
Cleaning Hacks from Pros: Ever feel like you’re battling a never-ending war against dirt and grime in your home? I know I have! It’s a universal struggle, and for centuries, people have been searching for easier, more effective ways to keep their living spaces sparkling. From ancient civilizations using natural remedies to modern-day innovations, the quest for a clean home is deeply ingrained in our history.
But let’s be honest, who has the time to spend hours scrubbing and polishing? That’s where these Cleaning Hacks from Pros come in! Imagine having a toolbox filled with insider secrets that can cut your cleaning time in half and leave your home looking professionally cleaned. These aren’t your grandma’s old-fashioned tips (though some of those are pretty great too!). We’re talking about tried-and-true methods used by cleaning professionals to tackle even the toughest messes with ease.
This DIY article is your ultimate guide to unlocking those secrets. I’m going to share some of the most effective and surprising cleaning hacks that will transform the way you approach housework. Get ready to ditch the elbow grease and embrace a smarter, cleaner way of life!
DIY Cleaning Hacks with Harpic Toilet Cleaner: Beyond the Bowl!
Okay, let’s be honest. We all know Harpic is a powerhouse in the bathroom, specifically for tackling those stubborn toilet stains. But did you know this trusty cleaner has some surprising uses beyond its intended purpose? I’ve experimented with a few, and I’m excited to share my favorite DIY cleaning hacks using Harpic toilet cleaner. Remember safety first! Always wear gloves and eye protection, and test in an inconspicuous area before applying to the entire surface. And never, ever mix Harpic with bleach – that’s a recipe for disaster!
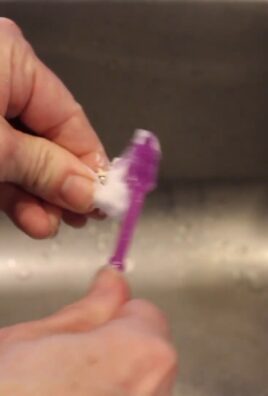
Cleaning Grout Like a Pro
Grout can be a real pain. It gets grimy and discolored so easily. Here’s how I use Harpic to bring it back to life.
Materials You’ll Need:
* Harpic toilet cleaner (the original blue kind works best)
* Old toothbrush or grout brush
* Gloves
* Eye protection
* Water
* Sponge or cloth
* Optional: Baking soda
Step-by-Step Instructions:
1. Prepare the Area: Make sure the area you’re cleaning is well-ventilated. Open a window or turn on a fan. This is important because Harpic has a strong scent.
2. Apply Harpic to the Grout: Carefully apply a small amount of Harpic directly to the grout lines. I like to use a small squeeze bottle for better control, but you can also pour it carefully.
3. Let it Sit (But Not Too Long!): Allow the Harpic to sit on the grout for about 5-10 minutes. Don’t leave it on for longer than that, as it could potentially damage the grout or surrounding tiles. This is crucial!
4. Scrub, Scrub, Scrub: Using your old toothbrush or grout brush, scrub the grout lines thoroughly. You’ll see the grime start to lift away.
5. Rinse Thoroughly: Rinse the area with plenty of water. Make sure all traces of Harpic are gone. I usually rinse multiple times to be safe.
6. Wipe Clean: Wipe the area dry with a clean sponge or cloth.
7. Optional Baking Soda Boost: For extra stubborn stains, you can make a paste of baking soda and water and apply it to the grout after rinsing. Let it sit for a few minutes, then scrub and rinse again.
Reviving Dingy Shower Heads
Hard water can wreak havoc on shower heads, leaving them clogged and covered in mineral deposits. Here’s how I use Harpic to get them sparkling again.
Materials You’ll Need:
* Harpic toilet cleaner
* Plastic bag (sandwich bag or larger, depending on the shower head size)
* Rubber band or zip tie
* Gloves
* Eye protection
* Old toothbrush or small brush
* Water
Step-by-Step Instructions:
1. Prepare the Bag: Pour enough Harpic into the plastic bag to fully submerge the shower head.
2. Submerge the Shower Head: Carefully place the shower head inside the bag, ensuring it’s completely submerged in the Harpic.
3. Secure the Bag: Use a rubber band or zip tie to securely attach the bag to the shower head, making sure it’s watertight.
4. Let it Soak: Let the shower head soak in the Harpic solution for at least 30 minutes, or even overnight for heavily clogged shower heads. The longer it soaks, the better the results!
5. Remove and Scrub: Remove the bag and carefully take out the shower head. Use an old toothbrush or small brush to scrub away any remaining mineral deposits.
6. Rinse Thoroughly: Rinse the shower head thoroughly with water until all traces of Harpic are gone.
7. Reattach and Test: Reattach the shower head to the shower arm and run the water to flush out any remaining debris. You should notice a significant improvement in water pressure and spray pattern.
Cleaning Toilet Brushes: A Must-Do!
Let’s face it, toilet brushes can get pretty gross. Here’s how I keep mine clean and sanitized with Harpic.
Materials You’ll Need:
* Harpic toilet cleaner
* Toilet brush holder
* Gloves
* Eye protection
* Water
Step-by-Step Instructions:
1. Empty the Brush Holder: Empty any water or debris from the toilet brush holder.
2. Pour in Harpic: Pour a generous amount of Harpic into the brush holder, enough to cover the bristles of the toilet brush.
3. Soak the Brush: Place the toilet brush in the holder, allowing the bristles to soak in the Harpic solution for at least 30 minutes. This will kill bacteria and disinfect the brush.
4. Rinse Thoroughly: After soaking, carefully remove the brush and rinse it thoroughly with water.
5. Replace in Holder: Allow the brush to drip dry before placing it back in the holder. You can also spray the brush with a disinfectant spray for extra protection.
6. Clean the Holder: Don’t forget to rinse out the brush holder with water and a little bit of Harpic to keep it clean and sanitized as well.
Removing Rust Stains (Use with Caution!)
Harpic can be effective at removing rust stains, but it’s important to use it with caution and test it in an inconspicuous area first. This is a more aggressive use, so proceed carefully!
Materials You’ll Need:
* Harpic toilet cleaner
* Gloves
* Eye protection
* Old toothbrush or cloth
* Water
* Baking soda (optional, for neutralizing)
Step-by-Step Instructions:
1. Test in an Inconspicuous Area: Before applying Harpic to the entire rust stain, test it in a small, hidden area to make sure it doesn’t damage the surface.
2. Apply Harpic to the Stain: Carefully apply a small amount of Harpic directly to the rust stain.
3. Let it Sit (Briefly!): Allow the Harpic to sit on the stain for only a few minutes (1-2 minutes max!). Do not leave it on for longer, as it could damage the surface.
4. Scrub Gently: Using an old toothbrush or cloth, gently scrub the stain.
5. Rinse Thoroughly: Rinse the area thoroughly with water.
6. Neutralize (Optional): If you’re concerned about the acidity of the Harpic, you can neutralize it by applying a paste of baking soda and water to the area after rinsing. Let it sit for a few minutes, then rinse again.
7. Repeat if Necessary: If the stain is still visible, you can repeat the process, but be very careful not to overexpose the surface to the Harpic.
Cleaning Ceramic Plant Pots
Over time, ceramic plant pots can develop unsightly mineral deposits and stains. Harpic can help restore them to their former glory.
Materials You’ll Need:
* Harpic toilet cleaner
* Gloves
* Eye protection
* Old toothbrush or scrub brush
* Water
* Bucket or large container
Step-by-Step Instructions:
1. Empty and Rinse the Pot: Remove any soil or plants from the pot and rinse it with water to remove loose dirt.
2. Prepare the Harpic Solution: In a bucket or large container, mix Harpic with water. I usually use a ratio of about 1 part Harpic to 3 parts water.
3. Soak the Pot: Submerge the plant pot in the Harpic solution and let it soak for at least 30 minutes, or even longer for heavily stained pots.
4. Scrub the Pot: After soaking, remove the pot from the solution and scrub it with an old toothbrush or scrub brush to remove any remaining stains and mineral deposits.
5. Rinse Thoroughly: Rinse the pot thoroughly with water until all traces of Harpic are gone.
6. Dry the Pot: Allow the pot to dry completely before replanting.
Important Safety Reminders:
* Always wear gloves and eye protection when working with Harpic.
* Never mix Harpic with bleach or other cleaning products. This can create dangerous fumes.
* Work in a well-ventilated area.
* Test in an inconspicuous area first before applying Harpic to the entire surface.
* Keep Harpic out of reach of children and pets.
* Rinse thoroughly after using Harpic.
* Do not use Harpic on delicate surfaces such as marble, granite, or painted surfaces without testing first.
Conclusion
So, there you have it – cleaning hacks straight from the pros that will revolutionize your cleaning routine! We’ve explored time-saving techniques, eco-friendly solutions, and clever ways to tackle even the most stubborn messes. But the real magic lies in putting these tips into practice.
Why is this DIY approach a must-try? Because it’s not just about cleaning; it’s about reclaiming your time, saving money, and creating a healthier, happier home. Store-bought cleaning products can be expensive and often contain harsh chemicals that are harmful to both your family and the environment. By embracing these professional cleaning hacks, you’re opting for a more sustainable and effective way to keep your space sparkling.
Think about it: no more endless scrubbing with ineffective cleaners, no more breathing in toxic fumes, and no more breaking the bank on specialized products. Instead, you’ll have a toolbox of simple, yet powerful, techniques that will make cleaning feel less like a chore and more like a satisfying accomplishment.
Variations and Suggestions:
The beauty of these cleaning hacks is their adaptability. Feel free to experiment with different essential oils in your homemade cleaners to create your signature scent. Lavender, lemon, and tea tree oil are all excellent choices for their antibacterial and aromatic properties.
* **For stubborn stains:** Consider adding a bit of baking soda to your vinegar solution for extra scrubbing power.
* **For delicate surfaces:** Always test your cleaning solution in an inconspicuous area first to ensure it doesn’t cause any damage.
* **For a deeper clean:** Steam cleaning can be a fantastic way to sanitize and refresh carpets, upholstery, and even hard surfaces.
We encourage you to start small. Pick one or two of these cleaning hacks and incorporate them into your routine. Once you see the results, you’ll be hooked!
Don’t just take our word for it – try these professional cleaning hacks for yourself and experience the difference. We’re confident that you’ll be amazed at how easy and effective they are.
We’d love to hear about your experiences! Share your before-and-after photos, your favorite variations, and any other cleaning tips you’ve discovered in the comments below. Let’s create a community of clean-living enthusiasts who are passionate about making their homes shine.
Frequently Asked Questions (FAQs)
Q: Are these cleaning hacks safe for all surfaces?
A: While most of these cleaning hacks are generally safe and effective, it’s always best to test them on an inconspicuous area first, especially when dealing with delicate surfaces like wood, marble, or granite. Some acidic solutions, like vinegar or lemon juice, can etch or damage certain materials if left on for too long. Always dilute your cleaning solutions properly and avoid using abrasive scrubbers on easily scratched surfaces. When in doubt, consult the manufacturer’s instructions for your specific surface.
Q: Can I use these cleaning hacks if I have allergies or sensitivities?
A: If you have allergies or sensitivities to certain ingredients, such as vinegar, lemon, or essential oils, it’s crucial to exercise caution. Read the ingredient lists carefully and consider wearing gloves and a mask while cleaning. You can also substitute ingredients with hypoallergenic alternatives. For example, if you’re allergic to vinegar, you can try using baking soda or hydrogen peroxide instead. If you’re unsure about a particular ingredient, consult with your doctor or allergist before using it.
Q: How often should I use these cleaning hacks?
A: The frequency of cleaning depends on your lifestyle, the size of your home, and your personal preferences. However, a general guideline is to perform a light cleaning of high-traffic areas, such as the kitchen and bathrooms, at least once a week. Deeper cleaning tasks, such as cleaning carpets, upholstery, and appliances, can be done less frequently, such as once a month or every few months. Regular maintenance cleaning will prevent dirt and grime from building up, making your home easier to clean in the long run.
Q: Are these cleaning hacks environmentally friendly?
A: Yes, many of these cleaning hacks are more environmentally friendly than traditional store-bought cleaning products. By using natural ingredients like vinegar, baking soda, lemon juice, and essential oils, you can reduce your exposure to harsh chemicals and minimize your environmental impact. Additionally, making your own cleaning solutions reduces the need for plastic bottles and packaging, further contributing to a more sustainable lifestyle. However, it’s important to dispose of cleaning solutions properly and avoid pouring them down the drain, as some ingredients can still be harmful to aquatic life.
Q: Can I use these cleaning hacks to clean my entire house?
A: Absolutely! These cleaning hacks can be used to clean virtually every area of your house, from the kitchen and bathrooms to the living room and bedrooms. You can use them to clean countertops, floors, appliances, windows, mirrors, upholstery, and more. However, it’s important to use the appropriate cleaning solution for each surface and to follow the instructions carefully. With a little bit of knowledge and effort, you can transform your entire house into a sparkling clean and healthy living space using these simple and effective cleaning hacks.
Q: What are some essential tools I need for these cleaning hacks?
A: While many of these cleaning hacks require only basic household items, having a few essential tools on hand can make the process even easier and more efficient. Some must-have tools include:
* Spray bottles: For storing and dispensing cleaning solutions.
* Microfiber cloths: For wiping and dusting surfaces.
* Sponges: For scrubbing and cleaning.
* Scrub brushes: For tackling stubborn stains and grime.
* Rubber gloves: To protect your hands from harsh chemicals and irritants.
* A bucket: For mixing cleaning solutions.
* A vacuum cleaner: For cleaning carpets and floors.
* A steam cleaner (optional): For deep cleaning and sanitizing.
Q: How can I make my own all-purpose cleaner using these hacks?
A: Making your own all-purpose cleaner is incredibly easy and cost-effective. Here’s a simple recipe:
1. In a spray bottle, combine equal parts white vinegar and water.
2. Add a few drops of your favorite essential oil for fragrance (optional).
3. Shake well to mix.
This all-purpose cleaner can be used to clean countertops, floors, appliances, and other surfaces. Just spray it on, let it sit for a few minutes, and then wipe it clean with a microfiber cloth.
Q: What’s the best way to remove stubborn stains using these cleaning hacks?
A: For stubborn stains, try using a combination of baking soda and vinegar. Sprinkle baking soda onto the stain, then pour a small amount of vinegar over it. Let it fizz for a few minutes, then scrub with a brush or sponge. Rinse with water and repeat if necessary. For tougher stains, you can also try using a paste of baking soda and water, or a solution of hydrogen peroxide and water. Always test your cleaning solution in an inconspicuous area first to ensure it doesn’t damage the surface.
Q: How can I keep my house clean with a busy schedule?
A: Keeping your house clean with a busy schedule can be challenging, but it’s definitely possible with a few simple strategies:
* Create a cleaning schedule: Set aside a specific time each week for cleaning tasks.
* Break down tasks into smaller chunks: Instead of trying to clean your entire house at once, focus on one room or area at a time.
* Delegate tasks: If you have family members or roommates, assign them cleaning tasks to share the workload.
* Clean as you go: Wipe up spills and messes immediately to prevent them from becoming stubborn stains.
* Declutter regularly: Get rid of items you no longer need or use to reduce clutter and make cleaning easier.
* Hire a cleaning service: If you’re really short on time, consider hiring a professional cleaning service to help you keep your house clean.
By implementing these strategies, you can maintain a clean and organized home even with a busy schedule.
Leave a Comment