
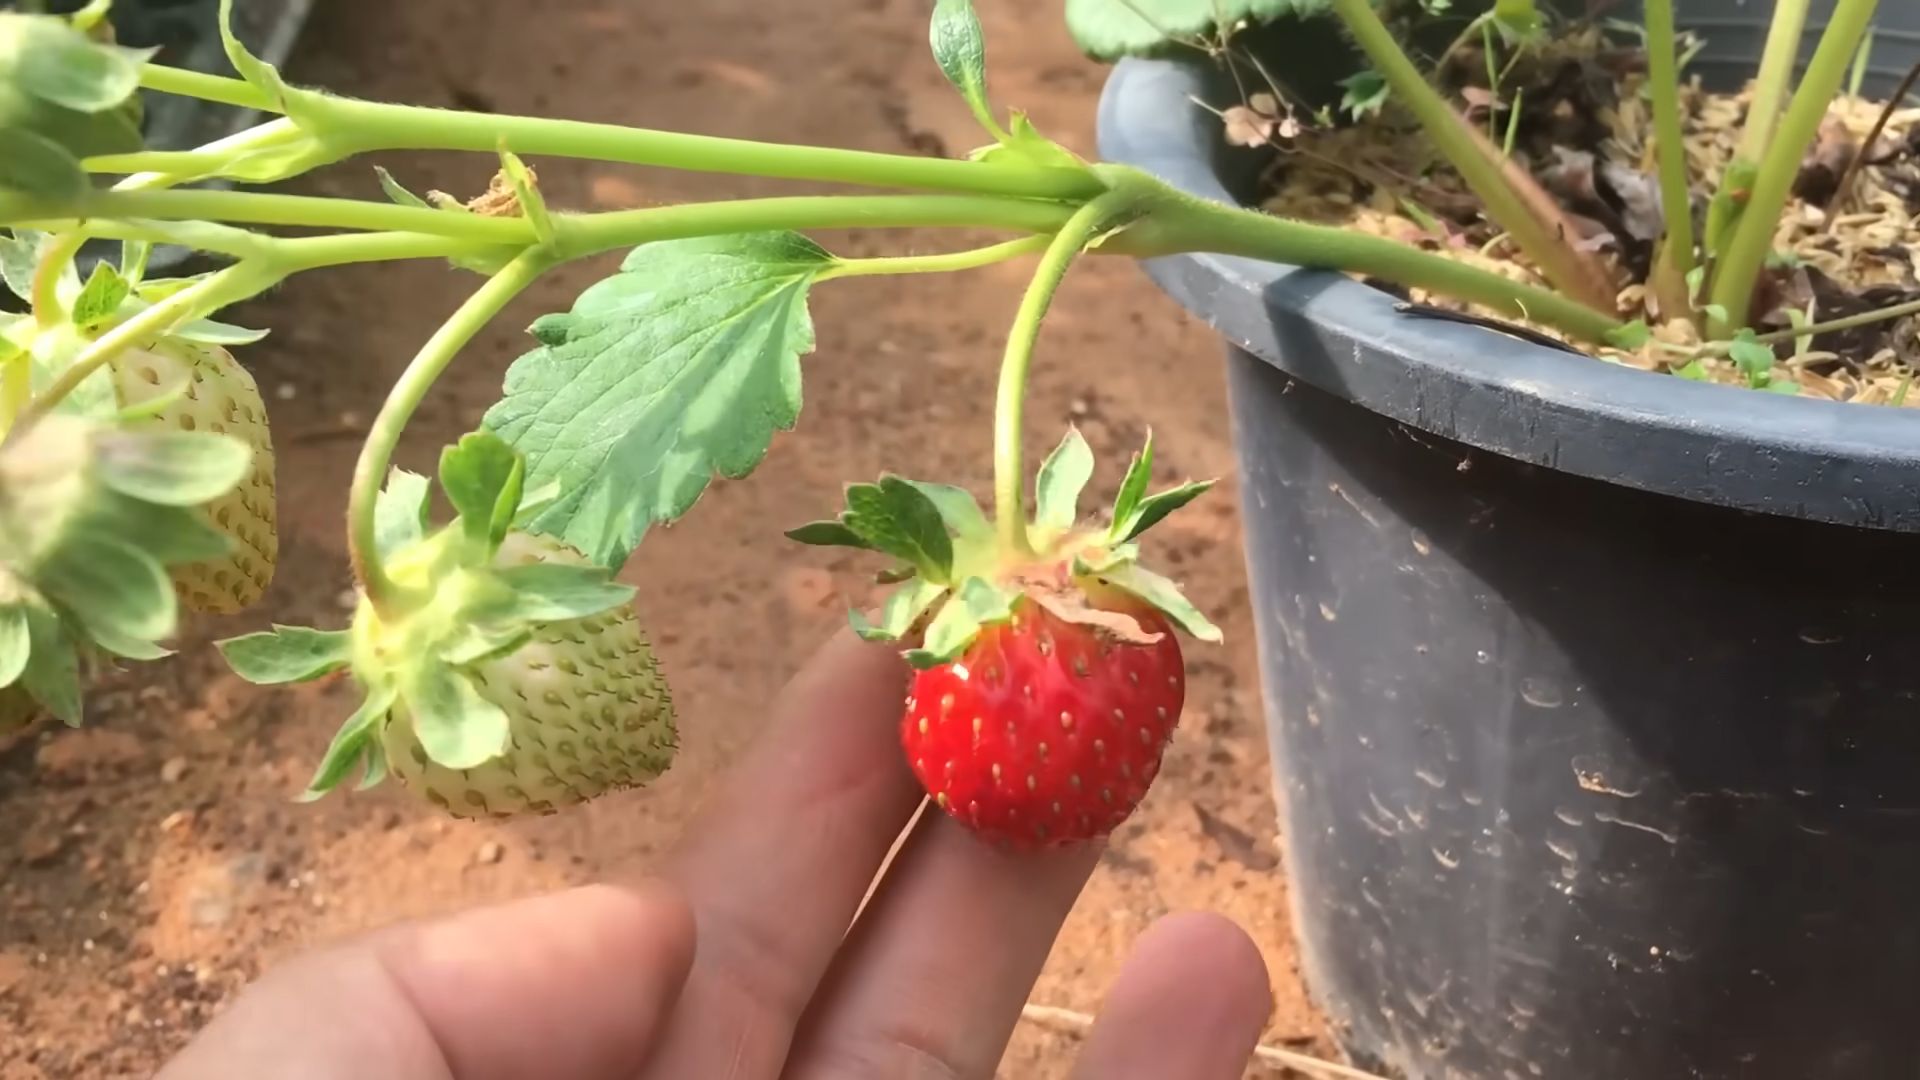
Growing Strawberries from Seed might seem like a daunting task, but trust me, the reward of plucking your own sun-ripened berries straight from your garden is absolutely worth the effort! Forget those bland, store-bought strawberries – imagine the burst of flavor from a variety you’ve nurtured from the tiniest seed.
For centuries, strawberries have been cherished across cultures, from ancient Roman gardens to the strawberry fields of Victorian England. They weren’t always as readily available as they are today, making them a symbol of summer indulgence and a treat to be savored. Now, you can bring that same sense of abundance and connection to nature right to your own backyard.
Why should you bother with this DIY project? Well, for starters, growing strawberries from seed allows you to cultivate unique varieties that you simply won’t find at your local nursery. Plus, it’s incredibly satisfying to witness the entire life cycle of a plant, from a tiny seed to a bountiful harvest. I know, I know, it sounds intimidating, but I’m here to guide you through every step of the process with easy-to-follow tricks and hacks. Get ready to transform your garden into a strawberry paradise!
DIY Floating Shelves: A Simple Guide to Stylish Storage
Hey there, fellow DIY enthusiasts! Today, I’m going to walk you through creating your very own floating shelves. These shelves are not only super stylish but also a fantastic way to add storage without bulky brackets. Get ready to transform your walls with this easy-to-follow guide!
Materials You’ll Need
Before we dive in, let’s gather all the necessary materials. Trust me, having everything ready beforehand will make the process much smoother.
* **Lumber:** Choose your desired wood type and thickness. I personally love using pine or reclaimed wood for a rustic look. Consider the length and depth of your shelves based on your needs.
* **Floating Shelf Brackets:** These are the key to the “floating” effect. Make sure to choose brackets that can support the weight you plan to put on the shelves. There are different types, so pick the ones that suit your style and skill level. I recommend heavy-duty hidden brackets for a clean look.
* **Screws:** You’ll need screws to attach the brackets to the wall studs and to secure the shelves to the brackets. Make sure you have the right size and length for your brackets and wall type.
* **Wood Glue:** This will help reinforce the bond between the shelf and the bracket, adding extra stability.
* **Wood Filler (Optional):** If you’re using reclaimed wood or want to hide any imperfections, wood filler is your best friend.
* **Sandpaper:** Different grits (80, 120, 220) for smoothing the wood.
* **Stain or Paint:** Choose your desired finish to match your decor.
* **Polyurethane or Sealer:** To protect the wood and finish.
* **Safety Glasses:** Always protect your eyes!
* **Dust Mask:** Especially important when sanding.
* **Gloves:** To protect your hands from stain or paint.
Tools You’ll Need
Having the right tools is just as important as having the right materials. Here’s a list of the tools you’ll need for this project:
* **Drill:** Essential for pre-drilling holes and driving screws.
* **Stud Finder:** Absolutely crucial for finding wall studs to ensure your shelves are securely mounted.
* **Level:** To make sure your shelves are perfectly straight.
* **Measuring Tape:** For accurate measurements.
* **Pencil:** For marking measurements and drilling locations.
* **Saw:** To cut the wood to the desired length. A miter saw is ideal, but a hand saw will also work.
* **Sander (Optional):** A power sander will speed up the sanding process, but you can also sand by hand.
* **Clamps:** To hold the wood in place while the glue dries.
* **Paintbrushes or Rags:** For applying stain, paint, and sealer.
* **Ruler or Square:** For accurate measurements and marking.
Step-by-Step Instructions
Alright, let’s get started! Follow these steps carefully, and you’ll have beautiful floating shelves in no time.
1. Preparing the Wood
1. **Measure and Cut:** Use your measuring tape and pencil to mark the desired length of your shelves on the lumber. Then, use your saw to cut the wood to size. Double-check your measurements before cutting!
2. **Sand the Wood:** Start with a coarser grit sandpaper (80 or 120) to remove any rough edges or imperfections. Then, move to a finer grit (220) to smooth the surface. Sand with the grain of the wood for the best results.
3. **Apply Wood Filler (Optional):** If you have any knots, cracks, or imperfections you want to hide, apply wood filler to those areas. Let it dry completely according to the manufacturer’s instructions, and then sand it smooth.
4. **Clean the Wood:** Use a clean cloth to remove any dust or debris from the wood. This will ensure a smooth and even finish.
2. Staining or Painting the Wood
1. **Apply Stain or Paint:** Choose your desired stain or paint color and apply it to the wood using a paintbrush or rag. Follow the manufacturer’s instructions for application and drying time. I usually apply two coats for a richer color.
2. **Let it Dry:** Allow the stain or paint to dry completely. This is crucial for a durable finish.
3. **Apply a Second Coat (Optional):** If you want a deeper color or more coverage, apply a second coat of stain or paint. Again, let it dry completely.
4. **Apply Polyurethane or Sealer:** Once the stain or paint is completely dry, apply a coat of polyurethane or sealer to protect the wood and finish. This will also make the shelves easier to clean. Let it dry according to the manufacturer’s instructions.
3. Installing the Floating Shelf Brackets
This is the most crucial part of the project. Accurate placement and secure mounting are essential for strong and stable shelves.
1. **Locate the Wall Studs:** Use your stud finder to locate the wall studs where you want to install your shelves. Mark the location of the studs with a pencil. This is super important because you need to screw the brackets directly into the studs for maximum support.
2. **Mark Bracket Placement:** Hold the floating shelf bracket against the wall, aligning it with the stud marks. Use a level to ensure the bracket is perfectly straight. Mark the screw holes on the wall with a pencil.
3. **Pre-Drill Holes:** Use a drill to pre-drill holes at the marked locations. This will make it easier to drive the screws and prevent the wood from splitting. Make sure the drill bit is slightly smaller than the diameter of the screws.
4. **Attach the Brackets to the Wall:** Align the bracket with the pre-drilled holes and use screws to attach it securely to the wall studs. Make sure the screws are long enough to penetrate deep into the studs. Use a level to double-check that the bracket is still straight.
5. **Repeat for Additional Brackets:** If you’re installing multiple brackets for a longer shelf, repeat steps 2-4 for each bracket, ensuring they are evenly spaced and level.
4. Attaching the Shelves to the Brackets
1. **Position the Shelf:** Carefully slide the shelf onto the floating shelf brackets. Make sure it’s flush against the wall.
2. **Secure the Shelf to the Brackets:** Use a drill to drive screws through the underside of the shelf and into the brackets. This will secure the shelf to the brackets and prevent it from sliding off.
3. **Add Wood Glue (Optional):** For extra stability, you can apply a small amount of wood glue to the top of the brackets before sliding the shelf on. This will create a stronger bond between the shelf and the brackets.
4. **Clamp the Shelf (Optional):** If you used wood glue, use clamps to hold the shelf in place while the glue dries. This will ensure a strong and secure bond.
Tips and Tricks for Success
Here are a few extra tips to help you achieve the best results:
* **Choose the Right Brackets:** The type of floating shelf bracket you choose will depend on the weight you plan to put on the shelves and the style you’re going for. Hidden brackets offer a clean look, while industrial-style brackets can add a rustic touch.
* **Use a Stud Finder:** Don’t skip this step! Attaching the brackets to wall studs is essential for ensuring the shelves are strong and stable.
* **Level, Level, Level:** Use a level throughout the installation process to ensure your shelves are perfectly straight.
* **Pre-Drill Holes:** This will prevent the wood from splitting when you drive in the screws.
* **Don’t Overload the Shelves:** Be mindful of the weight capacity of your brackets and avoid overloading the shelves.
* **Consider the Depth of the Shelves:** The depth of your shelves will depend on what you plan to put on them. Deeper shelves can hold larger items, but they may also be more prone to sagging.
* **Get Creative with the Finish:** Experiment with different stains, paints, and finishes to create a unique look that matches your decor.
* **Take Your Time:** Don’t rush the process. Take your time and pay attention to detail for the best results.
Troubleshooting
Sometimes, things don’t go exactly as planned. Here are a few common problems and how to fix them:
* **Shelves are Sagging:** This usually means the brackets are not strong enough or the shelves are overloaded. Try using heavier-duty brackets or reducing the weight on the shelves.
* **Brackets are Not Secure:** Make sure the brackets are attached to wall studs and that the screws are long enough to penetrate deep into the studs.
* **Shelves are Not Level:** Double-check the level of the brackets and adjust as needed. You may need to shim the brackets to get them perfectly level.
* **Wood is Splitting:** Pre-drilling holes can help prevent this. If the wood does split
Conclusion
So, there you have it! Growing strawberries from seed might seem a little daunting at first, but as you’ve seen, it’s a rewarding and surprisingly accessible project. Forget relying solely on store-bought seedlings; with a little patience and these simple steps, you can cultivate your own vibrant patch of delicious, homegrown berries. The satisfaction of nurturing a tiny seed into a thriving plant that yields sweet, juicy fruit is truly unparalleled.
Why is this DIY trick a must-try? Because it offers you complete control over the varieties you grow. You’re no longer limited to what’s available at your local garden center. You can explore heirloom varieties, disease-resistant strains, or even those with unique flavor profiles that you won’t find anywhere else. Plus, starting from seed is often more economical than buying established plants, especially if you’re looking to create a substantial strawberry patch.
But the benefits extend beyond just cost and variety. Growing strawberries from seed allows you to acclimate your plants to your specific climate and soil conditions from the very beginning. This can lead to stronger, healthier plants that are better equipped to thrive in your garden. And let’s not forget the sheer joy of witnessing the entire life cycle of a plant, from the first tiny sprout to the bountiful harvest.
Ready to take your strawberry game to the next level? Consider these variations and suggestions:
* Experiment with different varieties: Don’t be afraid to try a mix of everbearing and June-bearing strawberries to extend your harvest season. Alpine strawberries are also a delightful option, offering a unique, intense flavor.
* Use different starting mediums: While seed starting mix is recommended, you can also experiment with coco coir or even homemade compost, ensuring it’s well-draining and sterilized.
* Try different containers: While seed trays are convenient, you can also use recycled yogurt cups or egg cartons to start your seeds. Just make sure they have drainage holes.
* Consider companion planting: Plant your strawberries alongside herbs like basil or thyme to deter pests and enhance their flavor.
* Don’t forget the fertilizer: Once your seedlings are established, provide them with a balanced fertilizer to promote healthy growth and abundant fruiting.
Ultimately, the best way to learn is by doing. So, gather your supplies, follow these steps, and embark on your own strawberry-growing adventure. We’re confident that you’ll be amazed by the results.
We encourage you to try this DIY trick for growing strawberries from seed and share your experiences with us! Post photos of your seedlings, share your tips and tricks, and let us know what varieties you’re growing. We can’t wait to see your success stories! Happy gardening!
Frequently Asked Questions (FAQ)
How long does it take for strawberry seeds to germinate?
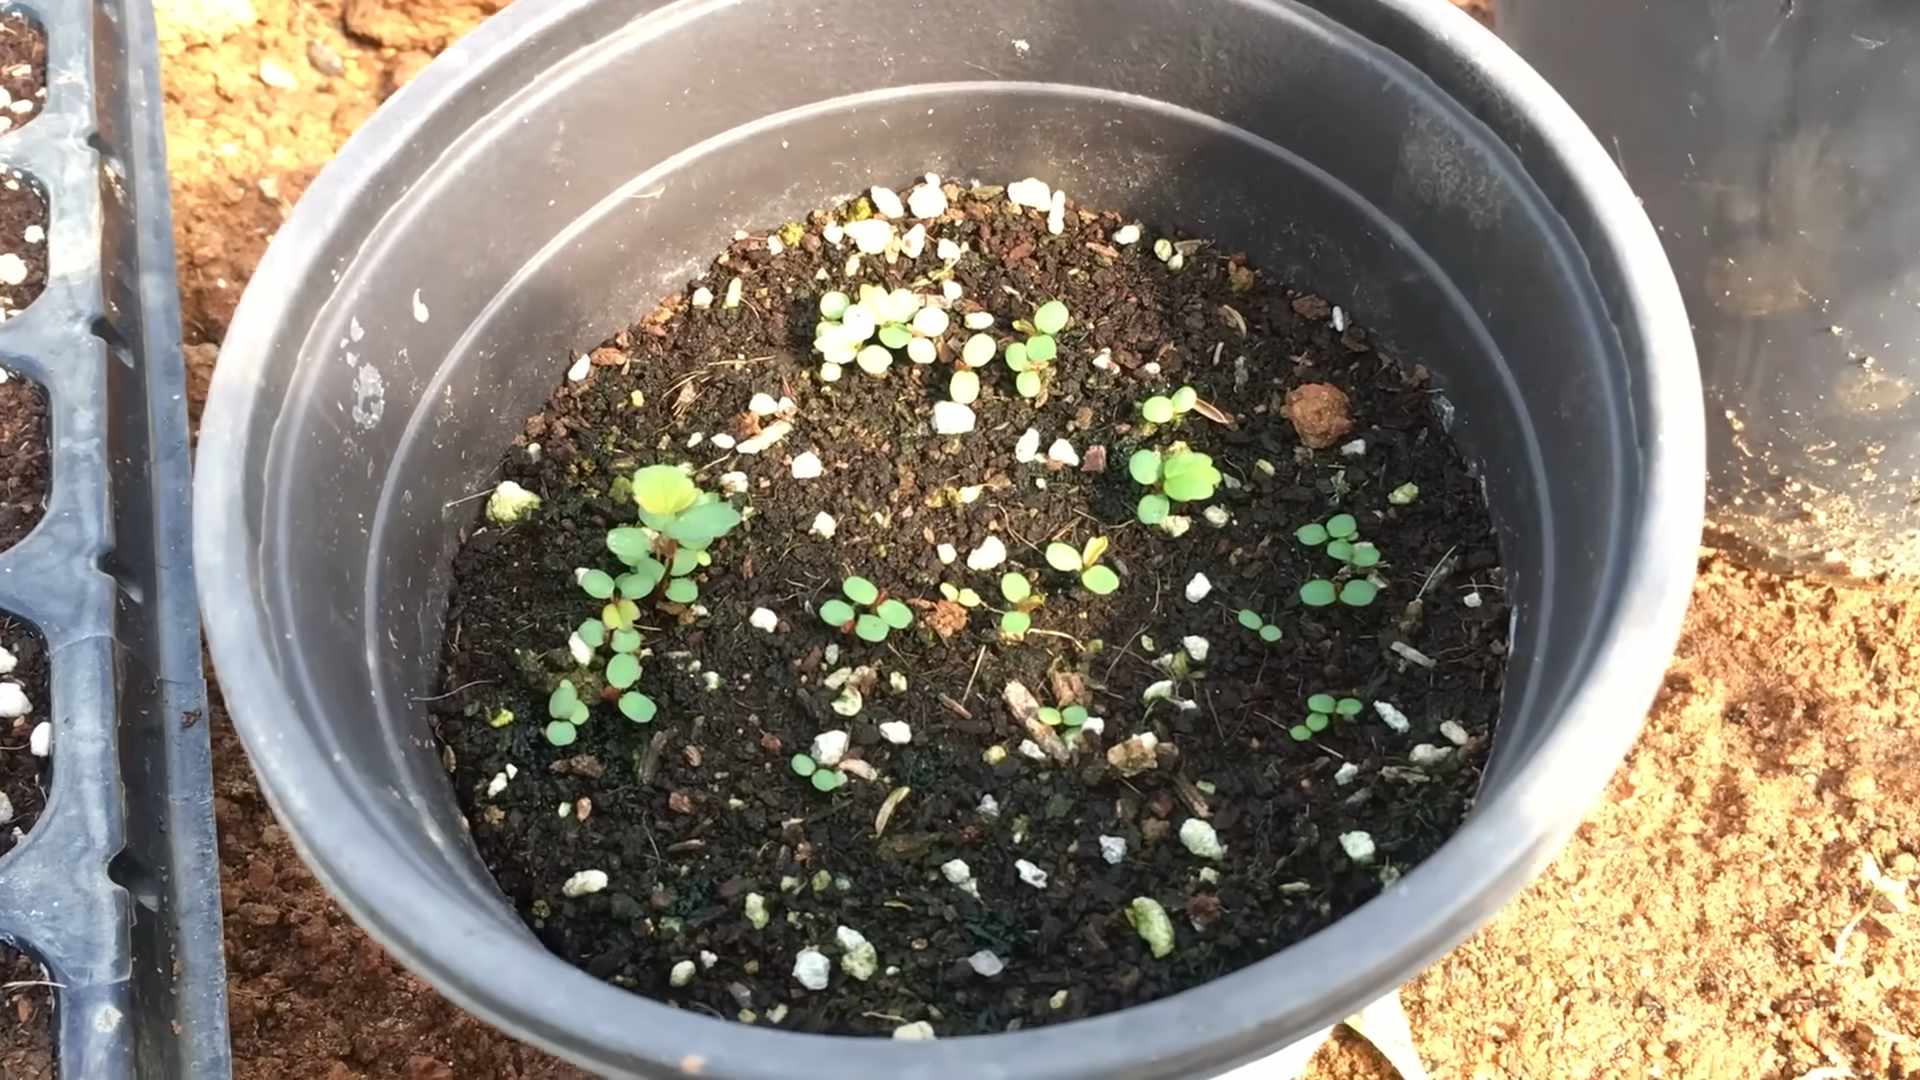
Germination time for strawberry seeds can vary quite a bit, typically ranging from 1 to 6 weeks. Several factors influence this, including the freshness of the seeds, the temperature, and the moisture level. Maintaining a consistent temperature of around 70-75°F (21-24°C) and keeping the soil consistently moist (but not waterlogged) are crucial for successful germination. Remember, patience is key! Don’t give up if you don’t see sprouts within a week or two.
Do strawberry seeds need light to germinate?
Yes, strawberry seeds require light to germinate. They are what’s known as “light-dependent germinators.” This means that the seeds need exposure to light to trigger the germination process. Therefore, it’s important not to bury the seeds too deeply when sowing them. Simply pressing them gently onto the surface of the soil is sufficient. After sowing, provide them with adequate light, either natural or artificial, to encourage germination.
What is the best soil for growing strawberries from seed?
The best soil for growing strawberries from seed is a well-draining, slightly acidic seed starting mix. This type of mix is typically sterile, which helps to prevent fungal diseases that can affect young seedlings. It’s also lightweight and provides good aeration, which is essential for healthy root development. Avoid using garden soil, as it can be too heavy and may contain pathogens or weed seeds. You can also amend your seed starting mix with perlite or vermiculite to further improve drainage.
When is the best time to start strawberry seeds indoors?
The best time to start strawberry seeds indoors is typically 8-10 weeks before the last expected frost in your area. This allows the seedlings to develop into strong, healthy plants before they are transplanted outdoors. Check your local frost dates to determine the appropriate time to start your seeds. Starting them too early can result in leggy, weak plants, while starting them too late may not give them enough time to mature before the growing season ends.
How often should I water my strawberry seedlings?
Strawberry seedlings need consistent moisture to thrive, but it’s important to avoid overwatering, which can lead to root rot. Water your seedlings whenever the top inch of soil feels dry to the touch. Use a gentle watering can or spray bottle to avoid disturbing the delicate seedlings. Ensure that the containers have adequate drainage to prevent water from accumulating at the bottom.
How do I harden off my strawberry seedlings before transplanting them outdoors?
Hardening off is the process of gradually acclimating your seedlings to outdoor conditions before transplanting them. This helps them to adjust to the sun, wind, and temperature fluctuations, reducing the risk of shock. Start by placing your seedlings outdoors in a sheltered location for a few hours each day, gradually increasing the amount of time they spend outside over the course of a week or two. Protect them from direct sunlight and strong winds initially.
What are some common problems when growing strawberries from seed and how can I prevent them?
Some common problems include damping off (a fungal disease that causes seedlings to collapse), poor germination, and pest infestations. To prevent damping off, use a sterile seed starting mix, avoid overwatering, and provide good ventilation. To improve germination, ensure that the seeds are fresh, provide adequate light, and maintain a consistent temperature. To prevent pest infestations, inspect your seedlings regularly and take appropriate action if you notice any signs of pests.
Can I grow strawberries from seed directly in the garden?
While it’s possible to grow strawberries from seed directly in the garden, it’s generally not recommended. Strawberry seeds are very small and delicate, and they require specific conditions to germinate successfully. Starting them indoors gives them a head start and protects them from harsh weather conditions and pests. However, if you choose to direct sow, make sure the soil is well-prepared, the seeds are sown shallowly, and the area is kept consistently moist.
What kind of fertilizer should I use for my strawberry plants?
Once your strawberry seedlings are established, you can start fertilizing them with a balanced fertilizer. Look for a fertilizer with an NPK ratio (nitrogen, phosphorus, potassium) of around 10-10-10 or 12-12-12. You can also use a fertilizer specifically formulated for berries. Follow the instructions on the fertilizer package carefully, and avoid over-fertilizing, which can damage the plants.
How long does it take for strawberry plants grown from seed to produce fruit?
Strawberry plants grown from seed typically take about a year to produce their first significant crop of fruit. However, some varieties, such as everbearing strawberries, may produce a small amount of fruit in their first year. Be patient and continue to care for your plants, and you’ll be rewarded with a bountiful harvest in the following year.
Leave a Comment