
Angled Luffa Planting Beginners, listen up! Have you ever dreamed of growing your own sponges? Yes, you read that right! We’re diving into the fascinating world of cultivating angled luffa, also known as Chinese okra or ridge gourd, right in your own backyard. For centuries, luffa has been a staple in many cultures, not just for its practical use as a natural exfoliating sponge, but also as a delicious and nutritious vegetable.
Imagine the satisfaction of harvesting your very own luffa sponges, knowing exactly where they came from and how they were grown. Forget those mass-produced, synthetic sponges! With a little know-how, angled luffa planting can be a rewarding and sustainable addition to your home garden.
But where do you even begin? That’s where this guide comes in! I know starting a new gardening project can feel overwhelming, especially if you’re a beginner. That’s why I’ve put together this simple, step-by-step guide to help you successfully grow your own angled luffa. We’ll cover everything from seed selection and soil preparation to trellising and harvesting. So, grab your gardening gloves, and let’s get started on this exciting journey together!
Growing Angled Luffa: A Beginner’s Guide to Bountiful Harvests
Alright, so you’re thinking about growing angled luffa? Awesome! It’s a rewarding experience, and you’ll end up with your own natural sponges. I’m going to walk you through everything you need to know to get started and have a successful harvest.
What You’ll Need
Before we dive into the nitty-gritty, let’s gather our supplies. Having everything ready beforehand will make the whole process smoother.
* Angled Luffa Seeds: Obviously! Make sure you get them from a reputable source. Look for varieties that are well-suited to your climate.
* Seed Starting Trays or Pots: These will be your nursery for the first few weeks.
* Seed Starting Mix: This is a light, well-draining mix specifically designed for seedlings.
* Larger Pots (Optional): If you’re starting indoors and plan to transplant later, you’ll need larger pots for the seedlings to grow into before going into the ground.
* Well-Draining Soil: Luffa loves rich, well-draining soil. Amend your garden soil with compost or aged manure if needed.
* Compost or Aged Manure: This will provide essential nutrients for your luffa plants.
* Trellis or Support Structure: Luffa vines are vigorous climbers and need strong support. Think sturdy!
* Gardening Gloves: To keep your hands clean and protected.
* Watering Can or Hose: For, well, watering!
* Fertilizer (Optional): A balanced fertilizer can give your plants an extra boost.
* Pruning Shears or Scissors: For trimming and harvesting.
Starting Your Luffa Seeds
Luffa has a long growing season, so starting seeds indoors is often the best way to get a head start, especially if you live in a cooler climate.
1. Soaking the Seeds: Luffa seeds have a tough outer shell. To improve germination, soak them in warm water for 24-48 hours before planting. This softens the shell and helps the seedlings emerge more easily. I usually put them in a small bowl of water on a sunny windowsill.
2. Planting the Seeds: Fill your seed starting trays or pots with seed starting mix. Make a small indentation (about 1/2 inch deep) in the center of each cell or pot. Place one or two seeds in each indentation and cover gently with soil.
3. Watering and Warmth: Water the soil gently until it’s moist but not soggy. Cover the trays or pots with a clear plastic lid or plastic wrap to create a humid environment. Place them in a warm location (around 70-80°F or 21-27°C). A heat mat can be helpful if your home is cool.
4. Germination: Keep the soil consistently moist and check for germination in about 7-14 days. Once the seedlings emerge, remove the plastic cover and move them to a sunny location or under grow lights.
5. Thinning (If Necessary): If you planted two seeds per cell or pot and both germinate, thin them out by snipping off the weaker seedling at the soil line. This will give the stronger seedling more room to grow.
Transplanting Your Luffa Seedlings
Once your seedlings have developed a few sets of true leaves and the weather has warmed up (no more danger of frost!), it’s time to transplant them into their permanent home.
1. Hardening Off: Before transplanting, you need to “harden off” your seedlings. This means gradually exposing them to outdoor conditions over a period of about a week. Start by placing them outside in a sheltered location for a few hours each day, gradually increasing the amount of time they spend outdoors. This will help them adjust to the sun, wind, and temperature changes.
2. Preparing the Soil: Choose a sunny location with well-draining soil. Amend the soil with compost or aged manure to improve its fertility and drainage. Luffa plants need plenty of space, so space them about 2-3 feet apart.
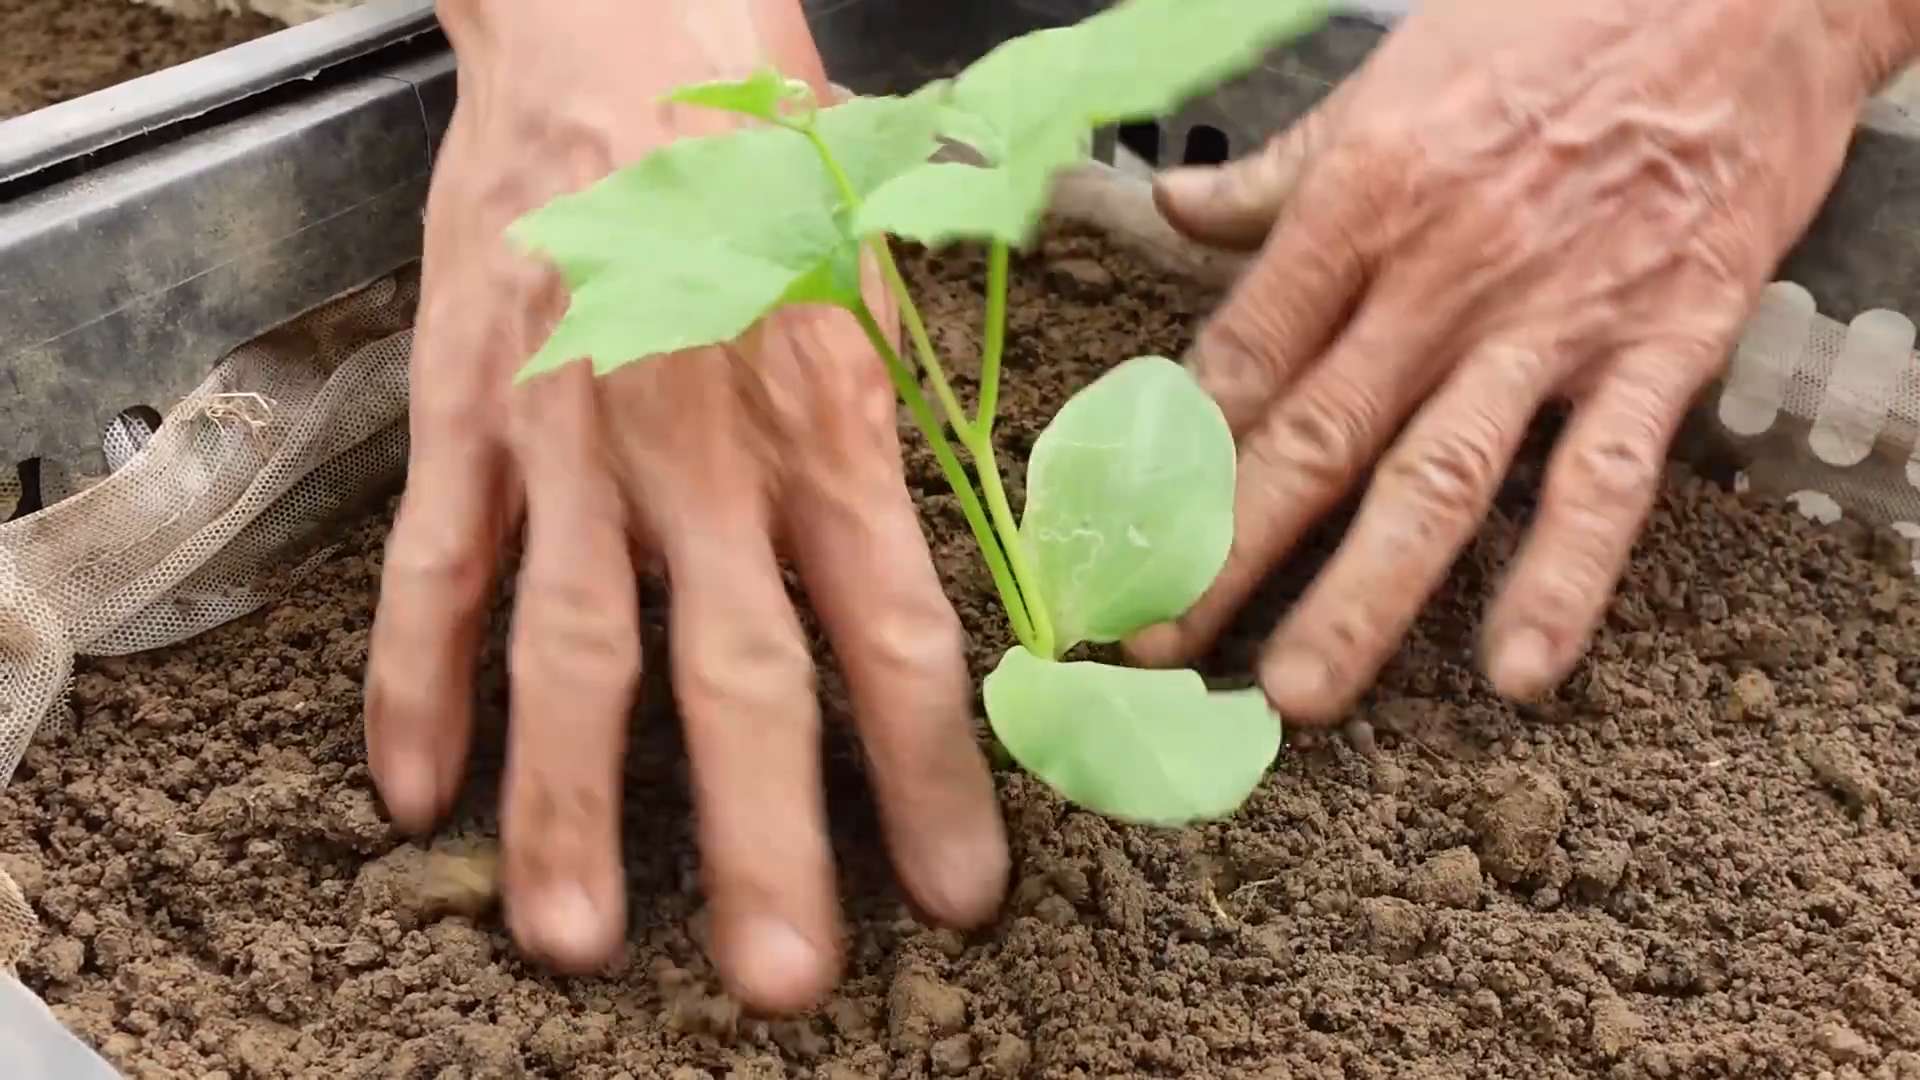
3. Transplanting: Dig a hole that’s slightly larger than the root ball of the seedling. Gently remove the seedling from its pot, being careful not to damage the roots. Place the seedling in the hole and backfill with soil. Water thoroughly.
4. Providing Support: Immediately after transplanting, provide your luffa plants with a trellis or other support structure. Luffa vines can grow quite long and heavy, so make sure your support is strong enough to handle the weight. I’ve used everything from sturdy fences to homemade trellises made from bamboo poles.
Caring for Your Luffa Plants
Now that your luffa plants are in the ground, it’s time to give them the care they need to thrive.
1. Watering: Luffa plants need consistent moisture, especially during hot, dry weather. Water deeply and regularly, making sure the soil stays moist but not waterlogged. I usually water in the morning to allow the foliage to dry before nightfall, which helps prevent fungal diseases.
2. Fertilizing: Luffa plants are heavy feeders and benefit from regular fertilization. You can use a balanced fertilizer or side-dress with compost or aged manure every few weeks.
3. Pruning: Pruning can help improve air circulation and encourage fruit production. Remove any dead or yellowing leaves. You can also prune the vines to control their size and shape. I usually prune back some of the side shoots to encourage the plant to focus its energy on producing fruit.
4. Pest and Disease Control: Keep an eye out for pests and diseases. Common pests include aphids, squash bugs, and cucumber beetles. You can control these pests with insecticidal soap or neem oil. Fungal diseases can be prevented by providing good air circulation and avoiding overhead watering.
Harvesting Your Luffa Sponges
This is the exciting part! Harvesting your own luffa sponges is incredibly satisfying.
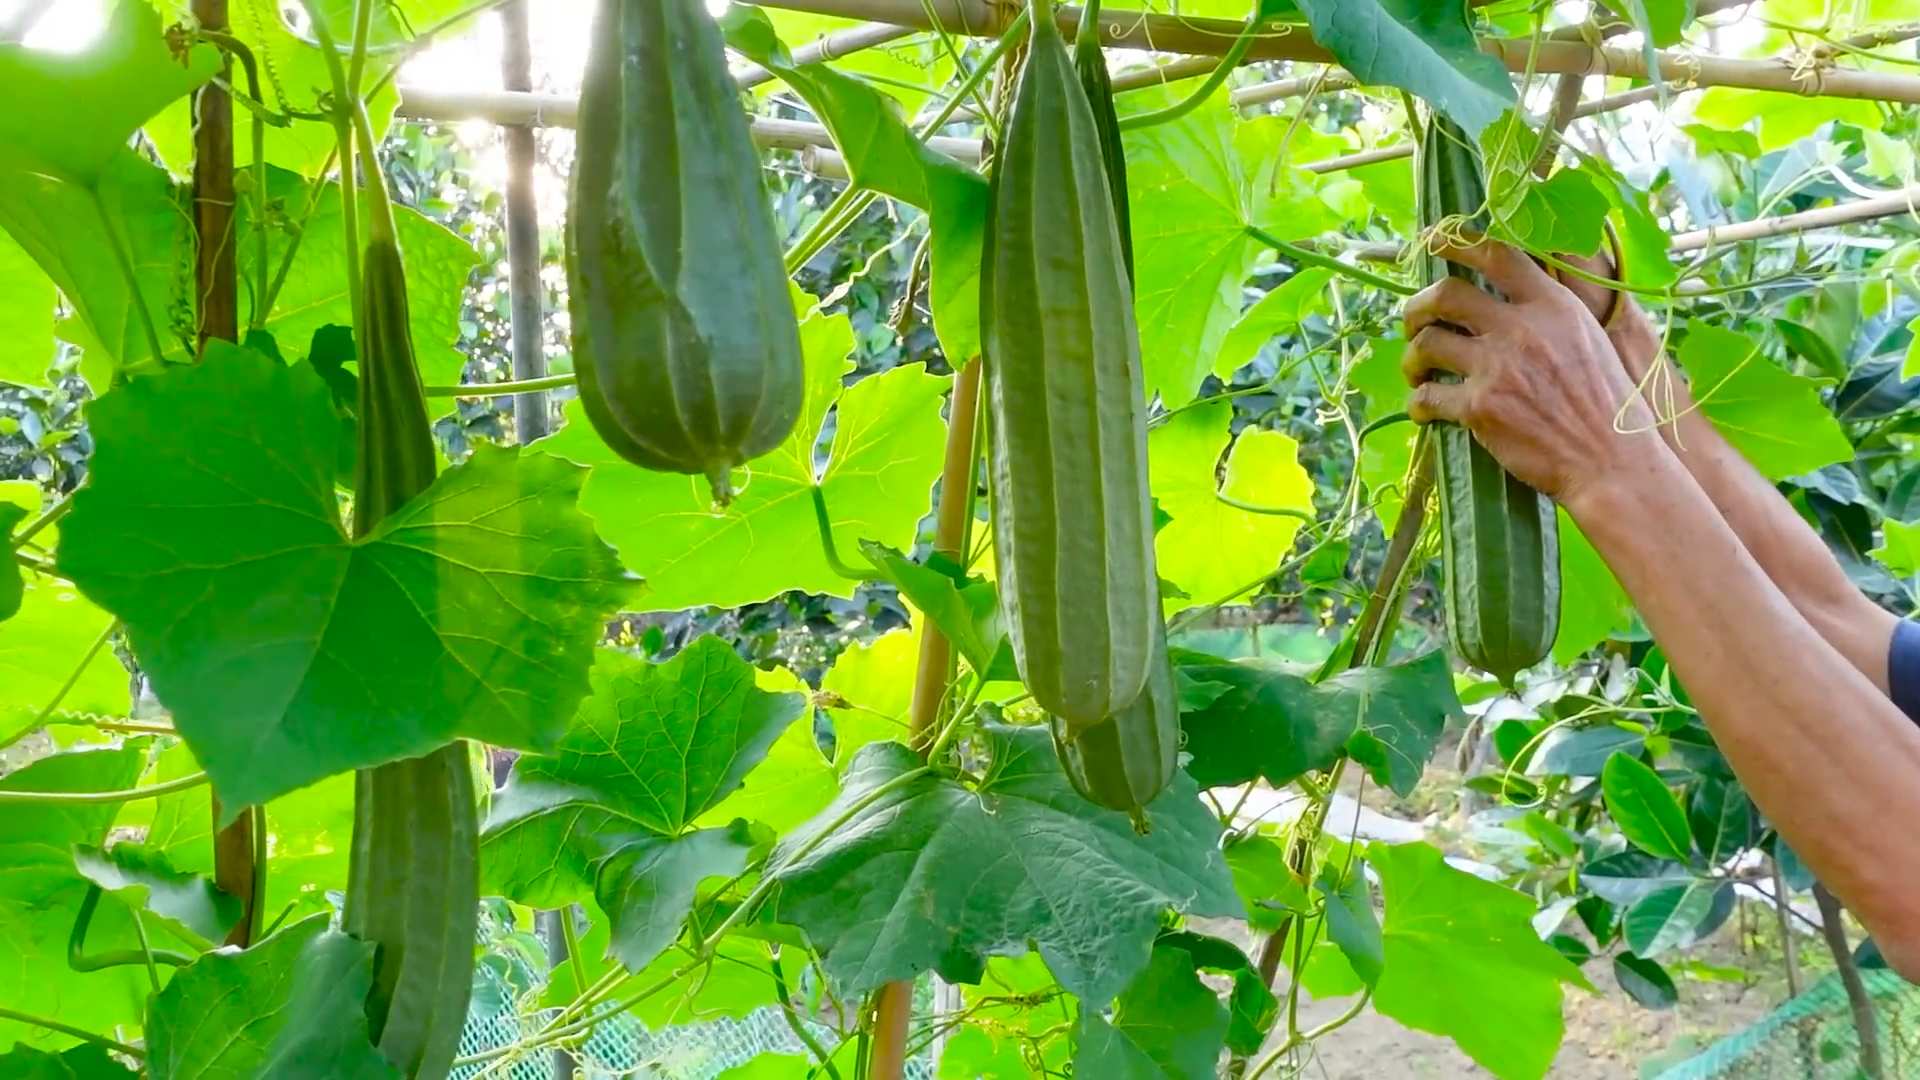
1. Knowing When to Harvest: The key to harvesting good luffa sponges is timing. You want to harvest the fruits when they are fully mature but before they start to dry out completely on the vine. The skin should be turning brown and feel lightweight. If you shake the luffa, you should hear the seeds rattling inside.
2. Harvesting the Fruits: Use pruning shears or scissors to cut the luffa fruits from the vine. Leave a few inches of stem attached.
3. Peeling the Luffa: This can be a bit messy, but it’s essential for revealing the sponge inside. There are a couple of ways to peel luffa:
* Method 1: Soaking and Peeling: Soak the luffa fruits in water for a few days to soften the skin. Once the skin is soft, you can peel it off by hand. This method is easier but takes longer.
* Method 2: Cracking and Peeling: Gently crack the skin of the luffa fruit by squeezing it or tapping it on a hard surface. Then, peel off the skin by hand. This method is faster but requires a bit more force.
4. Removing the Seeds: After peeling, shake out the seeds. You can save these seeds for planting next year.
5. Washing and Drying: Rinse the luffa sponge thoroughly with water to remove any remaining pulp or debris. You can use a hose or a bucket of water. Squeeze out any excess water and hang the luffa sponge in a well-ventilated area to dry completely. This may take several days.
6. Bleaching (Optional): If you want a whiter sponge, you can soak it in a diluted bleach solution (1 part bleach to 10 parts water) for a few minutes. Rinse thoroughly with water and dry completely. I personally prefer to skip this step and keep my luffa sponges natural.
Using Your Homegrown Luffa Sponges
Congratulations! You’ve successfully grown and harvested your own luffa sponges. Now it’s time to put them to use.
* Exfoliating Your Skin: Luffa sponges are excellent for exfoliating your skin. Use them in the shower or bath to gently scrub away dead skin cells and leave your skin feeling smooth and refreshed.
* Washing Dishes: Luffa sponges can also be used to wash dishes. They’re gentle enough for delicate surfaces but abrasive enough to remove stubborn food particles.
* Cleaning Your Home: Luffa sponges can be used to clean various surfaces in your home, such as countertops, sinks, and tubs.
* Craft Projects: Get creative! Luffa sponges can be used in a variety of craft projects, such as making soap dishes, bath mats, and even decorative items.
Troubleshooting
Even with the best planning, things can sometimes go wrong
Conclusion
So, there you have it! Mastering angled luffa planting for beginners doesn’t have to be intimidating. By following these simple steps and understanding the luffa’s needs, you’re well on your way to harvesting your own natural sponges. This DIY trick is a must-try for several reasons. First, it’s incredibly rewarding to grow something from seed to usable product. Second, you’ll have a sustainable and eco-friendly alternative to synthetic sponges, reducing your environmental impact. Third, the fresh, homegrown luffa offers a superior texture and cleaning power compared to store-bought options.
But the benefits don’t stop there. Growing your own luffa allows you to control the entire process, ensuring that your sponges are free from harsh chemicals and pesticides. Plus, it’s a fantastic conversation starter and a unique addition to your garden.
Why is this a must-try? Because it combines sustainability, self-sufficiency, and a touch of gardening magic into one fulfilling project.
Now, let’s talk about variations. While the steps outlined above provide a solid foundation, feel free to experiment and adapt them to your specific climate and growing conditions. For instance, if you live in a particularly hot and dry area, consider providing your luffa plants with some afternoon shade to prevent them from overheating. You can also try different types of trellises or supports to see which one works best for your garden.
Another fun variation is to experiment with different varieties of luffa. While angled luffa is a popular choice, there are also smooth luffa varieties that produce slightly different textures. You can even try saving seeds from your best-performing plants to create your own unique luffa strain over time.
Consider companion planting with your luffa. Marigolds can help deter pests, while basil can improve the overall health of your plants. Experiment with different combinations to find what works best in your garden.
Don’t be afraid to get creative with your luffa harvest as well. In addition to using them as sponges, you can also incorporate them into crafts, such as soaps, bath bombs, and even decorative items. The possibilities are endless!
We strongly encourage you to give this DIY angled luffa planting a try. It’s a fun, educational, and ultimately rewarding experience. And most importantly, don’t forget to share your experiences with us! We’d love to hear about your successes, challenges, and any tips or tricks you discover along the way. Post pictures of your luffa plants, share your harvesting stories, and let us know how you’re using your homegrown sponges. Together, we can create a community of luffa enthusiasts and inspire others to embrace this sustainable and fulfilling project. So, grab your seeds, get your hands dirty, and get ready to enjoy the satisfaction of growing your own natural sponges! Happy gardening!
FAQ
What is the best time of year to plant angled luffa seeds?
The best time to plant angled luffa seeds is typically in the late spring or early summer, after the last frost has passed and the soil has warmed up to at least 70°F (21°C). Luffa plants require a long growing season (around 150-200 days) to mature and produce viable sponges, so starting them early is crucial, especially in cooler climates. If you live in an area with a shorter growing season, consider starting your seeds indoors 6-8 weeks before the last expected frost. This will give your plants a head start and ensure that they have enough time to mature before the first frost of the fall.
How much space do angled luffa plants need?
Angled luffa plants are vigorous climbers and require plenty of space to grow. Each plant needs at least 2-3 feet of space in the garden. They also need a strong trellis or support structure to climb on, as the vines can grow up to 30 feet long. Make sure your trellis is sturdy enough to support the weight of the mature vines and the developing luffa fruits. A good rule of thumb is to provide at least 6-8 feet of vertical space for each plant. If you’re growing multiple plants, space them at least 3-4 feet apart to allow for adequate air circulation and sunlight penetration.
How often should I water my angled luffa plants?
Angled luffa plants need consistent moisture, especially during hot and dry weather. Water your plants deeply at least once or twice a week, or more often if the soil dries out quickly. Aim to keep the soil consistently moist but not waterlogged. Avoid overhead watering, as this can increase the risk of fungal diseases. Instead, water at the base of the plants, using a soaker hose or drip irrigation system. Mulching around the plants can also help to retain moisture and suppress weeds. During periods of heavy rainfall, you may need to reduce watering to prevent the soil from becoming waterlogged.
How do I know when my angled luffa is ready to harvest?
Knowing when to harvest your angled luffa is crucial for getting the best quality sponges. The ideal time to harvest is when the luffa fruit has turned yellow or brown and the skin has become dry and brittle. You should be able to easily press your fingernail into the skin. If the skin is still green and firm, the luffa is not yet ripe. To test for ripeness, try shaking the luffa. If you can hear the seeds rattling inside, it’s a good indication that it’s ready to harvest. Use pruning shears or a sharp knife to cut the luffa from the vine, leaving a few inches of stem attached.
How do I process my angled luffa into a sponge?
Processing your angled luffa into a sponge is a relatively simple process. First, soak the harvested luffa in water for a few days to soften the skin. Once the skin is soft, you should be able to peel it off easily with your hands. If the skin is difficult to remove, try soaking the luffa for a longer period of time. After the skin is removed, rinse the luffa thoroughly to remove any remaining pulp and seeds. You can use a hose or a bucket of water to do this. Once the luffa is clean, allow it to dry completely in a well-ventilated area. This may take several days or even weeks, depending on the humidity. Once the luffa is dry, you can cut it into smaller pieces if desired. You can also bleach the luffa to lighten its color, but this is optional.
What are some common problems when growing angled luffa, and how can I prevent them?
Some common problems when growing angled luffa include pests, diseases, and nutrient deficiencies. Pests such as squash bugs, aphids, and cucumber beetles can damage the leaves and fruits of your luffa plants. To prevent pest infestations, inspect your plants regularly and remove any pests by hand. You can also use organic insecticides such as neem oil or insecticidal soap. Diseases such as powdery mildew and fungal leaf spots can also affect luffa plants. To prevent diseases, provide good air circulation around your plants and avoid overhead watering. You can also use fungicides if necessary. Nutrient deficiencies can also cause problems with luffa growth. To prevent nutrient deficiencies, amend your soil with compost or other organic matter before planting. You can also fertilize your plants regularly with a balanced fertilizer.
Can I save seeds from my angled luffa for future planting?
Yes, you can save seeds from your angled luffa for future planting. To save seeds, allow a few of your luffa fruits to fully mature on the vine. These fruits will become very dry and brittle. Once the fruits are completely dry, harvest them and break them open to extract the seeds. The seeds should be black or dark brown and hard. Discard any seeds that are shriveled or damaged. Store the seeds in a cool, dry place in an airtight container. Be sure to label the container with the date and variety of the seeds. The seeds should remain viable for several years if stored properly.

Leave a Comment