
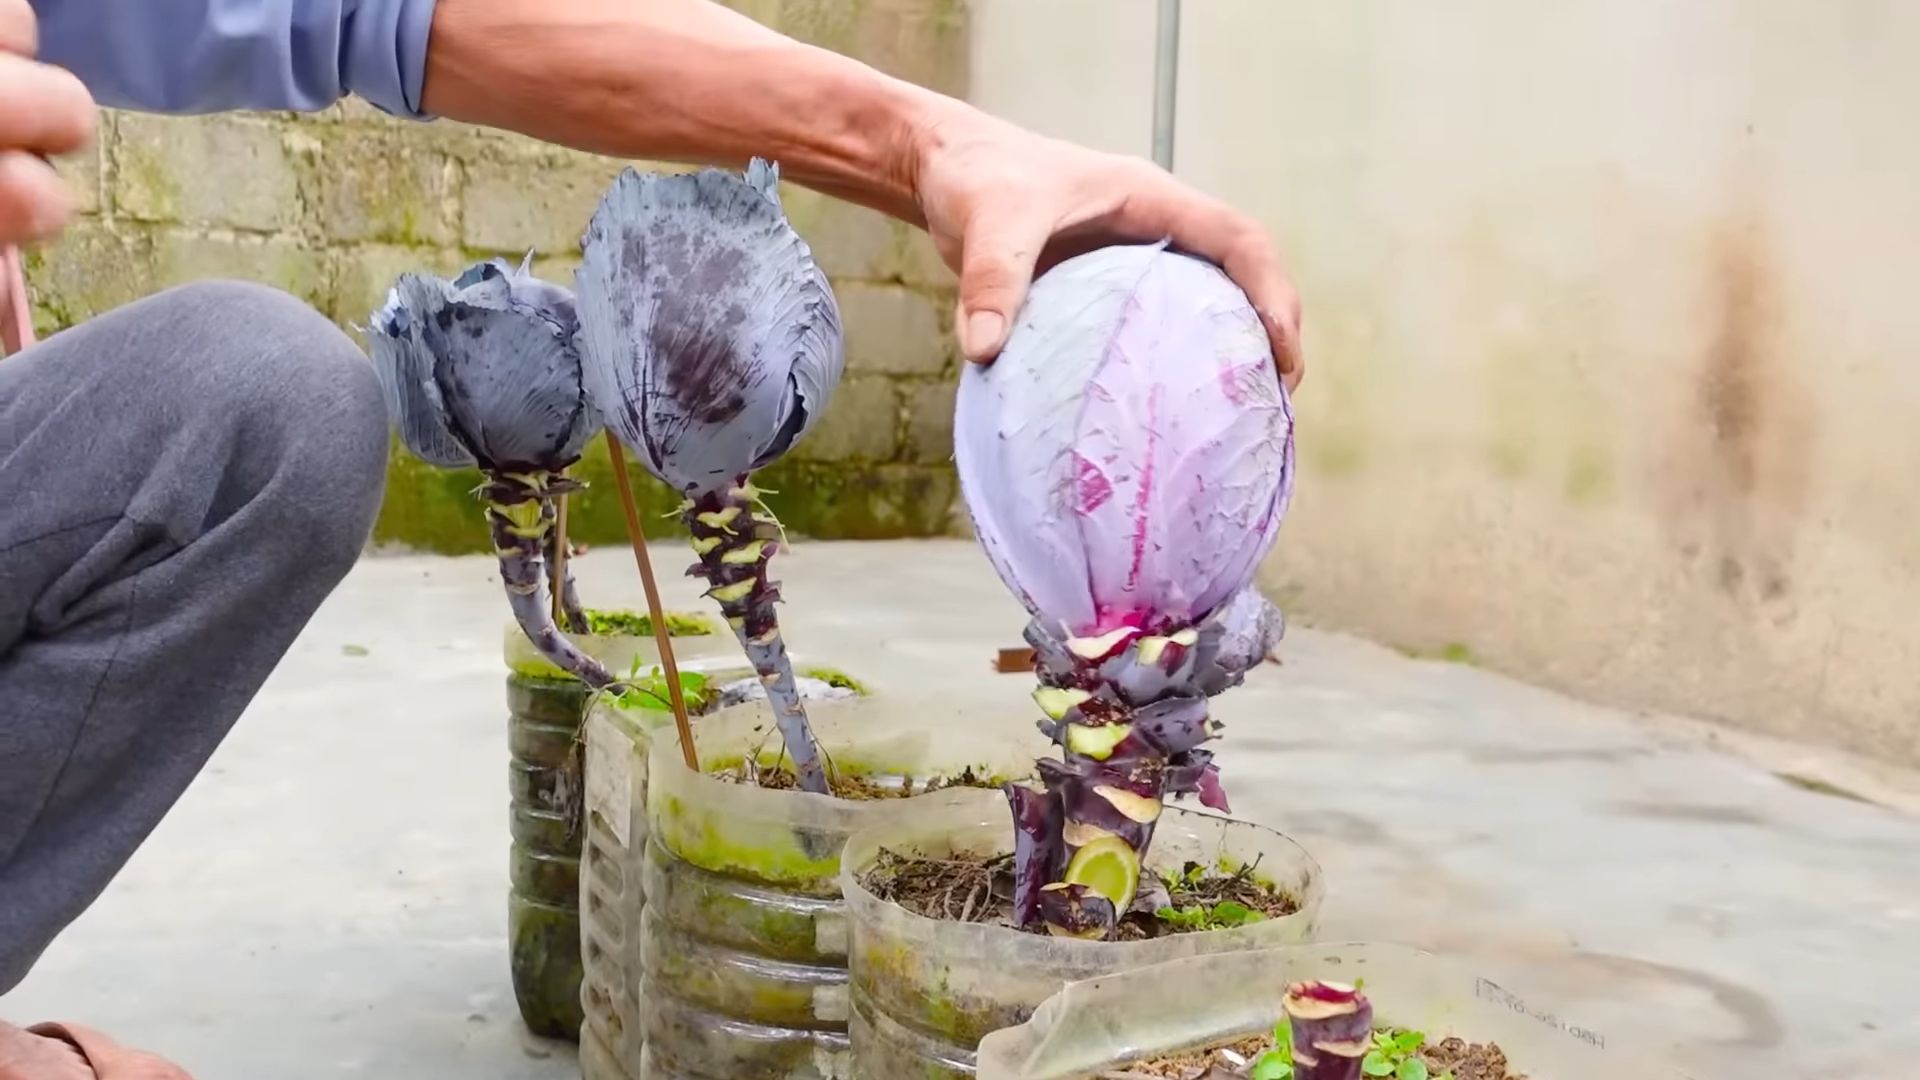
Grow bigger purple cabbage, you say? Absolutely! I’m thrilled you’re here because I’m about to share some of my favorite, tried-and-true secrets for cultivating those gorgeous, vibrant heads of purple cabbage that will be the envy of the neighborhood. Forget those small, lackluster cabbages you might be used to – we’re aiming for showstoppers!
Cabbage, in general, has a rich history, dating back thousands of years. From ancient Rome, where it was considered a medicinal plant, to its prominent place in European cuisine, cabbage has always been a staple. But purple cabbage, with its striking color, adds a touch of elegance and visual appeal to any garden and plate.
Now, why do you need these DIY tricks? Well, let’s be honest, sometimes gardening can feel like a bit of a gamble. You put in the effort, but the results aren’t always what you hoped for. These hacks are designed to take the guesswork out of grow bigger purple cabbage and give you the confidence to achieve a bountiful harvest. I’m going to show you simple, effective techniques that will optimize your soil, protect your plants from pests, and ensure they get the nutrients they need to thrive. Get ready to roll up your sleeves and transform your garden into a purple cabbage paradise!
DIY: Unleash the Giant Purple Cabbage Within!
Okay, cabbage enthusiasts, let’s talk about purple cabbage. Not just any purple cabbage, but HUGE, vibrant, show-stopping purple cabbages. I’m going to share my secrets to growing purple cabbages that will make your neighbors green with envy (pun intended!). This isn’t just about throwing some seeds in the ground; it’s about creating the perfect environment for these beauties to thrive.
Understanding Purple Cabbage Needs
Before we dive into the nitty-gritty, let’s understand what makes purple cabbage tick. They’re not overly fussy, but they do have preferences:
* Sunlight: They crave at least 6 hours of direct sunlight per day. More is better!
* Soil: Rich, well-draining soil is key. They love soil that’s slightly acidic to neutral (pH 6.0-7.0).
* Water: Consistent moisture is crucial, especially during head formation. Think consistently damp, not soggy.
* Nutrients: Purple cabbages are heavy feeders. They need plenty of nitrogen, phosphorus, and potassium.
* Temperature: They prefer cooler temperatures (60-70°F), making them ideal for spring and fall planting.
Getting Started: Seed Starting or Transplants?
You have two options: starting from seed or buying transplants. I personally prefer starting from seed because it gives me more control over the process, but transplants are a great option if you’re short on time or space.
Starting from Seed (My Preferred Method)
1. Timing is Everything: Start your seeds indoors about 6-8 weeks before the last expected frost. This gives them a head start.
2. Seed Starting Mix: Use a good quality seed starting mix. Don’t use garden soil; it’s too heavy and can harbor diseases.
3. Planting the Seeds: Sow the seeds about ¼ inch deep in small pots or seed trays. I usually plant 2-3 seeds per cell to increase my chances of germination.
4. Keep it Moist: Gently water the seeds and keep the soil consistently moist. A spray bottle works well for this.
5. Warmth and Light: Place the seed trays in a warm location (around 70-75°F) and provide plenty of light. A heat mat can help with germination, and grow lights are essential if you don’t have a sunny windowsill.
6. Thinning: Once the seedlings emerge and have a couple of true leaves, thin them to one plant per cell. Choose the strongest, healthiest-looking seedling.
7. Hardening Off: Before transplanting the seedlings outdoors, you need to “harden them off.” This means gradually exposing them to outdoor conditions over a period of 7-10 days. Start by placing them outside for a few hours each day in a sheltered location, gradually increasing the amount of time they spend outdoors.
Using Transplants (The Convenient Option)
1. Choose Wisely: Select healthy-looking transplants with sturdy stems and vibrant green leaves. Avoid plants that are leggy or have yellowing leaves.
2. Timing is Still Important: Plant your transplants outdoors after the last expected frost, when the soil has warmed up.
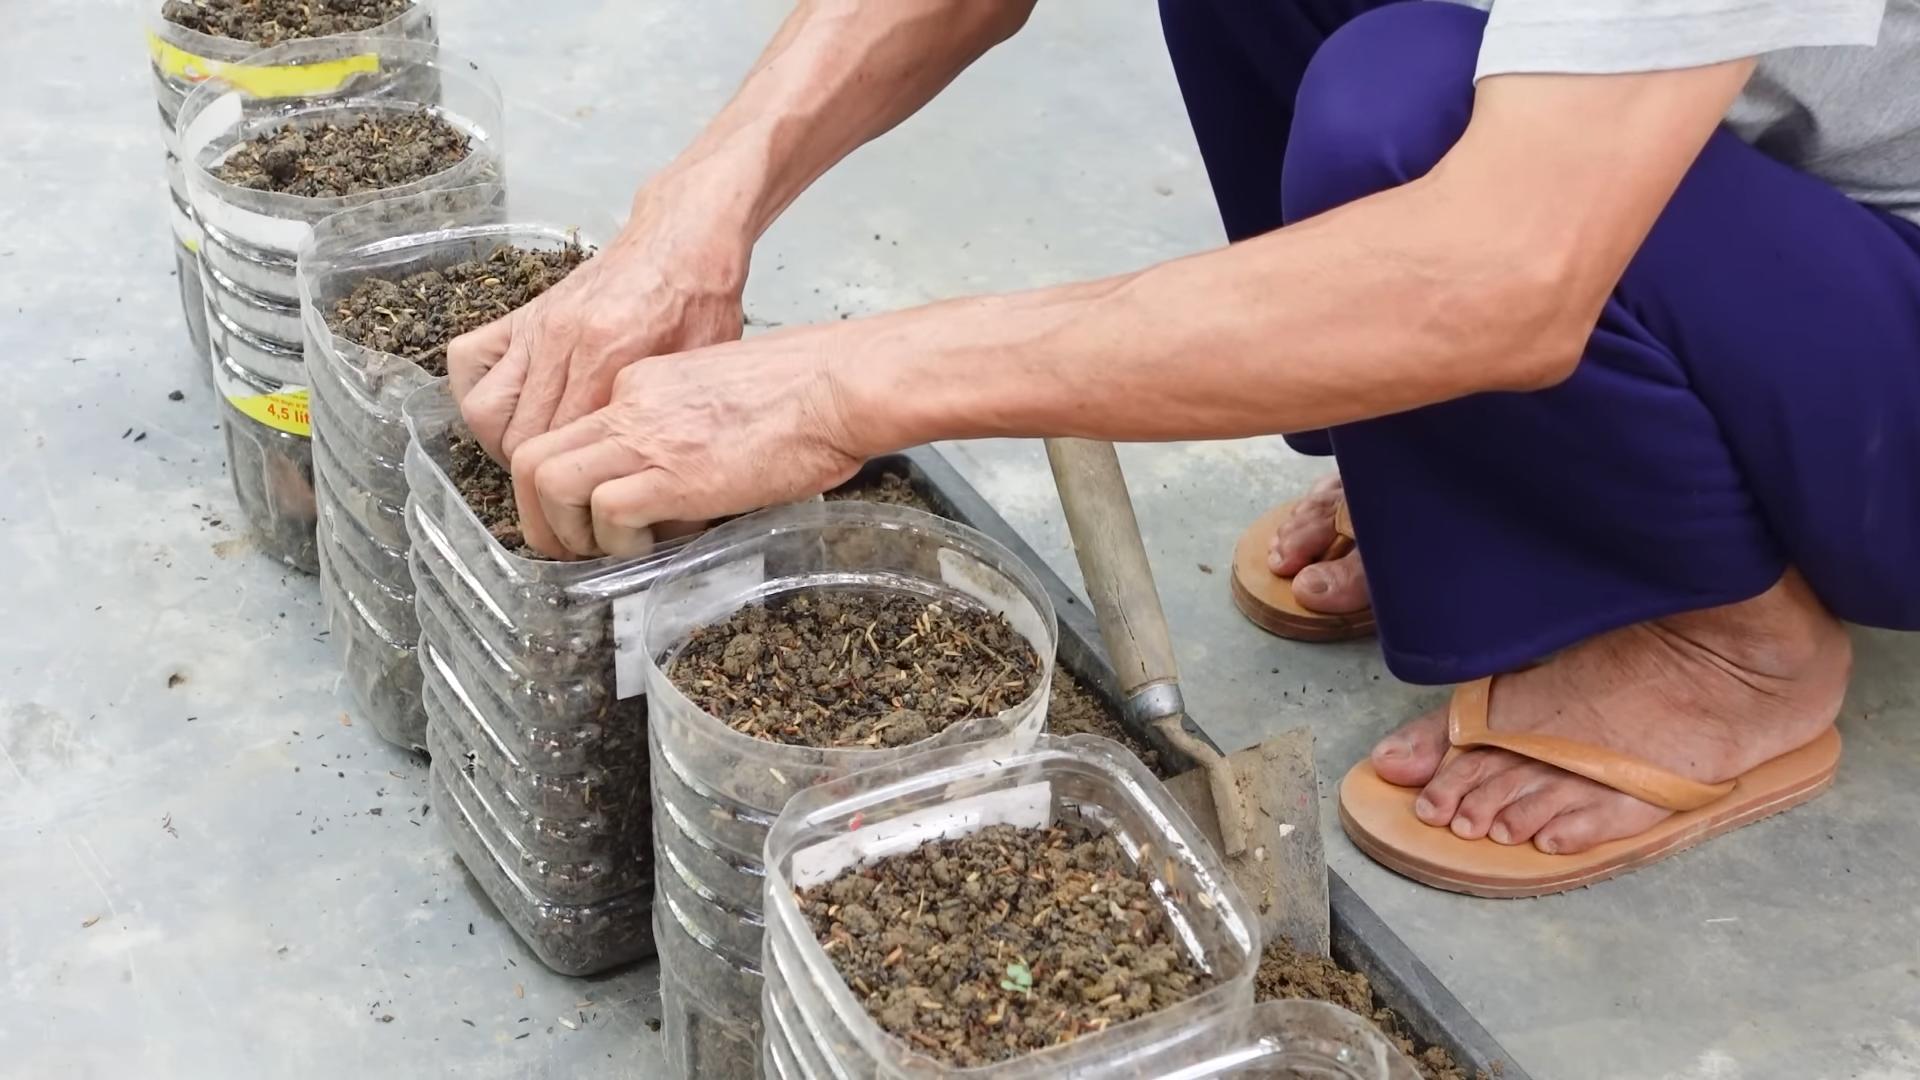
Preparing the Soil: The Foundation for Success
This is arguably the most important step. Purple cabbages need nutrient-rich soil to reach their full potential.
1. Soil Testing: Ideally, you should test your soil to determine its pH and nutrient levels. This will help you tailor your amendments accordingly. You can get a soil testing kit at most garden centers or send a sample to your local agricultural extension office.
2. Amending the Soil: Regardless of your soil type, you’ll want to amend it with plenty of organic matter. This will improve drainage, aeration, and nutrient retention.
* Compost: This is my go-to amendment. It’s packed with nutrients and beneficial microbes. I add a generous layer of compost to the planting area.
* Aged Manure: Another excellent source of nutrients. Make sure it’s well-aged to avoid burning the plants.
* Leaf Mold: Decomposed leaves are a great way to improve soil structure and drainage.
* Bone Meal: Provides phosphorus, which is essential for root development.
* Blood Meal: Provides nitrogen, which is important for leafy growth.
3. Adjusting pH (If Necessary): If your soil is too acidic (pH below 6.0), you can add lime to raise the pH. If it’s too alkaline (pH above 7.0), you can add sulfur to lower the pH. Follow the instructions on the product label.
4. Tilling or Digging: Thoroughly till or dig the soil to a depth of at least 12 inches. This will loosen the soil and make it easier for the roots to penetrate.
Planting Your Purple Cabbage: Giving Them Room to Grow
1. Spacing: Give your purple cabbages plenty of room to grow. Space them about 18-24 inches apart in rows that are 24-36 inches apart. This will allow them to develop large, healthy heads.
2. Planting Depth: Plant the seedlings or transplants at the same depth they were growing in their containers.
3. Watering: Water thoroughly after planting. This will help settle the soil around the roots.
4. Mulching: Apply a layer of mulch around the plants. This will help retain moisture, suppress weeds, and regulate soil temperature. I like to use straw, wood chips, or shredded leaves.
Ongoing Care: Keeping Them Happy and Healthy
Growing giant purple cabbages requires consistent care and attention.
1. Watering: Water regularly, especially during dry periods. Aim for about 1 inch of water per week. Check the soil moisture regularly and water when the top inch feels dry.
2. Fertilizing: Purple cabbages are heavy feeders, so you’ll need to fertilize them regularly.
* Side-Dressing: About 3-4 weeks after planting, side-dress the plants with a balanced fertilizer (e.g., 10-10-10). Sprinkle the fertilizer around the base of the plants, being careful not to get it on the leaves. Water thoroughly after fertilizing.
* Foliar Feeding: You can also supplement with foliar feeding. This involves spraying the leaves with a diluted fertilizer solution. This is a quick and easy way to provide nutrients directly to the plant.
3. Weed Control: Keep the area around your purple cabbages free of weeds. Weeds compete with the plants for nutrients and water. Hand-pulling weeds is the best option, but you can also use a hoe or cultivator.
4. Pest and Disease Control: Keep an eye out for pests and diseases. Common pests of purple cabbage include cabbage worms, aphids, and flea beetles. Common diseases include black rot and clubroot.
* Cabbage Worms: These are green caterpillars that can devour the leaves of your purple cabbages. Hand-picking them off the plants is an effective method of control. You can also use Bacillus thuringiensis (Bt), a biological insecticide that is safe for humans and pets.
* Aphids: These are small, sap-sucking insects that can weaken the plants. Spraying the plants with a strong stream of water can dislodge them. You can also use insecticidal soap or neem oil.
* Flea Beetles: These are small, jumping beetles that can create small holes in the leaves. Covering the plants with row covers can prevent flea beetles from reaching them. You can also use insecticidal soap or neem oil.
* Black Rot: This is a bacterial disease that causes black lesions on the leaves. To prevent black rot, plant disease-resistant varieties and avoid overhead watering.
* Clubroot: This is a fungal disease that causes swollen, distorted roots. To prevent clubroot, rotate your crops and amend the soil with lime to raise the pH.
5. Sun Protection: In very hot climates, purple cabbages may benefit from some afternoon shade. You can use shade cloth to protect them from the intense sun.
Harvesting Your Giant Purple Cabbage: The Grand Finale!
1. Timing: Purple cabbages are typically ready to harvest 70-100 days after planting. The head should be firm and dense.
2. Harvesting: Use a sharp knife to cut the head from the stem. Leave a few outer leaves attached to protect the head.
3. Storage: Store your purple cabbages in a cool, dry place. They can last for several weeks in the refrigerator.
Extra Tips for Maximum Cabbage Size
* Consistent Watering is Key: Don’t let your cab
Conclusion
So, there you have it! Unlocking the secret to growing bigger, more vibrant purple cabbages isn’t about magic; it’s about understanding their needs and providing the right environment. This DIY trick, focusing on soil enrichment and consistent watering, is a game-changer for any gardener, whether you’re a seasoned pro or just starting out.
Why is this a must-try? Because it’s effective, economical, and environmentally friendly. Forget expensive fertilizers packed with harsh chemicals. This method leverages readily available resources and sustainable practices to nurture your purple cabbages from tiny seedlings to impressive, colorful heads. Imagine the satisfaction of harvesting cabbages that are not only larger but also bursting with flavor and nutrients, all thanks to your own efforts.
But don’t stop there! Experimentation is key to gardening success. Consider these variations to further optimize your purple cabbage growing:
* Companion Planting: Plant your purple cabbages alongside herbs like rosemary or thyme to deter pests naturally. Marigolds are also excellent companions, attracting beneficial insects that prey on cabbage worms.
* Soil pH Adjustment: While the DIY trick focuses on nutrient enrichment, regularly testing your soil pH is crucial. Purple cabbages thrive in slightly acidic soil (pH 6.0-7.0). If your soil is too alkaline, amend it with sulfur or peat moss.
* Different Mulch Options: While we recommended organic mulch, explore other options like straw or even shredded leaves. Each type offers different benefits in terms of moisture retention and weed suppression.
* Succession Planting: To enjoy a continuous harvest of purple cabbages, consider succession planting. Sow seeds every few weeks to ensure a steady supply throughout the growing season.
This DIY trick is more than just a method; it’s an invitation to connect with nature and cultivate your own food. It’s about understanding the intricate relationship between soil, water, and plant growth. And it’s about the joy of witnessing the transformation from a tiny seed to a beautiful, bountiful purple cabbage.
We are confident that by implementing this DIY trick, you’ll see a significant improvement in the size and quality of your purple cabbages. But the real magic happens when you share your experiences with others. We encourage you to try this method, document your progress, and share your results with the gardening community. Let us know what worked for you, what challenges you faced, and any variations you discovered along the way. Your insights could help other gardeners achieve their purple cabbage growing dreams!
So, grab your gardening gloves, prepare your soil, and get ready to witness the power of this simple yet effective DIY trick. Happy gardening, and may your purple cabbages grow big and bold!
Frequently Asked Questions (FAQ)
What exactly does this DIY trick entail?
This DIY trick primarily focuses on enriching the soil with organic matter and ensuring consistent watering. Specifically, it involves amending the soil with compost, well-rotted manure, or other organic materials before planting. This provides essential nutrients for the purple cabbages to thrive. Additionally, it emphasizes the importance of regular watering, especially during dry periods, to maintain consistent soil moisture. The goal is to create an optimal growing environment that promotes healthy root development and ultimately leads to larger, more vibrant purple cabbages.
How often should I water my purple cabbages?
The frequency of watering depends on several factors, including the weather, soil type, and the size of your plants. As a general rule, aim to keep the soil consistently moist but not waterlogged. Check the soil moisture level regularly by sticking your finger about an inch into the soil. If it feels dry, it’s time to water. During hot, dry weather, you may need to water daily or even twice a day. In cooler, wetter weather, you may only need to water every few days. Using a soaker hose or drip irrigation can help deliver water directly to the roots, minimizing water waste and reducing the risk of fungal diseases.
What kind of compost or manure is best for purple cabbages?
Any well-rotted compost or manure will benefit your purple cabbages. However, some options are particularly effective. Compost made from vegetable scraps, leaves, and grass clippings is an excellent all-around choice. Well-rotted cow manure is also a great source of nutrients, but be sure it’s properly composted to avoid burning the roots. Chicken manure is very rich in nitrogen, so use it sparingly and make sure it’s well-composted. Avoid using fresh manure, as it can harm your plants.
How much compost or manure should I add to the soil?
A good rule of thumb is to amend the soil with about 2-4 inches of compost or well-rotted manure before planting. Mix it thoroughly into the top 6-8 inches of soil. You can also side-dress your plants with compost or manure during the growing season. Simply sprinkle a layer of compost or manure around the base of the plants, being careful not to touch the stems.
What if I don’t have access to compost or manure?
If you don’t have access to compost or manure, you can use other organic materials to enrich the soil. Shredded leaves, grass clippings, and even coffee grounds can be added to the soil to improve its structure and fertility. You can also use a commercial organic fertilizer, but be sure to follow the instructions on the label.
How long does it take to see results from this DIY trick?
You should start to see results within a few weeks of implementing this DIY trick. The plants will appear healthier and more vigorous, and the leaves will be a deeper, richer color. The cabbages themselves will also start to grow larger and more quickly. However, keep in mind that the exact timeline will depend on the specific growing conditions and the variety of purple cabbage you’re growing.
What are some common problems that can affect purple cabbages, and how can I prevent them?
Some common problems that can affect purple cabbages include cabbage worms, aphids, and fungal diseases. Cabbage worms can be controlled by handpicking them off the plants or by using Bacillus thuringiensis (Bt), a natural insecticide. Aphids can be controlled by spraying the plants with insecticidal soap or by introducing beneficial insects like ladybugs. Fungal diseases can be prevented by ensuring good air circulation, avoiding overwatering, and using disease-resistant varieties. Crop rotation is also an important preventative measure.
Can I use this DIY trick for other types of cabbages?
Yes, this DIY trick can be used for other types of cabbages, such as green cabbage, red cabbage, and savoy cabbage. The principles of soil enrichment and consistent watering apply to all types of cabbages. However, you may need to adjust the specific techniques based on the specific needs of each variety.
What is the best time of year to plant purple cabbages?
Purple cabbages are cool-season crops, so they’re best planted in the spring or fall. In areas with mild winters, you can even plant them in the winter for a spring harvest. The ideal planting time will depend on your local climate and the specific variety of purple cabbage you’re growing. Check your local planting calendar for specific recommendations.
How do I know when my purple cabbages are ready to harvest?
Purple cabbages are ready to harvest when the heads are firm and solid. The size of the head will vary depending on the variety, but generally, you should harvest them when they reach a diameter of 6-8 inches. To harvest, simply cut the head off the plant with a sharp knife, leaving a few outer leaves intact.

Leave a Comment