
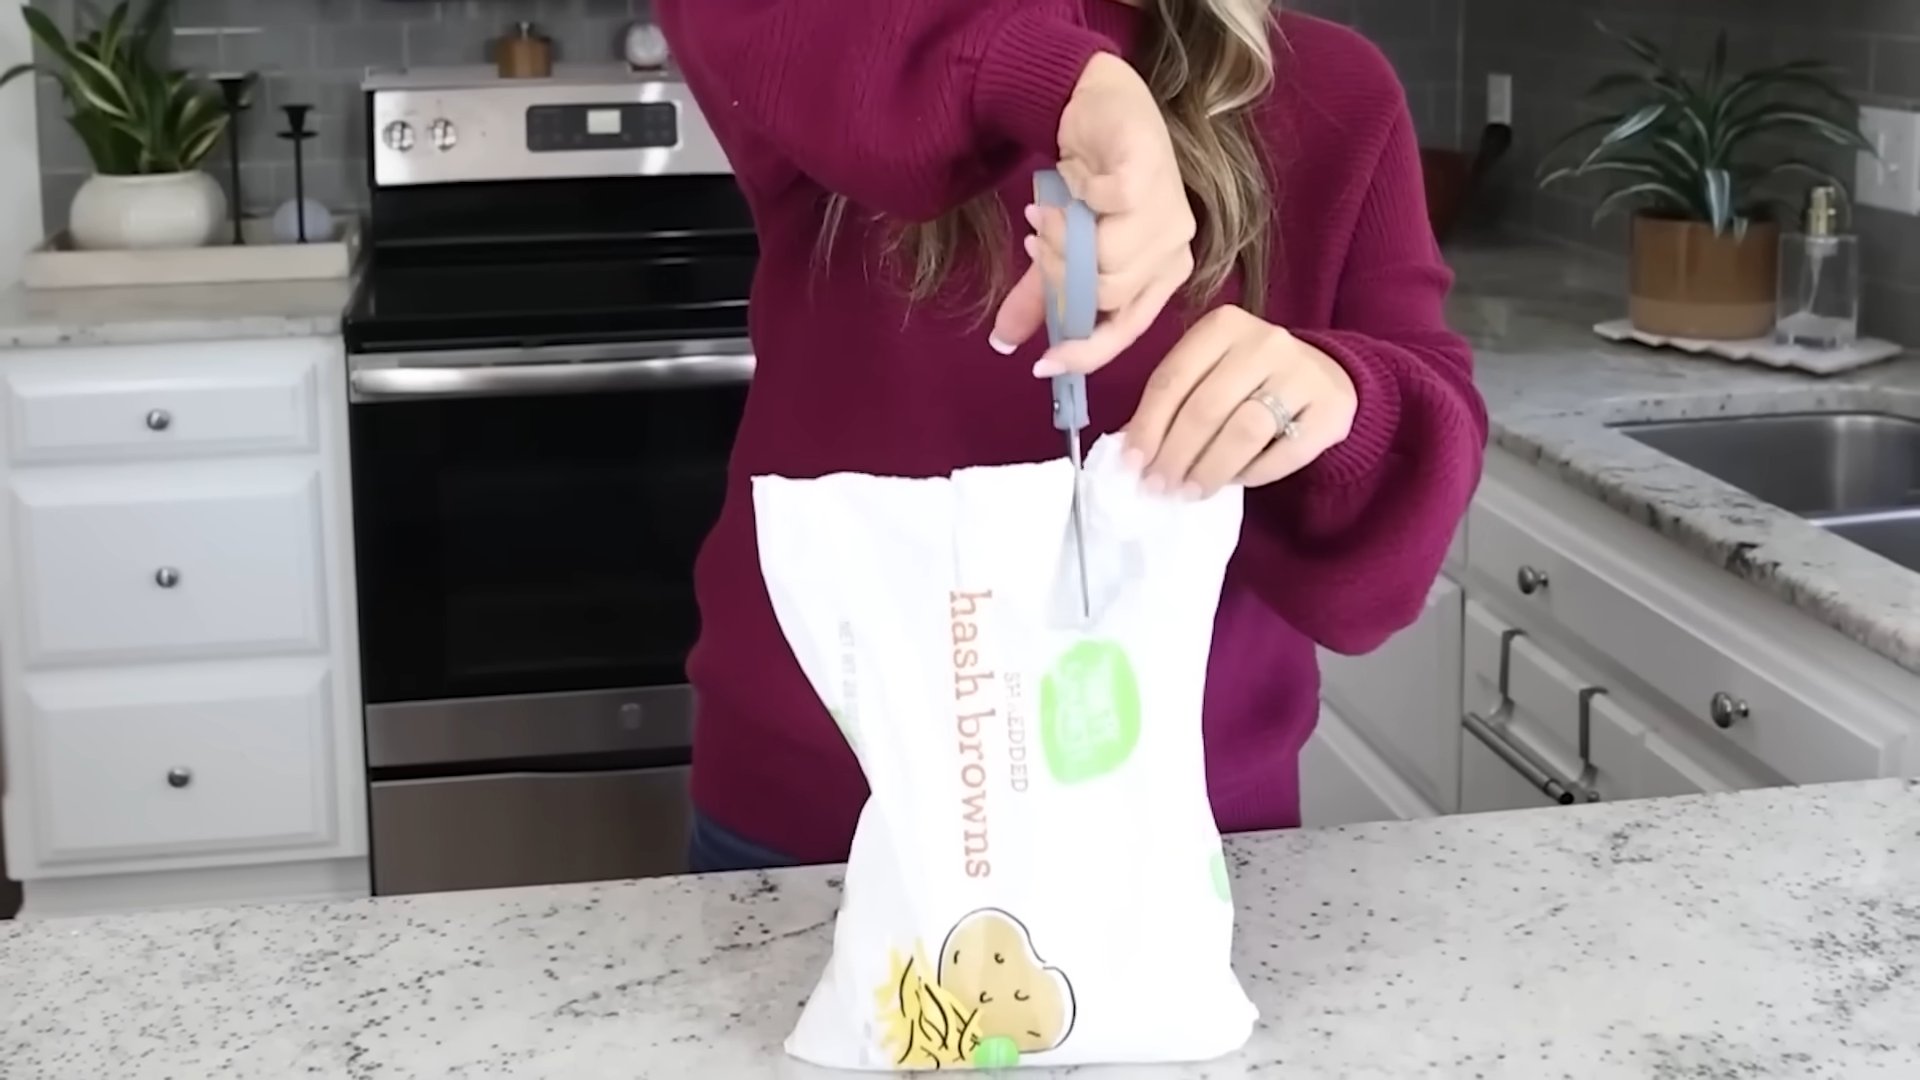
Bag tying shortcut: Ever wrestled with a flimsy plastic bag, desperately trying to tie a knot before its contents spill everywhere? I know I have! It’s a universal struggle, whether you’re bagging up garden waste, securing leftovers, or even just trying to keep your kid’s lunchbox tidy. This simple, yet ingenious, bag tying shortcut will change your life – or at least, make tidying up a whole lot easier!
While the art of knot-tying itself dates back to prehistoric times, serving crucial roles in everything from building shelters to securing food, the modern plastic bag presents a unique challenge. Its slippery surface and often thin material can make traditional knots difficult to execute. This is where our DIY trick comes in handy.
Let’s face it, time is precious. Nobody wants to spend unnecessary minutes battling a stubborn plastic bag. This bag tying shortcut isn’t just about convenience; it’s about efficiency. It’s about reclaiming those precious moments and using them for something you actually enjoy. Plus, a securely tied bag means less mess, less waste, and ultimately, less stress. So, ditch the frustration and get ready to master this simple, yet effective, technique. You’ll wonder how you ever lived without it!
Grow Bush Beans Like a Pro: A Simple DIY Guide
Hey there, fellow gardening enthusiasts! I’m so excited to share my tried-and-true method for growing bush beans. It’s surprisingly easy, even if you’re a complete beginner. Bush beans are a fantastic addition to any garden – they’re productive, relatively low-maintenance, and oh-so-delicious fresh from the vine. Let’s dive in!
Choosing Your Bush Bean Variety
Before we get our hands dirty, let’s talk about bean varieties. There are tons of different bush bean types, each with its own unique flavor, color, and growing characteristics. Here are a few of my favorites:
* Blue Lake Bush Beans: These are classic, reliable, and produce abundant yields of dark green, stringless beans. They’re perfect for canning, freezing, or eating fresh.
* Contender Bush Beans: As the name suggests, these beans are tough and resilient, tolerating cooler temperatures better than some other varieties. They’re also early producers, so you’ll be harvesting sooner.
* Provider Bush Beans: Another early-maturing variety, Provider beans are known for their excellent flavor and disease resistance.
* Roma II Bush Beans: If you love Italian cuisine, Roma II beans are a must-try. They have a flat, wide pod and a rich, nutty flavor.
* Royal Burgundy Bush Beans: For a pop of color in your garden, try Royal Burgundy beans. They have beautiful purple pods that turn green when cooked.
Consider your climate, taste preferences, and intended use when choosing your bean variety. Most seed packets will provide helpful information about each variety’s specific needs.
Preparing Your Garden Bed
Bush beans thrive in well-drained soil that’s rich in organic matter. Here’s how I prepare my garden bed for planting:
1. Choose a Sunny Spot: Bush beans need at least 6-8 hours of direct sunlight per day. Pick a location in your garden that gets plenty of sun.
2. Clear the Area: Remove any weeds, rocks, or debris from the planting area.
3. Amend the Soil: This is crucial! Beans prefer soil that’s slightly acidic to neutral (pH 6.0-7.0). I like to amend my soil with compost, aged manure, or other organic matter to improve drainage and fertility. Work the amendments into the top 6-8 inches of soil.
4. Loosen the Soil: Use a garden fork or tiller to loosen the soil to a depth of at least 12 inches. This will allow the bean roots to penetrate easily.
5. Level the Surface: Rake the soil to create a smooth, level surface. This will make planting easier and ensure even watering.
Planting Your Bush Bean Seeds
Now for the fun part – planting! Here’s my step-by-step guide:
1. Check the Soil Temperature: Bush beans are warm-season crops, so it’s important to wait until the soil has warmed up to at least 60°F (15°C) before planting. You can use a soil thermometer to check the temperature.
2. Sow the Seeds: Plant the seeds about 1 inch deep and 2-3 inches apart in rows that are 18-24 inches apart. I like to use a dibber or my finger to create small holes for the seeds.
3. Cover the Seeds: Gently cover the seeds with soil and pat it down lightly.
4. Water Thoroughly: Water the planting area thoroughly to moisten the soil. Be careful not to overwater, as this can cause the seeds to rot.
5. Mark the Rows: Use plant markers or labels to identify the rows of beans. This will help you keep track of what you’ve planted.
Caring for Your Bush Bean Plants
Once your bean seeds have sprouted, it’s important to provide them with the care they need to thrive. Here’s what I do:
1. Water Regularly: Bush beans need consistent moisture, especially during flowering and pod development. Water deeply whenever the top inch of soil feels dry to the touch. Avoid overhead watering, as this can promote fungal diseases. Soaker hoses or drip irrigation are ideal.
2. Weed Regularly: Keep the garden bed free of weeds, which can compete with the bean plants for nutrients and water. Hand-pull weeds carefully to avoid disturbing the bean roots.
3. Fertilize Sparingly: Bush beans don’t need a lot of fertilizer, as they can fix nitrogen from the air. However, you can give them a boost with a side dressing of compost or a balanced organic fertilizer a few weeks after planting. Avoid fertilizers that are high in nitrogen, as this can promote leafy growth at the expense of pod production.
4. Watch for Pests and Diseases: Keep an eye out for common bean pests like aphids, bean beetles, and spider mites. You can control these pests with insecticidal soap, neem oil, or other organic pest control methods. Also, be aware of potential diseases like powdery mildew and bean rust. Prevent these diseases by providing good air circulation, avoiding overhead watering, and using disease-resistant varieties.
5. Mulch: Applying a layer of mulch around your bean plants can help to conserve moisture, suppress weeds, and regulate soil temperature. I like to use straw, shredded leaves, or wood chips as mulch.
Harvesting Your Bush Beans
The moment you’ve been waiting for! Bush beans are typically ready to harvest about 50-60 days after planting, depending on the variety. Here’s how I harvest my beans:
1. Check for Readiness: The bean pods should be firm, plump, and snap easily when bent. They should also be free of blemishes or discoloration.
2. Harvest Regularly: Harvest the beans every few days to encourage continued production. Overripe beans can become tough and stringy.
3. Pick Carefully: Use your hands to gently snap the bean pods from the plant. Be careful not to damage the plant.
4. Enjoy Your Harvest: Freshly harvested bush beans are delicious steamed, sautéed, or added to salads. You can also preserve them by canning, freezing, or drying.
Troubleshooting Common Bush Bean Problems
Even with the best care, you might encounter some problems when growing bush beans. Here are a few common issues and how to address them:
* Poor Germination: If your bean seeds aren’t germinating, it could be due to cold soil, overwatering, or poor-quality seeds. Make sure the soil is warm enough before planting, avoid overwatering, and use fresh, viable seeds.
* Yellowing Leaves: Yellowing leaves can be a sign of nutrient deficiency, overwatering, or disease. Check the soil pH and nutrient levels, avoid overwatering, and treat any diseases promptly.
* Lack of Pod Production: If your bean plants are growing well but not producing pods, it could be due to hot weather, lack of pollination, or excessive nitrogen fertilization. Provide shade during the hottest part of the day, attract pollinators to your garden, and avoid fertilizers that are high in nitrogen.
* Pest Infestations: As mentioned earlier, aphids, bean beetles, and spider mites can be a problem. Use organic pest control methods to keep these pests under control.
* Disease Problems: Powdery mildew and bean rust are common fungal diseases. Prevent these diseases by providing good air circulation, avoiding overhead watering, and using disease-resistant varieties.
Extending Your Bush Bean Harvest
Want to enjoy fresh bush beans for as long as possible? Here are a few tips for extending your harvest:
* Succession Planting: Plant a new batch of bean seeds every 2-3 weeks to ensure a continuous supply of beans throughout the growing season.
* Choose Early-Maturing Varieties: Select varieties that mature quickly to get an early start on your harvest.
* Provide Shade: During the hottest part of the summer, provide shade for your bean plants to prevent them from bolting (going to seed).
* Water Consistently: Consistent watering is essential for pod production.
* Harvest Regularly: As mentioned earlier, harvest the beans every few days to encourage continued production.
Saving Bush Bean Seeds
If you want to save seeds from your bush bean plants for next year, here’s what I do:
1. Choose Healthy Plants: Select healthy, vigorous plants that produce abundant yields of high-quality beans.
2. Allow Pods to Dry: Allow some of the bean pods to dry completely on the plant. The pods should turn brown and brittle.
3. Harvest the Pods: Harvest the dried pods and shell the beans.
4. Dry the Seeds: Spread the seeds out on a screen or tray in a cool, dry place for a few weeks to ensure they are completely dry.
5. Store the Seeds: Store the dried seeds in an airtight container in a cool, dark place.

Conclusion
So, there you have it! This simple bag tying shortcut isn’t just a clever trick; it’s a game-changer for anyone who regularly deals with plastic bags, whether it’s in the kitchen, garden, or anywhere else. Forget fumbling with slippery plastic and struggling to create a secure knot. This method is faster, easier, and more reliable than traditional tying methods. It’s a small change that can make a surprisingly big difference in your daily routine.
Why is this a must-try? Because it saves you time and frustration. Think about all those moments you’ve spent wrestling with a stubborn bag, only to end up with a loose, unreliable knot. This shortcut eliminates that struggle, allowing you to quickly and efficiently seal your bags, keeping your food fresh, your trash contained, and your supplies organized. It’s a practical solution to a common problem.
But the beauty of this bag tying shortcut lies not only in its simplicity but also in its adaptability. Feel free to experiment with different types of bags. While it works exceptionally well with standard grocery bags and trash bags, you can also try it with smaller produce bags or even larger storage bags. The key is to adjust the loop size and the tightness of the tuck to suit the specific bag you’re using.
Looking for variations? Consider using a small carabiner clip or a key ring to create a more permanent loop. This is especially useful for bags that you need to open and close frequently, such as those containing pet food or garden supplies. Simply thread the bag through the clip or ring before tying, and you’ll have a convenient handle for easy access.
Another variation is to use a small piece of twine or ribbon instead of the bag itself to create the loop. This can be helpful if the bag material is particularly thin or prone to tearing. Just tie the twine or ribbon securely around the bag opening before creating the loop and tucking the end through.
We are confident that once you try this bag tying shortcut, you’ll wonder how you ever lived without it. It’s a simple, effective, and surprisingly satisfying way to tackle a common household task.
Now, we want to hear from you! Give this bag tying shortcut a try and let us know what you think. Share your experiences, your variations, and any tips you discover in the comments below. We’re always eager to learn from our readers and build a community of resourceful DIYers. Your feedback will help others discover the benefits of this simple yet powerful technique. So, go ahead, grab a bag, and give it a try. You might just be surprised at how much easier your life can be!
Frequently Asked Questions (FAQ)
What types of bags does this shortcut work best with?
This bag tying shortcut is incredibly versatile and works well with a wide variety of bags. It’s particularly effective with standard plastic grocery bags, trash bags (both kitchen and larger sizes), produce bags, and even some types of storage bags. The key is to adjust the size of the loop and the tightness of the tuck based on the thickness and material of the bag. Thicker bags might require a slightly larger loop, while thinner bags might benefit from a tighter tuck. Experiment to find what works best for each type of bag you use.
Is this method really more secure than a regular knot?
In many cases, yes! The loop and tuck method creates a more secure closure than a simple overhand knot. The loop acts as a lever, tightening the closure as the bag is filled or moved. This prevents the bag from easily coming undone, which can be a common problem with traditional knots, especially when dealing with slippery plastic. The pressure exerted on the tucked end helps to maintain a firm grip, reducing the likelihood of slippage. However, the security also depends on how tightly you tuck the end. Make sure to pull it snug for the best results.
Can I use this shortcut with biodegradable or compostable bags?
Yes, you can absolutely use this shortcut with biodegradable or compostable bags. However, keep in mind that these bags are often more delicate than traditional plastic bags. Therefore, it’s crucial to be gentle when creating the loop and tucking the end. Avoid pulling too tightly, as this could cause the bag to tear. You might also consider using a slightly larger loop to distribute the pressure more evenly. As always, test the method on a small, inconspicuous area of the bag first to ensure it doesn’t damage the material.
What if the bag is too full to easily create a loop?
If the bag is overly full, creating a loop can be challenging. In this case, try gently compressing the contents of the bag to create some space at the top. You can also try folding down the top edge of the bag before creating the loop. This will provide a more manageable surface to work with. If neither of these methods works, consider using a larger bag or dividing the contents into multiple bags. Overfilling a bag not only makes it difficult to tie but also increases the risk of it tearing or breaking.
The tucked end keeps slipping out. What am I doing wrong?
If the tucked end is consistently slipping out, there are a few potential reasons. First, make sure you’re pulling the tucked end snug enough. A loose tuck is more likely to come undone. Second, consider the material of the bag. If it’s particularly slippery, the tuck might not hold as well. In this case, try creating a slightly tighter loop or using a small piece of tape to secure the tucked end in place. Finally, ensure that the loop itself is not too large. A larger loop can create more slack, making it easier for the tucked end to slip out.
Is this method suitable for sealing food storage bags?
Yes, this method can be used for sealing food storage bags, but it’s important to consider the type of food and the storage conditions. For dry goods like cereal or snacks, this method provides a reasonably airtight seal. However, for liquids or foods that require a truly airtight seal, such as those being stored in the freezer, it’s best to use a dedicated food storage bag with a zipper or a container with a lid. While this bag tying shortcut is convenient, it may not provide the same level of protection against moisture and air as specialized food storage solutions.
Can I reuse the bags after tying them with this method?
Absolutely! One of the great advantages of this bag tying shortcut is that it’s easy to untie and reuse the bags. Simply pull on the tucked end to release the closure. Unlike a tight knot, this method doesn’t damage the bag, allowing you to reuse it multiple times. This is a great way to reduce waste and save money. Just be sure to clean the bag thoroughly before reusing it, especially if it was used to store food or other potentially messy items.
Does this work with produce bags that have holes in them?
Yes, this method can still work with produce bags that have holes, but you might need to adjust your technique slightly. The key is to position the loop and tuck in a way that avoids the holes. If the holes are near the top of the bag, try folding down the top edge before creating the loop. This will create a solid surface for the closure. If the holes are scattered throughout the bag, you might need to be more careful when tucking the end to ensure it doesn’t snag on a hole. In some cases, it might be necessary to use a different method for sealing bags with numerous or large holes.

Leave a Comment