
Harvesting Okra: Your Guide to a Bountiful Okra Harvest
Harvesting okra might seem straightforward, but there’s a surprising amount to learn to ensure you get the most delicious and tender pods from your garden. I’ve been growing okra for years, and I’ve discovered some amazing harvesting okra tricks that have significantly improved my yield and the quality of my okra. This isn’t just about picking pods; it’s about understanding the plant’s growth cycle and applying simple techniques to maximize your harvest. This article will share my tried-and-true methods for harvesting okra, transforming your gardening experience from frustrating to fulfilling.
Okra, with its fascinating history stretching back to ancient Ethiopia, has become a beloved vegetable across the globe. From its use in stews and gumbo to its starring role in countless other dishes, okra’s versatility is undeniable. But what good is a bountiful okra plant if you don’t know how to properly harvest its fruits? That’s where this guide comes in. Knowing the right time and technique for harvesting okra is crucial for ensuring tender, flavorful pods. Otherwise, you risk tough, seedy okra that’s far less enjoyable.
Why should you care about mastering the art of harvesting okra? Simply put: better okra! Learning the proper techniques ensures you get the most out of your hard work. You’ll avoid the disappointment of harvesting tough, overripe pods and instead enjoy a continuous supply of delicious, tender okra for your culinary creations. This guide will equip you with the knowledge and confidence to harvest your okra like a pro, leading to a more rewarding and enjoyable gardening experience. Let’s dive in and unlock the secrets to a truly bountiful okra harvest!
Deep Cleaning Your Kitchen Sink: A DIY Guide
Let’s face it, the kitchen sink is a germ haven. Food particles, grease, and hard water stains accumulate quickly, leaving your sink looking dull and potentially harboring bacteria. But don’t despair! With a little elbow grease and the right supplies, you can achieve a sparkling clean sink that will make you proud. This guide will walk you through a thorough cleaning process, tackling everything from everyday grime to stubborn stains.
Gathering Your Supplies
- Rubber gloves: Protect your hands from harsh chemicals and bacteria.
- Baking soda: A natural cleaning agent that’s gentle yet effective.
- White vinegar: Another natural cleaner that cuts through grease and grime.
- Dish soap: Your regular dish soap will do the trick.
- Warm water: Plenty of it!
- Scrub brush or sponge: Choose one that’s sturdy enough to tackle tough stains.
- Old toothbrush: Perfect for reaching those hard-to-clean corners and crevices.
- Microfiber cloth or paper towels: For wiping and drying.
- Optional: Bleach (for disinfecting), a pumice stone (for stubborn stains), a sink strainer (to prevent future clogs).
Phase 1: Pre-Cleaning and Clearing the Deck
1. Empty the sink completely. Remove any dishes, sponges, or other items. This gives you a clean workspace.
2. Remove the sink strainer. If you have a removable strainer, take it out and clean it separately. You can usually soak it in warm, soapy water or use a bottle brush to clean it thoroughly. Let it air dry completely before putting it back.
3. Remove any loose debris. Use a sponge or paper towel to wipe away any loose food particles, hair, or other visible debris.
Phase 2: The Baking Soda and Vinegar Power Duo
1. Sprinkle baking soda generously. Cover the entire surface of your sink with a thick layer of baking soda. Don’t be shy!
2. Pour white vinegar over the baking soda. The baking soda and vinegar will react, creating a fizzing action that helps loosen dirt and grime. Let it fizz for about 15-20 minutes. You’ll hear a satisfying sizzle!
3. Scrub away the grime. After the fizzing subsides, use your scrub brush or sponge to scrub the entire sink surface. Pay special attention to areas with stubborn stains or buildup. The old toothbrush is great for getting into those tight corners and around the faucet.
4. Rinse thoroughly. Once you’ve scrubbed everything, rinse the sink thoroughly with warm water.
Phase 3: Tackling Stubborn Stains
1. Assess the situation. Are there any remaining stains? If so, we’ll need to bring out the big guns.
2. Pumice stone (optional). For really stubborn mineral deposits or hard water stains, a pumice stone can be very effective. Gently rub the pumice stone over the affected area in a circular motion. Be careful not to apply too much pressure, as you could scratch the sink surface.
3. Bleach solution (optional). If you’re concerned about bacteria or want a deeper clean, you can create a bleach solution. Mix one part bleach with ten parts water. Apply the solution to the sink, let it sit for about 5-10 minutes, then scrub and rinse thoroughly. Always wear gloves when using bleach. Ensure proper ventilation in the area.
4. Repeat if necessary. If the stains are particularly stubborn, you may need to repeat the baking soda and vinegar treatment or the pumice stone/bleach process.
Phase 4: Final Polish and Shine
1. Wipe down the sink. Use a clean microfiber cloth or paper towel to wipe down the entire sink surface. This will remove any remaining residue and leave it sparkling.
2. Dry thoroughly. Make sure to dry the sink completely to prevent water spots.
3. Replace the strainer. Once everything is dry, replace the sink strainer.
4. Admire your work! You’ve successfully deep-cleaned your kitchen sink, leaving it looking and feeling brand new.
Maintaining a Clean Sink
To prevent future buildup, consider these tips:
- Wipe down your sink after each use.
- Rinse your sink with hot water after washing dishes to remove any lingering food particles.
- Use a sink strainer to catch food scraps and prevent clogs.
- Perform a quick cleaning with baking soda and vinegar once a week.
- Consider a deeper clean like the one described above every month or two, depending on usage.
Remember, regular maintenance is key to keeping your kitchen sink sparkling clean and hygienic. By following these steps, you can easily maintain a clean and sanitary kitchen sink, free from grime and bacteria. Happy cleaning!
Conclusion
So there you have it – a complete guide to harvesting okra, a surprisingly simple yet rewarding process that unlocks the potential of this versatile vegetable. This DIY approach to harvesting your own okra is a must-try for several reasons. First, it guarantees freshness unmatched by store-bought produce. You’ll be picking okra at its peak ripeness, ensuring optimal flavor and texture. Second, harvesting your own okra allows you to control the quality and quantity, tailoring your harvest to your specific needs and culinary preferences. Third, and perhaps most importantly, it connects you directly to the growing process, fostering a deeper appreciation for the food you consume and the effort involved in bringing it to your table. It’s a truly satisfying experience, from planting the seeds to savoring the delicious results.
Beyond the basic harvesting techniques outlined above, there are several exciting variations you can explore. Experiment with different harvesting times to see how it affects the okra’s tenderness. Some prefer to harvest early in the morning for the freshest, most crisp okra, while others find that slightly later harvests yield a more robust flavor. You can also try different methods of preserving your harvest. Freezing is a great option for long-term storage, while pickling allows you to enjoy the unique tangy flavor of preserved okra throughout the year. Consider experimenting with different recipes to showcase the versatility of your homegrown okra – from classic fried okra to gumbo, stews, and even chutneys, the possibilities are endless.
Don’t be intimidated by the seemingly simple task of harvesting okra. It’s an incredibly rewarding experience that will elevate your cooking and deepen your connection to your garden. The satisfaction of picking your own fresh, vibrant okra is unparalleled. So, gather your harvesting tools, head to your garden, and embark on this fulfilling journey. We encourage you to try this DIY approach to harvesting okra and share your experiences with us! Let us know your favorite harvesting tips, your go-to okra recipes, and any challenges you encountered along the way. Your feedback will inspire and help other aspiring home gardeners.
We believe that everyone should have the opportunity to experience the joy of growing and harvesting their own food. This simple guide to harvesting okra is a stepping stone towards that goal. By mastering this fundamental skill, you’ll unlock a world of culinary possibilities and a deeper connection to the natural world. So, what are you waiting for? Get out there and start harvesting!
Frequently Asked Questions (FAQs)
How often should I harvest okra?
Okra should be harvested every 2-3 days, or even more frequently during peak production. Regular harvesting encourages the plant to produce more pods, leading to a more abundant yield. Leaving the pods on the plant for too long will result in tough, woody okra.
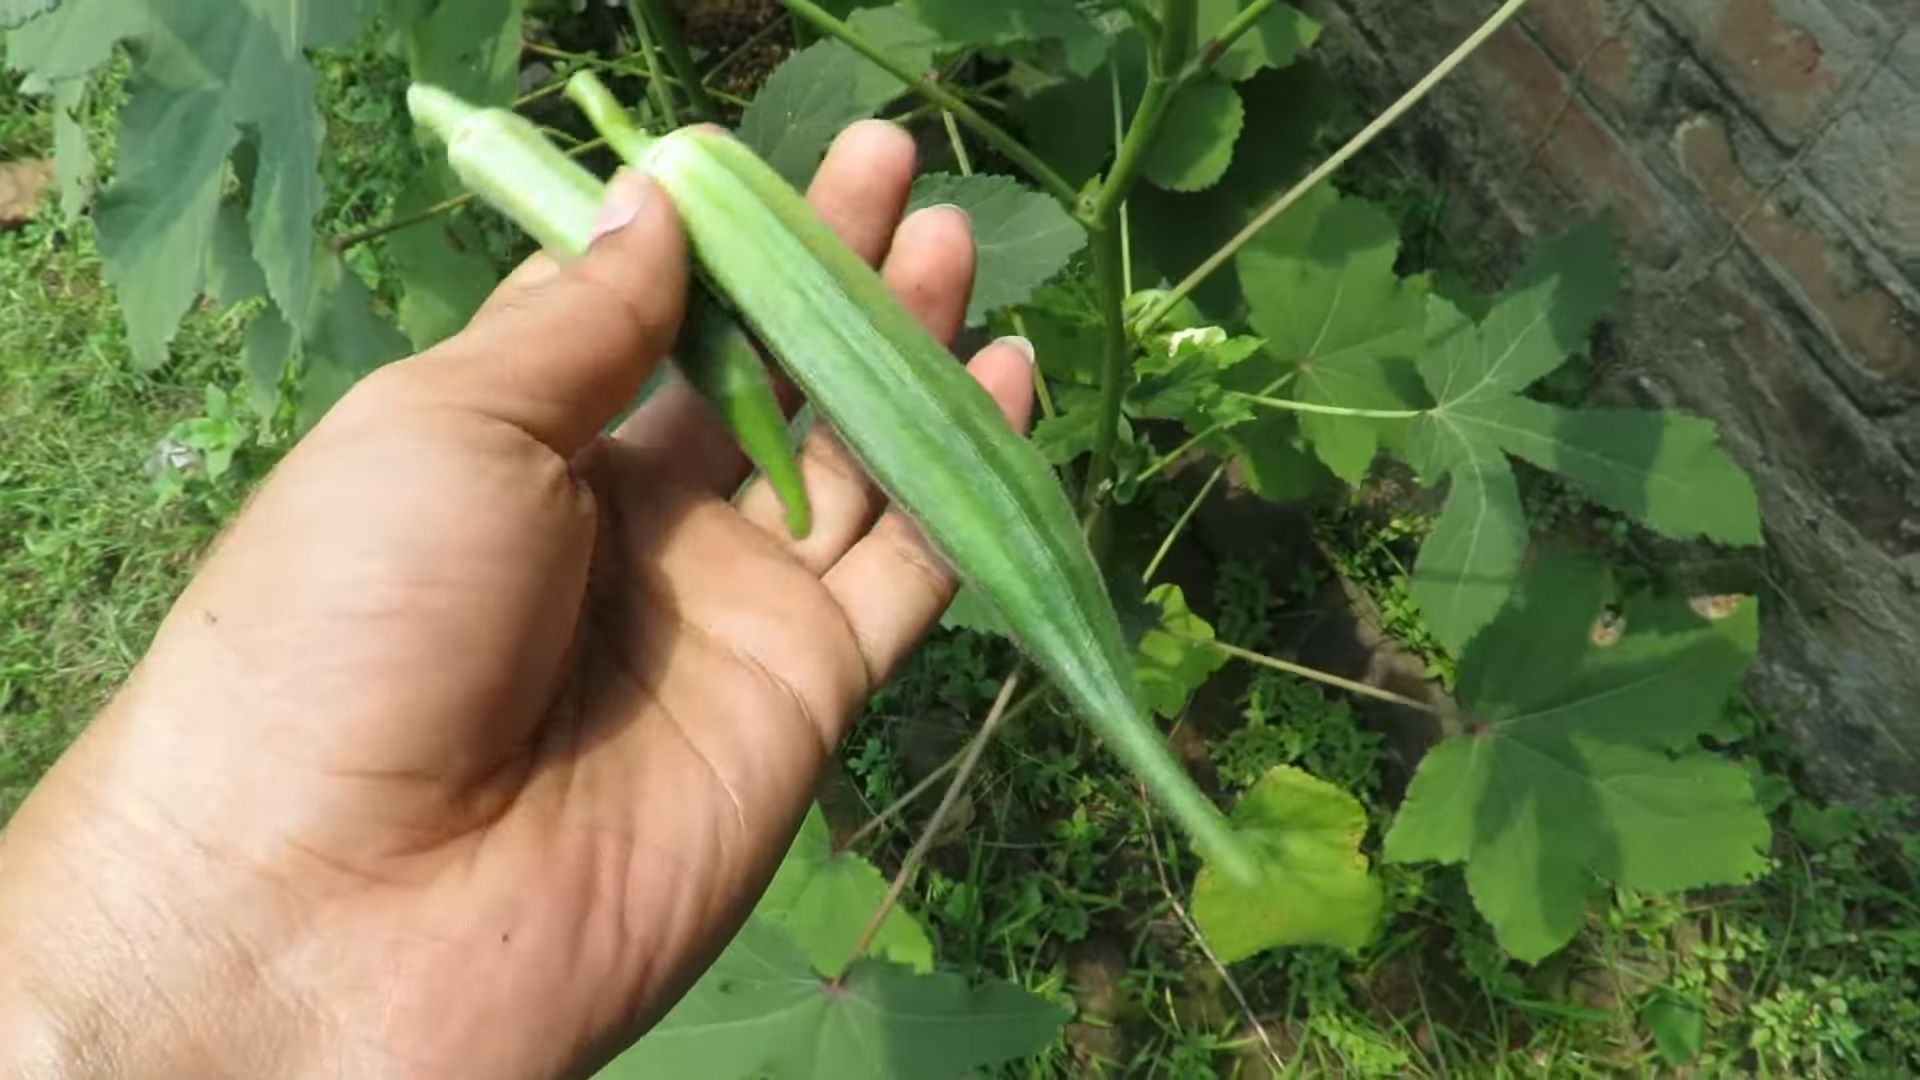
What are the signs of ripe okra?
Ripe okra pods are typically 2-3 inches long, firm, and tender. Avoid harvesting pods that are overly large or have a tough, woody texture. The color can vary depending on the variety, but generally, a deep green color indicates ripeness. However, some varieties may have a reddish or purplish hue when ripe.
What should I do with my harvested okra?
Freshly harvested okra is best used immediately or within a day or two. You can store it in the refrigerator in a plastic bag for a short period. For longer storage, consider freezing or pickling your okra. There are countless recipes that showcase okra’s versatility, from simple stir-fries to more complex dishes like gumbo.
Can I harvest okra in the rain?
While you can technically harvest okra in the rain, it’s generally recommended to wait until the plants are dry. Wet okra is more susceptible to damage and spoilage. Plus, harvesting in dry conditions makes cleaning and handling the pods much easier.
What if my okra plants aren’t producing many pods?
Several factors can affect okra production. Ensure your plants are receiving adequate sunlight (at least 6-8 hours per day), water (especially during dry periods), and nutrients. Check for pests and diseases and address any issues promptly. Consider consulting a gardening expert or local agricultural extension office for further assistance.
What are some common mistakes to avoid when harvesting okra?
One common mistake is leaving the pods on the plant for too long, resulting in tough, woody okra. Another is harvesting too aggressively, damaging the plant in the process. Always use sharp, clean tools and handle the plants gently. Finally, ensure you are harvesting the correct part of the plant – the pods, not the leaves or flowers.
How can I tell if my okra is ready to harvest?
The best way to tell if your okra is ready to harvest is by checking the size and texture of the pods. They should be 2-3 inches long, firm to the touch, and relatively smooth. Avoid harvesting pods that are overly large, as these will likely be tough and stringy. The color can vary depending on the variety, but a deep green color is generally a good indicator of ripeness.
What are the benefits of harvesting my own okra?
Harvesting your own okra offers several advantages. First, you get to enjoy the freshest, most flavorful okra possible, picked at its peak ripeness. Second, you have complete control over the quality and quantity of your harvest. Third, it’s a rewarding and educational experience that connects you to the growing process and fosters a deeper appreciation for your food.
Where can I find more information on growing and harvesting okra?
Numerous resources are available online and in print to help you learn more about growing and harvesting okra. Consult gardening websites, books, and your local agricultural extension office for detailed information on specific growing conditions, pest control, and harvesting techniques tailored to your region.


Leave a Comment