
Sweet Potato Gardening Guide: Grow Your Own Delicious Harvest
Sweet potato gardening might seem daunting, but I’m here to tell you it’s surprisingly achievable, even for beginners! This Sweet Potato Gardening Guide is packed with easy-to-follow DIY tricks and hacks that will transform your backyard into a thriving sweet potato patch. Forget expensive grocery store prices and enjoy the unparalleled taste of homegrown sweet potatoes.
For centuries, sweet potatoes have held a significant place in various cultures, providing a vital source of nutrition and sustenance. From their origins in Central and South America to their widespread cultivation across the globe, these versatile tubers have played a crucial role in shaping culinary traditions and agricultural practices. Now, you can tap into this rich history and experience the satisfaction of growing your own.
Why bother with a DIY approach to sweet potato gardening? Because there’s nothing quite like the taste of a freshly harvested sweet potato, bursting with flavor and nutrients. Plus, growing your own allows you to control the quality and avoid pesticides and other chemicals. This Sweet Potato Gardening Guide will equip you with the knowledge and techniques to achieve a bountiful harvest, regardless of your gardening experience. We’ll cover everything from selecting the right slips to harvesting your delicious crop, ensuring you have a successful and rewarding sweet potato growing journey.
So, let’s get started on your sweet potato adventure! This guide is your key to unlocking the secrets of successful sweet potato cultivation, transforming your gardening dreams into a reality.
Level Up Your Cooking: Mastering Garlic’s Flavor Potential
Garlic. That pungent, aromatic bulb that elevates any dish from simple to sublime. But are you truly harnessing its full potential? This guide will walk you through various techniques to transform your garlic game, from prepping to preserving, ensuring you always have perfectly flavored garlic at your fingertips.
Prepping Garlic: Beyond the Crush
- Choosing Your Garlic: Opt for firm, plump bulbs with dry, papery skins. Avoid those with soft spots or sprouting cloves.
- Storing Garlic: Store your garlic in a cool, dark, and dry place. A well-ventilated basket or a paper bag works best. Avoid refrigeration, as it can accelerate sprouting.
- Separating the Cloves: Gently squeeze the bulb to loosen the cloves. You can then easily peel them individually or use a clever trick: place the whole bulb on a cutting board and firmly press down on it with the flat side of a large knife. The cloves will separate easily.
- Peeling Garlic: There are several methods. The simplest is to use the flat side of a knife to gently crush each clove, then the peel will slip right off. For larger batches, soak the cloves in warm water for a few minutes – this softens the skins, making them easier to remove.
- Mincing Garlic: A sharp knife is your best friend here. Use a rocking motion to finely mince the cloves. For even finer results, consider using a garlic press. However, a knife allows for more control over the texture.
Cooking with Garlic: Techniques for Maximum Flavor
- Sautéing: This is a classic method. Add minced garlic to hot oil (olive oil is a popular choice) and cook for about 30 seconds to 1 minute, until fragrant and lightly golden. Don’t overcook, as this will lead to bitterness.
- Roasting: Roasting garlic mellows its flavor and creates a sweet, almost caramelized taste. Cut the top off the bulb, drizzle with olive oil, and wrap in foil. Roast at 400°F (200°C) for 30-40 minutes, until soft and golden. The roasted cloves are easily squeezed out of their skins.
- Confiting: Confiting garlic in oil is a fantastic way to preserve it and infuse the oil with incredible flavor. Submerge peeled garlic cloves in olive oil, heat gently until the oil is warm, then remove from heat and let it cool completely. Store in the refrigerator. This garlic-infused oil is perfect for drizzling over salads or pasta.
- Adding Garlic at Different Stages: The timing of garlic addition impacts its flavor. Adding it early allows it to infuse the dish with its flavor over time. Adding it towards the end preserves its sharpness and pungency.
- Blending Garlic into Sauces and Pastes: Garlic can be blended into smooth sauces and pastes, creating a rich and flavorful base for many dishes. Consider adding other ingredients like herbs, nuts, or spices to create unique flavor combinations.
Garlic Infusions and Preserving
- Garlic-Infused Olive Oil: As mentioned above, confit garlic in olive oil for a flavorful and long-lasting infusion. This oil can be used in dressings, marinades, and as a finishing oil for many dishes.
- Garlic Powder: Dehydrate minced garlic cloves in a low oven or dehydrator until completely dry and brittle. Then, grind them into a powder using a spice grinder or mortar and pestle. Store in an airtight container.
- Pickled Garlic: Pickling garlic preserves it and adds a tangy twist to its flavor. Submerge peeled garlic cloves in a brine solution (vinegar, water, salt, and sugar) and let it sit for at least a week. The longer it sits, the more intense the flavor becomes.
- Freezing Garlic: You can freeze minced or whole garlic cloves for later use. Freezing preserves the garlic’s flavor and texture relatively well. However, it’s best to use frozen garlic within a few months for optimal quality.
Troubleshooting Common Garlic Issues
- Bitter Garlic: Overcooked garlic will taste bitter. Ensure you cook it only until fragrant and lightly golden.
- Garlic Burn: High heat can cause garlic to burn quickly. Use medium heat and cook it gently.
- Strong Garlic Breath: While unavoidable for some, consuming parsley, mint, or apples after eating garlic can help reduce the intensity of garlic breath.
Beyond the Basics: Creative Garlic Applications
- Garlic Aioli: Create a creamy garlic aioli by blending garlic, mayonnaise, lemon juice, and salt and pepper to taste.
- Garlic Bread: A classic for a reason! Brush toasted bread with garlic butter (melted butter mixed with minced garlic and herbs) and bake until golden brown.
- Garlic Scapes: Don’t throw away the garlic scapes (the flower stalks)! They have a milder, more delicate garlic flavor and can be sautéed, grilled, or added to salads.
- Garlic-Infused Butter: Similar to garlic bread, you can create a flavorful garlic butter by combining softened butter with minced garlic, herbs, and spices. This is great for spreading on bread, vegetables, or meats.
With these techniques and tips, you’ll be well on your way to mastering the art of garlic and elevating your culinary creations to new heights!
Conclusion
So there you have it – your comprehensive guide to achieving a bountiful sweet potato harvest right in your own backyard! This DIY approach to sweet potato gardening isn’t just about growing delicious tubers; it’s about connecting with nature, understanding the growth cycle of a fascinating plant, and experiencing the immense satisfaction of harvesting your own homegrown produce. This sweet potato gardening guide empowers you to take control of your food source, ensuring quality and freshness while minimizing your environmental impact. The relatively low-maintenance nature of sweet potatoes, coupled with their adaptability to various climates and soil types, makes this a truly rewarding project for gardeners of all skill levels. From the initial planting of slips to the final harvest, the journey is filled with opportunities for learning and growth, both literally and figuratively. The unique flavor and versatility of homegrown sweet potatoes will elevate your culinary creations to a whole new level. Beyond the simple act of growing, you’ll find yourself appreciating the nuances of this humble root vegetable in a way you never thought possible.
Beyond the basic techniques outlined in this guide, there are countless opportunities for experimentation and personalization. Consider trying different varieties of sweet potatoes to discover your favorites – from the classic orange-fleshed varieties to the vibrant purple and white options. Experiment with companion planting, incorporating herbs like basil or marigolds to deter pests and improve soil health. If space is limited, explore vertical gardening techniques or container gardening to maximize your yield. For those in colder climates, consider starting your slips indoors to give them a head start before transplanting them outdoors. Don’t be afraid to get creative and adapt the techniques to your specific environment and preferences. The beauty of gardening is in its adaptability, and sweet potatoes are remarkably forgiving plants.
We strongly encourage you to embark on this sweet potato gardening adventure. Share your experiences, both successes and challenges, with fellow gardening enthusiasts. Document your progress with photos and videos, and inspire others to grow their own delicious and nutritious sweet potatoes. The community aspect of gardening is invaluable, and sharing your knowledge and experiences can help others achieve their own gardening goals. Remember, even small successes are significant milestones on your gardening journey. Don’t be discouraged by setbacks; learn from them and keep growing! The rewards of a successful sweet potato harvest are immeasurable, from the taste of freshly harvested tubers to the deep sense of accomplishment that comes with nurturing life from seed to table.
Frequently Asked Questions
What type of soil is best for growing sweet potatoes?
Sweet potatoes thrive in well-drained, sandy loam soil. Avoid heavy clay soils, which can retain too much moisture and lead to root rot. Amend heavy clay soils with organic matter like compost to improve drainage and aeration. A slightly acidic to neutral pH (6.0-7.0) is ideal. Testing your soil’s pH is a good first step to ensure optimal conditions.
When is the best time to plant sweet potatoes?
The best time to plant sweet potatoes is after the last frost and when the soil temperature has warmed to at least 65-70°F (18-21°C). This typically falls between late spring and early summer, depending on your geographic location. Planting too early can result in poor growth or even plant death.
How much sunlight do sweet potatoes need?
Sweet potatoes require at least six to eight hours of direct sunlight per day to thrive. Choose a sunny location in your garden that receives ample sunlight throughout the day. Insufficient sunlight can lead to reduced yields and smaller tubers.
How often should I water my sweet potatoes?
Water your sweet potatoes regularly, especially during dry periods. Aim for consistently moist soil, but avoid overwatering, which can lead to root rot. The frequency of watering will depend on your climate and soil conditions. Feel the soil before watering; if the top inch or two feels dry, it’s time to water.
What are some common pests and diseases that affect sweet potatoes?
Sweet potatoes can be susceptible to various pests and diseases, including sweet potato weevils, nematodes, and fungal diseases like root rot. Practicing good sanitation, crop rotation, and using disease-resistant varieties can help minimize these problems. Regularly inspect your plants for signs of pests or diseases and take appropriate action if necessary. Early detection is key to effective pest and disease management.
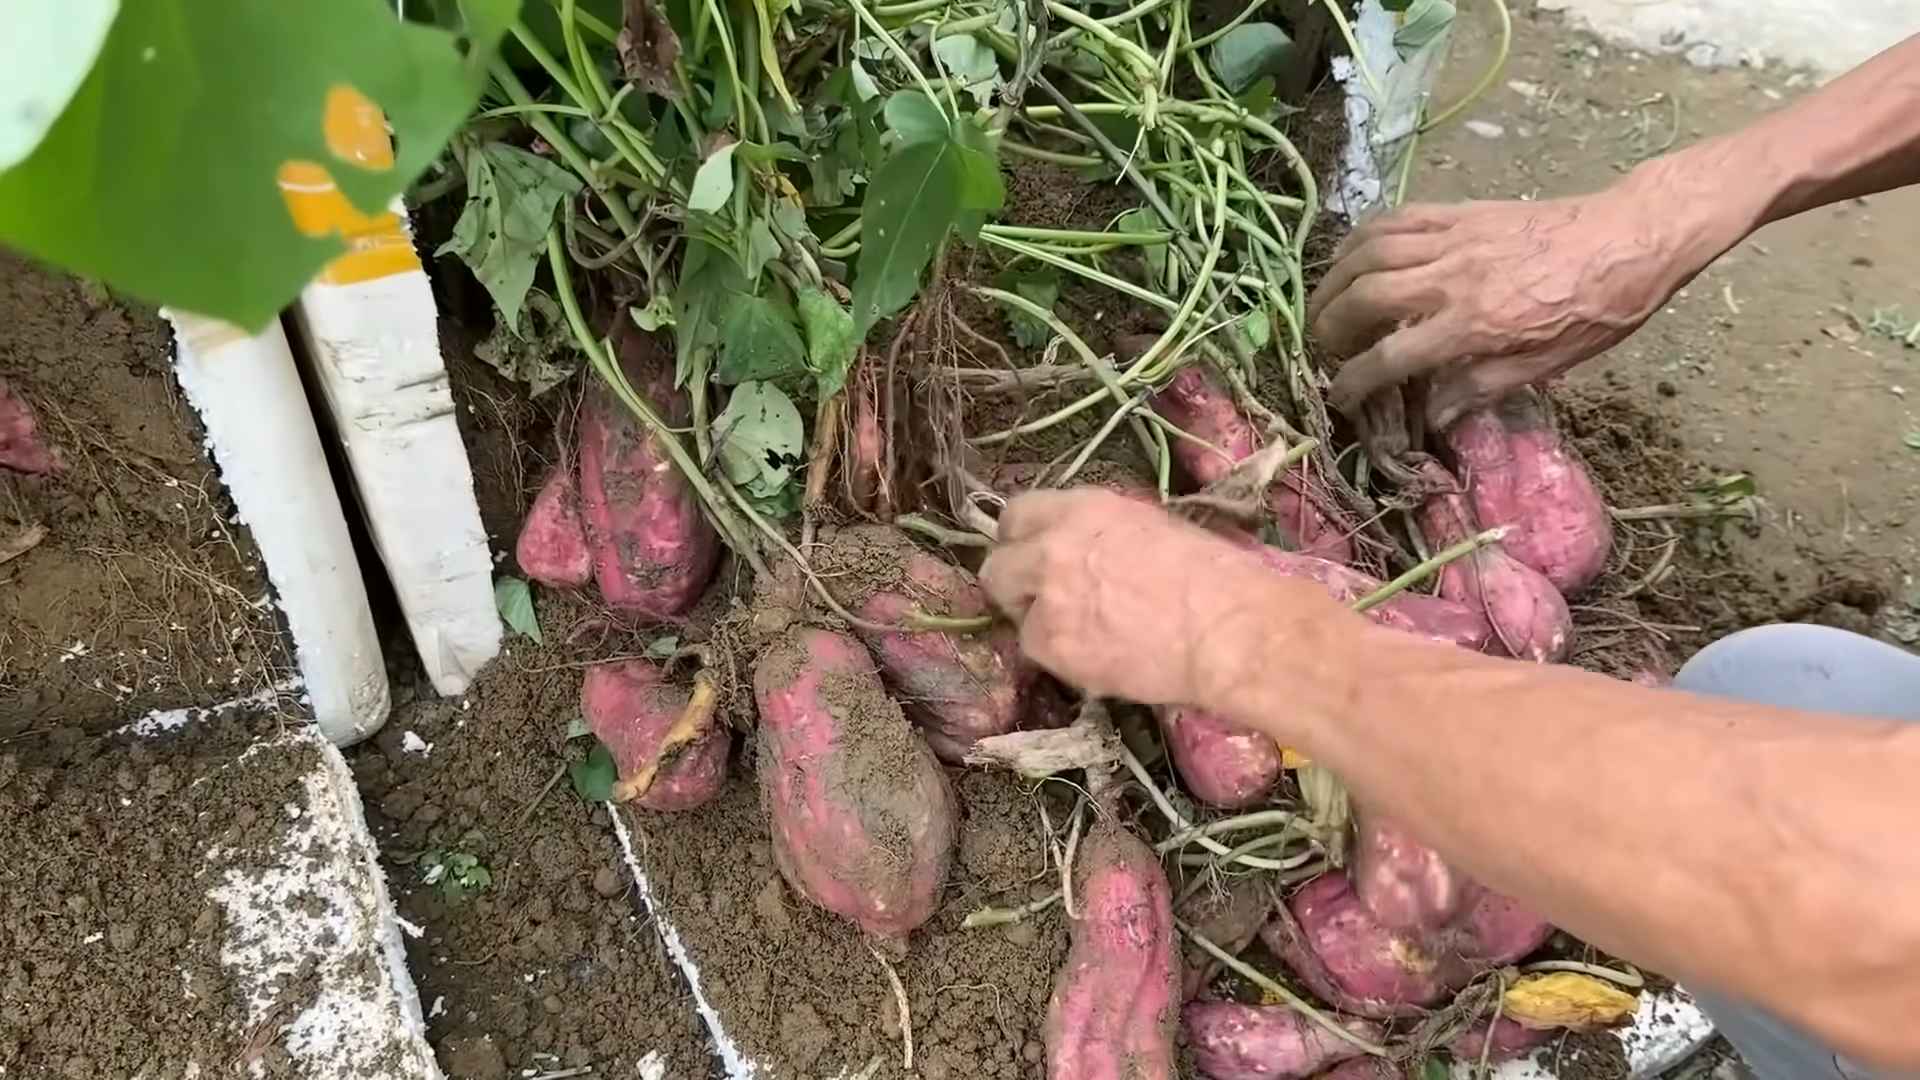
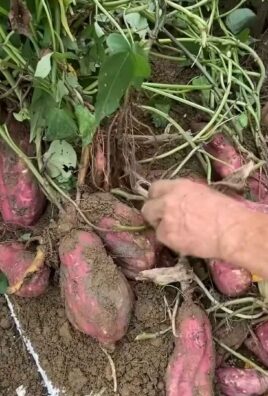
How do I harvest sweet potatoes?
Sweet potatoes are typically ready for harvest 90-120 days after planting, depending on the variety and growing conditions. Harvest on a dry day to prevent the tubers from rotting. Carefully dig around the plants, being careful not to damage the tubers. Allow the harvested sweet potatoes to cure in a warm, dry place for a few weeks before storing them. Proper curing enhances their flavor and shelf life.
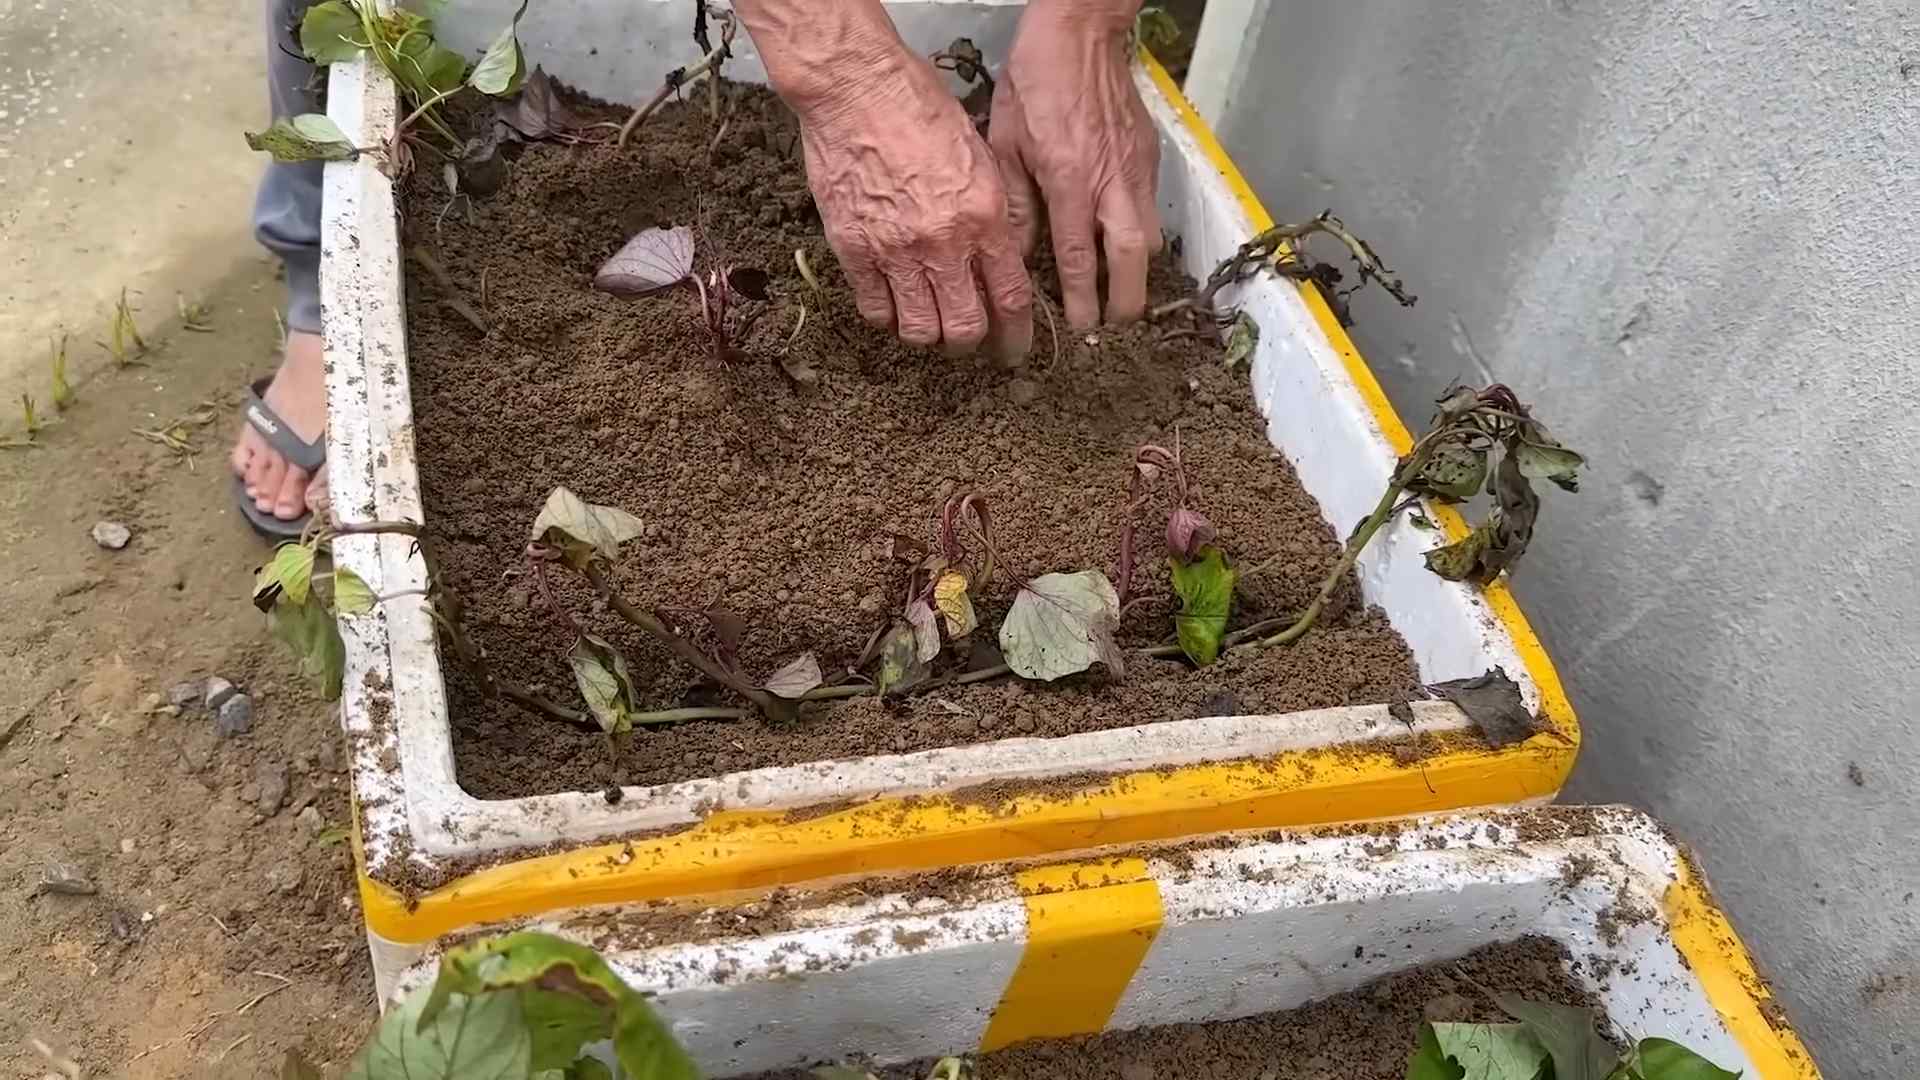
Can I grow sweet potatoes in containers?
Yes, you can absolutely grow sweet potatoes in containers! Choose large containers (at least 12 inches deep) with drainage holes to ensure proper root development and prevent waterlogging. Use a well-draining potting mix and follow the same planting and care instructions as for in-ground planting. Container gardening is a great option for those with limited space.
What should I do with my harvested sweet potatoes?
Once cured, your homegrown sweet potatoes are ready to enjoy! They can be used in a wide variety of dishes, from roasted sweet potato fries to creamy sweet potato soup. You can also store them in a cool, dark, and dry place for several months. Enjoy the fruits (or rather, roots!) of your labor!


Leave a Comment