
Bagged watermelon surprise! Ever dreamt of biting into a perfectly ripe, personal-sized watermelon you grew yourself, right in your own backyard? I know I have! Forget lugging those giant, unwieldy melons home from the store. Today, we’re diving into a fun and slightly unconventional DIY project that will have you saying, “Wow, I grew *that*?”
The idea of shaping fruits and vegetables isn’t exactly new. In Japan, farmers have been cultivating square watermelons for decades, primarily for aesthetic purposes and ease of stacking. While our “bagged watermelon surprise” isn’t about creating perfect cubes, it borrows that same spirit of playful manipulation to achieve a unique and manageable result.
Why would you want to try this? Well, space is often a premium in urban gardens. This trick allows you to control the size and shape of your watermelon, making it perfect for smaller gardens or even container gardening. Plus, let’s be honest, the novelty factor is huge! Imagine the look on your friends’ faces when you present them with a perfectly formed, personal-sized bagged watermelon surprise you nurtured from seed. It’s a conversation starter, a fun experiment, and a delicious reward all rolled into one. So, grab your gardening gloves, and let’s get started!
Bagged Watermelon Surprise: A DIY Delight!
Hey there, fellow DIY enthusiasts! Today, I’m super excited to share a fun and surprisingly easy project: creating a bagged watermelon surprise! This isn’t just about growing a watermelon; it’s about shaping it into a unique, conversation-starting piece of edible art. Imagine presenting a square or heart-shaped watermelon at your next barbecue! Sounds cool, right? Let’s dive in!
What You’ll Need
Before we get started, let’s gather our supplies. This is crucial for a smooth and successful watermelon shaping adventure.
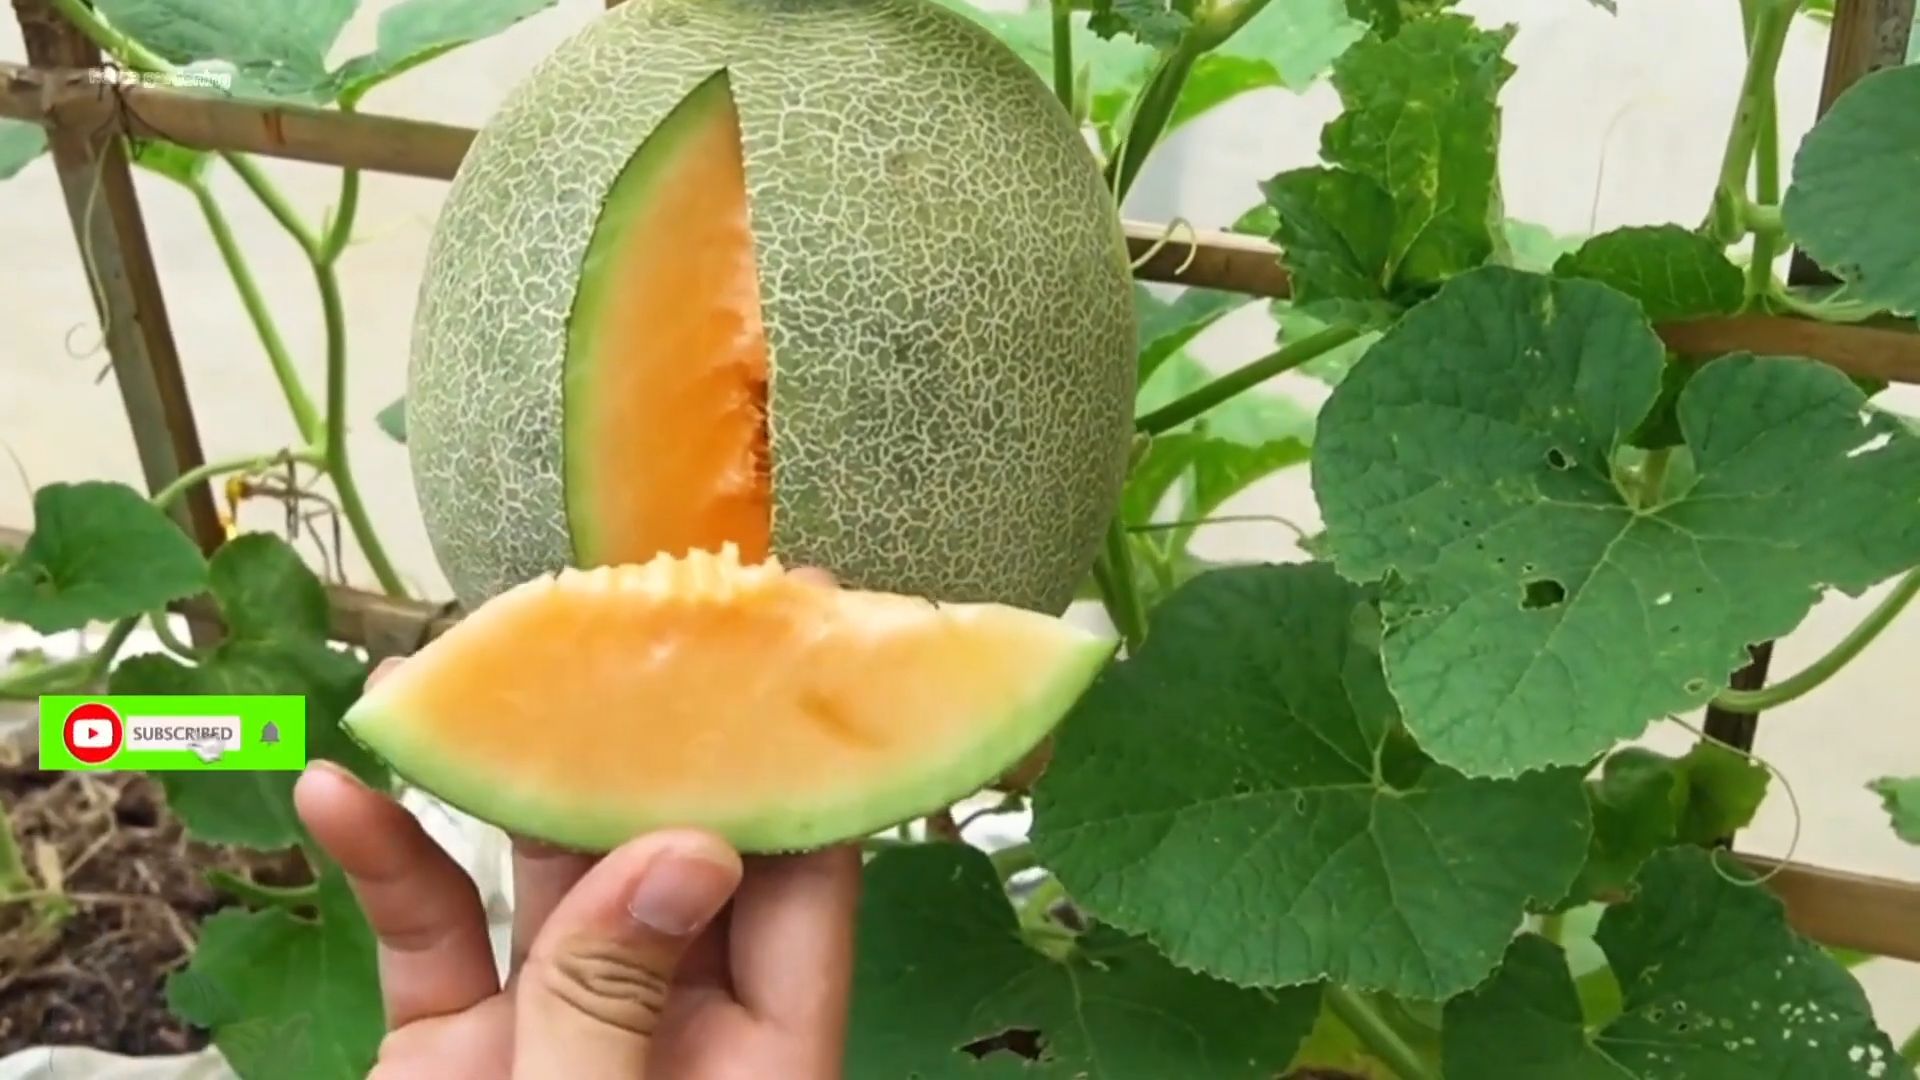
* **Watermelon Seeds (or a Seedling):** Choose a variety known for its smaller size and relatively thin rind. Sugar Baby or Bush Sugar Baby are excellent choices.
* **A Mesh Bag (or Mold):** This is the heart of our project! You’ll need a mesh bag or a mold in the shape you desire. Think square, heart, star – get creative! Make sure the bag is large enough to accommodate a growing watermelon. You can find these online or even repurpose a sturdy onion or potato bag. For molds, you can find specialized watermelon molds online, usually made of clear plastic.
* **Support Structure (Optional):** Depending on the size and weight of your watermelon, you might need a support structure to prevent the bag or mold from collapsing. Think a small wooden frame or even a sturdy wire hanger.
* **Gardening Gloves:** To keep your hands clean and protected.
* **Trowel or Shovel:** For planting.
* **Watering Can or Hose:** For, well, watering!
* **Fertilizer (Optional):** Watermelon plants are heavy feeders, so a little fertilizer can help them thrive.
* **Patience:** This is key! Shaping a watermelon takes time and a little bit of luck.
Choosing Your Watermelon Variety
This is important! Not all watermelons are created equal when it comes to shaping. You want a variety that’s relatively small and has a thinner rind. Here’s why:
* **Size Matters:** A smaller watermelon is easier to manage and less likely to break your bag or mold.
* **Thinner Rind:** A thinner rind is more pliable and will conform to the shape of the bag or mold more readily.
As I mentioned earlier, Sugar Baby and Bush Sugar Baby are great choices. They’re compact, produce relatively small watermelons, and have thinner rinds compared to larger varieties like Charleston Gray. Do your research and choose a variety that suits your climate and growing conditions.
Preparing Your Planting Site
Watermelons are sun-loving plants, so choose a spot in your garden that gets at least 6-8 hours of direct sunlight per day. The soil should be well-draining and rich in organic matter.
1. **Clear the Area:** Remove any weeds, rocks, or debris from the planting site.
2. **Amend the Soil:** Dig in plenty of compost or well-rotted manure to improve soil fertility and drainage. Watermelons are heavy feeders, so this step is crucial.
3. **Create a Mound (Optional):** Watermelons prefer slightly raised beds or mounds. This helps with drainage and warms the soil more quickly. Create a mound about 12 inches high and 2-3 feet wide.
Planting Your Watermelon
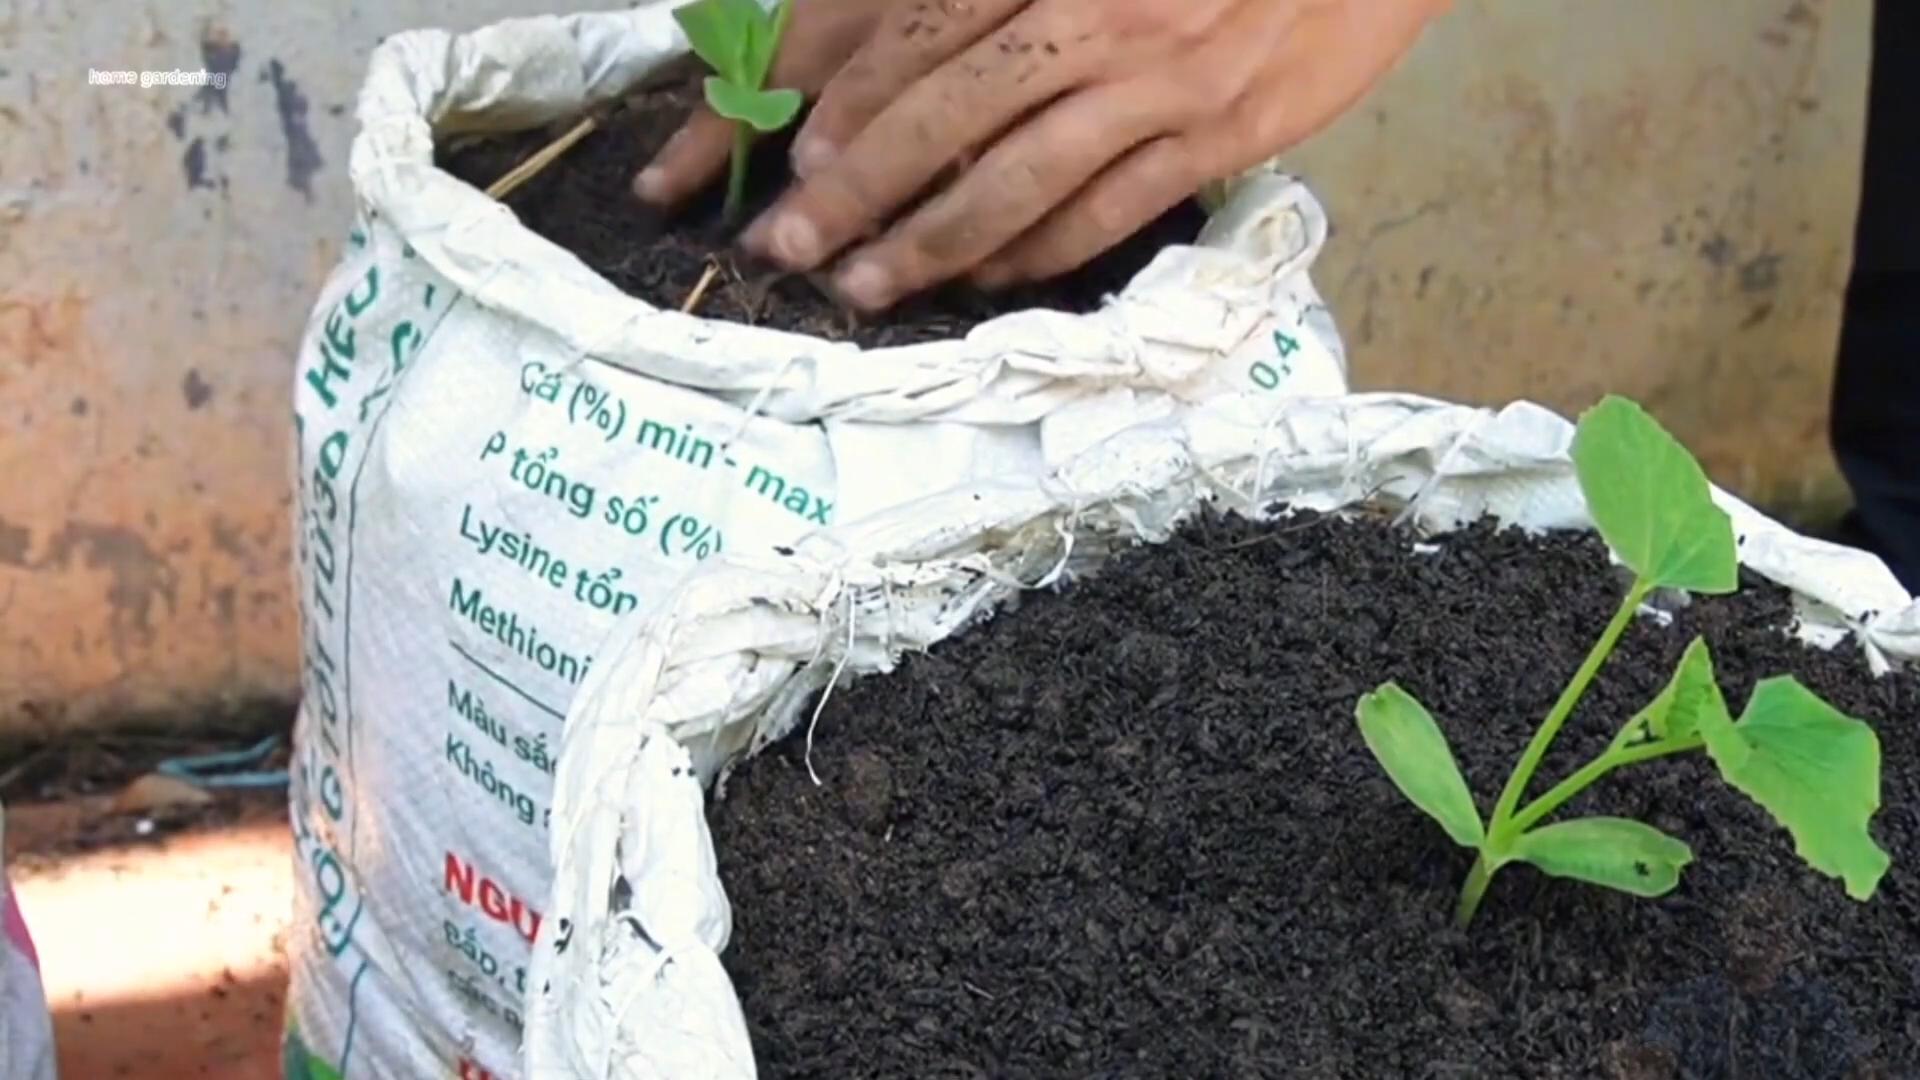
You can either start your watermelon seeds indoors a few weeks before the last frost or direct sow them in the garden after the soil has warmed up. I prefer direct sowing because it avoids transplant shock.
1. **Sow the Seeds:** Sow 2-3 seeds per hill, about 1 inch deep. Space the hills about 2-3 feet apart.
2. **Water Thoroughly:** Water the planting site thoroughly after sowing the seeds.
3. **Thin the Seedlings:** Once the seedlings emerge and have a few true leaves, thin them to one plant per hill. Choose the strongest and healthiest seedling.
The Bagging/Molding Process
This is where the magic happens! We’ll be carefully placing the developing watermelon into the bag or mold to shape it.
1. **Timing is Key:** This is the most crucial step. You need to wait until the watermelon is about the size of a softball or slightly larger. If you put it in too early, it might not develop properly. If you wait too long, it might be too big to fit! I usually check the size of the watermelon every day once it starts to develop.
2. **Prepare the Bag/Mold:** Make sure your bag or mold is clean and ready to go. If you’re using a mesh bag, you might want to reinforce it with some twine or wire to prevent it from stretching too much. If you’re using a mold, make sure it’s properly assembled.
3. **Gently Place the Watermelon:** Carefully lift the watermelon and gently place it inside the bag or mold. Be very careful not to damage the vine or the watermelon itself.
4. **Secure the Bag/Mold:** If you’re using a mesh bag, tie it securely around the stem of the watermelon. Make sure it’s not too tight, as this could restrict growth. If you’re using a mold, follow the manufacturer’s instructions for securing it.
5. **Provide Support (If Needed):** If the watermelon is getting heavy, you might need to provide some support to prevent the bag or mold from collapsing. You can use a small wooden frame or even a sturdy wire hanger.
Caring for Your Bagged Watermelon
Now that your watermelon is safely tucked away in its bag or mold, it’s time to provide it with the care it needs to thrive.
1. **Water Regularly:** Watermelons need plenty of water, especially during hot weather. Water deeply and regularly, making sure the soil stays consistently moist.
2. **Fertilize (Optional):** If you haven’t already, you can give your watermelon plant a boost with some fertilizer. Use a fertilizer that’s high in phosphorus and potassium, which are essential for fruit development.
3. **Monitor for Pests and Diseases:** Keep an eye out for common watermelon pests and diseases, such as aphids, squash bugs, and powdery mildew. Take action promptly if you notice any problems.
4. **Be Patient:** Shaping a watermelon takes time, so be patient and don’t disturb the bag or mold too often. Check on it periodically to make sure everything is going smoothly, but avoid the temptation to peek inside too frequently.
Harvesting Your Bagged Watermelon Surprise
The moment of truth! Harvesting your bagged watermelon is an exciting time.
1. **Check for Ripeness:** Watermelons are typically ready to harvest about 80-90 days after planting. There are a few ways to tell if a watermelon is ripe:
* **The Tendril Test:** The tendril closest to the watermelon should be brown and dry.
* **The Ground Spot Test:** The spot where the watermelon rests on the ground should be yellow or cream-colored.
* **The Thump Test:** Give the watermelon a gentle thump. A ripe watermelon will sound hollow.
2. **Carefully Remove the Bag/Mold:** Once you’re confident that the watermelon is ripe, carefully remove the bag or mold. Be gentle and avoid damaging the watermelon.
3. **Harvest the Watermelon:** Use a sharp knife to cut the watermelon from the vine, leaving a few inches of stem attached.
4. **Admire Your Creation!:** Take a moment to admire your unique, shaped watermelon. You did it!
Troubleshooting Tips
Even with the best planning, things don’t always go according to plan. Here are a few troubleshooting tips to help you overcome common challenges:
* **Watermelon is Too Big for the Bag/Mold:** If the watermelon is getting too big for the bag or mold, you might need to remove it and let it grow naturally. Alternatively, you could try using a larger bag or mold.
* **Bag/Mold is Collapsing:** If the bag or mold is collapsing, provide additional support. You can use a small wooden frame or even a sturdy wire hanger.
* **Watermelon is Rotting:** If you notice any signs of rot, remove the watermelon immediately to prevent the disease from spreading to other plants.
* **Pests and Diseases:** Address pest and disease problems promptly to prevent them from damaging your watermelon.
Creative Ideas and Variations
Once you’ve mastered the basic bagged watermelon technique, you can start experimenting with different shapes and designs. Here are a few ideas to get you started:
* **Heart-Shaped Watermelon:** Use a heart-shaped mold to create a romantic watermelon for Valentine’s Day or an anniversary.
* **Star-Shaped Watermelon:** Use a star-shaped mold to create a patriotic watermelon for the Fourth of July.
* **Lettered Watermelon:** Use stencils to create a watermelon with letters or words on its surface.
* **Multi-Shaped Watermelon:** Use multiple small molds to create a watermelon with a variety of shapes.
Final Thoughts
Creating a bagged watermelon surprise is a fun and rewarding project that’s sure to impress your friends
Conclusion
So, there you have it! Transforming an ordinary, store-bought watermelon into a “Bagged Watermelon Surprise” is more than just a fun kitchen experiment; it’s a gateway to unlocking a whole new level of refreshing summer enjoyment. We’ve walked you through the simple steps, highlighting the ease and accessibility of this DIY trick. But why is this a must-try?
Firstly, it’s about control. You dictate the sweetness, the flavor profile, and the overall presentation. Tired of bland, watery watermelon? This method allows you to infuse it with your favorite juices, liqueurs (for the adults, of course!), or even a touch of spice for an unexpected kick. Imagine a watermelon infused with lime and mint for a mojito-inspired treat, or perhaps a hint of ginger and honey for a soothing, revitalizing snack. The possibilities are truly endless.
Secondly, it’s about the wow factor. Let’s be honest, serving a perfectly cubed, uniformly flavored watermelon is far more impressive than simply slicing it open. It elevates a simple fruit into a sophisticated dessert or a show-stopping centerpiece for your next barbecue. Think of the Instagram potential!
Thirdly, it’s about minimizing waste. By removing the rind and processing the watermelon into manageable portions, you’re less likely to have leftovers that end up forgotten in the back of the fridge. Plus, the rind can be repurposed for pickling or even as a natural fertilizer for your garden.
Ready to take your watermelon game to the next level? Don’t be afraid to experiment! Try different flavor combinations, adjust the soaking time to your preference, and get creative with your presentation. Consider adding a sprinkle of sea salt for a sweet and savory contrast, or garnishing with fresh herbs for a pop of color and aroma.
Here are a few suggestions to get you started:
* Tropical Twist: Infuse the watermelon with pineapple juice, coconut water, and a squeeze of lime.
* Spicy Watermelon: Add a pinch of chili powder or a few slices of jalapeño to the juice mixture for a surprising kick.
* Berry Blast: Combine watermelon with strawberries, blueberries, and raspberries for a vibrant and antioxidant-rich treat.
* Adults Only: For a grown-up version, soak the watermelon in a mixture of watermelon juice and your favorite liquor, such as vodka, rum, or tequila. Remember to enjoy responsibly!
We are confident that once you try this “Bagged Watermelon Surprise” trick, you’ll never look at watermelon the same way again. It’s a simple, effective, and incredibly rewarding way to transform a humble fruit into a culinary masterpiece.
So, what are you waiting for? Grab a watermelon, gather your ingredients, and get ready to experience the ultimate summer refreshment. And most importantly, don’t forget to share your creations with us! We’d love to see your unique flavor combinations and presentation ideas. Tag us on social media and let us know how your “Bagged Watermelon Surprise” turned out. Happy watermelon-ing!
Frequently Asked Questions
Can I use any type of watermelon for this recipe?
Yes, you can use any type of watermelon, including seeded, seedless, mini watermelons, or even yellow watermelons. However, seedless watermelons are generally easier to work with since you won’t have to spend time removing the seeds. The size of the watermelon will determine the size of the bag you need and the amount of juice required for infusion.
How long should I soak the watermelon in the juice mixture?
The soaking time depends on your preference and the intensity of flavor you desire. For a subtle flavor, soak the watermelon for at least 2 hours. For a more pronounced flavor, soak it for 4-6 hours, or even overnight in the refrigerator. Keep in mind that the longer the watermelon soaks, the softer it will become.
What kind of bag should I use?
Use a food-grade, resealable plastic bag that is large enough to hold all of the watermelon cubes and the juice mixture. A gallon-sized bag is usually sufficient for a medium-sized watermelon. Make sure the bag is sturdy and leak-proof to prevent any spills. You can also use a vacuum-sealed bag for even better infusion and preservation.
Can I use frozen watermelon for this recipe?
While you can use frozen watermelon, it’s not recommended. Freezing watermelon changes its texture, making it mushy and less absorbent. Fresh watermelon will yield the best results in terms of flavor and texture.
How do I prevent the watermelon from becoming too mushy?
To prevent the watermelon from becoming too mushy, avoid over-soaking it. Start with a shorter soaking time and check the texture periodically. Also, make sure the watermelon is properly chilled before soaking, as this will help maintain its firmness.
Can I add other fruits to the bag along with the watermelon?
Yes, you can add other fruits to the bag to create a mixed fruit salad. Berries, melon, grapes, and pineapple are all great additions. Just make sure to cut the fruits into similar sizes for even soaking and flavor distribution.
How long will the “Bagged Watermelon Surprise” last in the refrigerator?
The “Bagged Watermelon Surprise” will last for up to 3-4 days in the refrigerator. Store it in the sealed bag to prevent it from drying out or absorbing odors from other foods.
Can I use this method to infuse other fruits?
Yes, you can use this method to infuse other fruits, such as cantaloupe, honeydew melon, and even pineapple. The soaking time and juice mixture may need to be adjusted depending on the fruit’s texture and sweetness.
What are some other flavor combinations I can try?
The possibilities are endless! Here are a few more ideas:
* Lemon-Lime: Infuse the watermelon with lemon juice, lime juice, and a touch of agave nectar.
* Mint-Cucumber: Combine watermelon with cucumber slices, fresh mint leaves, and a splash of lime juice.
* Watermelon Margarita: Soak the watermelon in a mixture of watermelon juice, tequila, lime juice, and a splash of orange liqueur.
* Rosemary-Infused Watermelon: Add fresh rosemary sprigs to the juice mixture for a unique and aromatic flavor.
Is this recipe suitable for children?
Yes, this recipe is suitable for children as long as you use non-alcoholic juice mixtures. Avoid adding any alcohol or ingredients that may be harmful to children.
How can I make this recipe healthier?
To make this recipe healthier, use natural sweeteners like honey or maple syrup instead of refined sugar. You can also use fresh fruit juices instead of store-bought juices, which may contain added sugars and preservatives.
Can I grill the watermelon after soaking it?
Yes, you can grill the watermelon after soaking it for a smoky and caramelized flavor. Just make sure to pat it dry before grilling to prevent it from steaming. Grill it over medium heat for a few minutes per side until grill marks appear.
What is the best way to serve the “Bagged Watermelon Surprise”?
The “Bagged Watermelon Surprise” can be served in a variety of ways. You can serve it as a refreshing snack, a light dessert, or a colorful addition to a fruit platter. You can also use it to make smoothies, cocktails, or even watermelon salsa. Get creative and enjoy!

Leave a Comment