
Colgate and lemon uses might sound like the ingredients for a strange cleaning concoction, but trust me, they’re about to become your secret weapon for tackling some common household headaches! Have you ever stared at a stubborn stain, a tarnished silver piece, or even just wished your shoes looked a little brighter? Well, you’re not alone! For generations, people have been passing down simple, effective DIY tricks using everyday items, and the combination of Colgate toothpaste and lemon is a powerhouse duo in that tradition.
Think of it as a modern twist on age-old cleaning wisdom. While our ancestors might have used lye or other harsh chemicals, we now have access to safer, readily available alternatives. The slightly abrasive texture of Colgate, combined with the natural acidity of lemon juice, creates a potent cleaning and brightening agent.
Why do you need to know these Colgate and lemon uses? Because life is messy! Spills happen, silver tarnishes, and sometimes, you just need a quick and easy solution without resorting to harsh chemicals or expensive cleaning products. I’m going to show you how to harness the power of these two simple ingredients to tackle everything from removing stains to polishing metal, all while saving you time and money. Get ready to be amazed by the versatility of this unexpected combination!
DIY Teeth Whitening with Colgate and Lemon: A Comprehensive Guide
Hey everyone! I’m so excited to share this DIY teeth whitening hack with you. I know, I know, the internet is full of these, but trust me, this one is simple, uses ingredients you probably already have, and can give you noticeable results. We’re talking about using Colgate toothpaste and lemon juice to brighten your smile. Now, before we dive in, let’s get one thing straight: I’m not a dentist, and this isn’t a substitute for professional dental care. Always consult with your dentist before trying any at-home whitening methods, especially if you have sensitive teeth or any existing dental issues.
That being said, I’ve personally tried this method, and I’ve seen a difference. Just remember to use it sparingly and with caution. Okay, let’s get started!
What You’ll Need
Before we begin, gather all your supplies. This will make the process smoother and prevent you from running around mid-whitening.
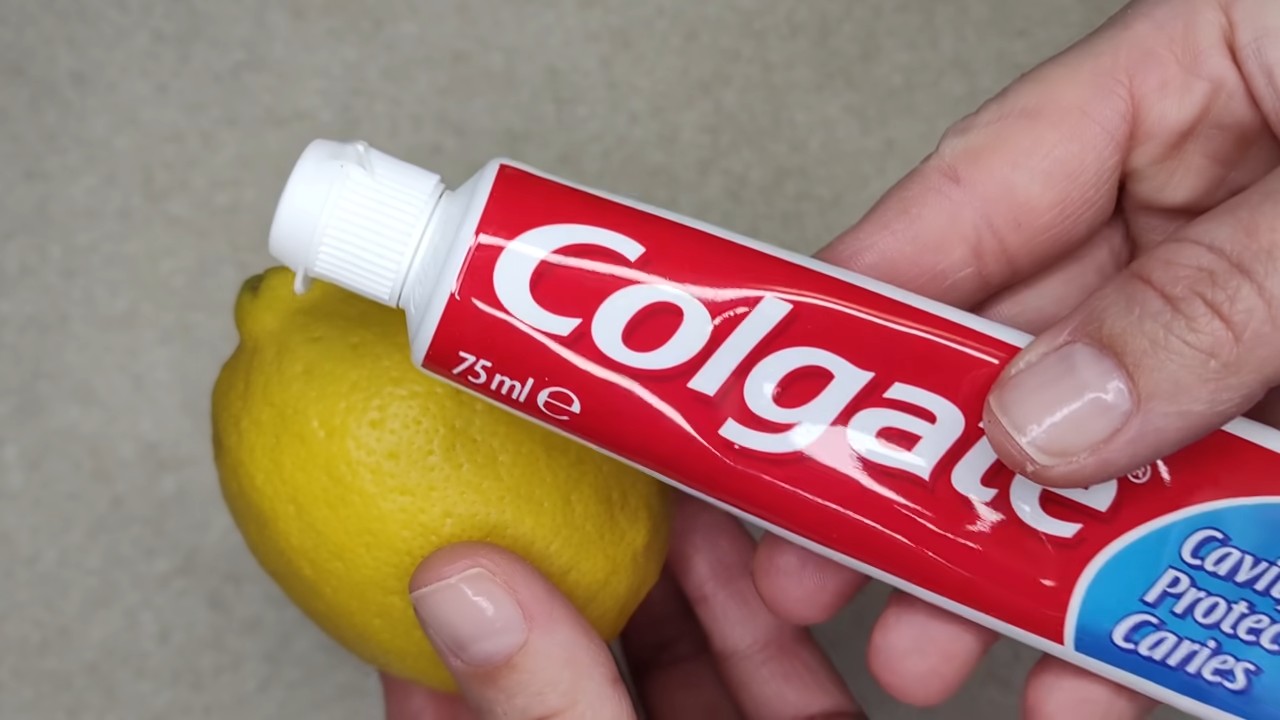
* Colgate Toothpaste: I recommend using a plain, white Colgate toothpaste. Avoid the ones with colored stripes or whitening beads, as they might interfere with the lemon juice.
* Fresh Lemon: You’ll need a fresh lemon for its juice. Bottled lemon juice often contains preservatives that might not be as effective or as gentle.
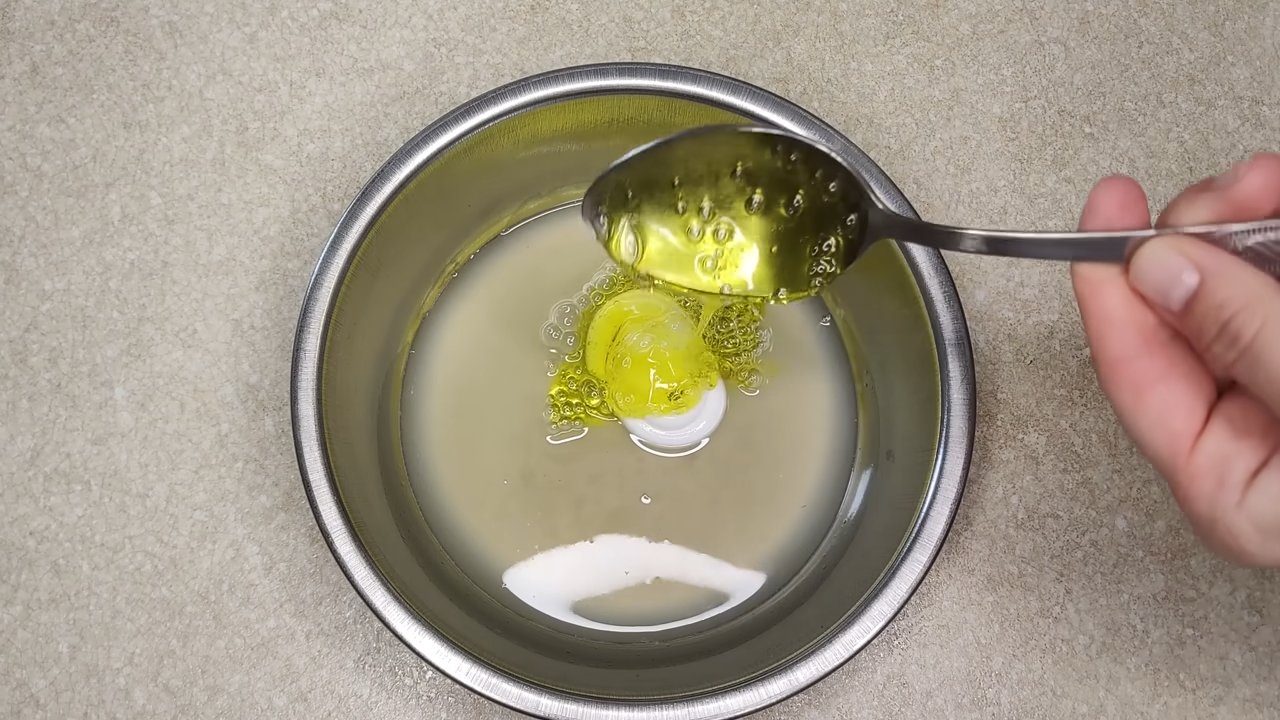
* Small Bowl: For mixing the toothpaste and lemon juice.
* Toothbrush: Use a soft-bristled toothbrush. A hard-bristled brush can damage your enamel, especially when combined with lemon juice.
* Water: For rinsing your mouth.
* Timer: To keep track of the whitening time.
* Lip Balm (Optional): Lemon juice can be drying, so applying lip balm beforehand can help protect your lips.
* Petroleum Jelly (Optional): To protect your gums from the acidity of the lemon.
Understanding the Science (A Little Bit!)
Okay, so why does this work? Lemon juice contains citric acid, which is a natural bleaching agent. It helps to break down stains on the surface of your teeth. Colgate toothpaste, on the other hand, contains abrasives that help to remove these loosened stains. The combination of the two can lead to a brighter smile.
Important Note: The citric acid in lemon juice can also erode tooth enamel if used excessively. That’s why moderation and proper technique are crucial.
Step-by-Step Instructions: The Whitening Process
Now for the fun part! Follow these steps carefully to whiten your teeth safely and effectively.
1. Prepare Your Mouth: Before you start, rinse your mouth thoroughly with water. This will remove any food particles or debris that might interfere with the whitening process. If you have sensitive gums, apply a thin layer of petroleum jelly to protect them from the lemon juice. This is a step I always take!
2. Mix the Whitening Paste: In your small bowl, squeeze about a teaspoon of Colgate toothpaste. Then, add a few drops of fresh lemon juice. Start with just a few drops (around 5-6) and mix well. The mixture should form a smooth paste. Be careful not to add too much lemon juice, as this can make the mixture too acidic. I usually aim for a consistency similar to regular toothpaste.
3. Apply the Paste to Your Toothbrush: Scoop up a small amount of the whitening paste with your toothbrush. Remember, a little goes a long way.
4. Brush Your Teeth Gently: Brush your teeth with the whitening paste for about 2 minutes. Use gentle, circular motions. Avoid applying too much pressure, as this can damage your enamel. Pay special attention to areas where you have noticeable stains. I like to focus on my front teeth, as they’re the most visible.
5. Let it Sit (Optional, and with Caution!): For a more intense whitening effect, you can leave the paste on your teeth for an additional minute. However, I strongly advise against leaving it on for longer than that, as the lemon juice can start to erode your enamel. If you experience any sensitivity or discomfort, rinse immediately. I personally skip this step most of the time, especially if my teeth are feeling a bit sensitive.
6. Rinse Thoroughly: After brushing or letting the paste sit, rinse your mouth thoroughly with water. Make sure to remove all traces of the whitening paste. I usually rinse several times to be sure.
7. Brush with Regular Toothpaste: After rinsing, brush your teeth again with your regular toothpaste. This will help to remove any remaining lemon juice and restore the pH balance in your mouth.
8. Rinse Again: Rinse your mouth one last time with water.
9. Admire Your Smile (and Hydrate!): Take a look in the mirror and admire your brighter smile! Remember to drink plenty of water to rehydrate your mouth.
Important Considerations and Safety Tips
Okay, so now you know how to do it, but let’s talk about some important things to keep in mind. This isn’t a magic bullet, and it’s definitely not something you should do every day.
* Frequency: I recommend using this method no more than once or twice a week. Overuse can lead to enamel erosion and tooth sensitivity. I usually do it once every other week, or even less frequently if my teeth are feeling sensitive.
* Sensitivity: If you experience any tooth sensitivity or gum irritation, stop using this method immediately. Consult with your dentist if the sensitivity persists.
* Enamel Erosion: Lemon juice is acidic and can erode tooth enamel. Be careful not to overuse this method, and always brush gently.
* Existing Dental Issues: If you have any existing dental issues, such as cavities or gum disease, consult with your dentist before trying this method.
* Pregnancy and Breastfeeding: If you are pregnant or breastfeeding, consult with your doctor before trying this method.
* Children: This method is not recommended for children.
* Listen to Your Body: Pay attention to how your teeth and gums feel. If you experience any discomfort, stop using this method.
Troubleshooting and Common Issues
Sometimes things don’t go exactly as planned. Here are some common issues you might encounter and how to deal with them.
* Tooth Sensitivity: If you experience tooth sensitivity, try using a toothpaste designed for sensitive teeth. You can also reduce the amount of lemon juice you use or shorten the whitening time.
* Gum Irritation: If you experience gum irritation, try applying petroleum jelly to your gums before whitening. You can also use a softer toothbrush and brush more gently.
* Uneven Whitening: If you notice uneven whitening, try focusing on the areas that are more stained. You can also try using a whitening toothpaste in between treatments.
* No Results: If you don’t see any results after a few treatments, this method might not be effective for you. Consult with your dentist about other whitening options. Sometimes, professional whitening is the only way to achieve significant results.
Alternative Ingredients and Variations
While Colgate and lemon are the main ingredients for this hack, here are a few variations you can try (with caution, of course!).
* Baking Soda: You can add a pinch of baking soda to the mixture for extra whitening power. Baking soda is a mild abrasive that can help to remove surface stains. However, be careful not to use too much, as it can be harsh on your enamel.
* Hydrogen Peroxide: You can add a few drops of hydrogen peroxide to the mixture for a more intense whitening effect. However, be very careful when using hydrogen peroxide, as it can irritate your gums and damage your enamel if used improperly. I would only recommend this if you are very experienced with DIY whitening and understand the risks.
* Coconut Oil: After whitening, you can try oil pulling with coconut oil to help remove any remaining stains and improve your oral health. Oil pulling involves swishing coconut oil in your mouth for about 20 minutes.
Maintaining Your White Smile
Okay, so you’ve whitened your teeth. Now what? Here are some tips for maintaining your bright smile.
* Brush and Floss Regularly: Brush your teeth at least twice a day and floss daily to remove plaque and prevent stains.
* Limit Stain-Causing Foods and Drinks: Coffee, tea, red wine, and berries can all stain your teeth. Try to limit your consumption of these foods and drinks, or rinse your mouth with water after consuming them.
* Use a Whitening Toothpaste: Use a whitening toothpaste in between treatments to help maintain your bright smile.
* Visit Your Dentist Regularly: Visit your dentist for regular checkups and cleanings.
Final Thoughts
So there you have it! My comprehensive guide to DIY teeth whitening with Colgate and lemon. Remember to use this method sparingly and with caution. Always consult with your dentist before trying any at-home whitening methods. And most importantly, listen to your body and stop if you experience any discomfort.
I hope this guide has been helpful! Let me know in the
Conclusion
So, there you have it! This simple yet surprisingly effective DIY trick using Colgate and lemon offers a fantastic and affordable way to tackle stubborn stains, brighten dull surfaces, and even address minor skin imperfections. Forget expensive commercial cleaners or harsh chemical treatments; this method harnesses the natural power of lemon juice combined with the gentle abrasiveness of Colgate toothpaste to deliver noticeable results.
Why is this a must-try? Because it’s accessible, economical, and often yields results that rival pricier alternatives. Think about it: you likely already have these ingredients in your home. No special trips to the store, no complicated instructions, just a straightforward solution to common household and beauty concerns.
But the beauty of this DIY trick lies not only in its simplicity but also in its adaptability. Feel free to experiment with variations to suit your specific needs. For instance, if you’re dealing with particularly tough stains on surfaces, consider adding a pinch of baking soda to the mixture for an extra boost of cleaning power. For sensitive skin, dilute the lemon juice with water or honey to minimize potential irritation. Remember to always test the mixture on a small, inconspicuous area first, regardless of where you’re applying it.
When using this **Colgate and lemon** mixture on your skin, be extra cautious. Avoid applying it to open wounds, irritated skin, or around the eyes. Always follow up with a moisturizer to replenish any lost hydration. And remember, consistency is key. While you might see immediate improvements, regular application (within safe limits, of course) will yield the best long-term results.
We’ve covered a range of applications, from whitening teeth to cleaning tarnished silverware. The versatility of this DIY remedy is truly remarkable. However, it’s crucial to remember that this is a DIY solution, and results may vary depending on the specific situation and the individual using it.
Ultimately, the best way to discover the full potential of this Colgate and lemon trick is to try it yourself. We encourage you to experiment, adapt, and find the applications that work best for you. And most importantly, we want to hear about your experiences! Share your tips, tricks, and before-and-after photos in the comments below. Let’s build a community of DIY enthusiasts who are passionate about finding simple, effective, and affordable solutions to everyday problems. Your insights could help others discover the amazing benefits of this humble yet powerful combination. So go ahead, give it a try, and let us know what you think! You might just be surprised by the results.
Frequently Asked Questions (FAQ)
1. Is it safe to use Colgate and lemon on my teeth?
While some people advocate using Colgate and lemon for teeth whitening, it’s crucial to exercise extreme caution. Lemon juice is highly acidic and can erode tooth enamel over time, leading to increased sensitivity and potential damage. Colgate toothpaste, while containing fluoride for enamel protection, may not be enough to counteract the acidity of the lemon. If you choose to try this method, use it sparingly (no more than once a week) and dilute the lemon juice significantly with water. After application, rinse your mouth thoroughly with water and wait at least 30 minutes before brushing your teeth with regular fluoride toothpaste. It’s always best to consult with your dentist before trying any DIY teeth whitening methods to ensure they are safe for your specific dental health. They can recommend professional whitening treatments or safe at-home alternatives.
2. Can I use any type of Colgate toothpaste for this DIY trick?
Generally, plain white Colgate toothpaste is recommended for most applications. Gel toothpastes or those with added ingredients like whitening agents or charcoal might not produce the same results or could potentially cause unwanted reactions, especially when used on skin. The key ingredient in Colgate that aids in cleaning is its mild abrasive quality, which helps to scrub away dirt and grime. Stick to the classic white paste for the most predictable and effective outcome.
3. How often can I use the Colgate and lemon mixture on my skin?
The frequency of application depends on your skin type and the specific issue you’re addressing. For most people, using this mixture more than once or twice a week is not recommended. Lemon juice is a natural exfoliant, but its acidity can be irritating, especially for sensitive skin. Overuse can lead to dryness, redness, and even chemical burns. Always start with a small test patch and monitor your skin’s reaction. If you experience any irritation, discontinue use immediately. For those with sensitive skin, diluting the lemon juice with water or honey is highly recommended.
4. What are some alternative uses for Colgate and lemon besides those mentioned in the article?
Beyond teeth whitening and surface cleaning, Colgate and lemon can be used for a variety of other purposes, although caution is advised. Some people use it to lighten dark spots or acne scars, but again, proceed with caution due to the lemon’s acidity. It can also be used to clean and brighten fingernails. Another potential use is for removing stubborn stains from white clothing, but always test the mixture on an inconspicuous area first to ensure it doesn’t damage the fabric. Remember to thoroughly rinse any treated surfaces or fabrics after application.
5. Can I store the Colgate and lemon mixture for later use?
It’s generally not recommended to store the Colgate and lemon mixture. The lemon juice can react with the toothpaste over time, potentially altering its effectiveness or creating unwanted byproducts. It’s best to prepare a fresh batch each time you need it to ensure optimal results and minimize the risk of any adverse reactions. Plus, it only takes a few seconds to mix, so there’s really no need to make a large batch in advance.
6. What precautions should I take when using Colgate and lemon?
Always perform a patch test before applying the mixture to a large area, especially on your skin. Avoid contact with your eyes and mucous membranes. If you experience any irritation, redness, or burning, discontinue use immediately and rinse the affected area thoroughly with water. Wear gloves when using the mixture for cleaning to protect your hands. Keep the mixture out of reach of children and pets. And remember, this DIY trick is not a substitute for professional medical or dental advice. If you have any concerns about your health, consult with a qualified healthcare provider.
7. What if I have sensitive skin? Can I still use this DIY trick?
If you have sensitive skin, you can still try this DIY trick, but with extra precautions. Dilute the lemon juice significantly with water or honey to reduce its acidity. Perform a patch test on a very small, inconspicuous area of your skin and wait 24 hours to see if any irritation develops. If you experience any redness, itching, or burning, discontinue use immediately. If your skin tolerates the diluted mixture, use it sparingly and for a very short period of time. Always follow up with a gentle moisturizer to replenish any lost hydration. If you’re unsure whether this DIY trick is suitable for your sensitive skin, consult with a dermatologist.
8. Will this Colgate and lemon mixture remove deep stains from surfaces?
While the Colgate and lemon mixture can be effective for removing many types of stains, it may not be powerful enough to tackle deep-seated or heavily ingrained stains. For such stubborn stains, you may need to resort to stronger cleaning agents or professional cleaning services. However, it’s worth trying the Colgate and lemon mixture first, as it’s a gentler and more environmentally friendly option. You can also try adding a pinch of baking soda to the mixture for an extra boost of cleaning power. Remember to always test the mixture on an inconspicuous area first to ensure it doesn’t damage the surface.


Leave a Comment