
Homemade Fly Trap: Are pesky flies buzzing around your home, turning your peaceful haven into an irritating insect playground? I know the feeling! Before you reach for harsh chemicals or expensive store-bought solutions, let’s dive into a simple, effective, and budget-friendly DIY project: building your very own homemade fly trap.
The concept of trapping flies isn’t new. Throughout history, people have devised clever methods to control these unwanted guests. From ancient civilizations using sticky resins to catch insects to modern-day innovations, the battle against flies has been ongoing. But you don’t need to be an entomologist to win this fight!
Why is a homemade fly trap so essential? Well, flies aren’t just annoying; they can also carry harmful bacteria and contaminate your food. Creating a safe and effective trap means protecting your family and enjoying a cleaner, healthier living space. Plus, it’s incredibly satisfying to repurpose everyday items and create something useful. So, let’s get started and reclaim your home from those buzzing invaders with this easy and effective DIY project!
DIY Fly Trap: Say Goodbye to Pesky Flies!
Okay, let’s face it, flies are annoying. They buzz around your head, land on your food, and generally make life unpleasant. Store-bought fly traps can be expensive and often contain harsh chemicals. But don’t worry, I’m going to show you how to make a super effective fly trap using things you probably already have in your kitchen! This is a simple, budget-friendly, and eco-conscious way to reclaim your space from those unwanted guests.
What You’ll Need
Before we get started, gather these supplies. Trust me, having everything ready will make the process much smoother.
* A plastic bottle (2-liter soda bottle works great, but any size will do)
* Scissors or a utility knife
* Tape (duct tape or packing tape is best)
* Something sweet to attract the flies (apple cider vinegar, sugar water, honey, overripe fruit – I’ll explain the options later!)
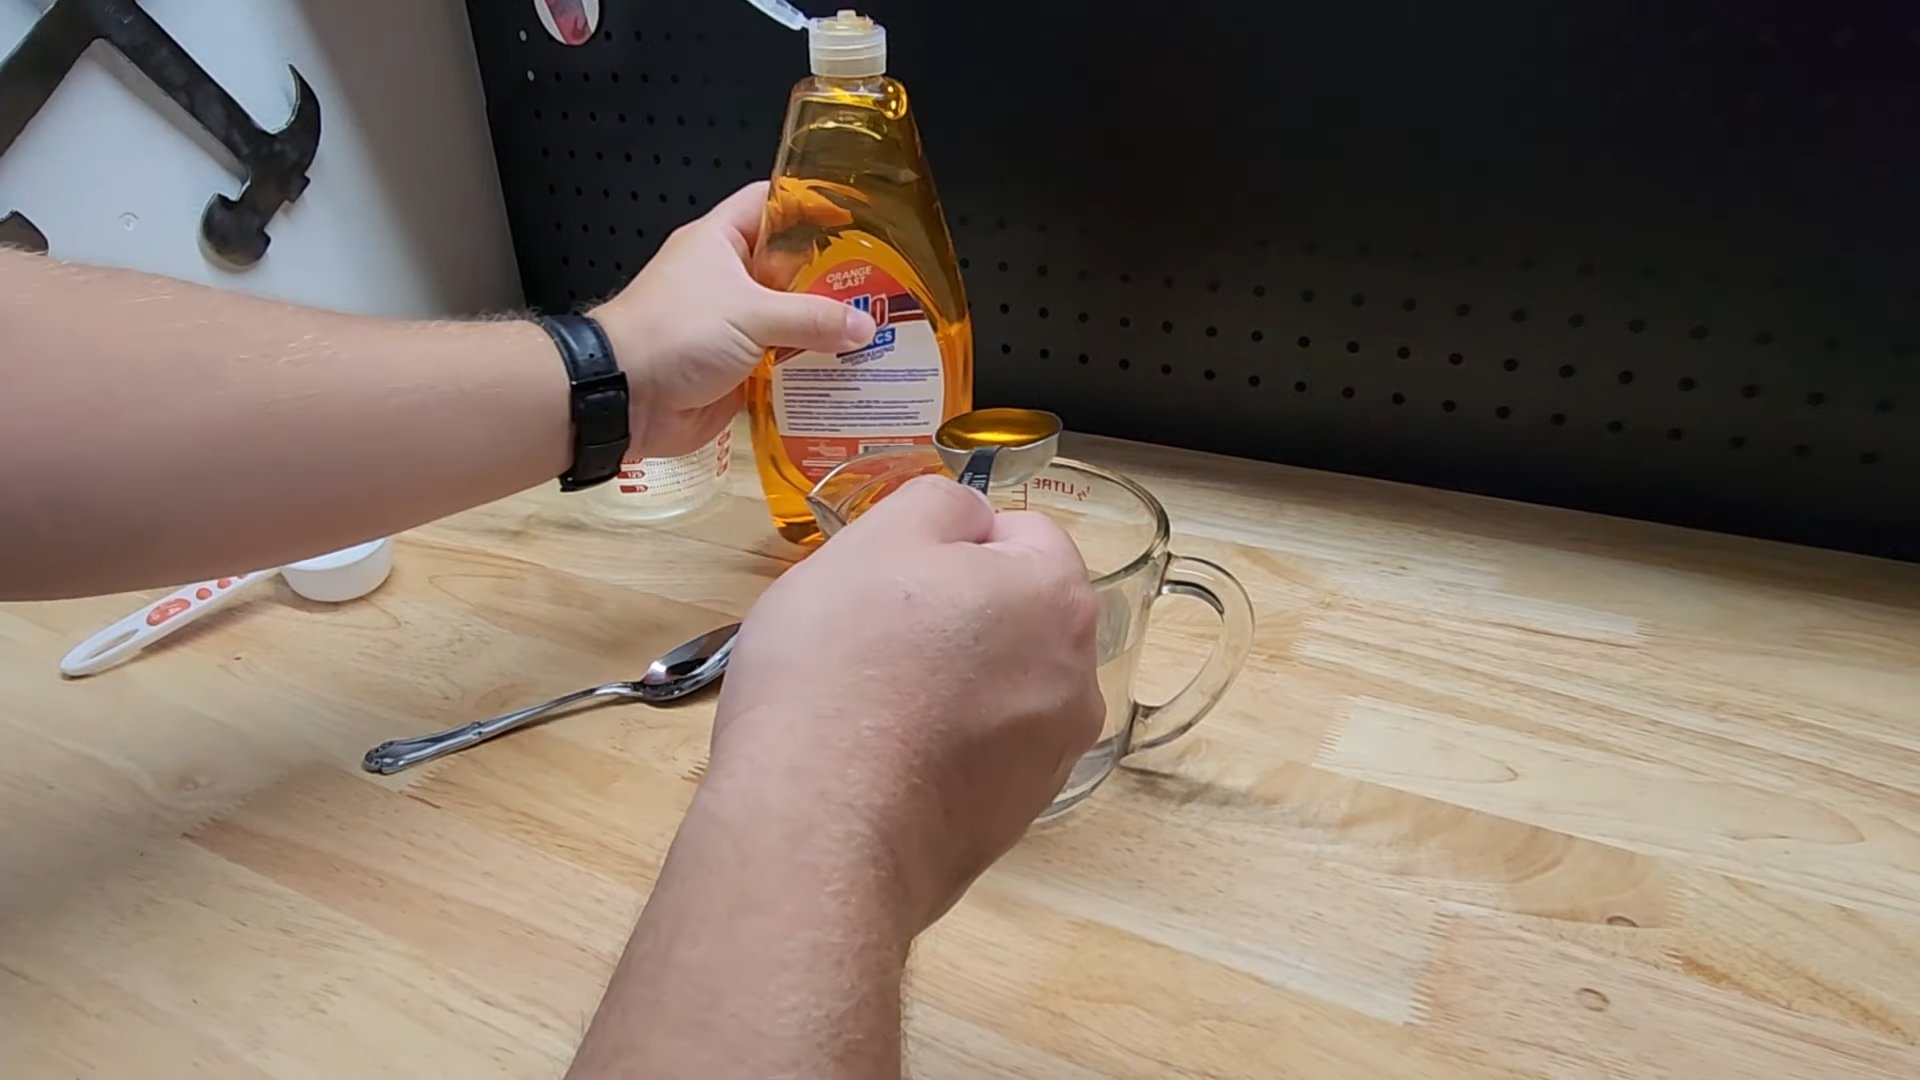
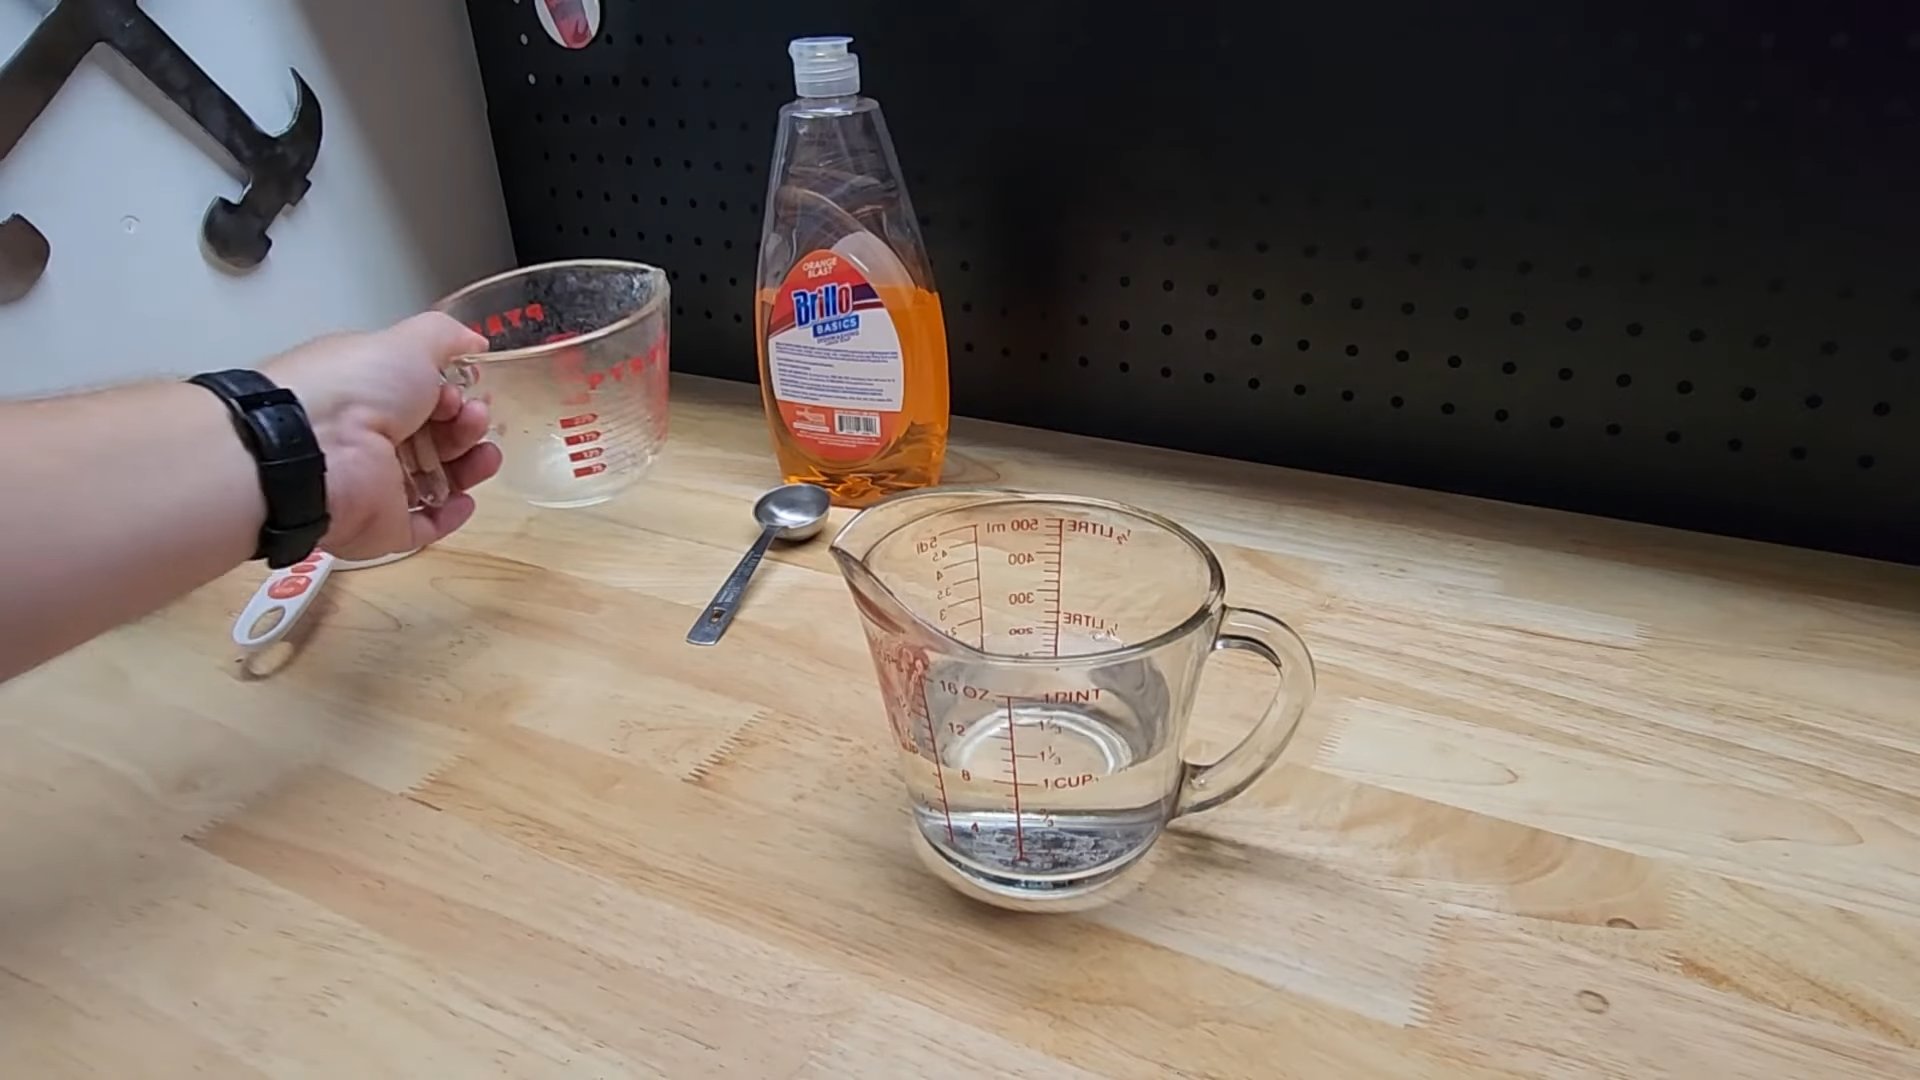
* Dish soap (just a drop or two)
* Water
Choosing Your Bait: The Secret Weapon
The key to a successful fly trap is the bait. Flies are attracted to sweet and fermenting smells, so we need to create something irresistible. Here are a few options, and I’ll tell you my personal favorite:
* Apple Cider Vinegar: This is a classic and works wonders. The strong, slightly fermented scent is like a fly magnet.
* Sugar Water: A simple solution of sugar and water can be very effective. I usually use about a quarter cup of sugar per cup of water.
* Honey: A small amount of honey mixed with water is another great option.
* Overripe Fruit: Got a banana that’s past its prime? Perfect! Flies love the smell of rotting fruit.
* My Personal Favorite: A combination of apple cider vinegar, a little sugar, and a few drops of dish soap. The vinegar attracts them, the sugar sweetens the deal, and the dish soap breaks the surface tension of the liquid, making it harder for them to escape.
Building Your Fly Trap: Step-by-Step Instructions
Alright, let’s get our hands dirty! Here’s how to assemble your DIY fly trap:
1. Prepare the Bottle: First, you need to cut the top off the plastic bottle. About one-third of the way down from the top is a good place to start. I find that using a utility knife to make an initial cut, and then switching to scissors, makes the process easier and safer. Be careful when using the knife!
2. Invert the Top: Now, invert the top portion of the bottle (the part you just cut off) and place it upside down into the bottom portion of the bottle. This creates a funnel-like entrance for the flies. The narrow opening makes it easy for them to get in, but difficult to get out.
3. Secure the Top: Use tape to secure the inverted top to the bottom of the bottle. Make sure there are no gaps or openings around the edges. You want to create a tight seal so the flies can’t escape through the sides. I usually go around the edge a couple of times with the tape to make sure it’s really secure.
4. Add the Bait: Now for the fun part – adding the bait! Pour your chosen bait mixture into the bottom of the bottle. You only need enough to cover the bottom by an inch or two. Remember, if you’re using dish soap, just add a few drops. Too much soap can actually repel the flies.
5. Placement is Key: Place your fly trap in an area where you’ve noticed a lot of fly activity. This could be near your kitchen counter, garbage can, or outdoor patio. Experiment with different locations to see what works best.
Tips and Tricks for Maximum Fly-Catching Power
Here are a few extra tips to help you get the most out of your DIY fly trap:
* Experiment with Different Baits: What works for one person might not work for another. Try different bait combinations to see what attracts the flies in your area.
* Clean Regularly: Once the trap is full of flies (or the bait starts to get gross), empty it and refill it with fresh bait. This will keep the trap effective and prevent it from becoming a breeding ground for other pests.
* Outdoor Placement: If you’re using the trap outdoors, make sure to place it in a sheltered area to protect it from rain. Rain can dilute the bait and make it less effective.
* Dark vs. Light: Some people find that flies are more attracted to traps placed in darker areas, while others have better luck in well-lit spots. Again, experiment to see what works best for you.
* Safety First: Keep the trap out of reach of children and pets. While the bait is generally non-toxic, it’s best to be cautious.
* Consider the Environment: Think about the surrounding environment. Are there other attractants nearby, like open garbage cans or pet waste? Addressing these issues can also help reduce the fly population.
* Multiple Traps: Don’t be afraid to set up multiple traps in different locations. The more traps you have, the more flies you’ll catch.
* Vinegar Type: While apple cider vinegar is my go-to, you can also try white vinegar. It’s not quite as effective, but it can still work in a pinch.
* Fruit Flies: This trap is especially effective for fruit flies. If you’re dealing with a fruit fly infestation, try using a piece of overripe fruit as bait.
* Patience is a Virtue: It might take a few days for the trap to start working effectively. Don’t get discouraged if you don’t see results immediately.
Troubleshooting: What to Do If Your Trap Isn’t Working
Sometimes, even with the best intentions, your fly trap might not be as effective as you’d hoped. Here are a few common problems and how to fix them:
* No Flies Entering: If flies aren’t entering the trap, it could be due to a few reasons. First, make sure the bait is fresh and appealing. If it’s been sitting out for a while, it might have lost its scent. Second, check the placement of the trap. Is it in an area where flies are actually present? Third, make sure there are no other, more attractive food sources nearby.
* Flies Entering and Escaping: If flies are getting into the trap but then escaping, it could be because the opening is too wide or the seal between the top and bottom of the bottle isn’t tight enough. Try narrowing the opening by adding more tape or using a smaller bottle. Also, double-check that there are no gaps around the edges of the tape.
* Bait Attracting Other Pests: If your bait is attracting other unwanted pests, like ants, try adjusting the recipe. For example, if you’re using sugar water, try reducing the amount of sugar. You can also try placing the trap on a stand or platform to keep it away from the ground.
* Smell: While the bait is designed to attract flies, it can sometimes have an unpleasant odor for humans. If the smell is bothering you, try placing the trap in a less frequented area or adding a few drops of essential oil (like lavender or peppermint) to the bait. Just be aware that the essential oil might also deter the flies, so experiment to see what works best.
Alternative Fly Trap Designs
While the plastic bottle trap is my favorite, there are other DIY fly trap designs you can try. Here are a couple of alternatives:
* Jar Trap: Use a glass jar instead of a plastic bottle. Cover the top of the jar with plastic wrap and secure it with a rubber band. Poke a few small holes in the plastic wrap for the flies to enter.
* Paper Cone Trap: Roll a piece of paper into a cone shape and tape it together. Place the cone inside a jar or glass, with the narrow end pointing down. Add your bait to the bottom of the jar.
Why This Works: The Science Behind the Trap
The effectiveness of this fly trap lies in its simple yet clever design. The inverted bottle top creates a funnel that’s easy for flies to enter but difficult to exit. Flies are naturally drawn to sweet and fermenting smells, so the bait acts as a powerful attractant. And the dish soap, if used, breaks the surface tension of the liquid, making it harder for the flies to escape once they land. It’s a perfect combination of science and ingenuity!
Environmental Benefits: A Greener Solution
Not only is this DIY fly trap effective and affordable, but it’s also environmentally friendly. By repurposing a plastic bottle, you’re reducing waste and preventing it from ending up in a landfill. Plus, you’re avoiding the use of harsh chemicals found in many store-bought fly traps. It’s a win-win for you and the planet!
Final Thoughts: Reclaim Your Space!
So there you have it –
Conclusion
So, there you have it! A simple, effective, and incredibly inexpensive way to reclaim your space from those pesky flies. This homemade fly trap isn’t just a solution; it’s a statement. A statement that says you’re resourceful, environmentally conscious, and not willing to surrender your peace of mind to buzzing invaders.
Why is this DIY trick a must-try? Because it works! Unlike expensive, chemical-laden sprays that can be harmful to your family and pets, this method utilizes readily available ingredients and leverages the flies’ natural attraction to sweet scents. It’s a win-win situation for you and the environment. You’re effectively eliminating flies without introducing harmful toxins into your home.
Beyond its effectiveness and eco-friendliness, this homemade fly trap is also incredibly versatile. Feel free to experiment with different attractants. While the classic apple cider vinegar and dish soap combination is a proven winner, you can also try using overripe fruit, honey, maple syrup, or even a small amount of beer. The key is to find a sweet, fermenting scent that the flies find irresistible.
Consider the container you use as well. While a simple jar or plastic bottle works perfectly fine, you can get creative and repurpose old containers to add a touch of personality to your fly-catching efforts. A decorative mason jar can be both functional and aesthetically pleasing.
For larger infestations, consider placing multiple traps in strategic locations around your home. Focus on areas where you’ve noticed the most fly activity, such as near windows, doors, garbage cans, and food preparation areas. Regularly check and empty the traps, replenishing the attractant as needed.
Don’t be afraid to adjust the amount of dish soap you use. Too much soap can create a thick layer that prevents flies from entering the trap, while too little may not be enough to break the surface tension of the liquid. Experiment to find the perfect balance for your specific situation.
We are confident that this homemade fly trap will become your go-to solution for dealing with unwanted flies. It’s a simple, effective, and sustainable way to keep your home pest-free.
Now, it’s your turn! We encourage you to give this DIY trick a try and see the results for yourself. Share your experiences with us in the comments below. Let us know what attractants worked best for you, what containers you used, and any other tips or tricks you discovered along the way. Your feedback will help others create even more effective homemade fly traps. Let’s work together to create a fly-free environment for everyone!
Frequently Asked Questions (FAQ)
What exactly is a homemade fly trap, and why should I use one?
A homemade fly trap is a simple device constructed from readily available household items designed to attract and trap flies. Instead of relying on potentially harmful chemical sprays or expensive commercial traps, a homemade fly trap offers an eco-friendly, cost-effective, and safe alternative. It works by luring flies in with a sweet-smelling attractant, trapping them in a liquid solution, and preventing them from escaping. Using a homemade fly trap is beneficial because it reduces your exposure to harmful chemicals, saves you money, and allows you to control fly populations in a sustainable manner.
What are the best ingredients to use for the attractant in a homemade fly trap?
The most common and effective attractant is a combination of apple cider vinegar and dish soap. The vinegar’s sweet, fermented scent attracts flies, while the dish soap breaks the surface tension of the liquid, causing the flies to sink and drown. However, you can experiment with other sweet substances such as overripe fruit (bananas, peaches, etc.), honey, maple syrup, beer, or even a small amount of sugar water. The key is to find a scent that is particularly appealing to flies in your area. Remember to always add a few drops of dish soap to ensure the flies are trapped.
How do I build a homemade fly trap? What materials do I need?
Building a homemade fly trap is incredibly easy. Here’s a basic method:
1. **Gather your materials:** You’ll need a container (a jar, plastic bottle, or even a disposable cup), apple cider vinegar (or another attractant), dish soap, and optionally, plastic wrap or a paper cone.
2. **Prepare the attractant:** Pour about 1-2 inches of apple cider vinegar into the container. Add a few drops of dish soap.
3. **Create an entry point:** You have a couple of options here:
* **Plastic Wrap Method:** Cover the top of the container with plastic wrap and secure it with a rubber band. Poke small holes in the plastic wrap for the flies to enter.
* **Paper Cone Method:** Roll a piece of paper into a cone shape, leaving a small opening at the bottom. Place the cone into the container, ensuring the tip of the cone doesn’t touch the liquid.
4. **Placement:** Place the trap in an area where you’ve noticed fly activity.
Where should I place my homemade fly trap for the best results?
The best placement for your homemade fly trap is in areas where you frequently see flies. This includes near windows, doors, garbage cans, compost bins, pet food bowls, and food preparation areas. Consider placing multiple traps in different locations to maximize their effectiveness. Avoid placing the traps directly in areas where you eat or prepare food, as the smell of the attractant might be unpleasant.
How often should I clean and replace the attractant in my homemade fly trap?
You should clean and replace the attractant in your homemade fly trap every few days, or whenever the trap becomes full of flies or the attractant becomes cloudy or loses its scent. A fresh attractant will be more effective at luring in new flies. Empty the trap contents into a sealed bag and dispose of it properly. Wash the container thoroughly before refilling it with fresh attractant.
Is a homemade fly trap safe for pets and children?
Yes, a homemade fly trap is generally safe for pets and children, as it doesn’t contain any harmful chemicals. However, it’s still important to keep the trap out of reach of small children and pets to prevent them from accidentally ingesting the attractant. While the ingredients are not highly toxic, they can cause stomach upset if consumed in large quantities.
Can I use this homemade fly trap outdoors?
Yes, you can definitely use this homemade fly trap outdoors. In fact, it can be particularly effective in controlling fly populations around patios, decks, gardens, and picnic areas. Just be sure to protect the trap from rain, as rainwater can dilute the attractant and reduce its effectiveness. You can place the trap under a covered area or use a container with a lid to prevent rainwater from entering.
What if the homemade fly trap doesn’t seem to be working?
If your homemade fly trap isn’t working as expected, there are a few things you can try:
* **Adjust the attractant:** Experiment with different attractants to see which one works best for the flies in your area.
* **Check the placement:** Make sure the trap is placed in an area where flies are active.
* **Ensure proper entry:** Verify that the flies can easily enter the trap through the holes in the plastic wrap or the opening of the paper cone.
* **Clean the trap:** A dirty trap may not be as effective at attracting flies.
* **Increase the number of traps:** If you have a large fly infestation, consider using multiple traps.
* **Patience:** It may take a few days for the flies to discover the trap.
Are there any variations or modifications I can make to the homemade fly trap?
Absolutely! Here are a few variations you can try:
* **Fruit Fly Trap:** For fruit flies, use a small amount of apple cider vinegar and a drop of dish soap in a small glass or jar. Cover the top with plastic wrap and poke tiny holes in it.
* **Wine Fly Trap:** Use a small amount of leftover wine in the trap. The alcohol and sugar will attract flies.
* **Molasses Fly Trap:** Mix molasses with water and a drop of dish soap. Molasses is a strong attractant for many types of flies.
* **DIY Fly Paper:** Coat strips of paper with a mixture of honey and sugar. Hang the strips in areas where flies are present.
Remember to experiment and find what works best for your specific situation. The beauty of a homemade fly trap is its adaptability and cost-effectiveness.
Leave a Comment