
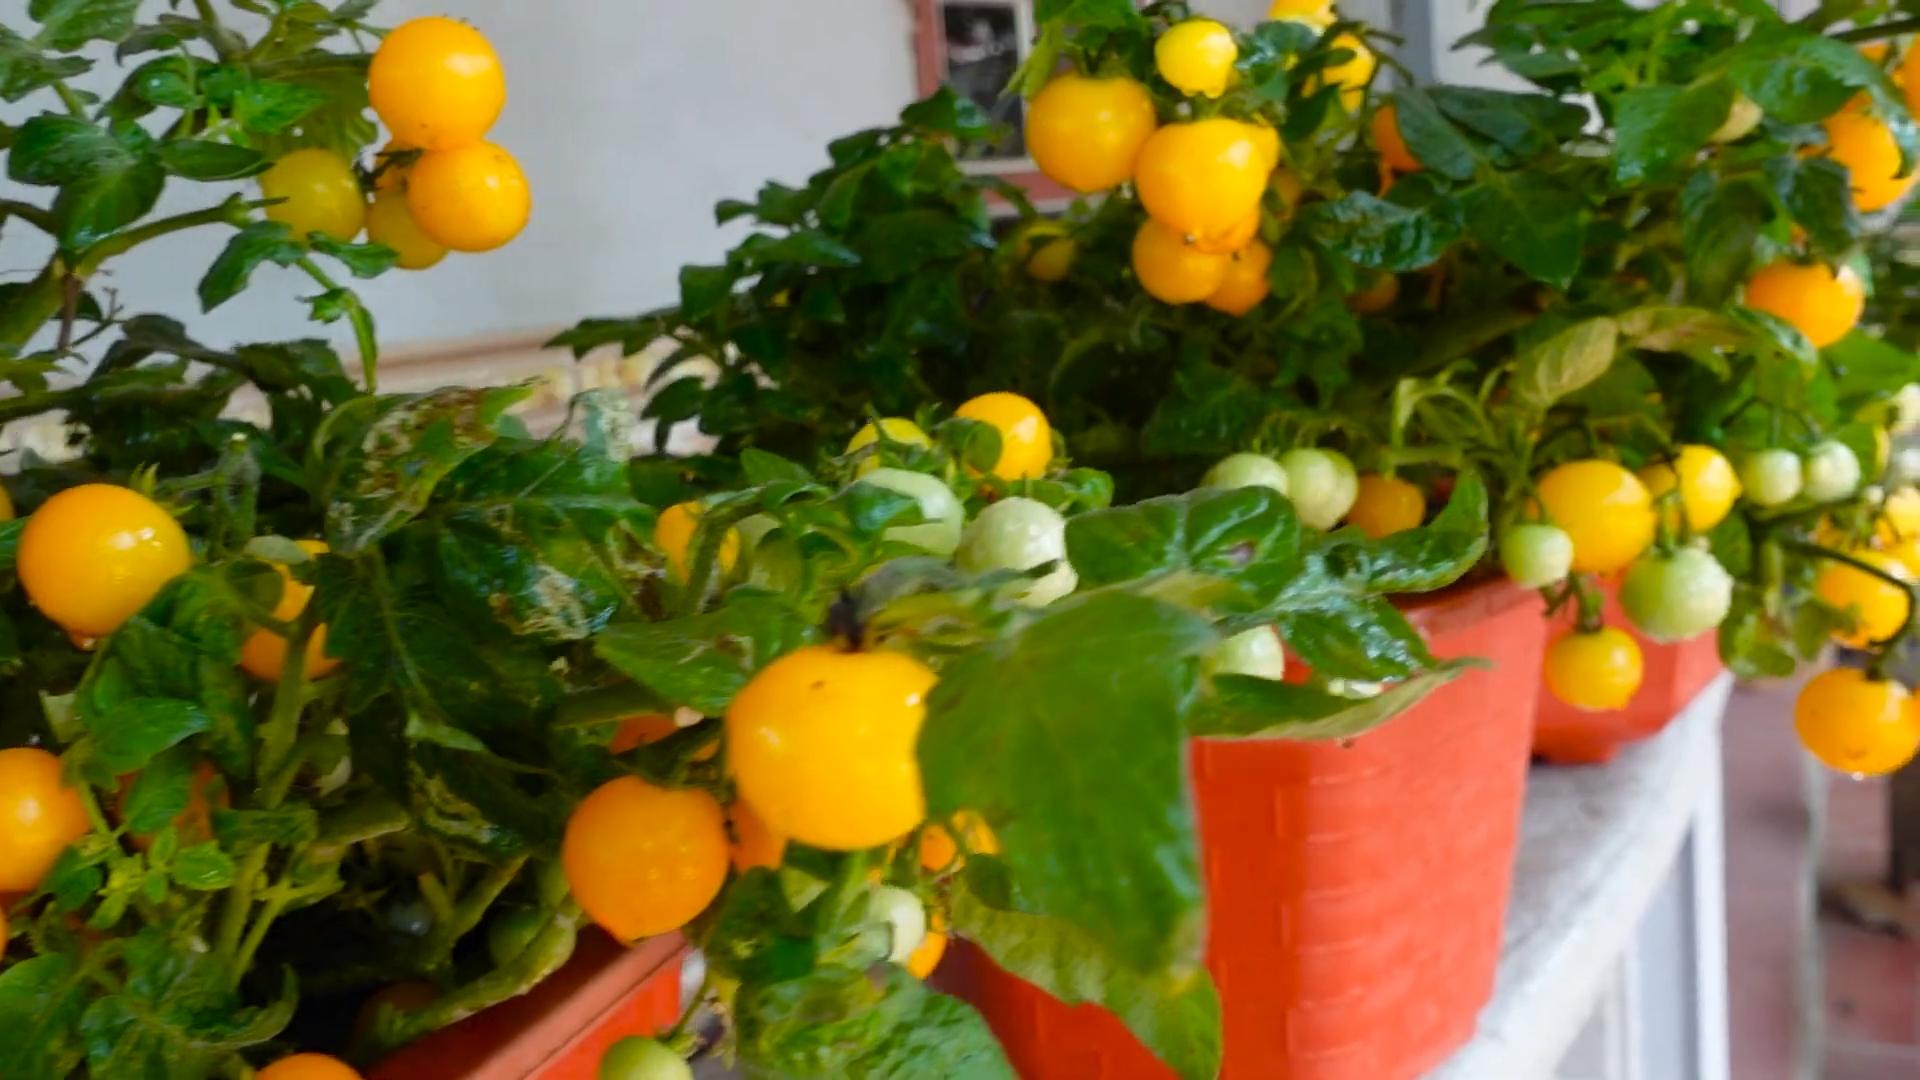
Balcony Cherry Tomatoes: Imagine stepping onto your balcony and plucking a handful of sweet, juicy cherry tomatoes, bursting with flavor, all grown by your own hand. Sounds idyllic, right? Well, it’s absolutely achievable, even if you’re short on space! For centuries, people have cultivated edible plants in small spaces, from window boxes in bustling cities to rooftop gardens in ancient civilizations. This connection to nature, even on a small scale, provides a sense of calm and accomplishment.
But let’s be honest, sometimes the idea of gardening feels overwhelming. Where do you even start? That’s where these DIY tricks and hacks come in! Growing balcony cherry tomatoes doesn’t have to be complicated or expensive. In this article, I’m going to share simple, effective, and budget-friendly methods to help you cultivate a thriving tomato patch right on your balcony. Whether you’re a seasoned gardener or a complete newbie, these tips will empower you to enjoy fresh, homegrown cherry tomatoes all season long. Get ready to transform your balcony into a miniature edible paradise!
Growing Delicious Cherry Tomatoes on Your Balcony: A DIY Guide
Hey there, fellow balcony gardeners! I’m so excited to share my tried-and-true method for growing a bountiful harvest of sweet, juicy cherry tomatoes right on your balcony. Trust me, there’s nothing quite like popping a sun-warmed tomato straight from the vine. This guide will walk you through everything you need to know, from choosing the right varieties to troubleshooting common problems. Let’s get started!
Choosing the Right Cherry Tomato Variety
Not all cherry tomatoes are created equal, especially when it comes to container gardening. Here’s what to consider:
* Determinate vs. Indeterminate: This is crucial!
* Determinate varieties grow to a specific size and produce all their fruit at once. They’re bushier and more compact, making them ideal for smaller balconies. Think ‘Roma’ or ‘Celebrity’ (though technically not cherry tomatoes, they’re good for containers).
* Indeterminate varieties keep growing and producing fruit throughout the season. They need staking or caging and can get quite large. While they require more space, they offer a longer harvest. ‘Sweet Million’, ‘Sungold’, and ‘Black Cherry’ are popular indeterminate choices.
* Disease Resistance: Look for varieties labeled with letters like V, F, N, T, or A. These indicate resistance to common tomato diseases like Verticillium wilt, Fusarium wilt, nematodes, Tobacco Mosaic Virus, and Alternaria.
* Taste Preference: Do you prefer sweet, tangy, or slightly acidic tomatoes? Read descriptions carefully to find varieties that match your palate.
* Size and Color: Cherry tomatoes come in a rainbow of colors and sizes, from tiny currant tomatoes to larger grape tomatoes. Choose what appeals to you!
I personally love growing ‘Sungold’ for its incredible sweetness and ‘Black Cherry’ for its unique flavor and beautiful color.
Gathering Your Supplies
Before you start planting, make sure you have everything you need:
* Large Containers: At least 12-18 inches in diameter and depth. Bigger is generally better, especially for indeterminate varieties. Fabric pots are great for drainage and aeration.
* High-Quality Potting Mix: Don’t use garden soil! It’s too heavy and doesn’t drain well in containers. Choose a lightweight potting mix specifically formulated for containers.
* Tomato Fertilizer: A slow-release fertilizer or a liquid fertilizer formulated for tomatoes.
* Stakes or Cages: Essential for supporting indeterminate varieties.
* Watering Can or Hose: For regular watering.
* Hand Trowel: For planting and transplanting.
* Pruning Shears: For removing suckers and dead leaves.
* Optional:
* Tomato Tone or Bone Meal: To add calcium and phosphorus to the soil.
* Mulch: To help retain moisture and suppress weeds.
* Plant Labels: To keep track of your different varieties.
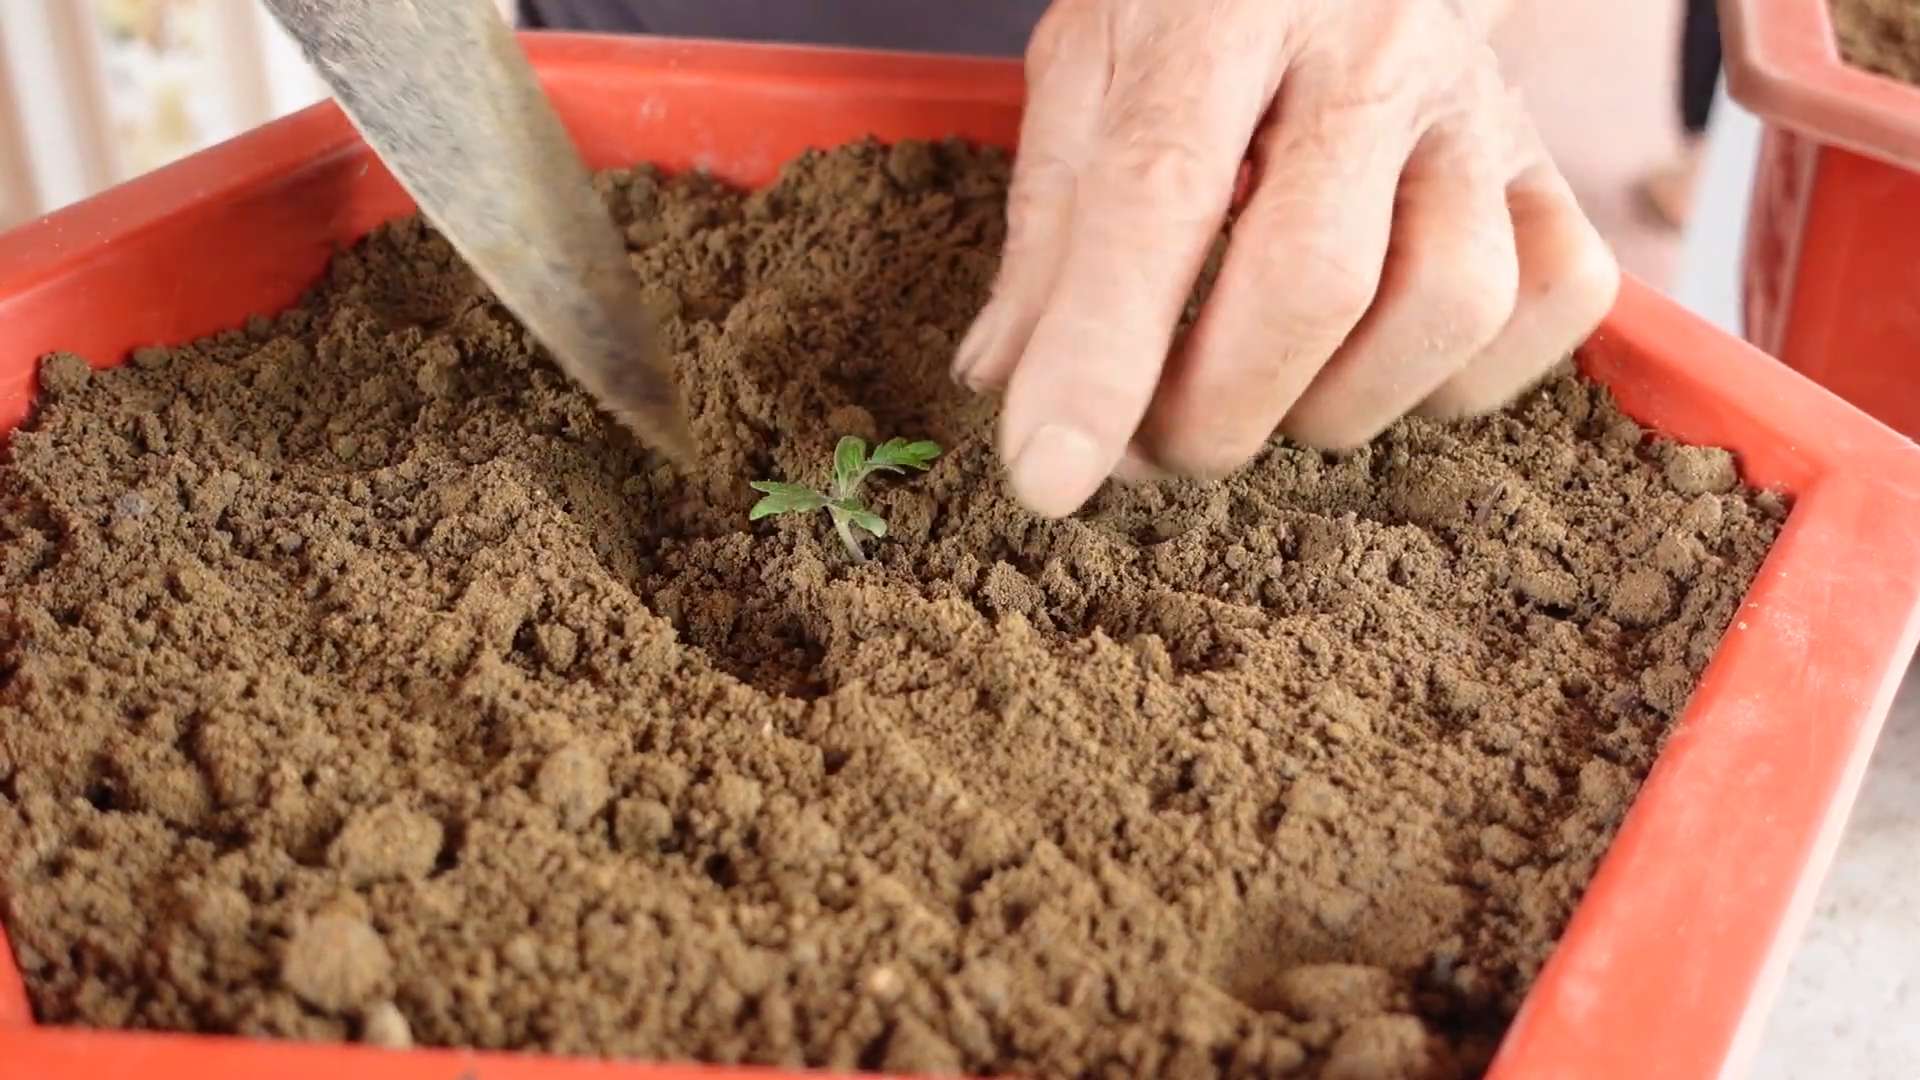
Planting Your Cherry Tomato Seedlings
Now for the fun part! Here’s how to plant your cherry tomato seedlings:
1. Prepare Your Containers: Fill your containers with potting mix, leaving a few inches of space at the top.
2. Add Fertilizer: Mix in a slow-release tomato fertilizer according to the package directions. If using Tomato Tone or bone meal, add that as well.
3. Dig a Hole: Dig a hole in the center of the container that’s deep enough to accommodate the root ball of your seedling.
4. Remove the Seedling: Gently remove the seedling from its nursery pot. If the roots are tightly bound, gently loosen them with your fingers.
5. Plant Deep: This is a key trick! Plant the seedling deeper than it was in the nursery pot, burying the stem up to the first set of leaves. Tomatoes can grow roots from their stems, which will result in a stronger, healthier plant.
6. Backfill and Water: Fill the hole with potting mix, gently firming the soil around the plant. Water thoroughly until water drains out of the bottom of the container.
7. Add Stakes or Cages: Install your stakes or cages now, before the plant gets too big. This will prevent you from damaging the roots later.
8. Mulch (Optional): Add a layer of mulch around the base of the plant to help retain moisture and suppress weeds.
Caring for Your Cherry Tomato Plants
Consistent care is essential for a successful harvest. Here’s what you need to do:
1. Watering: Water deeply and regularly, especially during hot, dry weather. Aim to keep the soil consistently moist but not soggy. Water at the base of the plant to avoid wetting the leaves, which can lead to disease. I usually water every other day, but it depends on the weather.
2. Fertilizing: If you used a slow-release fertilizer, you may not need to fertilize again for a few weeks. If using a liquid fertilizer, fertilize every 2-3 weeks according to the package directions.
3. Sunlight: Cherry tomatoes need at least 6-8 hours of sunlight per day. Place your containers in the sunniest spot on your balcony.
4. Pruning: For indeterminate varieties, you’ll need to prune regularly to remove suckers. Suckers are small shoots that grow between the main stem and the branches. Removing them will encourage the plant to focus its energy on producing fruit. Just pinch them off with your fingers.
5. Pest Control: Keep an eye out for common tomato pests like aphids, whiteflies, and tomato hornworms. You can usually control these pests with insecticidal soap or by hand-picking them off the plants.
6. Disease Prevention: To prevent diseases, avoid wetting the leaves when watering, provide good air circulation, and remove any diseased leaves promptly.
Troubleshooting Common Problems
Even with the best care, you may encounter some problems. Here are a few common issues and how to address them:
* Blossom End Rot: This is caused by a calcium deficiency and results in a dark, leathery spot on the bottom of the tomato. To prevent it, add calcium to the soil (Tomato Tone or bone meal) and water consistently.
* Leaf Spot: This is a fungal disease that causes brown spots on the leaves. Remove affected leaves and spray with a fungicide if necessary.
* Cracking: This can happen when tomatoes get too much water after a dry spell. Water consistently and avoid overwatering.
* Poor Fruit Set: This can be caused by high temperatures or lack of pollination. You can try hand-pollinating the flowers by gently shaking the plant or using a small brush to transfer pollen from one flower to another.
Harvesting Your Cherry Tomatoes
The best part! Cherry tomatoes are usually ready to harvest about 60-80 days after planting. They should be fully colored and slightly soft to the touch. Gently twist the tomato off the vine. The more you harvest, the more the plant will produce!
Section: Building a Simple Tomato Cage (Optional)
If you’re using indeterminate varieties, a sturdy tomato cage is essential. You can buy pre-made cages, but it’s also easy and more cost-effective to build your own. Here’s how:
1. Gather Your Materials: You’ll need:
* Heavy-duty wire mesh (at least 4 feet tall)
* Wire cutters
* Gloves (to protect your hands)
* Zip ties or wire
2. Cut the Mesh: Cut a piece of wire mesh that’s long enough to form a cylinder around your tomato plant, leaving enough room for it to grow. I usually aim for a diameter of about 18-24 inches.
3. Form the Cylinder: Roll the wire mesh into a cylinder and overlap the edges by a few inches.
4. Secure the Cylinder: Use zip ties or wire to secure the overlapping edges together, creating a sturdy cage.
5. Place the Cage: Place the cage around your tomato plant, pushing the bottom of the cage into the soil to secure it.
Section: Maximizing Your Balcony Space
Balcony gardening is all about making the most of limited space. Here are a few tips for maximizing your balcony garden:
* Vertical Gardening: Use trellises, hanging baskets, and vertical planters to grow plants up instead of out.
* Companion Planting: Plant herbs and flowers alongside your tomatoes to attract pollinators and deter pests. Basil, marigolds, and nasturtiums are great companion plants for tomatoes.
* Succession Planting: Plant new seedlings every few weeks to extend your harvest season.
* Choose Compact Varieties: Opt for smaller, bushier varieties that won’t take up too much space.
* Consider the Weight: Make sure your balcony can support the weight of your containers, especially when they
Conclusion
So, there you have it! Growing your own balcony cherry tomatoes is not only achievable, even in the smallest of spaces, but it’s also incredibly rewarding. Imagine stepping onto your balcony and plucking sun-ripened, bursting-with-flavor cherry tomatoes straight from the vine. No more bland, store-bought tomatoes lacking that authentic garden taste. This DIY trick transforms your balcony into a miniature edible oasis, providing you with a constant supply of fresh, organic produce.
Why is this a must-try? Because it’s simple, cost-effective, and brings the joy of gardening to even the most urban environments. You don’t need acres of land or a green thumb of steel. With a few basic supplies and a little bit of patience, you can cultivate a thriving tomato garden right outside your door. Plus, it’s a fantastic way to reduce your carbon footprint by growing your own food locally.
Beyond the basic method, there are countless ways to personalize your balcony cherry tomato garden. Consider experimenting with different varieties of cherry tomatoes. Yellow pear tomatoes offer a sweet and mild flavor, while black cherry tomatoes provide a rich, earthy taste. You can also try growing your tomatoes in hanging baskets for a visually stunning display, or companion planting with herbs like basil and oregano to enhance the flavor of your tomatoes and deter pests naturally. Another variation is to use self-watering containers, which are particularly helpful if you tend to forget to water your plants regularly. These containers have a reservoir at the bottom that slowly releases water to the roots, keeping your tomatoes consistently hydrated.
Don’t be afraid to get creative with your supports either. While tomato cages are a common choice, you can also use trellises, stakes, or even repurpose old ladders to provide support for your growing vines. Just make sure that whatever you use is sturdy enough to handle the weight of the mature plants and their fruit.
We wholeheartedly encourage you to give this DIY trick a try. It’s a fantastic project for beginners and experienced gardeners alike. The satisfaction of harvesting your own homegrown cherry tomatoes is truly unparalleled. And the best part? You’ll have a delicious and healthy snack readily available whenever you crave it.
Once you’ve embarked on your balcony cherry tomato adventure, we’d love to hear about your experience! Share your photos, tips, and challenges in the comments below. Let’s create a community of balcony gardeners and inspire others to bring the joy of homegrown produce to their own urban spaces. What variety did you choose? What challenges did you face, and how did you overcome them? Your insights could be invaluable to other aspiring balcony gardeners. So, grab your pots, soil, and seedlings, and get ready to enjoy the delicious rewards of your own balcony cherry tomato garden!
Frequently Asked Questions (FAQ)
What is the best variety of cherry tomato to grow on a balcony?
The best variety depends on your personal preferences and the amount of sunlight your balcony receives. However, some popular and reliable choices for balcony gardens include ‘Tiny Tim,’ ‘Patio,’ ‘Sweet Million,’ and ‘Sungold.’ ‘Tiny Tim’ is a dwarf variety that stays compact, making it ideal for small spaces. ‘Patio’ is another compact variety that produces abundant yields. ‘Sweet Million’ is known for its exceptionally sweet flavor and high productivity. ‘Sungold’ is a golden-orange cherry tomato with a unique, fruity taste. Consider the size of your containers and the amount of sunlight your balcony receives when making your selection. If you have limited sunlight, choose a variety that is known to tolerate partial shade.
How much sunlight do balcony cherry tomatoes need?
Cherry tomatoes thrive in full sun, which means they need at least 6-8 hours of direct sunlight per day. If your balcony doesn’t receive that much sunlight, you can still grow cherry tomatoes, but they may not produce as many fruits. Choose a spot that gets the most sunlight possible, and consider using grow lights to supplement the natural light if needed. Rotate your plants regularly to ensure that all sides receive adequate sunlight.
What size pot is best for growing cherry tomatoes on a balcony?
A pot that is at least 12 inches in diameter and 12 inches deep is recommended for growing cherry tomatoes on a balcony. Larger pots are even better, as they provide more room for the roots to grow and help retain moisture. Choose a pot with drainage holes to prevent waterlogging, which can lead to root rot. You can use plastic, terracotta, or ceramic pots, but make sure they are sturdy enough to support the weight of the mature plant and its fruit.
What type of soil should I use for balcony cherry tomatoes?
Use a high-quality potting mix that is specifically formulated for containers. Avoid using garden soil, as it can be too heavy and compacted for container gardening. A good potting mix will be well-draining and contain essential nutrients to support healthy plant growth. You can also amend your potting mix with compost or other organic matter to improve its fertility and water retention.
How often should I water my balcony cherry tomatoes?
Water your balcony cherry tomatoes regularly, especially during hot and dry weather. The frequency of watering will depend on the size of your pot, the type of soil you use, and the weather conditions. Check the soil moisture regularly by sticking your finger into the soil. If the top inch of soil feels dry, it’s time to water. Water deeply, until the water drains out of the drainage holes. Avoid overwatering, as this can lead to root rot.
Do I need to fertilize my balcony cherry tomatoes?
Yes, cherry tomatoes are heavy feeders and need regular fertilization to produce abundant yields. Use a balanced fertilizer that is specifically formulated for tomatoes. Follow the instructions on the fertilizer package for application rates and frequency. You can also use organic fertilizers, such as compost tea or fish emulsion. Fertilize your plants every 2-3 weeks during the growing season.
How do I support my balcony cherry tomato plants?
Cherry tomato plants can grow quite tall and need support to prevent them from falling over. You can use tomato cages, stakes, or trellises to support your plants. Install the support system when you plant your seedlings, so you don’t damage the roots later on. As the plants grow, tie the stems to the support system using soft twine or plant ties.
How do I prevent pests and diseases on my balcony cherry tomatoes?
Regularly inspect your plants for pests and diseases. Common pests that affect cherry tomatoes include aphids, whiteflies, and spider mites. You can control these pests by spraying your plants with insecticidal soap or neem oil. Common diseases that affect cherry tomatoes include early blight, late blight, and powdery mildew. You can prevent these diseases by providing good air circulation, avoiding overhead watering, and using disease-resistant varieties. If you notice any signs of disease, remove the affected leaves immediately.
When can I harvest my balcony cherry tomatoes?
Cherry tomatoes are typically ready to harvest about 60-80 days after planting. The fruits will be fully colored and slightly soft to the touch. Gently twist the tomatoes off the vine, being careful not to damage the plant. Harvest your tomatoes regularly to encourage continued production.
Can I grow cherry tomatoes on a balcony in a cold climate?
Yes, you can grow cherry tomatoes on a balcony in a cold climate, but you may need to take some extra precautions. Start your seedlings indoors 6-8 weeks before the last expected frost. Harden off your seedlings before transplanting them to your balcony. Choose a sunny spot that is protected from wind and frost. You may also need to cover your plants with frost blankets or move them indoors during periods of extreme cold.

Leave a Comment