
DIY Silver Cleaner: Is your once-gleaming silverware looking a little dull? Don’t despair! Before you rush out to buy expensive commercial cleaners, let me share a secret: you can restore your silver’s sparkle with simple ingredients you probably already have in your kitchen. I’m talking about a DIY silver cleaner that’s not only effective but also incredibly budget-friendly.
Silverware has been a symbol of elegance and refinement for centuries, gracing tables from royal banquets to cozy family dinners. Passed down through generations, these cherished pieces often carry sentimental value. But tarnish, that pesky dark coating, can quickly diminish their beauty. While professional cleaning is an option, it can be costly and time-consuming. That’s where this DIY silver cleaner comes in handy!
Why spend a fortune on harsh chemicals when you can achieve stunning results with a gentle, homemade solution? This DIY silver cleaner is perfect for anyone looking to save money, avoid harsh chemicals, and breathe new life into their tarnished treasures. Whether it’s your grandmother’s tea set or your favorite silver jewelry, this simple trick will have them shining like new in no time. Plus, it’s a fun and satisfying project that anyone can do. So, let’s get started and rediscover the brilliance of your silver!
DIY Silver Cleaner: Restore Your Shine with Household Items
Hey there, fellow DIY enthusiasts! Are you tired of looking at your tarnished silver jewelry, silverware, or decorative items? Store-bought silver cleaners can be expensive and often contain harsh chemicals. But don’t worry, I’m here to show you a super easy and effective way to clean your silver using ingredients you probably already have in your kitchen! This method is gentle, affordable, and gives amazing results. Let’s get started!
What You’ll Need
Before we dive in, let’s gather our supplies. This is a simple project, so the list is short and sweet:
* A glass or plastic bowl (avoid metal!)
* Aluminum foil
* Baking soda
* Salt (table salt works perfectly)
* Boiling water
* Tongs or a slotted spoon
* A soft cloth or microfiber towel
Why This Works: The Science Behind the Sparkle
Okay, a little bit of science to understand why this DIY cleaner is so effective. Tarnish on silver is actually silver sulfide, formed when silver reacts with sulfur compounds in the air. The aluminum foil in this process acts as a sacrificial metal. When you combine it with baking soda, salt, and hot water, you create an electrolytic reaction. This reaction pulls the sulfur from the silver sulfide and transfers it to the aluminum foil. Pretty cool, right?
Step-by-Step Instructions: Let’s Get Cleaning!
Alright, let’s get down to the nitty-gritty. Follow these steps carefully, and you’ll have sparkling silver in no time!
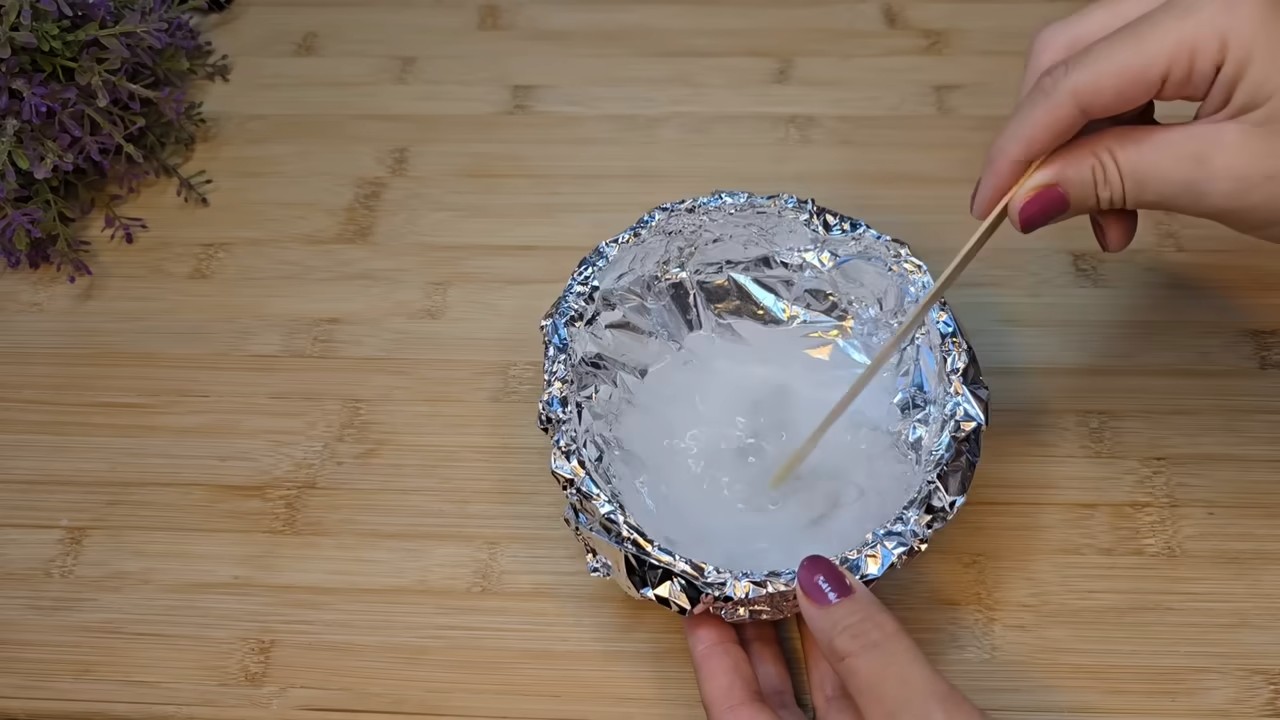
1. Prepare the Bowl: Line your glass or plastic bowl completely with aluminum foil. Make sure the shiny side of the foil is facing up, as this is the side that will be in contact with the silver and the cleaning solution. The foil needs to cover the entire inside surface of the bowl.
2. Add the Baking Soda and Salt: Pour 1 tablespoon of baking soda and 1 tablespoon of salt into the foil-lined bowl. Don’t worry about being super precise; a little more or less won’t hurt.
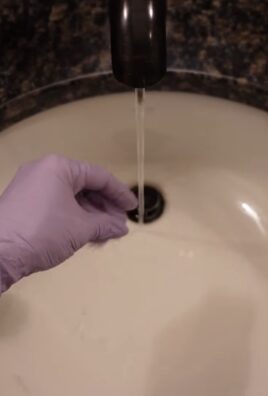
3. Pour in the Boiling Water: Carefully pour about 2-3 cups of boiling water into the bowl. The amount of water you need will depend on the size of your bowl and the amount of silver you’re cleaning. You want enough water to completely submerge the silver items. Be extremely careful when handling boiling water to avoid burns.
4. Stir the Solution: Gently stir the mixture until the baking soda and salt are completely dissolved. The water will likely fizz a bit as the baking soda reacts.
5. Submerge the Silver: Carefully place your silver items into the bowl, making sure they are touching the aluminum foil. This is crucial for the electrolytic reaction to work. If you have a lot of items, you might need to do this in batches to ensure everything makes good contact with the foil. Use tongs or a slotted spoon to avoid burning yourself.
6. Wait and Watch: Now comes the waiting game! Let the silver sit in the solution for 5-10 minutes. You should start to see the tarnish disappearing almost immediately. The more tarnished the silver, the longer it will need to soak. You might even notice a yellowish or brownish tinge appearing on the aluminum foil – that’s the sulfur being transferred!
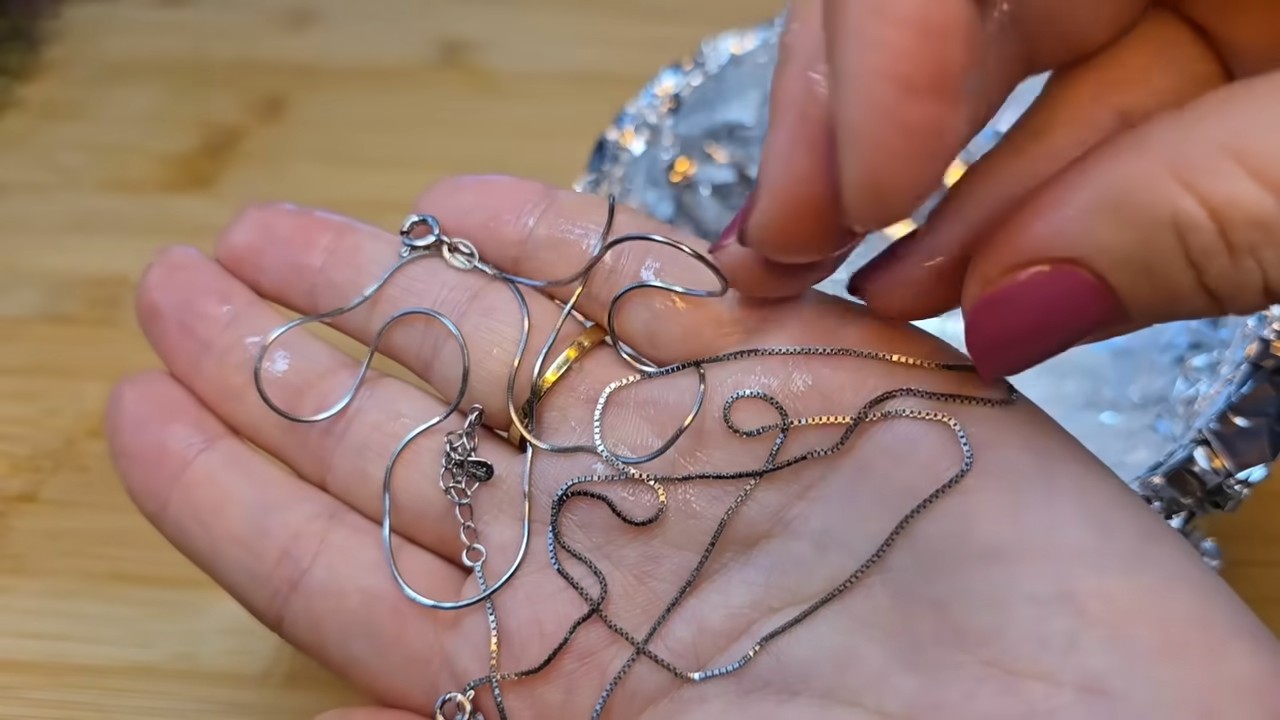
7. Remove and Rinse: After the allotted time, carefully remove the silver items from the bowl using tongs or a slotted spoon. Rinse them thoroughly under warm running water to remove any residue from the cleaning solution.
8. Dry and Polish: Use a soft cloth or microfiber towel to dry the silver items completely. As you dry them, you’ll notice they’re already looking much brighter! For an extra shine, you can gently polish them with the cloth.
Dealing with Stubborn Tarnish
Sometimes, you might encounter pieces with particularly stubborn tarnish. Don’t fret! Here are a few tips for tackling those tricky spots:
* Repeat the Process: If the tarnish isn’t completely gone after the first soak, simply repeat the process. You can use the same solution, but it might be more effective to make a fresh batch.
* Increase the Concentration: For heavily tarnished items, you can try increasing the amount of baking soda and salt in the solution. Try using 2 tablespoons of each instead of 1.
* Direct Contact: For small, hard-to-reach areas, you can make a paste of baking soda and water and gently rub it onto the tarnish with a soft cloth or cotton swab. Be careful not to scratch the silver.
* Longer Soak Time: If you’ve tried everything else, you can try soaking the silver for a longer period, up to 30 minutes. Just keep an eye on it to make sure the aluminum foil doesn’t disintegrate too much.
Cleaning Silverware: A Few Extra Tips
Cleaning silverware requires a little extra care, especially if it has intricate designs or delicate handles. Here are some tips specifically for silverware:
* Avoid Abrasive Cleaners: Never use abrasive cleaners or scouring pads on silverware, as they can scratch the surface.
* Handle with Care: Be gentle when handling silverware, especially antique pieces. Avoid bending or putting excessive pressure on delicate parts.
* Dry Immediately: Silverware is prone to water spots, so it’s important to dry it thoroughly immediately after rinsing.
* Proper Storage: To prevent tarnish from forming quickly, store your silverware in a tarnish-resistant cloth or bag. You can also add a piece of chalk or activated charcoal to the storage container, as these absorb sulfur compounds.
Cleaning Silver Jewelry: Delicate Details
Silver jewelry often has delicate details and gemstones that require special attention. Here’s how to clean your silver jewelry safely and effectively:
* Check for Gemstones: Before cleaning, check your jewelry for any gemstones or delicate settings. Some gemstones can be damaged by hot water or baking soda.
* Gentle Soaking: If your jewelry has gemstones, avoid soaking it for too long. A quick dip in the cleaning solution should be sufficient.
* Soft Brush: Use a soft-bristled brush (like a baby toothbrush) to gently scrub away tarnish from intricate details.
* Avoid Harsh Chemicals: Never use harsh chemicals or abrasive cleaners on silver jewelry, as they can damage the metal and gemstones.
* Rinse Thoroughly: Rinse your jewelry thoroughly under warm running water to remove any residue.
* Dry Carefully: Dry your jewelry carefully with a soft cloth, paying attention to any crevices or settings.
Preventing Tarnish: Keeping Your Silver Sparkling
Once you’ve cleaned your silver, you’ll want to keep it looking its best for as long as possible. Here are some tips for preventing tarnish:
* Regular Use: Believe it or not, using your silver regularly can actually help prevent tarnish. The oils from your skin can create a protective barrier.
* Proper Storage: Store your silver in a cool, dry place, away from direct sunlight and humidity. Use tarnish-resistant cloths or bags to protect it from air exposure.
* Avoid Contact with Sulfur: Keep your silver away from sulfur-containing substances, such as rubber bands, wool, and certain foods (like eggs and onions).
* Protective Coatings: You can apply a thin layer of silver polish or a tarnish-resistant coating to protect your silver from the elements.
* Clean Regularly: Even if your silver doesn’t look tarnished, it’s a good idea to clean it regularly to remove any buildup of dirt and oils.
Troubleshooting: Common Issues and Solutions
Sometimes, things don’t go exactly as planned. Here are some common issues you might encounter and how to fix them:
* Tarnish Not Removing: If the tarnish isn’t removing, make sure the silver is making good contact with the aluminum foil. You might also need to increase the concentration of baking soda and salt or soak the silver for a longer period.
* Aluminum Foil Disintegrating: If the aluminum foil is disintegrating too quickly, it might be too thin. Try using a thicker foil or doubling up the foil lining.
* Water Spots: If you’re getting water spots on your silver, make sure you’re drying it thoroughly immediately after rinsing. You can also use distilled water for rinsing to minimize water spots.
* Dull Finish: If your silver looks dull after cleaning, you can polish it with a silver polishing cloth to restore its shine.
Safety First: Important Precautions
While this DIY silver cleaner is relatively safe, it’s important to take a few precautions:
* Use Boiling Water Carefully: Be extremely careful when handling boiling water to avoid burns.
* Avoid Contact with Eyes: Avoid getting the cleaning solution in your eyes. If contact occurs, rinse thoroughly with water.
* Ventilation: Work in a well-ventilated area to avoid inhaling any fumes.
* Keep Out of Reach of
Conclusion
So, there you have it! This DIY silver cleaner isn’t just a cleaning hack; it’s a game-changer for anyone who values their silverware, jewelry, or other silver treasures. Forget those harsh, chemical-laden commercial cleaners that can damage your precious items and leave behind unpleasant odors. This simple, effective, and affordable method uses ingredients you likely already have in your pantry, making it a truly accessible solution for everyone.
Why is this DIY silver cleaner a must-try? Because it’s gentle yet powerful. It effectively removes tarnish without the abrasive scrubbing that can scratch and dull your silver. The electrochemical reaction does all the work, lifting away the sulfur compounds that cause tarnish and restoring your silver’s original luster. Plus, it’s incredibly satisfying to watch the tarnish disappear before your eyes!
But the benefits don’t stop there. This method is also environmentally friendly, reducing your reliance on harsh chemicals that can pollute our waterways. It’s a win-win for your silver and the planet.
Looking for variations? Absolutely! For heavily tarnished items, you can increase the amount of baking soda slightly. If you’re cleaning delicate jewelry with gemstones, be extra cautious and avoid prolonged immersion. You can also use a soft toothbrush to gently scrub around the stones after the cleaning process. For larger items that won’t fit in a container, you can create a paste of baking soda and water and apply it directly to the tarnished areas, then rinse thoroughly. Remember to always test a small, inconspicuous area first to ensure compatibility, especially with antique or delicate pieces.
We’ve found that adding a touch of lemon juice to the solution can sometimes boost the cleaning power, especially for stubborn tarnish. However, use lemon juice sparingly, as its acidity can potentially damage certain types of silver over time. Another variation involves using washing soda (sodium carbonate) instead of baking soda (sodium bicarbonate). Washing soda is stronger and can be more effective for heavily tarnished items, but it’s also more alkaline, so handle it with care and wear gloves.
Don’t be afraid to experiment and find what works best for your specific needs and the type of silver you’re cleaning. The key is to be gentle, patient, and observant.
We are confident that once you try this DIY silver cleaner, you’ll be amazed by the results. It’s a simple, effective, and affordable way to keep your silver sparkling for years to come.
So, what are you waiting for? Gather your supplies, follow the instructions, and prepare to be amazed. We encourage you to try this DIY silver cleaner and share your experience with us in the comments below. We’d love to hear your tips, variations, and before-and-after photos. Let’s build a community of silver-cleaning enthusiasts! Show off your sparkling silver and inspire others to ditch the harsh chemicals and embrace this natural, effective cleaning solution. Your silver will thank you for it!
Frequently Asked Questions (FAQ)
What kind of silver can I clean with this method?
This DIY silver cleaner is generally safe for most types of sterling silver, silver-plated items, and even some silver alloys. However, it’s crucial to exercise caution when cleaning antique silver, delicate jewelry with gemstones, or items with intricate designs. Always test a small, inconspicuous area first to ensure the method doesn’t damage the finish or the stones. Avoid using this method on items with intentionally oxidized or darkened areas, as it may remove the patina. If you’re unsure about the composition of your silver, consult a professional jeweler or antique dealer before proceeding.
How often should I clean my silver using this method?
The frequency of cleaning depends on how often you use your silver and how quickly it tarnishes. Silver that is frequently exposed to air and moisture will tarnish more quickly. As a general guideline, you can clean your silver every few months or as needed. If you store your silver properly in airtight containers or tarnish-resistant bags, you can significantly reduce the frequency of cleaning. Avoid over-cleaning, as it can eventually wear down the silver plating on plated items.
What if my silver is heavily tarnished?
For heavily tarnished silver, you may need to repeat the cleaning process multiple times. You can also try increasing the amount of baking soda in the solution or using washing soda (sodium carbonate) instead of baking soda. Washing soda is a stronger alkali and can be more effective at removing stubborn tarnish. However, handle washing soda with care and wear gloves, as it can be irritating to the skin. You can also try soaking the silver for a longer period, but be sure to monitor it closely to avoid any damage. If the tarnish is extremely severe, you may need to consult a professional silver cleaner.
Can I use this method to clean silver jewelry with gemstones?
Cleaning silver jewelry with gemstones requires extra caution. Some gemstones are porous and can be damaged by the cleaning solution. Avoid prolonged immersion and use a soft toothbrush to gently clean around the stones. Be sure to rinse the jewelry thoroughly with clean water and dry it immediately. Avoid using this method on jewelry with delicate or sensitive gemstones, such as pearls, opals, or turquoise. If you’re unsure about the safety of cleaning your jewelry, consult a professional jeweler.
What kind of container should I use for the cleaning process?
Use a glass or plastic container that is large enough to hold the silver item and the cleaning solution. Avoid using metal containers, as they can interfere with the electrochemical reaction. The container should also be heat-resistant, as the hot water can cause some materials to warp or crack. A baking dish or a large bowl works well.
What kind of aluminum foil should I use?
Regular aluminum foil works best for this method. Avoid using heavy-duty foil, as it may not conduct electricity as effectively. The foil should be clean and free of any grease or debris. Make sure the foil is in direct contact with the silver item for the electrochemical reaction to occur.
Why does this method work?
This method works because of an electrochemical reaction. The aluminum foil is more reactive than silver, so it attracts the sulfur compounds that cause tarnish. When the silver item is in contact with the aluminum foil in the hot water and baking soda solution, the sulfur atoms transfer from the silver to the aluminum, effectively removing the tarnish. The baking soda acts as an electrolyte, facilitating the transfer of electrons between the silver and the aluminum.
Is this method safe for the environment?
This DIY silver cleaner is generally considered to be more environmentally friendly than commercial silver cleaners, which often contain harsh chemicals. The ingredients used in this method, baking soda and aluminum foil, are relatively benign and do not pose a significant threat to the environment. However, it’s still important to dispose of the used solution properly. Avoid pouring it down the drain, as it may contain trace amounts of silver and other metals. Instead, dispose of it in a designated waste container.
How should I store my silver to prevent tarnish?
Proper storage is essential for preventing tarnish and keeping your silver looking its best. Store your silver in airtight containers or tarnish-resistant bags. These bags are made of special materials that absorb sulfur compounds and prevent them from reacting with the silver. You can also place anti-tarnish strips or cloths in the storage containers. Avoid storing silver in humid environments or near sources of sulfur, such as rubber bands or wool. Regularly polishing your silver can also help to prevent tarnish.
What if the DIY silver cleaner doesn’t work?
If the DIY silver cleaner doesn’t work, there could be several reasons. The tarnish may be too severe, the solution may not be hot enough, or the aluminum foil may not be in direct contact with the silver. Try repeating the process with a fresh solution and ensuring that the foil is properly positioned. You can also try increasing the amount of baking soda or using washing soda instead. If the tarnish persists, you may need to consult a professional silver cleaner. Some types of tarnish are more resistant to cleaning and may require specialized treatments.
Leave a Comment