
Growing Peanuts in Containers might sound like a quirky experiment reserved for seasoned gardeners, but trust me, it’s a surprisingly rewarding and accessible project for anyone, even if you’re short on space! Have you ever imagined harvesting your own homegrown peanuts right from your patio or balcony? It’s not just a fun conversation starter; it’s a tangible connection to the earth and a delicious treat waiting to happen.
Peanuts, despite their name, aren’t actually nuts! They’re legumes, and their history stretches back thousands of years to South America, where they were cultivated by ancient civilizations. From there, they journeyed across the globe, becoming a staple in cuisines worldwide. Now, you can participate in this rich agricultural history right in your own home.
Why should you try growing peanuts in containers? Well, for starters, it’s incredibly satisfying to nurture a plant from seed to harvest. But beyond the personal fulfillment, container gardening offers a fantastic solution for those with limited garden space, poor soil conditions, or even mobility challenges. Plus, it’s a great way to introduce children to the wonders of gardening and where their food comes from. Imagine the look on their faces when they dig up their very own peanut harvest! I’m here to guide you through every step, ensuring you have a bountiful and enjoyable peanut-growing experience. Let’s get started!
Growing Peanuts in Containers: A Beginner’s Guide
Hey there, fellow gardening enthusiasts! Ever thought about growing your own peanuts? It might sound a bit unusual, especially if you don’t have a sprawling farm, but trust me, it’s totally doable – and super rewarding – right in your own backyard or even on a sunny balcony! I’m going to walk you through the whole process of growing peanuts in containers, from choosing the right variety to harvesting your homegrown goodies. Let’s get our hands dirty!
Choosing the Right Peanut Variety
Before we dive into the nitty-gritty, let’s talk peanuts! Not all peanut varieties are created equal, especially when it comes to container gardening. You’ll want to choose a variety that’s well-suited for smaller spaces and shorter growing seasons. Here are a few of my favorites:
* Valencia: These are known for their sweet flavor and compact growth habit. They usually produce multiple peanuts per shell, making them a great choice for maximizing your harvest.
* Spanish: Spanish peanuts are another good option for containers. They’re relatively small and mature quickly, which is a bonus if you live in an area with a shorter growing season.
* Runner: While Runner peanuts are more commonly grown commercially, some smaller varieties can still thrive in containers. Just make sure to choose a compact cultivar.
Important Tip: Always buy raw, unsalted peanuts for planting. Roasted or salted peanuts won’t germinate! You can find these at most health food stores or online.
Gathering Your Supplies
Okay, now that we’ve chosen our peanut variety, let’s gather everything we need to get started. Here’s a checklist:
* Large Container: This is crucial! Peanuts need plenty of room to develop their roots and pegs (the stems that grow down into the soil to form the peanuts). I recommend a container that’s at least 18 inches in diameter and 18 inches deep. The bigger, the better, really.
* Well-Draining Potting Mix: Peanuts need well-draining soil to prevent root rot. Avoid using garden soil, as it can be too heavy and compacted. A good quality potting mix specifically designed for containers is your best bet.
* Raw, Unsalted Peanuts: As mentioned earlier, these are essential for planting.
* Watering Can or Hose: For regular watering.
* Optional:
* Pea Gravel or Rocks: To improve drainage at the bottom of the container.
* Organic Fertilizer: To provide extra nutrients during the growing season.
* Mulch: To help retain moisture and suppress weeds.
Planting Your Peanuts
Alright, let’s get those peanuts in the ground (or, in this case, the container!). This is where the magic begins.
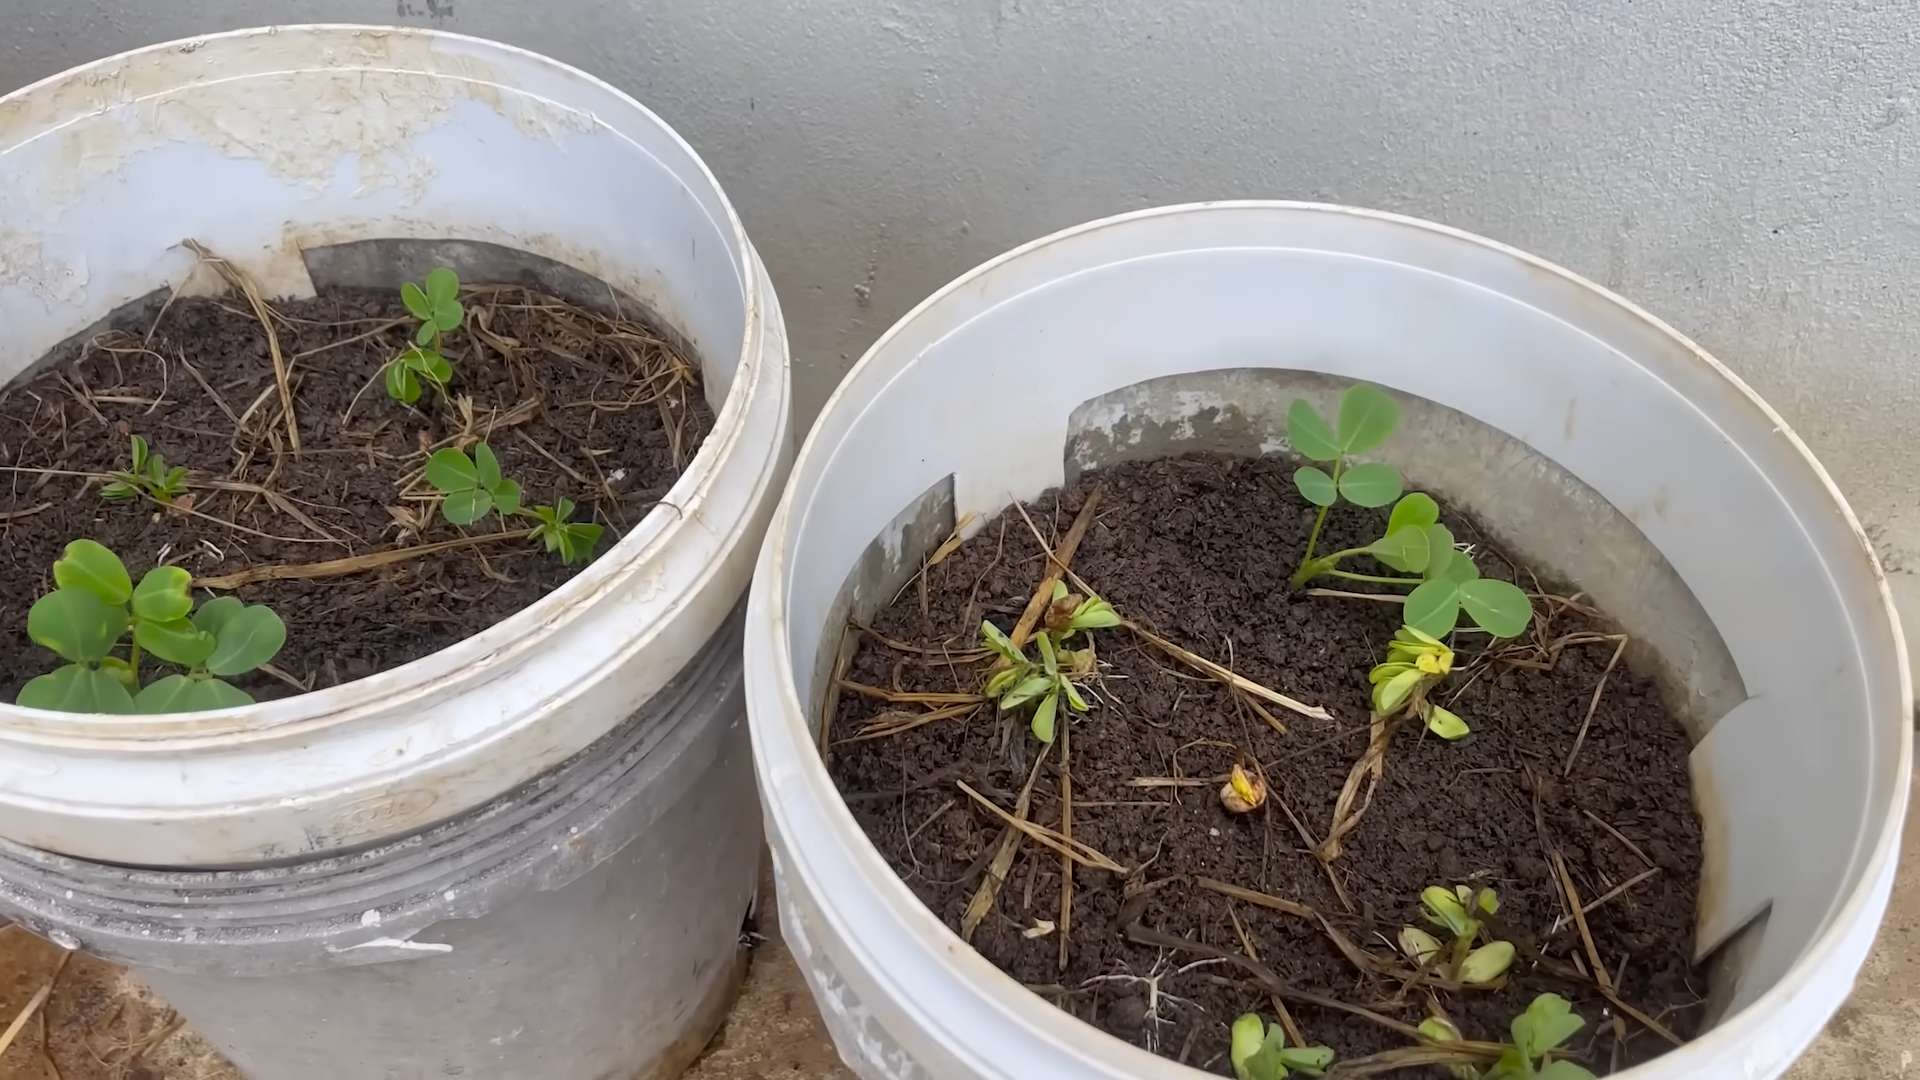
1. Prepare the Container: If you’re using pea gravel or rocks for drainage, place a layer at the bottom of the container. Then, fill the container with your well-draining potting mix, leaving a few inches of space at the top.
2. Soak the Peanuts: Soak the raw peanuts in water for about 24 hours before planting. This will help soften the shells and encourage germination.
3. Plant the Peanuts: Plant the peanuts about 1-2 inches deep and 6-8 inches apart. If you’re using a large container, you can plant multiple peanuts, but make sure they have enough space to grow.
4. Water Thoroughly: After planting, water the soil thoroughly until it’s evenly moist.
5. Choose a Sunny Location: Peanuts need at least 6-8 hours of sunlight per day to thrive. Place your container in a sunny spot where it will receive plenty of light.
Caring for Your Peanut Plants
Now that your peanuts are planted, it’s time to provide them with the care they need to grow and produce a bountiful harvest.
1. Watering: Peanuts need consistent moisture, especially during flowering and pegging (when the stems grow down into the soil). Water deeply whenever the top inch of soil feels dry to the touch. Avoid overwatering, as this can lead to root rot.
2. Fertilizing: Peanuts are legumes, which means they can fix nitrogen from the air. However, they still benefit from occasional fertilization. Use an organic fertilizer that’s low in nitrogen and higher in phosphorus and potassium. Follow the instructions on the fertilizer package. I usually fertilize every 4-6 weeks.
3. Hilling: As the peanut plants grow, you’ll notice small, stem-like structures called pegs growing down from the base of the plant. These pegs are what will eventually develop into peanuts. To encourage peanut production, gently hill the soil around the base of the plants, covering the pegs with soil. This provides them with a dark, moist environment to develop.
4. Weeding: Keep the container free of weeds, as they can compete with the peanut plants for nutrients and water. Hand-pull any weeds that appear.
5. Pest Control: Peanuts are generally pest-resistant, but keep an eye out for common garden pests like aphids or spider mites. If you notice any pests, treat them with an organic insecticide or insecticidal soap.
Harvesting Your Peanuts
This is the most exciting part! After all your hard work, it’s time to reap the rewards of your labor.
1. Timing: Peanuts typically take about 120-150 days to mature, depending on the variety and growing conditions. You’ll know it’s time to harvest when the leaves start to turn yellow and the plants begin to die back.
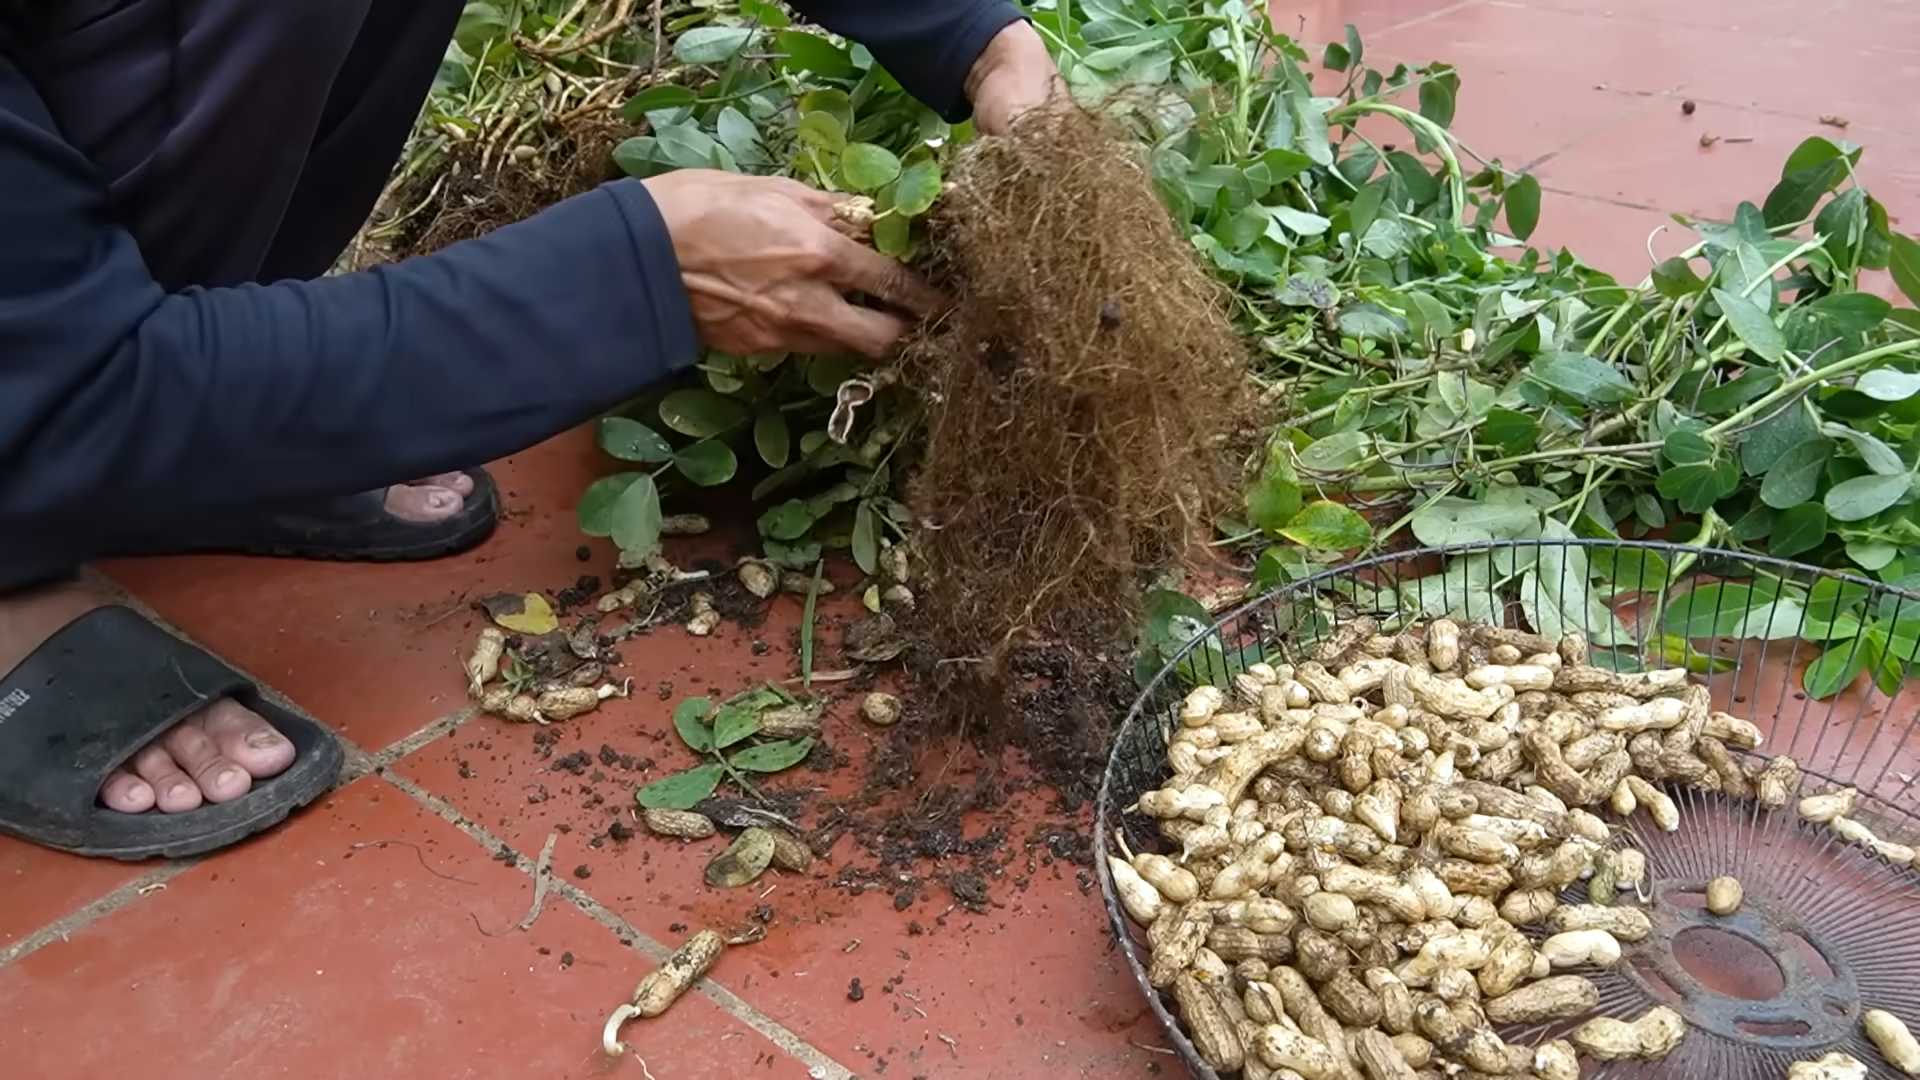
2. Digging: Gently dig up the entire plant, being careful not to damage the peanuts. You can use a garden fork or trowel to loosen the soil around the plant.
3. Cleaning: Shake off as much soil as possible from the peanuts.
4. Curing: This is a crucial step for developing the flavor and preventing mold. Hang the entire plant upside down in a warm, dry, and well-ventilated place for about 2-4 weeks. You can hang them in a garage, shed, or even indoors if you have enough space.
5. Separating: Once the peanuts are cured, you can separate them from the plant.
6. Roasting (Optional): If you want to roast your peanuts, preheat your oven to 350°F (175°C). Spread the peanuts in a single layer on a baking sheet and roast for about 20-25 minutes, or until they’re golden brown and fragrant. Let them cool completely before enjoying.
Troubleshooting Common Problems
Even with the best care, you might encounter a few challenges along the way. Here are some common problems and how to address them:
* Poor Germination: If your peanuts aren’t germinating, make sure they’re raw and unsalted. Also, ensure the soil is warm enough (at least 65°F or 18°C). You can also try scarifying the peanut shells by gently rubbing them with sandpaper before planting.
* Yellowing Leaves: Yellowing leaves can be a sign of nutrient deficiency, overwatering, or pest infestation. Check the soil moisture and fertilize if necessary. Inspect the plants for pests and treat accordingly.
* Lack of Peanuts: If your plants are growing well but not producing peanuts, it could be due to insufficient sunlight, poor pollination, or lack of hilling. Make sure the plants are getting enough sunlight and hill the soil around the base of the plants regularly.
* Root Rot: Root rot is caused by overwatering and poor drainage. Make sure your container has drainage holes and avoid overwatering. If you suspect root rot, you can try transplanting the plant into fresh, well-draining soil.
Enjoying Your Homegrown Peanuts
Congratulations! You’ve successfully grown your own peanuts in containers. Now it’s time to enjoy the fruits (or, in this case, the legumes) of your labor. You can eat them raw, roasted, or use them in your favorite recipes. Homegrown peanuts are so much more flavorful than store-bought ones, and you’ll have the satisfaction of knowing you grew them yourself.
I hope this guide has inspired you to try growing peanuts in containers. It’s a fun and rewarding experience that anyone can enjoy. Happy gardening!
Conclusion
So, there you have it – a comprehensive guide to successfully growing peanuts in containers! We’ve walked through everything from selecting the right peanut variety and container size to nurturing your plants and harvesting your very own homegrown peanuts. But why should you bother with this DIY project?
Simply put, growing peanuts in containers offers a unique and rewarding gardening experience, especially for those with limited space. Imagine the satisfaction of cracking open a shell and enjoying a freshly harvested peanut, knowing you nurtured it from seed to snack. It’s a fantastic way to connect with nature, learn about the peanut life cycle, and enjoy a delicious and healthy treat. Plus, it’s a conversation starter! How many people can say they grow their own peanuts?
This method also allows for greater control over the growing environment. You can easily move your containers to chase the sun, protect them from unexpected frosts, and ensure optimal drainage. This is particularly beneficial for those living in regions with shorter growing seasons or less-than-ideal soil conditions.
Don’t be afraid to experiment with different peanut varieties! Virginia peanuts are known for their large size, while Spanish peanuts offer a sweeter flavor. Runner peanuts are a popular choice for peanut butter, and Valencia peanuts are often roasted in the shell. Try growing a few different varieties side-by-side to discover your personal favorite.
Consider adding companion plants to your peanut containers. Marigolds can help deter pests, while herbs like basil and oregano can improve the overall health of your plants. Just be sure to choose plants that have similar watering and sunlight requirements.
Another variation to consider is the roasting process. Once you’ve harvested your peanuts, you can roast them in the oven or in a skillet for a delicious and satisfying snack. Experiment with different seasonings, such as salt, pepper, chili powder, or even a touch of honey, to create your own signature roasted peanut flavor.
Growing peanuts in containers is more than just a gardening project; it’s an adventure! It’s a chance to learn, experiment, and enjoy the fruits (or rather, the legumes) of your labor.
We strongly encourage you to give this DIY trick a try. It’s easier than you might think, and the rewards are well worth the effort. Remember to choose a sunny location, use well-draining soil, and water regularly. With a little patience and care, you’ll be enjoying your own homegrown peanuts in no time.
And most importantly, we want to hear about your experience! Share your photos, tips, and stories with us in the comments section below. Let us know what varieties you tried, what challenges you faced, and what successes you celebrated. Your feedback will help other gardeners learn and grow, and together, we can spread the joy of growing peanuts in containers. So, get your hands dirty and start growing your own delicious, homegrown peanuts today!
Frequently Asked Questions (FAQ)
What is the best time to start growing peanuts in containers?
The best time to start growing peanuts in containers is typically in the spring, after the last frost. Peanuts require warm soil temperatures (around 65-70°F or 18-21°C) to germinate properly. You can start seeds indoors 4-6 weeks before the last expected frost to get a head start on the growing season. If you live in a warmer climate with a longer growing season, you can plant directly into containers outdoors once the soil has warmed up.
What size container is needed for growing peanuts?
A container that is at least 12 inches deep and 12 inches in diameter is recommended for growing peanuts. Peanuts develop underground, so they need ample space for their roots and pods to develop. Larger containers are generally better, as they provide more room for growth and help retain moisture. A five-gallon bucket or a large planter pot works well. Make sure the container has drainage holes to prevent waterlogging.
What type of soil is best for growing peanuts in containers?
Peanuts prefer well-draining, sandy loam soil with a slightly acidic to neutral pH (around 6.0 to 7.0). Avoid heavy clay soils, as they can become waterlogged and hinder peanut development. You can create a suitable soil mix by combining equal parts of potting soil, sand, and compost. This will provide good drainage, aeration, and nutrients for your peanut plants.
How often should I water my peanut plants in containers?
Water your peanut plants regularly, especially during hot and dry weather. The soil should be kept consistently moist but not waterlogged. Check the soil moisture by sticking your finger about an inch deep into the soil. If it feels dry, it’s time to water. Water deeply, allowing the water to drain out of the bottom of the container. Avoid overhead watering, as this can promote fungal diseases.
How much sunlight do peanut plants need?
Peanut plants need at least 6-8 hours of direct sunlight per day to thrive. Choose a sunny location for your containers where they will receive plenty of sunlight throughout the day. If you live in a particularly hot climate, you may need to provide some afternoon shade to prevent the plants from overheating.
Do peanut plants need fertilizer?
Peanut plants benefit from regular fertilization, especially during the early stages of growth. Use a balanced fertilizer (e.g., 10-10-10) or a fertilizer specifically formulated for legumes. Follow the instructions on the fertilizer package for application rates. Avoid over-fertilizing, as this can lead to excessive foliage growth at the expense of peanut production. You can also amend the soil with compost or other organic matter to provide a slow-release source of nutrients.
How long does it take for peanuts to mature in containers?
Peanuts typically take 120-150 days to mature, depending on the variety and growing conditions. You’ll know your peanuts are ready to harvest when the foliage starts to turn yellow and the pods feel plump and full. You can also dig up a few plants to check the peanut development. If the peanuts are mature and the shells are hard, it’s time to harvest.
How do I harvest peanuts from containers?
To harvest peanuts from containers, gently pull the entire plant out of the container. Shake off any excess soil and then carefully remove the peanuts from the roots. You can also use a garden fork to loosen the soil around the plant before pulling it out.
How do I cure and store peanuts after harvesting?
After harvesting, cure the peanuts by drying them in a well-ventilated area for 1-2 weeks. Spread the peanuts out in a single layer on a screen or tray and turn them regularly to ensure even drying. Once the peanuts are completely dry, you can store them in an airtight container in a cool, dry place. Properly cured and stored peanuts can last for several months.
Are there any common pests or diseases that affect peanut plants in containers?
Common pests that can affect peanut plants include aphids, spider mites, and leafhoppers. These pests can be controlled with insecticidal soap or neem oil. Fungal diseases, such as leaf spot and powdery mildew, can also affect peanut plants. These diseases can be prevented by providing good air circulation, avoiding overhead watering, and using a fungicide if necessary. Regularly inspect your plants for signs of pests or diseases and take action promptly to prevent them from spreading.
Can I grow peanuts indoors?
While it’s possible to start peanut seeds indoors, it’s generally not recommended to grow them indoors for their entire life cycle. Peanuts require a lot of sunlight and space to develop properly, which can be difficult to provide indoors. If you do want to try growing peanuts indoors, make sure to provide them with plenty of light (using grow lights if necessary) and a large container.
What are some good companion plants for peanuts in containers?
Good companion plants for peanuts include marigolds, basil, oregano, and rosemary. Marigolds help deter pests, while herbs like basil and oregano can improve the overall health of your plants. Rosemary can also help repel certain insects. Avoid planting peanuts near plants that compete for nutrients or attract pests, such as beans or cabbage.
Leave a Comment