
Bottle Cabbage Growing: Ever dreamt of harvesting your own crisp, delicious cabbage right from your backyard, or even your balcony? I know I have! But the thought of sprawling gardens and complicated setups can be daunting. What if I told you there’s a simple, space-saving, and incredibly rewarding way to cultivate these leafy greens using something you probably already have lying around – plastic bottles?
Cabbage, a staple in cuisines worldwide, boasts a rich history dating back to ancient times. From its humble beginnings as a wild leafy plant, it has evolved into a diverse range of varieties, each offering unique flavors and textures. Traditionally, growing cabbage required dedicated garden space, but innovative techniques like bottle cabbage growing are democratizing access to fresh, homegrown produce.
In today’s world, where space is a premium and sustainability is key, bottle cabbage growing offers a fantastic solution. It’s perfect for urban dwellers, apartment residents, or anyone looking to minimize their environmental footprint. Plus, it’s a budget-friendly way to enjoy fresh, organic cabbage without relying on store-bought options. This DIY guide will walk you through the entire process, from selecting the right bottles to nurturing your cabbage plants to a bountiful harvest. Get ready to transform those discarded bottles into a thriving mini-garden and enjoy the satisfaction of growing your own food!
DIY Bottle Cabbage Growing: A Fun and Sustainable Project!
Hey there, fellow gardening enthusiasts! Ever thought about growing your own cabbage in a recycled plastic bottle? It’s a fantastic way to reuse materials, save space, and enjoy fresh, homegrown veggies. I’ve been experimenting with this method, and I’m excited to share my step-by-step guide with you. Trust me, it’s easier than you think!
What You’ll Need
Before we dive in, let’s gather our supplies. Here’s a list of everything you’ll need for this project:
* A large plastic bottle (2-liter soda bottle or similar works great)
* Cabbage seeds (choose your favorite variety!)
* Potting soil (a good quality mix is essential)
* Scissors or a utility knife
* Drill or nail (for drainage holes)
* Watering can or spray bottle
* Optional: Seed starting tray or small pots
* Optional: Liquid fertilizer (for feeding your cabbage later on)
Preparing the Bottle
Okay, let’s get started with prepping our bottle. This is a crucial step, so pay close attention!
1. Clean the Bottle: First things first, thoroughly clean the plastic bottle with soap and water. Remove any labels and residue. You want a clean slate for your cabbage to thrive.
2. Cut the Bottle: Now, carefully cut the bottle in half horizontally. You can use scissors or a utility knife for this. I prefer a utility knife for a cleaner cut, but be extra cautious! You’ll be using the bottom half of the bottle as your growing container. You can discard the top half, or save it for another DIY project!
3. Create Drainage Holes: Drainage is super important to prevent waterlogging and root rot. Use a drill or a nail to create several drainage holes in the bottom of the bottle. I usually make about 5-6 holes, evenly spaced.
Starting Your Cabbage Seeds
You have two options here: direct sowing or starting seeds indoors. I prefer starting seeds indoors because it gives them a head start and protects them from harsh weather.
Option 1: Direct Sowing
1. Fill the Bottle with Soil: Fill the bottom half of the bottle with potting soil, leaving about an inch of space at the top.
2. Sow the Seeds: Sprinkle a few cabbage seeds evenly over the soil surface.
3. Cover the Seeds: Gently cover the seeds with a thin layer of soil (about ¼ inch).
4. Water Gently: Water the soil gently using a watering can or spray bottle. Make sure the soil is moist but not waterlogged.
5. Place in a Sunny Spot: Place the bottle in a sunny location that receives at least 6 hours of sunlight per day.
6. Keep the Soil Moist: Keep the soil consistently moist until the seeds germinate. Germination usually takes about 5-10 days.
7. Thin Seedlings: Once the seedlings emerge, thin them out, leaving only the strongest one in the bottle.
Option 2: Starting Seeds Indoors (My Preferred Method)
1. Fill Seed Starting Tray or Pots: Fill a seed starting tray or small pots with seed starting mix.
2. Sow the Seeds: Sow 2-3 cabbage seeds in each cell or pot.
3. Cover the Seeds: Gently cover the seeds with a thin layer of seed starting mix.
4. Water Gently: Water the soil gently using a spray bottle.
5. Provide Light: Place the tray or pots under grow lights or in a sunny windowsill.
6. Keep the Soil Moist: Keep the soil consistently moist until the seeds germinate.
7. Harden Off Seedlings: Once the seedlings have developed a few true leaves, it’s time to harden them off. This means gradually exposing them to outdoor conditions over a period of 7-10 days. Start by placing them outside for an hour or two each day, gradually increasing the time.
Transplanting Your Cabbage Seedling
Once your seedling is ready, it’s time to transplant it into the prepared bottle.
1. Prepare the Bottle: Fill the bottom half of the bottle with potting soil, leaving about an inch of space at the top.
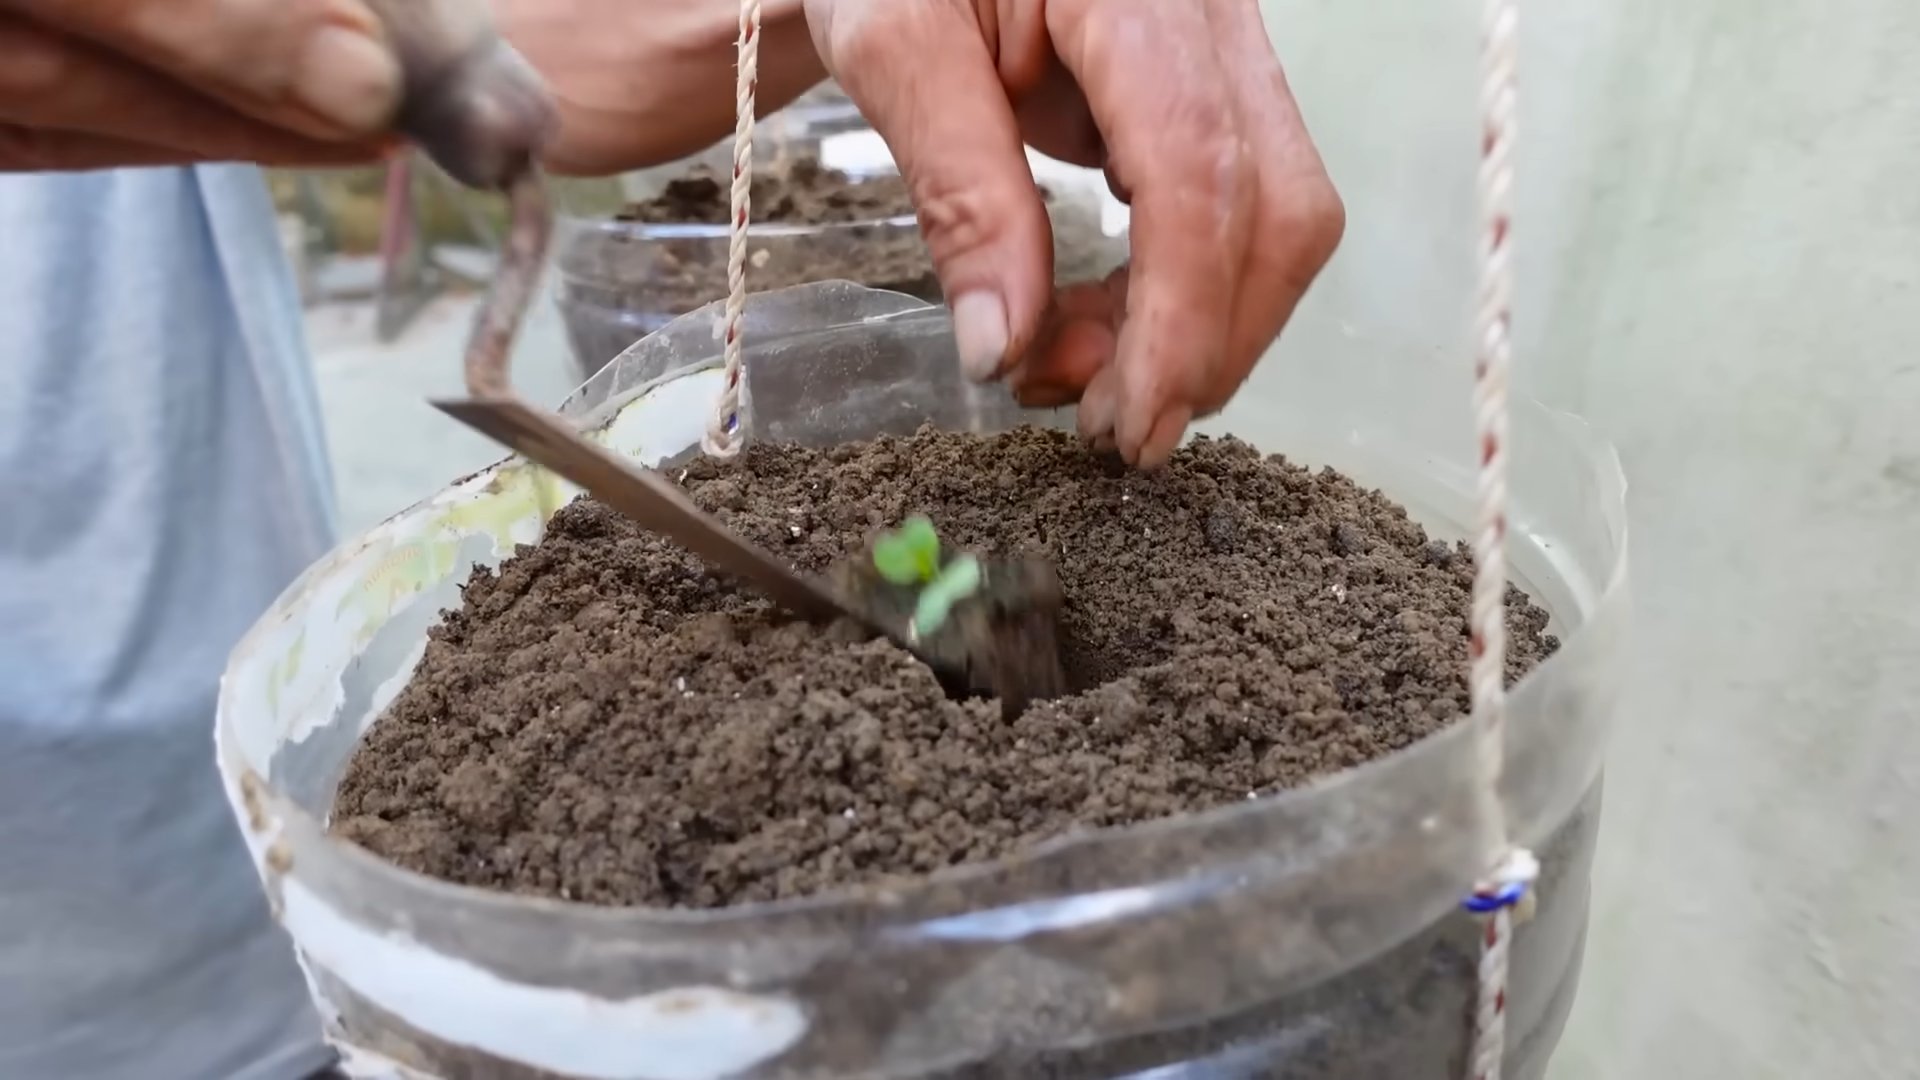
2. Create a Hole: Make a small hole in the center of the soil, large enough to accommodate the seedling’s root ball.
3. Carefully Remove the Seedling: Gently remove the seedling from the seed starting tray or pot, being careful not to damage the roots.
4. Place the Seedling: Place the seedling in the hole and gently backfill with soil.
5. Water Thoroughly: Water the seedling thoroughly after transplanting.
Caring for Your Bottle Cabbage
Now that your cabbage is planted, it’s time to provide it with the care it needs to thrive.
1. Sunlight: Cabbage needs at least 6 hours of sunlight per day. Place your bottle cabbage in a sunny location.
2. Watering: Water your cabbage regularly, especially during hot, dry weather. The soil should be consistently moist but not waterlogged. Check the soil moisture by sticking your finger into the soil. If the top inch feels dry, it’s time to water.
3. Fertilizing: Cabbage is a heavy feeder, so it needs regular fertilization. Use a liquid fertilizer diluted to half strength every 2-3 weeks. Follow the instructions on the fertilizer label. I like to use a balanced fertilizer with equal parts nitrogen, phosphorus, and potassium.
4. Pest Control: Keep an eye out for pests such as aphids, cabbage worms, and slugs. You can handpick pests off the plants or use organic pest control methods such as insecticidal soap or neem oil.
5. Weed Control: Keep the area around your cabbage free of weeds. Weeds can compete with your cabbage for nutrients and water.
6. Support: As your cabbage grows, it may need support to prevent it from falling over. You can use a stake or tomato cage to provide support.
Harvesting Your Cabbage
The moment we’ve all been waiting for! Harvesting your homegrown cabbage is incredibly rewarding.
1. Check for Maturity: Cabbage is typically ready to harvest when the head is firm and dense. The size of the head will vary depending on the variety.
2. Cut the Head: Use a sharp knife to cut the cabbage head from the stem. Leave a few outer leaves on the stem, as these may produce smaller side heads.
3. Enjoy Your Harvest: Now you can enjoy your fresh, homegrown cabbage in salads, soups, stews, or any other dish you like!
Troubleshooting
Even with the best care, you might encounter some challenges along the way. Here are a few common problems and how to address them:
* Yellowing Leaves: This could be a sign of overwatering, underwatering, or nutrient deficiency. Check the soil moisture and adjust your watering accordingly. Fertilize your cabbage with a balanced fertilizer.
* Stunted Growth: This could be caused by poor soil, lack of sunlight, or pest infestation. Make sure your cabbage is planted in good quality potting soil and receives at least 6 hours of sunlight per day. Check for pests and take appropriate action.
* Bolting: Bolting occurs when cabbage plants flower prematurely. This is usually caused by stress, such as extreme temperatures or lack of water. Try to provide consistent growing conditions and avoid stressing your plants.
Tips and Tricks
Here are a few extra tips to help you succeed with bottle cabbage growing:
* Choose the Right Variety: Some cabbage varieties are better suited for container growing than others. Look for compact varieties that don’t get too large.
* Use Good Quality Potting Soil: Don’t skimp on the potting soil! Use a good quality mix that provides good drainage and nutrients.
* Water Regularly: Cabbage needs consistent moisture, so water regularly, especially during hot, dry weather.
* Fertilize Regularly: Cabbage is a heavy feeder, so fertilize regularly with a balanced fertilizer.
* Protect from Pests: Keep an eye out for pests and take action to control them.
* Rotate Your Crops: Don’t plant cabbage in the same spot year after year. Rotate your crops to prevent soilborne diseases.
Growing cabbage in a bottle is a fun and rewarding experience. It’s a great way to reuse materials, save space, and enjoy fresh, homegrown veggies. With a little bit of care and attention, you can successfully grow your own bottle cabbage and impress your friends and family! Happy gardening!
Conclusion
So, there you have it! Transforming discarded plastic bottles into miniature cabbage cradles is more than just a quirky gardening experiment; it’s a testament to resourcefulness, sustainability, and the sheer joy of nurturing life from something seemingly destined for the landfill. This bottle cabbage growing method offers a multitude of benefits, from space-saving efficiency perfect for urban gardeners to a controlled environment that can significantly reduce pest infestations and optimize water usage.
But why is this DIY trick a must-try? Beyond the environmental advantages, it’s about accessibility. Gardening can often feel intimidating, requiring extensive land, specialized equipment, and a deep well of knowledge. This technique democratizes the process, making it achievable for anyone, regardless of their experience level or living situation. Imagine the satisfaction of harvesting fresh, crisp cabbage from your balcony, patio, or even a sunny windowsill, all thanks to a repurposed plastic bottle.
The beauty of this method also lies in its adaptability. Feel free to experiment with different cabbage varieties. Red cabbage, savoy cabbage, or even bok choy can thrive in these miniature ecosystems. Consider adding companion plants like marigolds or basil to deter pests and enhance the flavor of your cabbage. You can also adjust the size of the bottle to accommodate larger or smaller cabbage varieties. For example, a larger water cooler bottle could be used for a larger variety of cabbage.
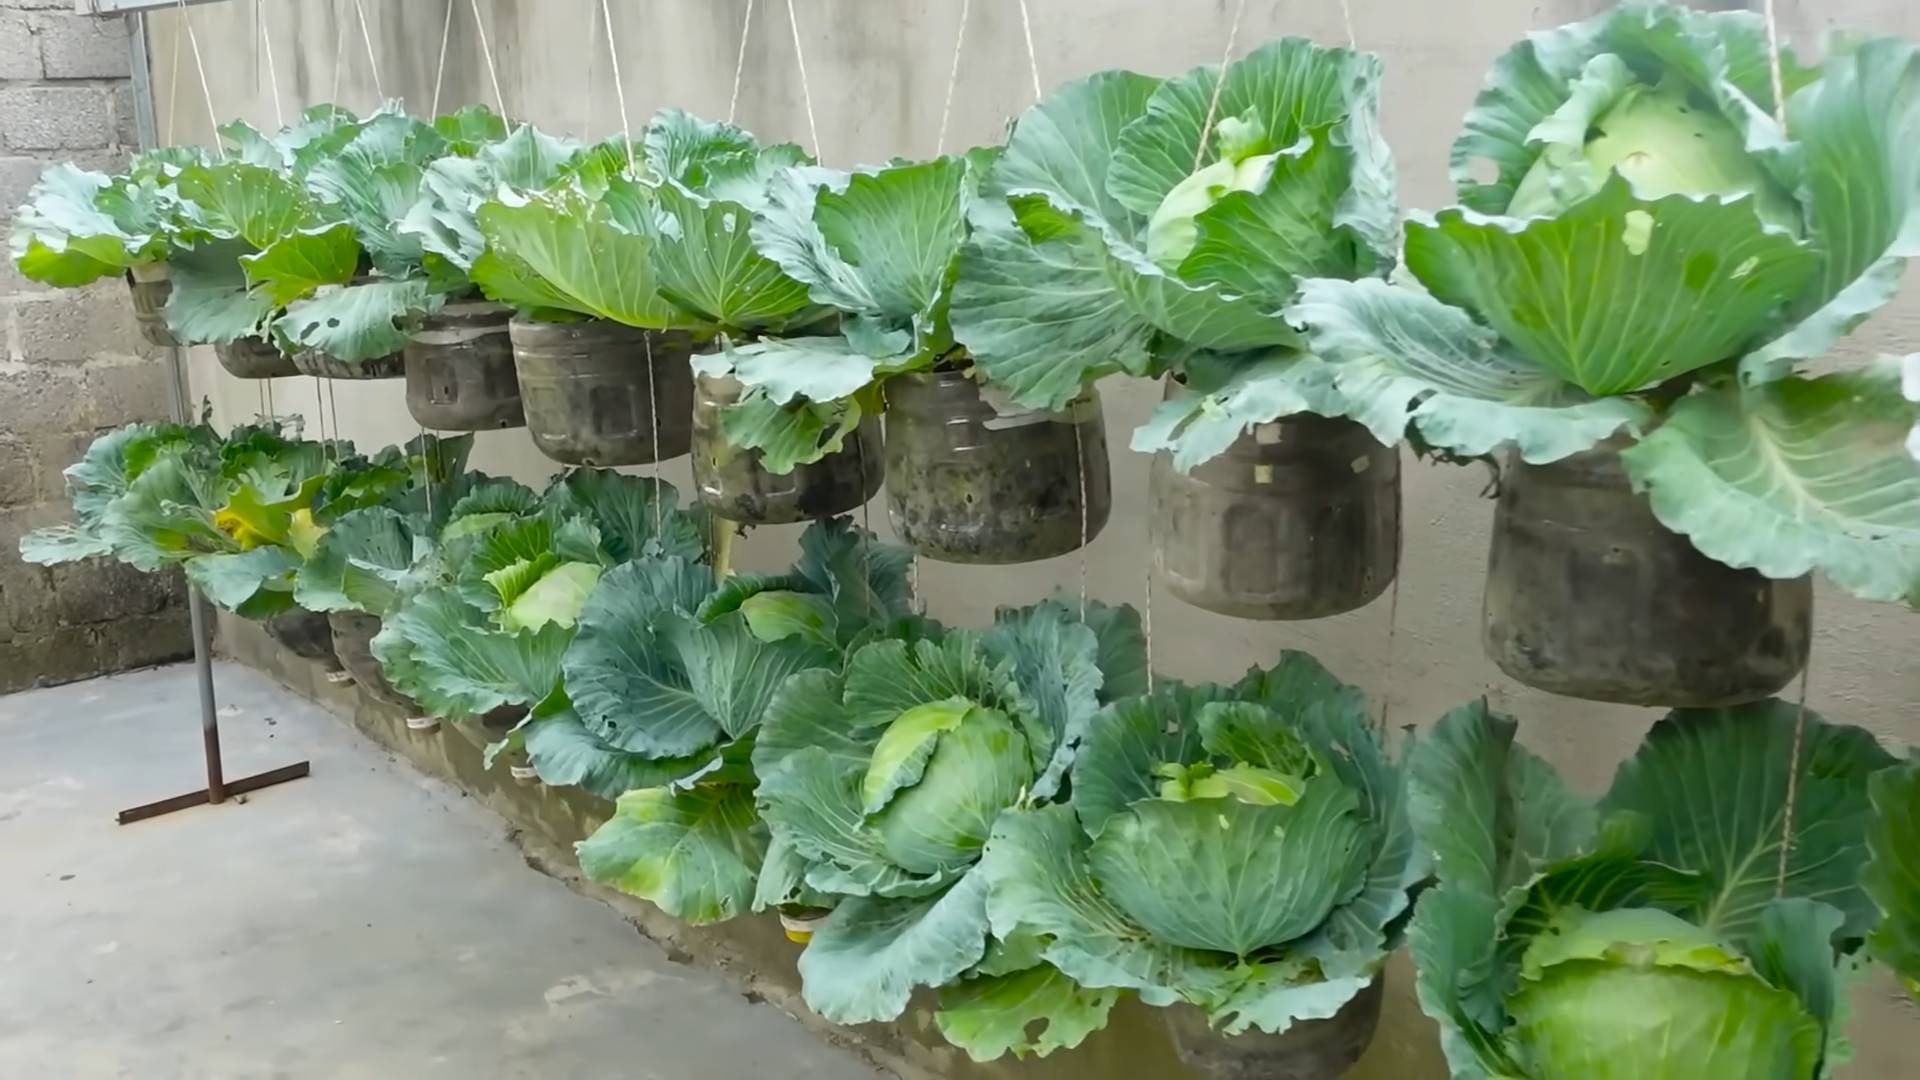
Don’t be afraid to get creative with your setup. Paint the bottles to add a splash of color to your garden, or arrange them in visually appealing patterns. You can even create a vertical garden by suspending the bottles from a frame or trellis. The possibilities are truly endless.
We understand that venturing into new gardening territory can sometimes feel daunting. That’s why we’ve compiled a comprehensive FAQ section below to address any questions or concerns you might have. We’ve covered everything from choosing the right soil to troubleshooting common problems.
Ultimately, the success of your bottle cabbage growing endeavor hinges on your willingness to experiment, learn, and adapt. Embrace the challenges, celebrate the small victories, and most importantly, have fun!
We are incredibly excited to see your bottle cabbage gardens come to life. We wholeheartedly encourage you to try this DIY trick and share your experiences with us. Post photos of your creations on social media using #BottleCabbage or tag us in your posts. We can’t wait to see what you grow! Your insights and experiences will not only inspire others but also contribute to a growing community of sustainable gardeners. Let’s transform waste into wonder, one bottle cabbage at a time.
Frequently Asked Questions (FAQ)
What type of plastic bottle is best for growing cabbage?
Ideally, you should use food-grade plastic bottles, such as those used for water, juice, or soda. Avoid bottles that have contained harsh chemicals or cleaning products, as these could contaminate the soil and harm your cabbage plants. PET (polyethylene terephthalate) bottles are a common and generally safe choice. Ensure the bottle is clean and free of any residue before using it. The size of the bottle will depend on the variety of cabbage you plan to grow. Smaller varieties will thrive in smaller bottles, while larger varieties will require larger containers.
What kind of soil should I use for bottle cabbage growing?
A well-draining potting mix is crucial for successful bottle cabbage growing. Avoid using garden soil, as it tends to be too heavy and can compact in the confined space of the bottle, leading to poor drainage and root rot. A good potting mix should contain a blend of peat moss, perlite, and vermiculite. You can also add compost to enrich the soil and provide essential nutrients for your cabbage plants. Consider adding a slow-release fertilizer to the potting mix to provide a steady supply of nutrients throughout the growing season.
How often should I water my bottle cabbage plants?
The frequency of watering will depend on several factors, including the weather, the size of the bottle, and the type of soil you’re using. Generally, you should water your cabbage plants when the top inch of soil feels dry to the touch. Avoid overwatering, as this can lead to root rot. Ensure that the bottle has adequate drainage holes to allow excess water to escape. During hot and dry weather, you may need to water your plants more frequently. Check the soil moisture regularly and adjust your watering schedule accordingly.
How much sunlight do bottle cabbage plants need?
Cabbage plants require at least six hours of direct sunlight per day to thrive. Choose a location that receives ample sunlight, such as a sunny balcony, patio, or windowsill. If you’re growing your cabbage plants indoors, you may need to supplement with artificial lighting, such as grow lights. Rotate the bottles regularly to ensure that all sides of the plants receive adequate sunlight. Insufficient sunlight can lead to leggy growth and reduced yields.
How do I prevent pests and diseases in my bottle cabbage garden?
One of the advantages of bottle cabbage growing is that it can help to reduce pest infestations. However, it’s still important to take preventative measures. Regularly inspect your plants for signs of pests or diseases. Common cabbage pests include aphids, cabbage worms, and slugs. You can control these pests by handpicking them off the plants, using insecticidal soap, or introducing beneficial insects like ladybugs. To prevent diseases, ensure that your plants have good air circulation and avoid overwatering. You can also use organic fungicides to protect your plants from fungal diseases.
Can I grow cabbage indoors in bottles?
Yes, you can absolutely grow cabbage indoors in bottles, especially if you have a sunny windowsill or access to grow lights. Choose a compact cabbage variety that is well-suited for container gardening. Ensure that the bottles have adequate drainage and use a well-draining potting mix. Provide your plants with at least six hours of direct sunlight or supplement with grow lights. Monitor the soil moisture regularly and water as needed. With proper care, you can enjoy fresh, homegrown cabbage even in the middle of winter.
How do I harvest my bottle cabbage?
The time it takes to harvest your cabbage will depend on the variety you’re growing. Generally, cabbage is ready to harvest when the head is firm and compact. To harvest, simply cut the head off the plant at the base, leaving a few outer leaves intact. You can also harvest individual leaves as needed for salads or cooking. After harvesting the main head, the plant may produce smaller side shoots that can also be harvested.
What are some variations I can try with bottle cabbage growing?
The possibilities are endless! You can experiment with different cabbage varieties, companion plants, and bottle designs. Try growing red cabbage, savoy cabbage, or bok choy in your bottles. Plant marigolds or basil alongside your cabbage to deter pests and enhance the flavor. Paint the bottles to add a splash of color to your garden, or create a vertical garden by suspending the bottles from a frame or trellis. You can also use different types of bottles, such as larger water cooler bottles or smaller plastic cups, depending on the size of the cabbage variety you’re growing.
What if my cabbage isn’t growing well in the bottle?
If your cabbage isn’t thriving, consider these factors:
* Sunlight: Are they getting enough? Move them to a sunnier spot or supplement with grow lights.
* Watering: Are you over or under watering? Check the soil moisture regularly.
* Nutrients: Are they getting enough fertilizer? Consider adding a slow-release fertilizer or liquid feed.
* Pests/Diseases: Inspect for any signs of infestation or disease and treat accordingly.
* Soil: Is the soil well-draining? If not, repot with a better potting mix.
Don’t be discouraged! Gardening is a learning process. Adjust your approach based on your observations, and you’ll be enjoying fresh bottle cabbage in no time.


Leave a Comment