
Balcony Bell Peppers Growing Tips: Dreaming of fresh, crisp bell peppers straight from your own balcony? You’re not alone! For centuries, cultivating food in small spaces has been a necessity and a source of immense satisfaction for people around the globe. From ancient rooftop gardens in Babylon to modern-day urban farms, the desire to nurture life and enjoy homegrown produce is deeply ingrained in us.
But let’s be honest, growing bell peppers, especially on a balcony, can feel a little daunting. Maybe you’ve tried before and ended up with tiny, sad-looking peppers, or perhaps you’re just not sure where to start. That’s where these balcony bell peppers growing tips come in! I’m going to share some simple, effective DIY tricks and hacks that will transform your balcony into a thriving pepper paradise.
Imagine the joy of harvesting vibrant, juicy bell peppers, knowing you grew them yourself. No more trips to the grocery store for bland, overpriced peppers! This guide will empower you to overcome common balcony gardening challenges, maximize your yield, and enjoy the delicious rewards of your labor. So, grab your gardening gloves, and let’s get started on this exciting journey of growing bell peppers on your balcony!
Growing Bell Peppers on Your Balcony: A DIY Guide for Urban Gardeners
Hey there, fellow balcony gardeners! I’m so excited you’re thinking about growing bell peppers on your balcony. It’s totally doable, and trust me, there’s nothing quite like biting into a juicy, homegrown bell pepper that you nurtured yourself. This guide will walk you through everything you need to know, from choosing the right varieties to troubleshooting common problems. Let’s get started!
Choosing the Right Bell Pepper Variety
Not all bell peppers are created equal, especially when it comes to container gardening. You’ll want to pick varieties that are compact and well-suited for smaller spaces. Here are a few of my favorites:
* ‘Patio Bell’: As the name suggests, this variety is specifically bred for containers. It produces smaller, but still delicious, bell peppers.
* ‘Mini Bell’: These are adorable and perfect for snacking! They come in a range of colors and are generally very productive.
* ‘Lunchbox Peppers’: Similar to mini bells, these are slightly larger and great for adding to salads or, well, lunchboxes!
* ‘Sweet Palermo’: While technically not a bell pepper, these sweet, elongated peppers are incredibly productive and thrive in containers. They are my personal favorite!
Gathering Your Supplies
Before you even think about planting, you need to make sure you have all the necessary supplies. Trust me, it’s much easier to gather everything beforehand than to run to the store mid-planting.
* Containers: Choose pots that are at least 12 inches in diameter and depth. Bigger is generally better, as it gives the roots more room to grow. I prefer using fabric pots because they allow for better drainage and aeration.
* Potting Mix: Don’t use garden soil! It’s too heavy and compacts easily in containers. Instead, opt for a high-quality potting mix specifically designed for container gardening. Look for mixes that contain peat moss, perlite, and vermiculite.
* Bell Pepper Seedlings or Seeds: You can start your bell peppers from seed indoors about 8-10 weeks before the last expected frost, or you can buy seedlings from a local nursery. I usually opt for seedlings because it’s faster and easier.
* Fertilizer: Bell peppers are heavy feeders, so you’ll need to fertilize them regularly. I recommend using a balanced, slow-release fertilizer at planting time, followed by a liquid fertilizer every 2-3 weeks during the growing season.
* Watering Can or Hose: You’ll need a way to water your plants regularly. A watering can is fine for smaller balconies, but a hose with a gentle spray nozzle is more convenient for larger spaces.
* Stakes or Cages: As your bell pepper plants grow, they may need support to prevent them from toppling over. Stakes or cages are a great way to provide this support.
* Gardening Gloves: Protect your hands from dirt and potential irritants.
* Trowel: For digging and transplanting.
Planting Your Bell Peppers
Okay, now for the fun part! Planting your bell peppers is relatively straightforward, but there are a few things to keep in mind to ensure success.
1. Prepare the Containers: Fill your containers with potting mix, leaving about an inch or two of space at the top.
2. Transplant the Seedlings (or Sow Seeds): If you’re using seedlings, gently remove them from their nursery pots and loosen the roots slightly. Dig a hole in the potting mix that’s large enough to accommodate the root ball. Place the seedling in the hole and backfill with potting mix, gently firming the soil around the base of the plant. If you’re starting from seed, sow the seeds about 1/4 inch deep and water gently.
3. Water Thoroughly: After planting, water your bell peppers thoroughly until the water drains out of the bottom of the container. This helps to settle the soil and get the roots off to a good start.
4. Add Fertilizer: Sprinkle a slow-release fertilizer around the base of the plants, following the instructions on the package.
5. Add Support: Install stakes or cages around your bell pepper plants to provide support as they grow.
6. Choose a Sunny Spot: Bell peppers need at least 6-8 hours of sunlight per day to thrive. Place your containers in a sunny spot on your balcony.
Caring for Your Bell Peppers
Once your bell peppers are planted, it’s important to provide them with the proper care to ensure a bountiful harvest.
* Watering: Water your bell peppers regularly, especially during hot, dry weather. The soil should be consistently moist, but not soggy. Check the soil moisture by sticking your finger into the soil. If the top inch or two feels dry, it’s time to water.
* Fertilizing: As mentioned earlier, bell peppers are heavy feeders. In addition to the slow-release fertilizer you added at planting time, you’ll need to fertilize them every 2-3 weeks with a liquid fertilizer. Follow the instructions on the package for proper dilution rates.
* Pruning: Pruning bell peppers can help to improve air circulation and encourage fruit production. Remove any suckers (small shoots that grow from the base of the plant) and any yellowing or diseased leaves.
* Pest Control: Keep an eye out for common pests like aphids, whiteflies, and spider mites. If you spot any pests, you can try spraying them with insecticidal soap or neem oil.
* Pollination: Bell peppers are self-pollinating, but sometimes they need a little help, especially if you live in an area with limited bee activity. You can hand-pollinate your bell peppers by gently shaking the plants or using a small paintbrush to transfer pollen from one flower to another.
Harvesting Your Bell Peppers
The moment you’ve been waiting for! Harvesting your bell peppers is the most rewarding part of the process.
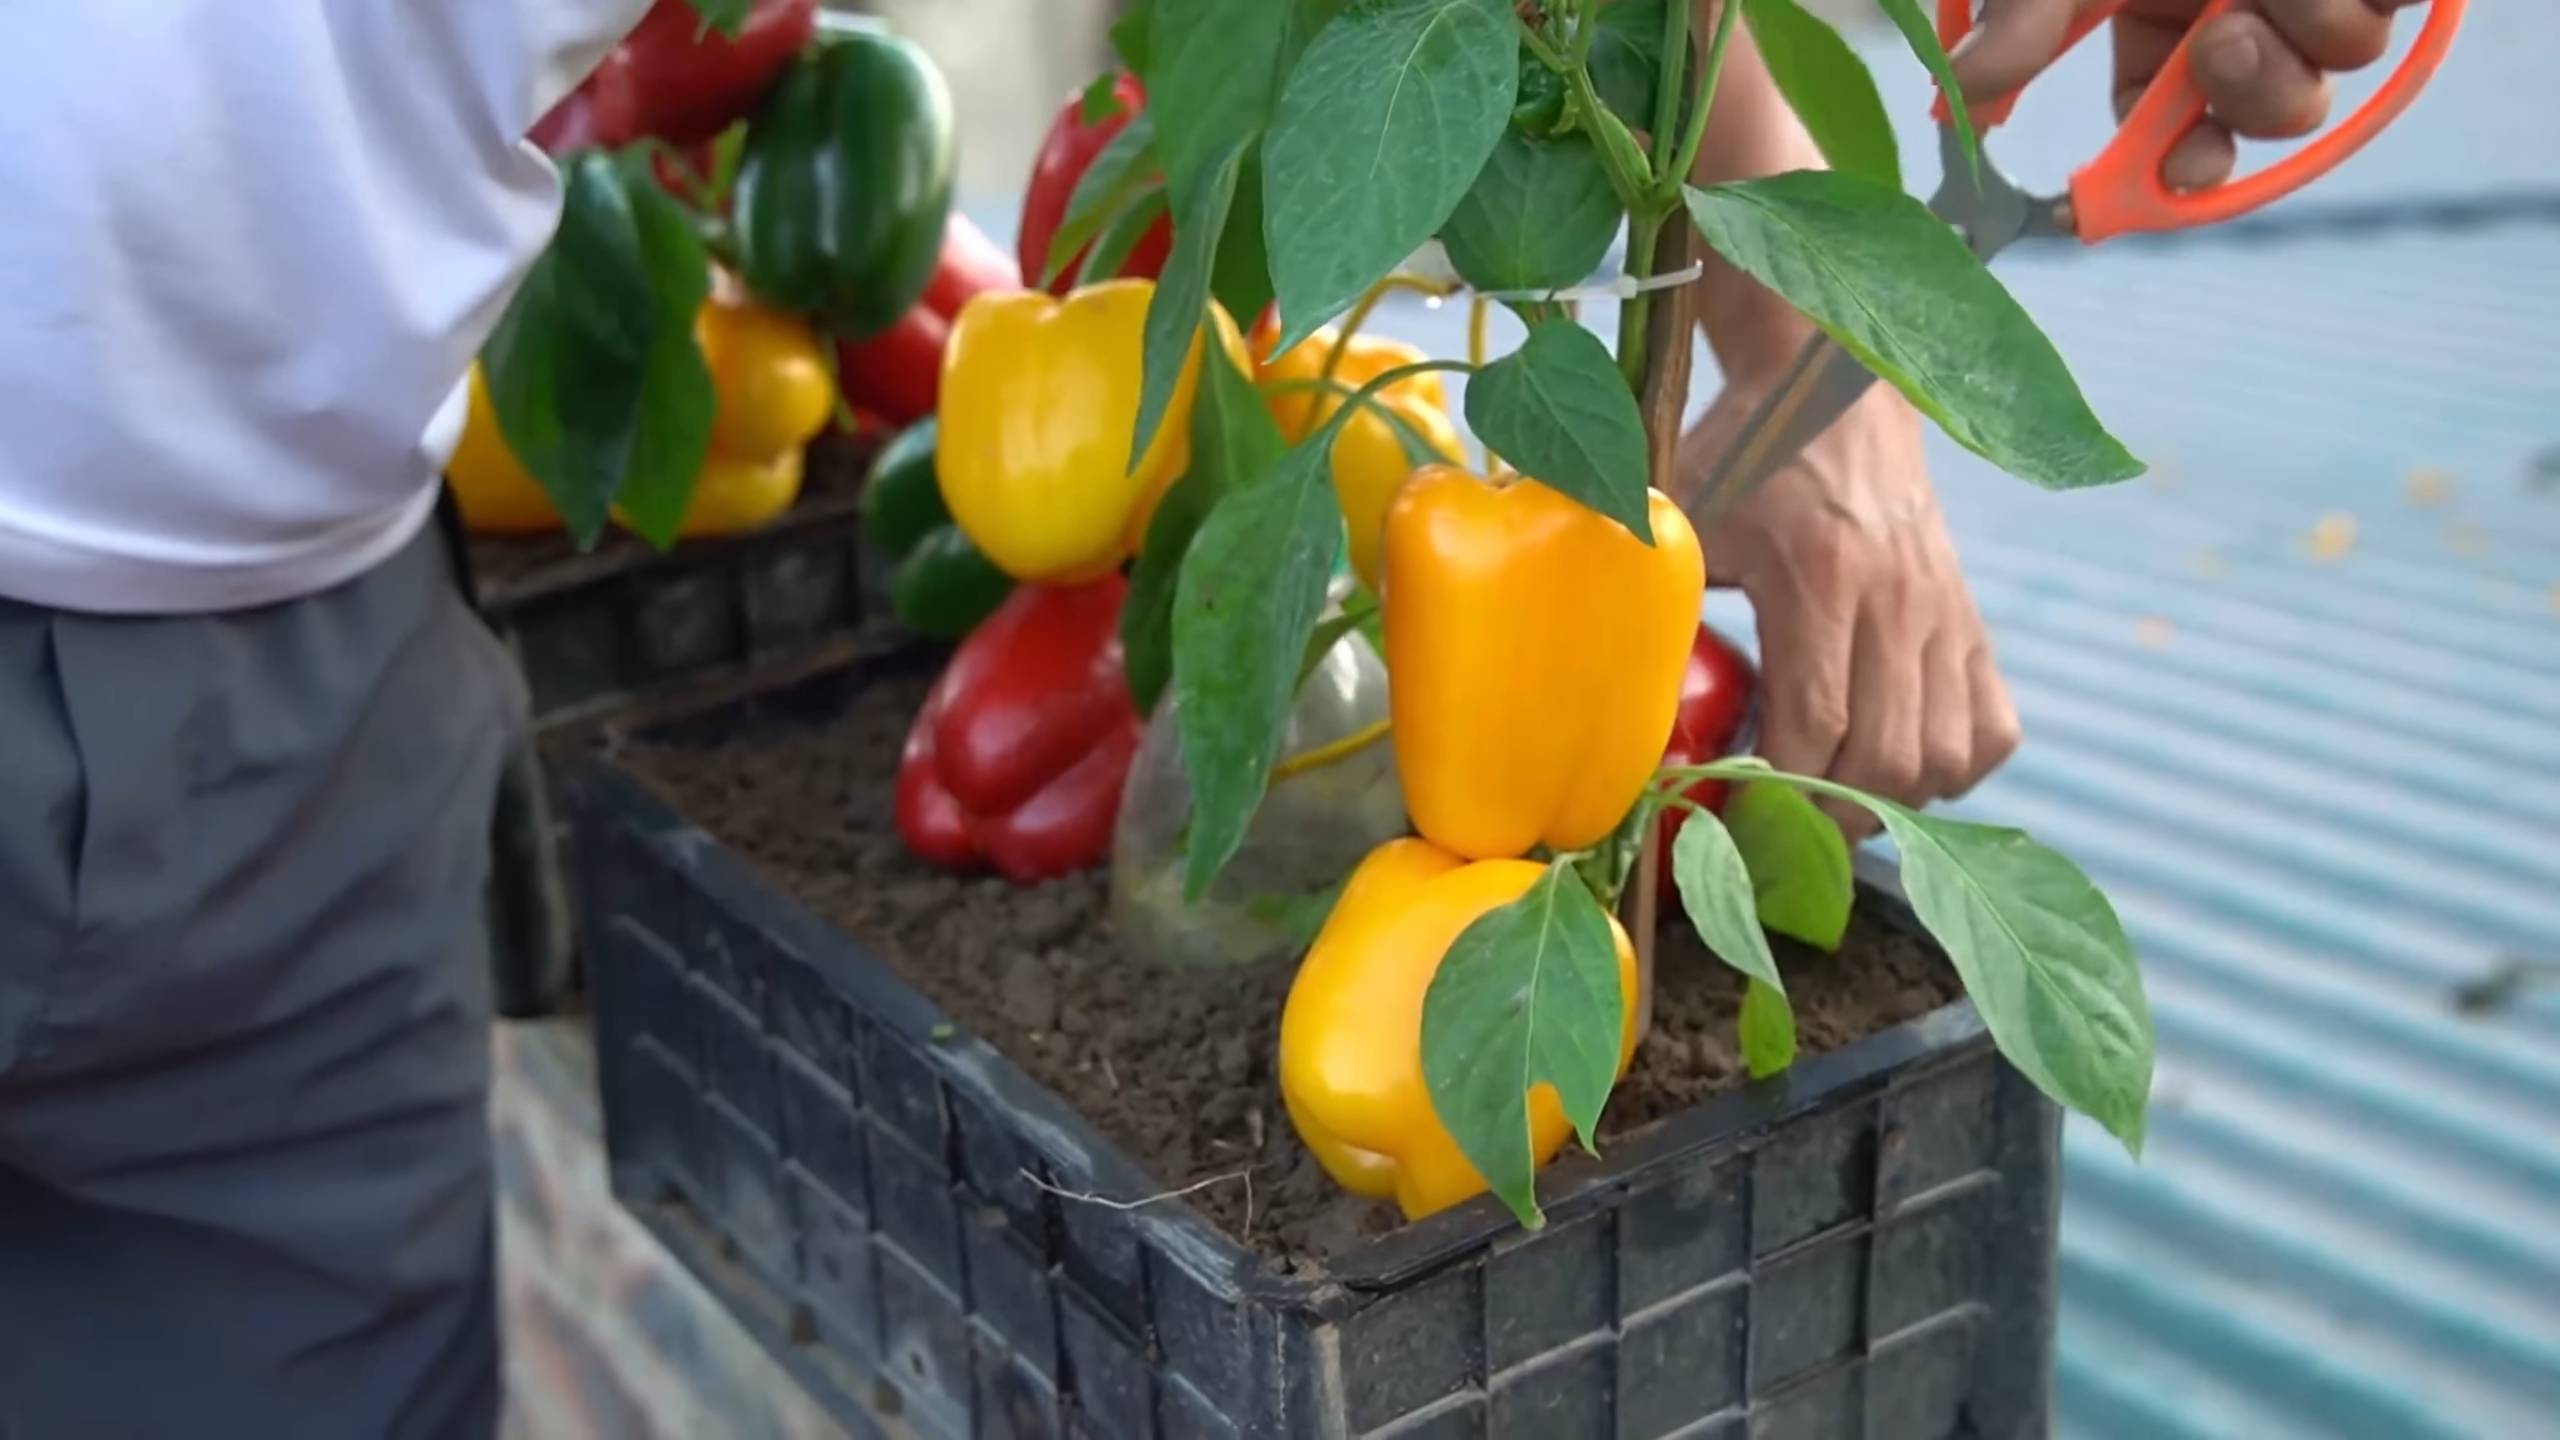
* When to Harvest: Bell peppers are typically ready to harvest about 60-80 days after transplanting. The exact timing will depend on the variety and the growing conditions. You can harvest bell peppers when they are green, or you can wait until they turn their mature color (red, yellow, orange, etc.). The color change indicates that the peppers are fully ripe and have a sweeter flavor.
* How to Harvest: Use a sharp knife or pruning shears to cut the bell peppers from the plant, leaving about an inch of stem attached. Be careful not to damage the plant when harvesting.
Troubleshooting Common Problems
Even with the best care, you may encounter some problems when growing bell peppers on your balcony. Here are a few common issues and how to address them:
* Blossom End Rot: This is a common problem that causes the bottom of the bell peppers to rot. It’s usually caused by a calcium deficiency or inconsistent watering. To prevent blossom end rot, make sure your soil is rich in calcium and water your plants regularly. You can also add a calcium supplement to the soil.
* Sunscald: This occurs when the bell peppers are exposed to too much direct sunlight, causing them to develop white or yellow patches. To prevent sunscald, provide some shade for your plants during the hottest part of the day.
* Pest Infestations: As mentioned earlier, bell peppers can be susceptible to various pests. Regularly inspect your plants for signs of pests and take action promptly if you spot any.
* Lack of Fruit Production: If your bell pepper plants are not producing fruit, it could be due to a number of factors, including insufficient sunlight, poor pollination, or nutrient deficiencies. Make sure your plants are getting enough sunlight, hand-pollinate them if necessary, and fertilize them regularly.
Extra Tips for Balcony Bell Pepper Success
* Rotate Your Crops: Don’t plant bell peppers in the same containers year after year. Rotate your crops to prevent soilborne diseases and nutrient depletion.
* Companion Planting: Plant basil, marigolds, or other companion plants near your bell peppers to help deter pests and attract pollinators.
* Mulch: Add a layer of mulch around the base of your plants to help retain moisture and suppress weeds.
* Observe Your Plants: Pay close attention to your bell pepper plants and learn to recognize the signs of stress or disease. The sooner you identify a problem, the easier it will be to fix it.
* Enjoy the Process: Growing bell peppers on your balcony should be a fun and rewarding experience. Don’t get discouraged if you encounter some challenges along the way. Just keep learning and experimenting, and you’ll be enjoying homegrown bell peppers in no time!
I hope this guide has been helpful! Happy gardening!

Conclusion
So, there you have it! Growing bell peppers on your balcony isn’t just a whimsical dream; it’s a tangible reality within your reach. We’ve walked through the essential steps, from selecting the right varieties to providing the optimal growing conditions, and hopefully, dispelled any lingering doubts you might have had. But why should you actually *do* it? Why dedicate precious balcony space to these vibrant, crunchy vegetables?
The answer is multifaceted. First and foremost, the taste of a homegrown bell pepper, ripened under the sun and harvested at its peak, is simply unparalleled. It’s a flavor explosion that store-bought peppers often struggle to match. Imagine adding that fresh, sweet crunch to your salads, stir-fries, or even just enjoying it as a healthy snack.
Beyond the taste, there’s the undeniable satisfaction of nurturing something from seed (or seedling) to harvest. It’s a connection to nature, a small act of self-sufficiency, and a rewarding experience that can bring a sense of calm and accomplishment to your daily life. Plus, let’s be honest, a balcony overflowing with lush green foliage and colorful bell peppers is a beautiful sight to behold! It transforms your outdoor space into a mini-oasis, a vibrant testament to your green thumb.
And let’s not forget the health benefits! Homegrown bell peppers are packed with vitamins and antioxidants, offering a nutritional boost to your diet. You know exactly what went into growing them, avoiding any unwanted pesticides or chemicals. It’s a healthy choice for you and your family.
Now, for a few variations to spice things up (pun intended!). Consider experimenting with different colored bell peppers – red, yellow, orange, and even purple! Each variety offers a slightly different flavor profile and adds visual interest to your balcony garden. You could also try growing smaller pepper varieties, like mini bells or sweet Italian peppers, if you’re short on space. Companion planting is another avenue to explore. Basil, for example, is said to improve the flavor of bell peppers and deter pests. Marigolds are also excellent for pest control.
Don’t be afraid to get creative with your container choices, too. While standard pots work perfectly well, you could also repurpose old buckets, baskets, or even grow bags. Just make sure they have adequate drainage. Vertical gardening is another fantastic option for maximizing space on a small balcony.
Ultimately, the key to successful balcony bell peppers growing lies in experimentation and observation. Pay attention to your plants, learn their needs, and adjust your approach accordingly. Don’t be discouraged by setbacks; every gardener faces challenges. The important thing is to learn from your mistakes and keep trying.
We wholeheartedly encourage you to give this DIY trick a try. It’s a rewarding, delicious, and surprisingly easy way to enhance your balcony and your life. And once you’ve harvested your first batch of homegrown bell peppers, we’d love to hear about your experience! Share your photos, tips, and stories in the comments below. Let’s create a community of balcony bell pepper enthusiasts! Happy growing!
Frequently Asked Questions (FAQ)
What is the best time of year to start growing bell peppers on my balcony?
The ideal time to start growing bell peppers depends on your climate. In general, you should start seeds indoors 6-8 weeks before the last expected frost. If you’re buying seedlings from a nursery, wait until after the last frost to transplant them outdoors. Bell peppers thrive in warm weather, so aim for daytime temperatures consistently above 70°F (21°C) and nighttime temperatures above 60°F (15°C). If you live in a region with a short growing season, consider starting your peppers indoors earlier to give them a head start.
What size container do I need for growing bell peppers?
Bell peppers need a decent amount of space for their roots to develop properly. A good rule of thumb is to use a container that is at least 12 inches in diameter and 12 inches deep. Larger containers, such as 5-gallon buckets or even larger, are even better, as they provide more room for root growth and help retain moisture. Make sure the container has drainage holes to prevent waterlogging, which can lead to root rot.
What kind of soil should I use for growing bell peppers in containers?
Bell peppers need well-draining, nutrient-rich soil. A good potting mix specifically formulated for vegetables is ideal. Avoid using garden soil, as it can be too heavy and compact in containers, hindering drainage and root growth. You can also amend your potting mix with compost or other organic matter to improve its fertility and water-holding capacity. A slightly acidic to neutral pH (around 6.0 to 7.0) is optimal for bell pepper growth.
How much sunlight do bell peppers need?
Bell peppers are sun-loving plants and need at least 6-8 hours of direct sunlight per day to thrive. Choose a location on your balcony that receives plenty of sunlight throughout the day. If your balcony doesn’t get enough direct sunlight, you may need to supplement with grow lights. Rotate your pepper plants regularly to ensure that all sides receive adequate sunlight.
How often should I water my bell pepper plants?
Water your bell pepper plants regularly, especially during hot, dry weather. The soil should be kept consistently moist, but not waterlogged. Check the soil moisture by sticking your finger about an inch into the soil. If it feels dry, it’s time to water. Water deeply, allowing the water to drain out of the drainage holes. Avoid watering the foliage, as this can promote fungal diseases. Mulching around the base of the plants can help retain moisture and suppress weeds.
What kind of fertilizer should I use for bell peppers?
Bell peppers are heavy feeders and benefit from regular fertilization. Use a balanced fertilizer specifically formulated for vegetables, such as a 10-10-10 or 5-10-5 fertilizer. Follow the instructions on the fertilizer package for application rates. You can also use organic fertilizers, such as compost tea or fish emulsion. Fertilize your bell pepper plants every 2-3 weeks during the growing season.
How do I prevent pests and diseases on my bell pepper plants?
Regularly inspect your bell pepper plants for signs of pests and diseases. Common pests include aphids, spider mites, and whiteflies. You can control these pests with insecticidal soap or neem oil. Fungal diseases, such as powdery mildew and blossom end rot, can be prevented by providing good air circulation, avoiding overhead watering, and ensuring that the soil is well-draining. Blossom end rot is often caused by calcium deficiency, so you may need to amend your soil with calcium.
When are bell peppers ready to harvest?
Bell peppers are typically ready to harvest 60-90 days after transplanting, depending on the variety. The peppers should be firm, glossy, and fully colored. You can harvest them at any stage of ripeness, but they will be sweetest and most flavorful when fully ripe. Use a sharp knife or pruning shears to cut the peppers from the plant, leaving a small stem attached.
Can I grow bell peppers indoors during the winter?
Yes, you can grow bell peppers indoors during the winter, but you will need to provide them with adequate light and warmth. Place your pepper plants near a sunny window or use grow lights to supplement the natural light. Maintain a consistent temperature of around 70-75°F (21-24°C). You may also need to hand-pollinate the flowers to ensure fruit set.
What are some common problems when growing bell peppers and how can I fix them?
Some common problems include blossom end rot (caused by calcium deficiency), stunted growth (caused by lack of nutrients or sunlight), and pest infestations. Blossom end rot can be prevented by adding calcium to the soil and ensuring consistent watering. Stunted growth can be addressed by fertilizing regularly and providing adequate sunlight. Pest infestations can be controlled with insecticidal soap or neem oil. Always diagnose the problem correctly before applying any treatments.
Leave a Comment