
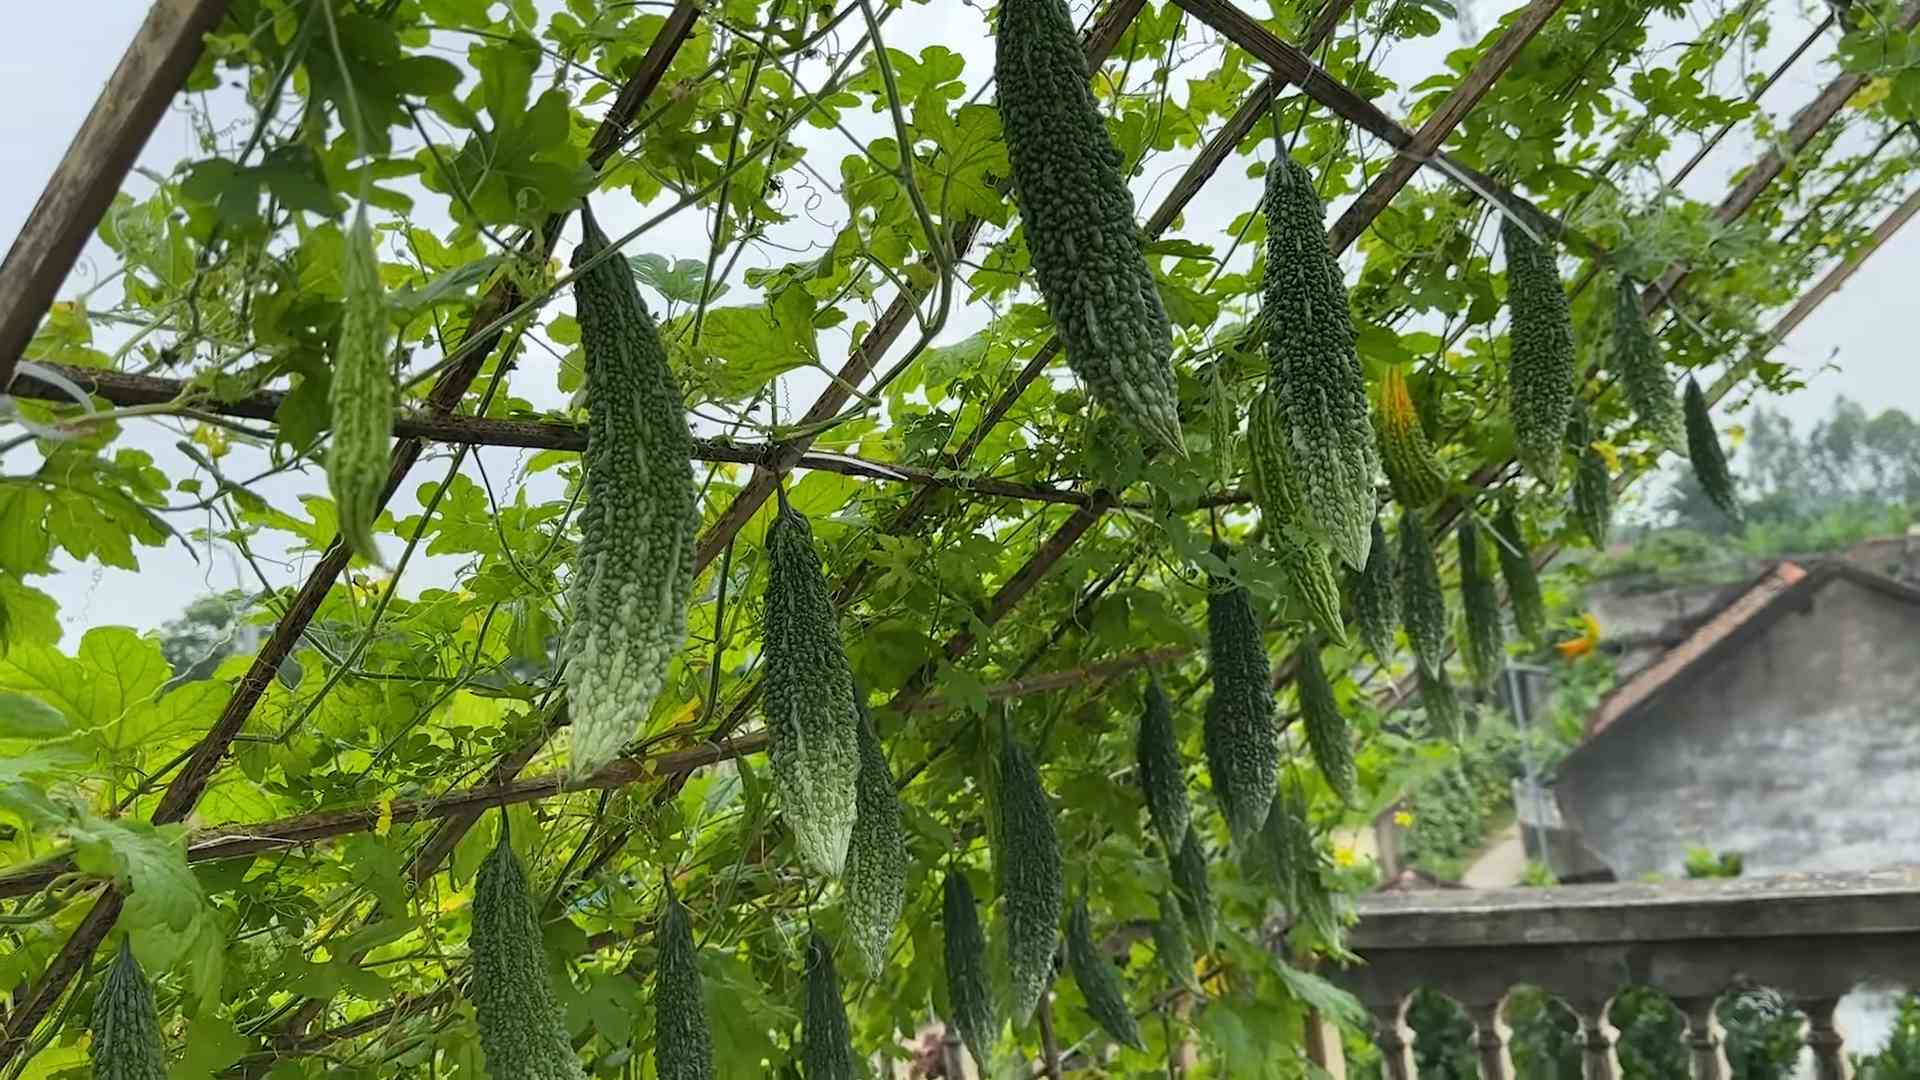
Bitter Gourd Trellis DIY: Ready to ditch the sprawling vines and embrace a vertical garden bursting with healthy, homegrown bitter gourds? I’m so excited to share this simple yet effective DIY trellis project that will transform your gardening experience! For centuries, cultures across Asia, particularly in India and China, have cultivated bitter gourd, not just for its unique flavor, but also for its incredible medicinal properties. Traditionally, these vigorous vines were often left to ramble across the ground, taking up precious space and making harvesting a real chore.
But what if I told you there’s a better way? A way to maximize your yield, improve air circulation (reducing the risk of disease!), and create a stunning visual feature in your garden? That’s where this bitter gourd trellis DIY comes in! Many gardeners struggle with managing the unruly growth of bitter gourd, leading to wasted space, damaged fruit, and overall frustration. This DIY trellis is the perfect solution, offering a sturdy and supportive structure for your vines to climb. I’ll guide you through each step, using readily available materials, so you can create your own thriving vertical garden and enjoy a bountiful harvest of fresh, healthy bitter gourds. Let’s get started!
DIY Bitter Gourd Trellis: Grow Up, Not Out!
Hey there, fellow gardeners! Are you tired of your bitter gourd vines sprawling all over your garden, taking up precious space and making it hard to harvest those bumpy green goodies? I know I was! That’s why I decided to build my own trellis, and let me tell you, it’s been a game-changer. Not only does it look fantastic, but it also makes tending to my bitter gourds so much easier. Plus, a vertical garden is just plain cool, right?
This guide will walk you through building a sturdy and attractive trellis that will support your bitter gourd vines and help them thrive. Don’t worry if you’re not a master carpenter; this project is totally doable for beginners. Let’s get started!
Materials You’ll Need
Before we dive in, let’s gather our supplies. Here’s what you’ll need:
* Wooden Posts: I used four 4×4 inch treated lumber posts, each 8 feet long. The length depends on how tall you want your trellis, but remember you’ll be burying a portion of the post in the ground.
* Wooden Boards: I opted for 1×4 inch lumber for the horizontal and vertical supports. You’ll need enough to create a grid pattern. The amount depends on the size of your trellis, but I recommend getting at least 20-30 feet.
* Galvanized Wire or Twine: This is for the vines to climb. I prefer galvanized wire because it’s durable and weather-resistant, but strong twine works too. Get a good roll of it!
* Concrete Mix: For setting the posts securely in the ground. One or two bags should be sufficient.
* Screws: Exterior-grade screws are a must to withstand the elements. I used 2-inch screws.
* Wood Stain or Paint (Optional): To protect the wood and give your trellis a polished look.
* Safety Glasses: Always protect your eyes!
* Work Gloves: To protect your hands.
* Measuring Tape: Essential for accurate cuts and spacing.
* Pencil: For marking measurements.
* Saw: To cut the wood. A circular saw or hand saw will work.
* Drill: With drill bits for pilot holes and driving screws.
* Post Hole Digger or Shovel: For digging the holes for the posts.
* Level: To ensure your posts are perfectly vertical.
* Wheelbarrow or Mixing Tub: For mixing the concrete.
* Water: For mixing the concrete.
* Staple Gun (Optional): If you’re using wire, a staple gun can help secure it to the wood.
Planning Your Trellis
Before you start building, it’s a good idea to plan out the dimensions of your trellis. Consider the following:
* Location: Choose a sunny spot in your garden where your bitter gourd vines will get at least 6-8 hours of sunlight per day. Also, make sure the soil is well-draining.
* Size: Determine the height and width of your trellis based on the available space and the expected size of your bitter gourd vines. I made mine about 6 feet tall and 4 feet wide.
* Grid Spacing: Decide how far apart you want the horizontal and vertical supports to be. I spaced mine about 12 inches apart. This provides ample support for the vines.
Building the Trellis Frame
Okay, let’s get our hands dirty! This is where the fun begins.
1. Dig the Post Holes: Using your post hole digger or shovel, dig four holes for the posts. The holes should be at least 2 feet deep and wide enough to accommodate the posts and concrete. Make sure the holes are spaced according to your planned trellis dimensions. I recommend using a string line to ensure the holes are in a straight line.
2. Set the Posts: Place the posts in the holes, making sure they are plumb (perfectly vertical). Use a level to check. You can use temporary braces to hold the posts in place while the concrete sets.
3. Mix the Concrete: In your wheelbarrow or mixing tub, mix the concrete according to the manufacturer’s instructions. Add water gradually until you achieve a thick, oatmeal-like consistency.
4. Pour the Concrete: Carefully pour the concrete into the holes around the posts, filling them to ground level. Use a trowel to smooth the surface of the concrete.
5. Let the Concrete Cure: Allow the concrete to cure for at least 24-48 hours before proceeding. This will ensure the posts are firmly anchored in the ground. I know it’s tempting to rush, but patience is key here!
Adding the Horizontal and Vertical Supports
Now that the frame is solid, we can add the supports that the bitter gourd vines will climb on.
1. Measure and Cut the Boards: Measure the distance between the posts and cut the 1×4 inch boards to the appropriate length for the horizontal and vertical supports. Remember to account for the thickness of the posts when measuring.
2. Attach the Horizontal Supports: Starting at the top, attach the horizontal supports to the posts using screws. Make sure the supports are level and evenly spaced. I pre-drilled pilot holes to prevent the wood from splitting.
3. Attach the Vertical Supports: Attach the vertical supports to the horizontal supports and posts using screws. Again, make sure the supports are plumb and evenly spaced. Creating a grid pattern.
4. Reinforce the Joints (Optional): For added strength, you can reinforce the joints where the horizontal and vertical supports meet using metal brackets or wood glue. This is especially helpful if you live in an area with strong winds.
Adding the Climbing Support (Wire or Twine)
This is what the bitter gourd vines will actually grab onto as they grow.
1. Attach the Wire or Twine: Starting at the bottom of the trellis, attach the galvanized wire or twine to the horizontal and vertical supports. You can use a staple gun to secure the wire, or simply tie the twine tightly to the supports.
2. Create a Grid Pattern: Create a grid pattern with the wire or twine, spacing it about 6-8 inches apart. This will provide plenty of climbing surface for the vines. Make sure the wire or twine is taut and secure.
3. Secure the Ends: Secure the ends of the wire or twine to the posts, making sure they are tightly fastened. You don’t want the vines pulling the wire loose.
Finishing Touches
Almost there! Now for the final touches that will make your trellis look amazing.
1. Sand the Wood (Optional): If you want a smoother finish, sand the wood with sandpaper before staining or painting. This will remove any splinters or rough edges.
2. Stain or Paint the Trellis (Optional): Apply a wood stain or paint to protect the wood and give your trellis a polished look. Choose a color that complements your garden. I went with a natural wood stain to let the beauty of the wood shine through.
3. Let it Dry: Allow the stain or paint to dry completely before planting your bitter gourd vines.
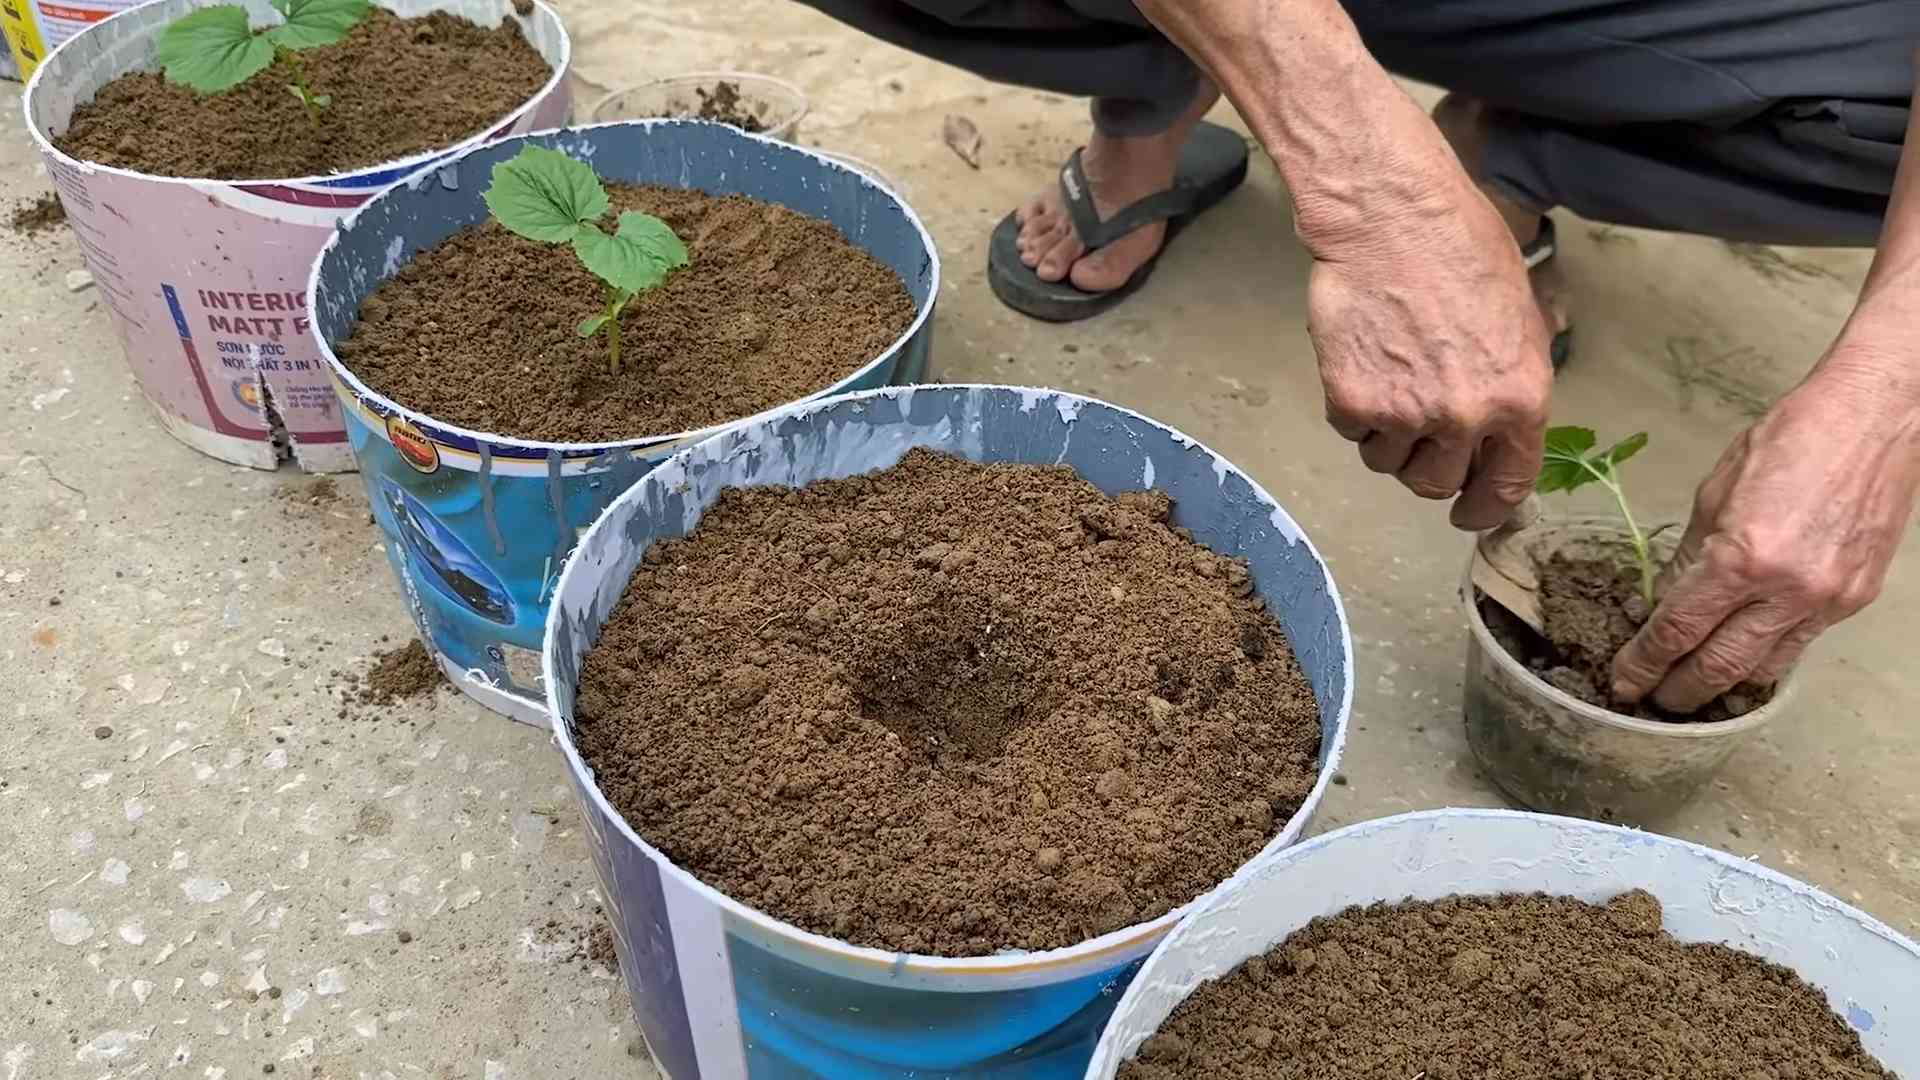
4. Plant Your Bitter Gourd: Plant your bitter gourd seedlings at the base of the trellis, spacing them according to the instructions on the seed packet.
5. Train the Vines: As the vines grow, gently train them to climb the trellis by guiding them along the wire or twine. You may need to tie them to the trellis initially.
6. Water and Fertilize: Water and fertilize your bitter gourd plants regularly, following the instructions on the fertilizer package.
Tips for Success
Here are a few extra tips to help you succeed with your bitter gourd trellis:
* Choose the Right Variety: Select a bitter gourd variety that is well-suited to your climate and growing conditions.
* Provide Support Early: Start training the vines to climb the trellis as soon as they are large enough.
* Prune Regularly: Prune the vines regularly to encourage branching and fruit production.
* Watch for Pests and Diseases: Keep an eye out for pests and diseases, and take action promptly if you notice any problems.
* Harvest Regularly: Harvest the bitter gourds when they are mature but still green.
Enjoy Your Harvest!
And that’s it! You’ve successfully built your own bitter gourd trellis. Now you can sit back, relax, and watch your vines climb and produce a bountiful harvest. I hope you found this guide helpful. Happy gardening! I know I’m excited to harvest my own bitter gourds soon. Let me know how your trellis turns out!
Conclusion
So, there you have it! Building your own bitter gourd trellis isn’t just a cost-effective solution; it’s an empowering way to take control of your garden and maximize your yield. We’ve walked you through the process, highlighting the simplicity and adaptability of this DIY project. Forget those flimsy, store-bought supports that buckle under the weight of your thriving vines. With a little effort and readily available materials, you can create a robust and aesthetically pleasing structure that will support your bitter gourds throughout the growing season.
But why is this DIY trellis a must-try? Beyond the obvious cost savings, it’s about creating a personalized growing environment perfectly suited to your garden’s specific needs. You can customize the size, shape, and materials to match your available space and aesthetic preferences. Imagine a beautifully crafted trellis, overflowing with vibrant green vines and the promise of a bountiful harvest. This isn’t just about growing vegetables; it’s about creating a thriving ecosystem in your backyard.
Consider these variations to further personalize your bitter gourd trellis:
* A-Frame Trellis: For smaller gardens or raised beds, an A-frame trellis provides excellent support and maximizes vertical space. It’s also incredibly easy to construct using just a few pieces of lumber and some sturdy wire.
* Archway Trellis: Create a stunning garden entrance by building an archway trellis. This option requires a bit more planning and construction, but the visual impact is well worth the effort. Imagine walking through a tunnel of lush green vines laden with bitter gourds!
* Repurposed Materials: Get creative and use recycled materials like old ladders, metal fencing, or even bamboo poles to build your trellis. This is a fantastic way to reduce waste and add a unique, rustic charm to your garden.
* Vertical Pallet Garden: If you are short on space, consider using a pallet as a vertical garden. Secure the pallet and reinforce it, then plant your bitter gourd seeds at the base. The vines will naturally climb the pallet, creating a green wall.
No matter which variation you choose, remember to prioritize stability and durability. Your bitter gourd vines will become quite heavy as they mature, so ensure your trellis can withstand the weight and any potential wind gusts.
We are confident that you’ll find this DIY bitter gourd trellis project both rewarding and beneficial. It’s a chance to connect with nature, exercise your creativity, and enjoy the satisfaction of growing your own food. So, gather your materials, roll up your sleeves, and get ready to build!
We can’t wait to hear about your experiences! Share your photos, tips, and any modifications you make to the design in the comments below. Let’s create a community of passionate gardeners who are dedicated to growing healthy, delicious bitter gourds with the help of a sturdy, DIY trellis. Happy gardening!
Frequently Asked Questions (FAQ)
What are the best materials to use for building a bitter gourd trellis?
The best materials depend on your budget, aesthetic preferences, and the size of your trellis. Common options include:
* Wood: Lumber is a versatile and readily available option. Cedar and redwood are naturally rot-resistant, making them ideal for outdoor use. Pressure-treated lumber is another option, but be sure to research its safety for growing edible plants.
* Metal: Metal pipes or rebar can create a strong and durable trellis. Consider using galvanized metal to prevent rust.
* Bamboo: Bamboo is a sustainable and aesthetically pleasing option. It’s lightweight yet strong, making it suitable for smaller trellises.
* Wire or Twine: Use sturdy wire or twine to create the climbing surface for your bitter gourd vines. Chicken wire, garden twine, or even old rope can work well.
How tall should my bitter gourd trellis be?
The ideal height of your trellis depends on the variety of bitter gourd you’re growing. Most varieties can grow quite long, so aim for a trellis that is at least 6-8 feet tall. This will provide ample space for the vines to climb and spread. If you’re growing a particularly vigorous variety, you may even want to consider a taller trellis.
How do I train my bitter gourd vines to climb the trellis?
Bitter gourd vines have tendrils that will naturally cling to the trellis. However, you may need to provide some initial guidance to encourage them to climb in the desired direction. Gently guide the tendrils towards the trellis and tie them loosely with garden twine if needed. As the vines grow, they will naturally attach themselves to the structure.
How far apart should I plant my bitter gourd seeds or seedlings?
Plant your bitter gourd seeds or seedlings about 12-18 inches apart at the base of the trellis. This will provide enough space for each plant to grow and thrive without overcrowding.
How much sunlight does bitter gourd need?
Bitter gourd thrives in full sun, requiring at least 6-8 hours of direct sunlight per day. Choose a location for your trellis that receives plenty of sunlight throughout the growing season.
How often should I water my bitter gourd plants?
Water your bitter gourd plants regularly, especially during hot and dry weather. Aim to keep the soil consistently moist but not waterlogged. Water deeply at the base of the plants, avoiding wetting the foliage as much as possible to prevent fungal diseases.
What kind of fertilizer should I use for bitter gourd?
Bitter gourd benefits from regular fertilization. Use a balanced fertilizer with equal amounts of nitrogen, phosphorus, and potassium. You can also supplement with organic fertilizers like compost or manure.
How do I prevent pests and diseases on my bitter gourd plants?
To prevent pests and diseases, practice good garden hygiene. Remove any dead or diseased leaves promptly. Encourage beneficial insects like ladybugs and lacewings to control pests. You can also use organic pesticides or fungicides if necessary. Ensure good air circulation around the plants by spacing them properly and pruning excess foliage.
When is the best time to harvest bitter gourds?
Harvest your bitter gourds when they are still young and green, before they turn orange or yellow. The younger fruits are less bitter and have a more tender texture. Harvest regularly to encourage continued production.
Can I grow bitter gourd in a container?
Yes, you can grow bitter gourd in a container, but you’ll need a large pot (at least 15-20 gallons) and a sturdy trellis. Ensure the container has good drainage and provide regular watering and fertilization. Choose a sunny location for your container garden.
What if my bitter gourd isn’t producing fruit?
Several factors can contribute to a lack of fruit production in bitter gourd. Ensure your plants are receiving enough sunlight, water, and nutrients. Hand-pollination may be necessary if there are not enough pollinators in your area. Also, check for any signs of pests or diseases that may be affecting fruit production.
How do I save seeds from my bitter gourds?
To save seeds, allow a few fruits to mature fully on the vine until they turn orange or yellow. Remove the seeds and wash them thoroughly. Spread them out on a paper towel to dry completely before storing them in an airtight container in a cool, dark place.

Leave a Comment