
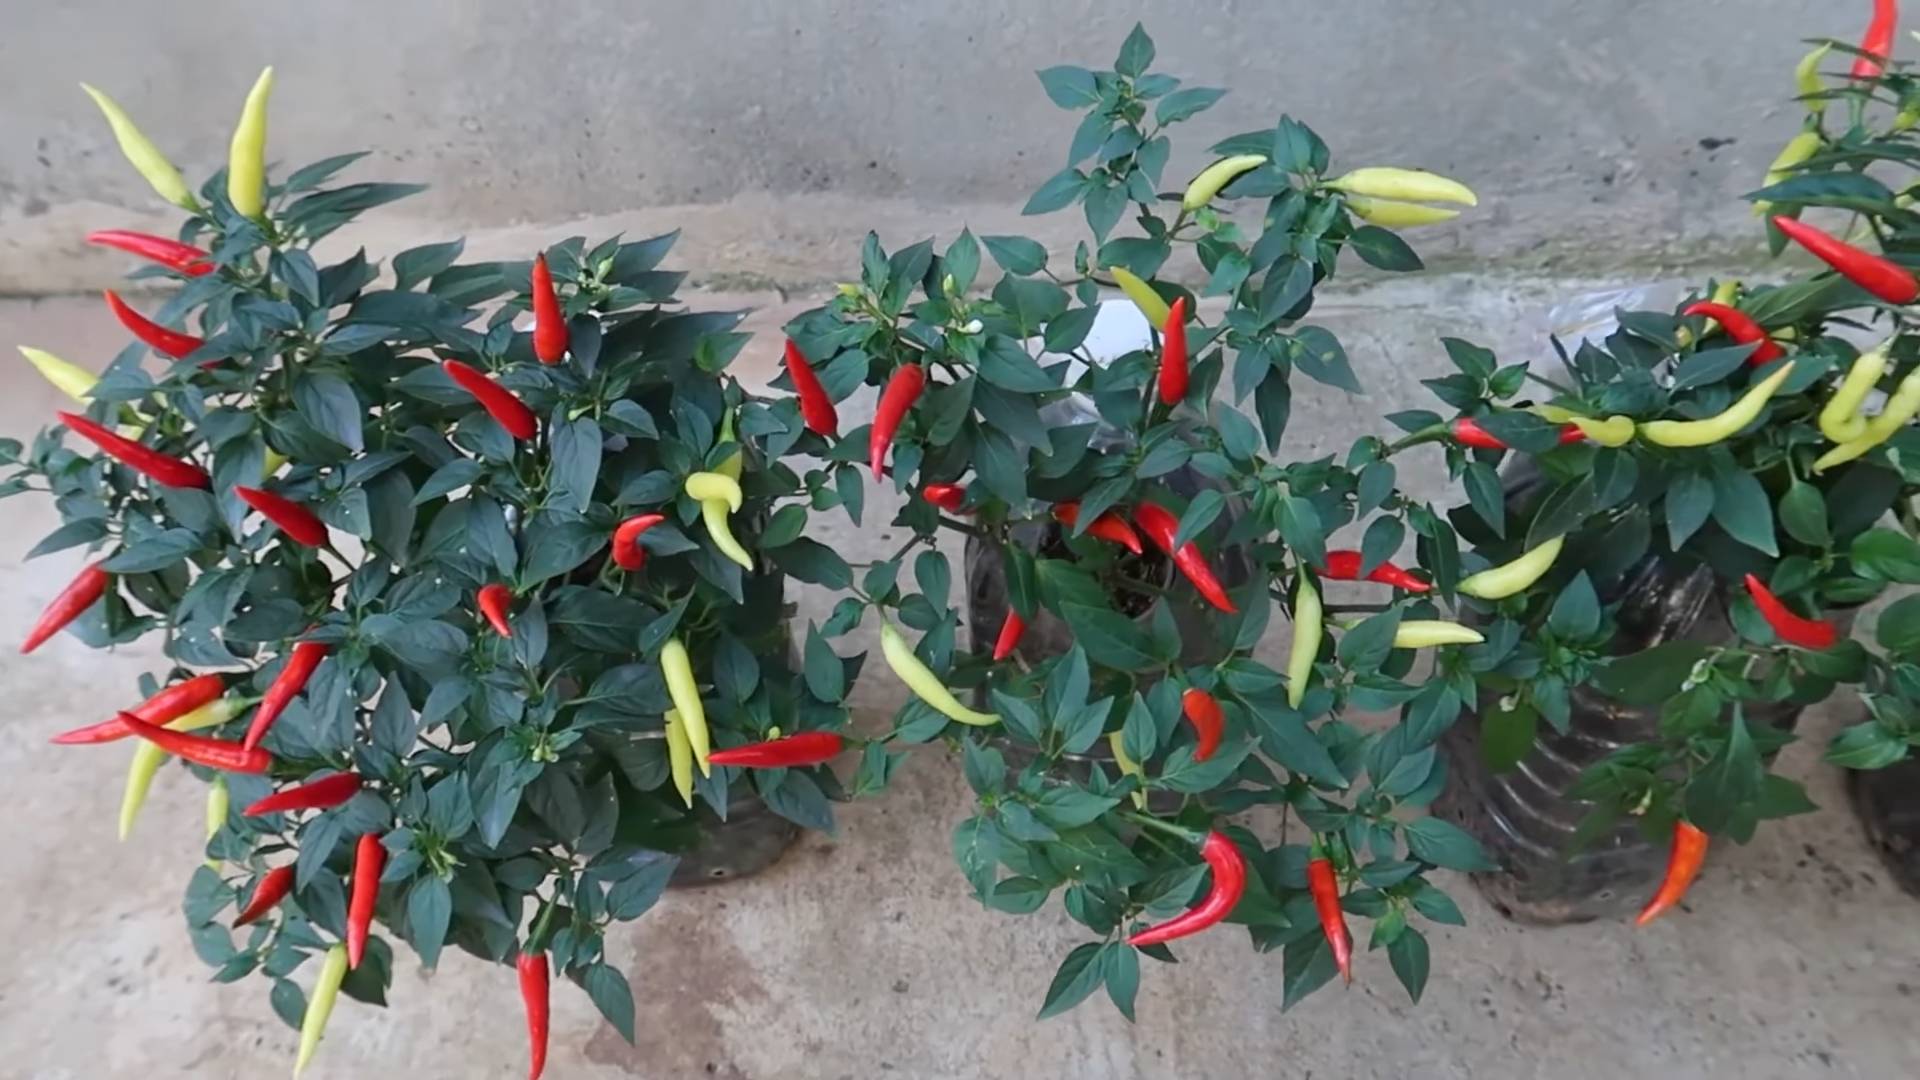
Bottle Gardening Chili Peppers: Imagine harvesting fiery, flavorful chili peppers right from your windowsill, even if you don’t have a sprawling garden! Sounds too good to be true? It’s not! For centuries, resourceful gardeners have found innovative ways to cultivate plants in limited spaces. From ancient rooftop gardens to modern-day vertical farms, the spirit of ingenuity thrives.
Today, I’m excited to share a simple yet effective DIY trick that will allow you to grow your own chili peppers using recycled bottles. This method isn’t just about saving space; it’s about sustainability, reducing waste, and enjoying the satisfaction of nurturing your own food.
Why should you try bottle gardening chili peppers? Well, store-bought chili peppers can be expensive and sometimes lack the vibrant flavor you crave. Plus, knowing exactly where your food comes from and how it’s grown is incredibly rewarding. This DIY project is perfect for apartment dwellers, balcony gardeners, or anyone looking for a fun and eco-friendly way to add a little spice to their life. Get ready to turn those empty bottles into miniature chili pepper paradises!
DIY Bottle Gardening: Grow Spicy Chili Peppers with Ease!
Hey there, fellow gardening enthusiasts! Ever thought about growing your own chili peppers but felt intimidated by the space requirements or the complexity? Well, I’m here to tell you that you can absolutely cultivate a thriving chili pepper plant right in a recycled plastic bottle! This method is not only eco-friendly but also incredibly space-saving and surprisingly easy. I’ve done it myself, and trust me, the satisfaction of harvesting your own homegrown chilies is unbeatable. Let’s dive into this fun and rewarding DIY project!
What You’ll Need: The Essential Supplies
Before we get our hands dirty, let’s gather all the necessary materials. Here’s a comprehensive list:
* A Large Plastic Bottle (2-Liter or Bigger): Look for a sturdy bottle, preferably one that’s clear or translucent to allow sunlight to reach the soil. Soda bottles or large juice containers work perfectly.
* Chili Pepper Seeds: Choose your favorite chili pepper variety! You can find seeds online, at your local garden center, or even save seeds from a chili pepper you bought at the grocery store (though germination rates might vary).
* Potting Soil: Opt for a well-draining potting mix specifically formulated for vegetables. This will provide the necessary nutrients and drainage for your chili pepper plant.
* Scissors or a Utility Knife: For cutting the plastic bottle. Be careful!
* Drill or Nail and Hammer: To create drainage holes in the bottom of the bottle.
* Watering Can or Spray Bottle: For watering your chili pepper plant.
* Optional: Small Pebbles or Gravel: To improve drainage at the bottom of the bottle.
* Optional: Plant Food or Fertilizer: To provide extra nutrients to your chili pepper plant as it grows. I prefer a balanced liquid fertilizer.
* Optional: Gloves: To keep your hands clean.
Step-by-Step Guide: From Bottle to Bounty
Now that we have everything we need, let’s get started! Follow these steps carefully, and you’ll be well on your way to growing your own chili peppers.
1. Preparing the Bottle: The Foundation for Growth
1. Clean the Bottle: Thoroughly wash the plastic bottle with soap and water to remove any residue. Rinse it well and let it dry completely. This is crucial to prevent any unwanted contaminants from affecting your plant.
2. Cut the Bottle: Using your scissors or utility knife, carefully cut the bottle in half horizontally. You’ll be using the bottom half as the main container for your chili pepper plant. I usually cut it about two-thirds of the way up, leaving a larger bottom section.
3. Create Drainage Holes: This is super important! Using your drill or nail and hammer, create several drainage holes in the bottom of the bottle. These holes will allow excess water to drain out, preventing root rot. I usually make about 5-6 holes, evenly spaced.
2. Planting the Seeds: Nurturing New Life
1. Add Drainage Layer (Optional): If you’re using pebbles or gravel, add a layer of about an inch to the bottom of the bottle. This will further improve drainage and prevent the soil from becoming waterlogged.
2. Fill with Potting Soil: Fill the bottom half of the bottle with potting soil, leaving about an inch of space at the top. Gently pat down the soil to remove any air pockets.
3. Sow the Seeds: Sprinkle a few chili pepper seeds evenly over the surface of the soil. I usually plant 2-3 seeds per bottle to increase the chances of germination.
4. Cover the Seeds: Lightly cover the seeds with a thin layer of potting soil, about ¼ inch deep.
5. Water Gently: Using your watering can or spray bottle, gently water the soil until it’s moist but not soggy. Be careful not to overwater, as this can cause the seeds to rot.
3. Germination and Early Care: Watching Your Peppers Sprout
1. Create a Mini Greenhouse (Optional): To speed up germination, you can create a mini greenhouse by placing the top half of the bottle over the bottom half. This will help to trap moisture and warmth. Make sure to remove the cap to allow for some ventilation.
2. Place in a Warm, Sunny Location: Place your bottle garden in a warm, sunny location that receives at least 6-8 hours of sunlight per day. A south-facing windowsill is ideal.
3. Keep the Soil Moist: Check the soil moisture regularly and water as needed to keep it consistently moist but not soggy.
4. Wait for Germination: Chili pepper seeds typically germinate within 7-14 days, but it can take longer depending on the variety and environmental conditions. Be patient!
5. Thin Seedlings (If Necessary): Once the seedlings have emerged and have a few sets of true leaves, thin them out, leaving only the strongest and healthiest seedling in the bottle. This will give the remaining seedling enough space to grow.
4. Ongoing Care: Nurturing Your Chili Pepper Plant to Maturity
1. Water Regularly: Water your chili pepper plant regularly, especially during hot and dry weather. Check the soil moisture daily and water when the top inch of soil feels dry to the touch.
2. Fertilize Regularly: To provide your chili pepper plant with the nutrients it needs to thrive, fertilize it every 2-3 weeks with a balanced liquid fertilizer. Follow the instructions on the fertilizer label.
3. Provide Support (If Needed): As your chili pepper plant grows, it may need some support to prevent it from toppling over. You can use a small stake or trellis to provide support.
4. Pest Control: Keep an eye out for pests such as aphids, spider mites, and whiteflies. If you notice any pests, treat them with an appropriate insecticide or organic pest control method. I prefer using neem oil.
5. Pruning (Optional): Pruning your chili pepper plant can help to encourage bushier growth and more fruit production. You can prune off any dead or yellowing leaves, as well as any suckers that grow from the base of the plant.
5. Harvesting Your Chili Peppers: The Sweet Reward
1. Harvest When Ripe: Chili peppers are typically ready to harvest when they have reached their mature color and size. The color will depend on the variety you’re growing.
2. Use Scissors or Pruning Shears: To harvest your chili peppers, use scissors or pruning shears to cut them off the plant. Be careful not to damage the plant.
3. Enjoy Your Harvest: Now you can enjoy your homegrown chili peppers in your favorite dishes! You can use them fresh, dried, or pickled.
Troubleshooting Tips: Addressing Common Issues
Even with the best care, you might encounter some challenges along the way. Here are some common issues and how to address them:
* Yellowing Leaves: This could be a sign of overwatering, underwatering, or nutrient deficiency. Adjust your watering schedule and fertilize your plant if necessary.
* Drooping Leaves: This could be a sign of underwatering or heat stress. Water your plant thoroughly and move it to a cooler location if necessary.
* Lack of Fruit Production: This could be due to insufficient sunlight, lack of pollination, or nutrient deficiency. Make sure your plant is getting enough sunlight, hand-pollinate the flowers if necessary, and fertilize your plant regularly.
* Pest Infestation: Treat any pest infestations promptly with an appropriate insecticide or organic pest control method.
Choosing the Right Chili Pepper Variety: Spice Up Your Life!
The beauty of growing your own chili peppers is the sheer variety you can choose from! Here are a few popular options to get you started:
* Jalapeño: A classic choice, known for its moderate heat and versatility. Perfect for salsas, poppers, and adding a kick to your favorite dishes.
* Serrano: A bit hotter than jalapeños, serranos offer a bright, fresh flavor. Great for adding heat to Mexican and Southeast Asian cuisine.
* Cayenne: These slender red peppers pack a punch! Use them to make chili powder, hot sauce, or add a fiery touch to stir-fries.
* Habanero: For the heat-seekers! Habaneros are intensely spicy and have a fruity, floral aroma. Use them sparingly!
* Bell Pepper: Okay, not technically a chili pepper, but bell peppers are a great option if you prefer a mild, sweet flavor.
Extra Tips for Success: Taking Your Bottle Garden to the Next Level
* Rotate Your Plant: Rotate your bottle garden regularly to ensure that all sides of the plant receive equal sunlight.
* Use Rainwater: If possible, use rainwater to water your chili pepper plant. Rainwater is naturally soft and contains beneficial nutrients.
* Consider Companion Planting: Plant basil or marigolds near your chili pepper

Conclusion
So, there you have it! Transforming ordinary plastic bottles into thriving chili pepper gardens is not just a fun project; it’s a sustainable, space-saving, and incredibly rewarding way to grow your own fiery flavors. We’ve walked you through the simple steps, highlighting the ease and accessibility of this DIY gardening method. But why is this bottle gardening chili peppers trick a must-try?
Firstly, it’s incredibly economical. You’re repurposing waste materials, reducing your environmental footprint, and saving money on expensive pots and planters. Secondly, it’s perfect for small spaces. Whether you have a sprawling backyard or a tiny balcony, bottle gardening allows you to cultivate a vibrant chili pepper patch virtually anywhere. Thirdly, it offers excellent drainage and aeration, crucial for healthy root development and preventing common plant diseases. Finally, it’s a fantastic educational opportunity, especially for children, teaching them about plant life cycles, sustainability, and the joy of growing their own food.
But the beauty of this method lies in its adaptability. Feel free to experiment with different types of bottles – larger bottles can accommodate bigger chili pepper varieties, while smaller bottles are ideal for compact plants. You can also get creative with the design, painting the bottles, adding decorative elements, or even creating vertical gardens by hanging them from walls or fences. Consider using different soil mixes depending on the specific needs of your chosen chili pepper variety. Some peppers thrive in well-draining, sandy soil, while others prefer a richer, more compost-heavy mix.
For those looking to take their bottle gardening to the next level, consider incorporating companion planting. Basil, for example, is known to repel pests and improve the flavor of chili peppers. Marigolds are another excellent choice, attracting beneficial insects and deterring nematodes.
Don’t be afraid to experiment with different watering techniques. While the self-watering system we described works well, you may need to adjust the frequency depending on your climate and the specific needs of your plants. Monitor the soil moisture regularly and water accordingly.
Ultimately, the success of your bottle gardening chili peppers project depends on your dedication and attention to detail. But with a little effort and creativity, you can transform discarded plastic bottles into a thriving chili pepper paradise.
We wholeheartedly encourage you to try this DIY trick and experience the satisfaction of growing your own delicious chili peppers. Share your experiences with us! Post pictures of your bottle gardens on social media using #BottleGardeningChiliPeppers and let us know what varieties you’re growing and any tips or tricks you’ve discovered along the way. We can’t wait to see your creations and learn from your experiences. Happy gardening!
Frequently Asked Questions (FAQ)
What types of chili peppers are best suited for bottle gardening?
Almost any chili pepper variety can be grown in bottles, but smaller to medium-sized varieties tend to thrive best. Consider varieties like Jalapeños, Serrano peppers, Thai chili peppers, or even smaller ornamental peppers. These varieties don’t require as much space as larger peppers like bell peppers or poblano peppers, making them ideal for the limited space of a bottle garden. When selecting your chili pepper variety, consider your climate and growing conditions. Some peppers are more tolerant of heat and drought, while others prefer cooler temperatures and more moisture. Research the specific needs of your chosen variety to ensure optimal growth.
How often should I water my bottle garden chili peppers?
The frequency of watering depends on several factors, including the size of the bottle, the type of soil, the climate, and the stage of growth of your chili pepper plants. As a general rule, check the soil moisture level regularly. If the top inch of soil feels dry to the touch, it’s time to water. Avoid overwatering, as this can lead to root rot. The self-watering system we described should help maintain consistent moisture levels, but you may still need to supplement with additional watering during hot or dry periods. During the seedling stage, keep the soil consistently moist but not waterlogged. As the plants mature, you can allow the soil to dry out slightly between waterings.
What kind of soil should I use for bottle gardening chili peppers?
A well-draining potting mix is essential for successful bottle gardening. Avoid using garden soil, as it can be too heavy and compact, leading to poor drainage and root problems. A good potting mix should contain a blend of peat moss, perlite, and vermiculite. You can also add compost to enrich the soil and provide essential nutrients. For chili peppers, a slightly acidic soil with a pH of around 6.0 to 6.8 is ideal. You can test the pH of your soil using a soil testing kit and amend it accordingly. Consider adding slow-release fertilizer to the potting mix to provide a steady supply of nutrients throughout the growing season.
How much sunlight do bottle garden chili peppers need?
Chili peppers thrive in full sun, requiring at least 6-8 hours of direct sunlight per day. If you’re growing your bottle garden indoors, you may need to supplement with artificial lighting, such as grow lights. Place your bottle garden in a sunny location, such as a south-facing window. If you’re growing your bottle garden outdoors, make sure to protect the plants from strong winds and extreme temperatures. During the hottest part of the day, you may need to provide some shade to prevent the leaves from scorching.
How do I fertilize my bottle garden chili peppers?
Chili peppers are heavy feeders and require regular fertilization to produce abundant yields. Use a balanced fertilizer with an NPK ratio (nitrogen, phosphorus, potassium) of around 10-10-10 or 5-10-5. Fertilize your plants every 2-3 weeks during the growing season. You can use a liquid fertilizer diluted according to the manufacturer’s instructions or a slow-release granular fertilizer. Avoid over-fertilizing, as this can lead to nutrient burn. Monitor your plants for signs of nutrient deficiencies, such as yellowing leaves or stunted growth, and adjust your fertilization schedule accordingly.
How do I protect my bottle garden chili peppers from pests and diseases?
Regularly inspect your plants for signs of pests and diseases. Common pests that affect chili peppers include aphids, spider mites, and whiteflies. You can control these pests with insecticidal soap, neem oil, or by introducing beneficial insects, such as ladybugs. Common diseases that affect chili peppers include fungal diseases like powdery mildew and blossom end rot. Prevent these diseases by providing good air circulation, avoiding overwatering, and using a fungicide if necessary. Remove any infected leaves or plants immediately to prevent the spread of disease.
Can I grow chili peppers indoors in bottles year-round?
Yes, you can grow chili peppers indoors in bottles year-round, provided you provide them with adequate light, warmth, and humidity. Use grow lights to supplement natural sunlight, especially during the winter months. Maintain a consistent temperature of around 70-80°F (21-27°C). Increase humidity by misting the plants regularly or using a humidifier. Pollinate the flowers manually by gently shaking the plants or using a small paintbrush to transfer pollen from one flower to another.
What do I do if my chili pepper plant is not producing peppers?
There are several reasons why your chili pepper plant may not be producing peppers. Common causes include insufficient sunlight, lack of pollination, nutrient deficiencies, and stress. Make sure your plant is receiving at least 6-8 hours of direct sunlight per day. Pollinate the flowers manually if necessary. Fertilize your plant regularly with a balanced fertilizer. Protect your plant from extreme temperatures, strong winds, and pests and diseases. If your plant is still not producing peppers, try pruning it back to encourage new growth.
Leave a Comment