
Bottle Grown Eggplant Early Harvest: Imagine sinking your teeth into a juicy, homegrown eggplant weeks before your neighbors even see blossoms on their plants! Sounds like a gardener’s dream, right? Well, it doesn’t have to be just a dream. I’m here to let you in on a little secret – a simple, yet incredibly effective DIY trick that will have you harvesting eggplants earlier than you ever thought possible: bottle growing!
For centuries, gardeners have sought ways to extend growing seasons and protect their precious plants. While the exact origin of bottle growing is hard to pinpoint, the ingenuity of using readily available materials to create mini-greenhouses has likely been practiced in various forms across cultures for generations. Think of it as a modern twist on time-tested techniques, adapted for the convenience of our modern lives.
Why is this Bottle Grown Eggplant Early Harvest trick so essential? Well, for many of us, the growing season feels far too short. Eggplants, in particular, are heat-loving plants that need a long, warm period to truly thrive. By using plastic bottles, we can create a protective microclimate around our young eggplant seedlings, shielding them from late frosts, strong winds, and even hungry pests. This gives them a significant head start, allowing them to establish strong roots and grow vigorously, ultimately leading to that coveted early harvest. Plus, it’s a fantastic way to recycle and reduce waste – a win-win for you and the environment! So, let’s dive in and discover how you can unlock the secrets to an abundant and early eggplant harvest using this simple DIY method!
Bottle Grown Eggplant: Early Harvest Hack
Hey there, fellow gardening enthusiasts! Ever dreamt of enjoying fresh, homegrown eggplant weeks before your neighbors? Well, I’m here to share a little secret – a DIY hack that lets you jumpstart your eggplant season using something you probably already have lying around: plastic bottles! This method not only gives you a head start but also protects those delicate seedlings from early frosts and pests. Let’s dive in!
Why Bottle Growing Eggplant?
Before we get our hands dirty, let’s talk about why this method is so awesome.
* Early Start: By starting your eggplant indoors in bottles, you bypass the unpredictable spring weather and give your plants a significant head start.
* Protection: The bottles act as mini-greenhouses, shielding your seedlings from frost, wind, and hungry critters like slugs and snails.
* Easy Transplanting: The bottle system makes transplanting a breeze, minimizing root disturbance and ensuring a smoother transition to the garden.
* Space Saving: If you’re short on space, this method allows you to grow several seedlings in a small area.
* Recycling: You’re giving those plastic bottles a new lease on life!
Materials You’ll Need
Okay, gather your supplies. Here’s what you’ll need to make this happen:
* Plastic Bottles: 2-liter soda bottles or similar sizes work best. Make sure they’re clean and clear. You’ll need one bottle per eggplant seedling.
* Eggplant Seeds: Choose your favorite variety! I personally love ‘Black Beauty’ for its classic flavor and reliable yields.
* Seed Starting Mix: This is crucial! Don’t use garden soil; it’s too heavy and can harbor diseases. A good seed starting mix is light, airy, and sterile.
* Spray Bottle with Water: For gentle watering.
* Scissors or Utility Knife: For cutting the bottles. Be careful!
* Permanent Marker: For labeling.
* Small Pots or Trays: To hold the bottles upright.
* Well-draining Potting Mix: For transplanting later.
* Optional: Heat Mat: To speed up germination.
* Optional: Grow Lights: If you don’t have a sunny windowsill.
Preparing the Bottles
This is where the magic begins! We’re going to transform those bottles into cozy little homes for our eggplant seedlings.
1. Clean the Bottles: Wash the bottles thoroughly with warm, soapy water to remove any residue. Rinse them well and let them dry completely.
2. Cut the Bottles: This is the most important step. You want to create a “hinge” that will allow you to easily remove the seedling later.
* Using your scissors or utility knife, carefully cut the bottle in half horizontally. Aim for a point about two-thirds of the way up from the bottom.
* Important: Do NOT cut all the way around! Leave about an inch or two uncut on one side. This will act as a hinge, allowing you to open and close the bottle.
3. Drainage Holes: Poke several drainage holes in the bottom of the bottle using your scissors or knife. This is essential to prevent waterlogging and root rot.
4. Label the Bottles: Use your permanent marker to label each bottle with the eggplant variety and the date you planted the seeds. This will help you keep track of everything.
Sowing the Seeds
Now for the fun part – planting those tiny seeds that will eventually become delicious eggplants!
1. Moisten the Seed Starting Mix: Add water to your seed starting mix until it’s evenly moist but not soggy. You should be able to squeeze a handful without water dripping out.
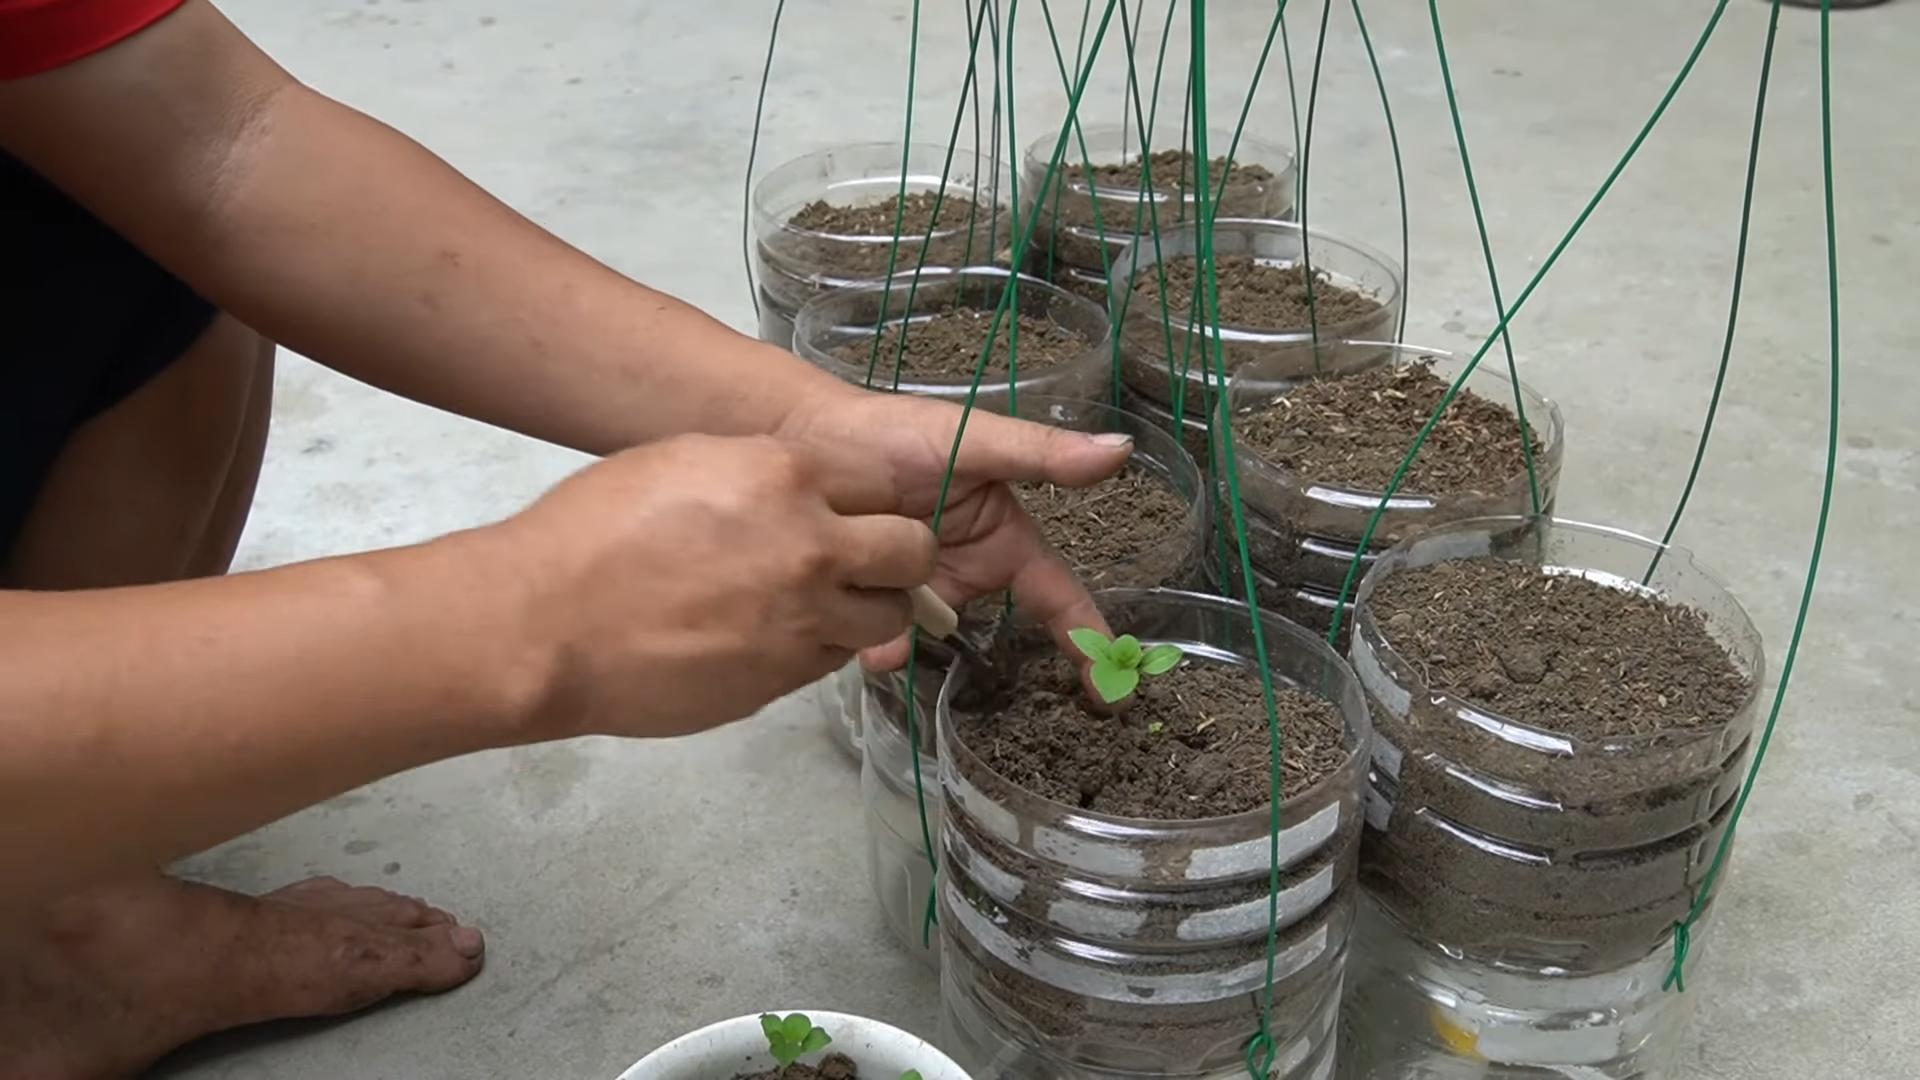
2. Fill the Bottles: Fill the bottom half of each bottle with the moistened seed starting mix, leaving about an inch of space at the top.
3. Sow the Seeds: Sprinkle 2-3 eggplant seeds on top of the soil in each bottle. Eggplant seeds are relatively small, so don’t bury them too deep.
4. Cover the Seeds: Gently cover the seeds with a thin layer of seed starting mix (about ¼ inch).
5. Water Gently: Use your spray bottle to gently water the soil, making sure not to disturb the seeds.
6. Close the Bottles: Carefully close the bottle halves, using the hinge you created earlier. This will create a humid environment that encourages germination.
7. Place in a Warm Location: Place the bottles in a warm location, such as a sunny windowsill or on a heat mat. Eggplant seeds germinate best at temperatures between 70-85°F (21-29°C).
8. Optional: Cover with a Clear Plastic Bag: To further increase humidity, you can place the bottles inside a clear plastic bag. Just make sure to open the bag occasionally to allow for air circulation.
Hey there, fellow gardening enthusiasts! Ever dreamt of enjoying fresh, homegrown eggplant weeks before your neighbors? Well, I’m here to share a little secret – a DIY hack that lets you jumpstart your eggplant season using something you probably already have lying around: plastic bottles! This method not only gives you a head start but also protects those delicate seedlings from early frosts and pests. Let’s dive in!
Why Bottle Growing Eggplant?
Before we get our hands dirty, let’s talk about why this method is so awesome.
* Early Start: By starting your eggplant indoors in bottles, you bypass the unpredictable spring weather and give your plants a significant head start.
* Protection: The bottles act as mini-greenhouses, shielding your seedlings from frost, wind, and hungry critters like slugs and snails.
* Easy Transplanting: The bottle system makes transplanting a breeze, minimizing root disturbance and ensuring a smoother transition to the garden.
* Space Saving: If you’re short on space, this method allows you to grow several seedlings in a small area.
* Recycling: You’re giving those plastic bottles a new lease on life!
Materials You’ll Need
Okay, gather your supplies. Here’s what you’ll need to make this happen:
* Plastic Bottles: 2-liter soda bottles or similar sizes work best. Make sure they’re clean and clear. You’ll need one bottle per eggplant seedling.
* Eggplant Seeds: Choose your favorite variety! I personally love ‘Black Beauty’ for its classic flavor and reliable yields.
* Seed Starting Mix: This is crucial! Don’t use garden soil; it’s too heavy and can harbor diseases. A good seed starting mix is light, airy, and sterile.
* Spray Bottle with Water: For gentle watering.
* Scissors or Utility Knife: For cutting the bottles. Be careful!
* Permanent Marker: For labeling.
* Small Pots or Trays: To hold the bottles upright.
* Well-draining Potting Mix: For transplanting later.
* Optional: Heat Mat: To speed up germination.
* Optional: Grow Lights: If you don’t have a sunny windowsill.
Preparing the Bottles
This is where the magic begins! We’re going to transform those bottles into cozy little homes for our eggplant seedlings.
1. Clean the Bottles: Wash the bottles thoroughly with warm, soapy water to remove any residue. Rinse them well and let them dry completely.
2. Cut the Bottles: This is the most important step. You want to create a “hinge” that will allow you to easily remove the seedling later.
* Using your scissors or utility knife, carefully cut the bottle in half horizontally. Aim for a point about two-thirds of the way up from the bottom.
* Important: Do NOT cut all the way around! Leave about an inch or two uncut on one side. This will act as a hinge, allowing you to open and close the bottle.
3. Drainage Holes: Poke several drainage holes in the bottom of the bottle using your scissors or knife. This is essential to prevent waterlogging and root rot.
4. Label the Bottles: Use your permanent marker to label each bottle with the eggplant variety and the date you planted the seeds. This will help you keep track of everything.
Sowing the Seeds
Now for the fun part – planting those tiny seeds that will eventually become delicious eggplants!
1. Moisten the Seed Starting Mix: Add water to your seed starting mix until it’s evenly moist but not soggy. You should be able to squeeze a handful without water dripping out.
2. Fill the Bottles: Fill the bottom half of each bottle with the moistened seed starting mix, leaving about an inch of space at the top.
3. Sow the Seeds: Sprinkle 2-3 eggplant seeds on top of the soil in each bottle. Eggplant seeds are relatively small, so don’t bury them too deep.
4. Cover the Seeds: Gently cover the seeds with a thin layer of seed starting mix (about ¼ inch).
5. Water Gently: Use your spray bottle to gently water the soil, making sure not to disturb the seeds.
6. Close the Bottles: Carefully close the bottle halves, using the hinge you created earlier. This will create a humid environment that encourages germination.
7. Place in a Warm Location: Place the bottles in a warm location, such as a sunny windowsill or on a heat mat. Eggplant seeds germinate best at temperatures between 70-85°F (21-29°C).
8. Optional: Cover with a Clear Plastic Bag: To further increase humidity, you can place the bottles inside a clear plastic bag. Just make sure to open the bag occasionally to allow for air circulation.
Caring for the Seedlings
Once your seeds have germinated (usually within 7-14 days), it’s time to provide them with the care they need to thrive.
1. Provide Light: Once the seedlings emerge, they need plenty of light. If you’re using a windowsill, make sure it gets at least 6 hours of direct sunlight per day. If you don’t have enough natural light, use grow lights.
2. Water Regularly: Keep the soil consistently moist, but not soggy. Water when the top inch of soil feels dry to the touch. Use your spray bottle to water gently, avoiding overwatering.
3. Ventilate: Open the bottle halves for a few hours each day to allow for air circulation and prevent fungal diseases.
4. Thin the Seedlings: Once the seedlings have developed their first true leaves (the second set of leaves), thin them out, leaving only the strongest seedling in each bottle. Snip off the weaker seedlings at the soil line with scissors.
5. Fertilize: Once the seedlings have developed several sets of true leaves, you can start fertilizing them with a diluted liquid fertilizer. Follow the instructions on the fertilizer label. I like to use a balanced fertilizer, such as 20-20-20, diluted to half strength.
Hardening Off the Seedlings
Before transplanting your eggplant seedlings into the garden, you need to “harden them off.” This process gradually acclimates them to outdoor conditions, preventing transplant shock.
1. Start Gradually: Begin by placing the bottles outdoors in a sheltered location for just a few hours each day. Gradually increase the amount of time they spend outdoors each day, exposing them to more sunlight and wind.
2. Protect from Frost: If there’s a risk of frost, bring the bottles back indoors.
3. After a Week or Two: After a week or two of hardening off, your seedlings should be ready to be transplanted into the garden.
Transplanting to the Garden
The moment we’ve been waiting for! It’s time to give your eggplant seedlings a permanent home in the garden.
1. Choose a Sunny Location: Eggplants need at least 6-8 hours of direct sunlight per day. Choose a location in your garden that gets plenty of sun.
2. Prepare the Soil: Eggplants prefer well-drained soil that is rich in organic matter. Amend your soil with compost or well-rotted manure before planting.
3. Dig a Hole: Dig a hole that is slightly larger than the root ball of your eggplant seedling.
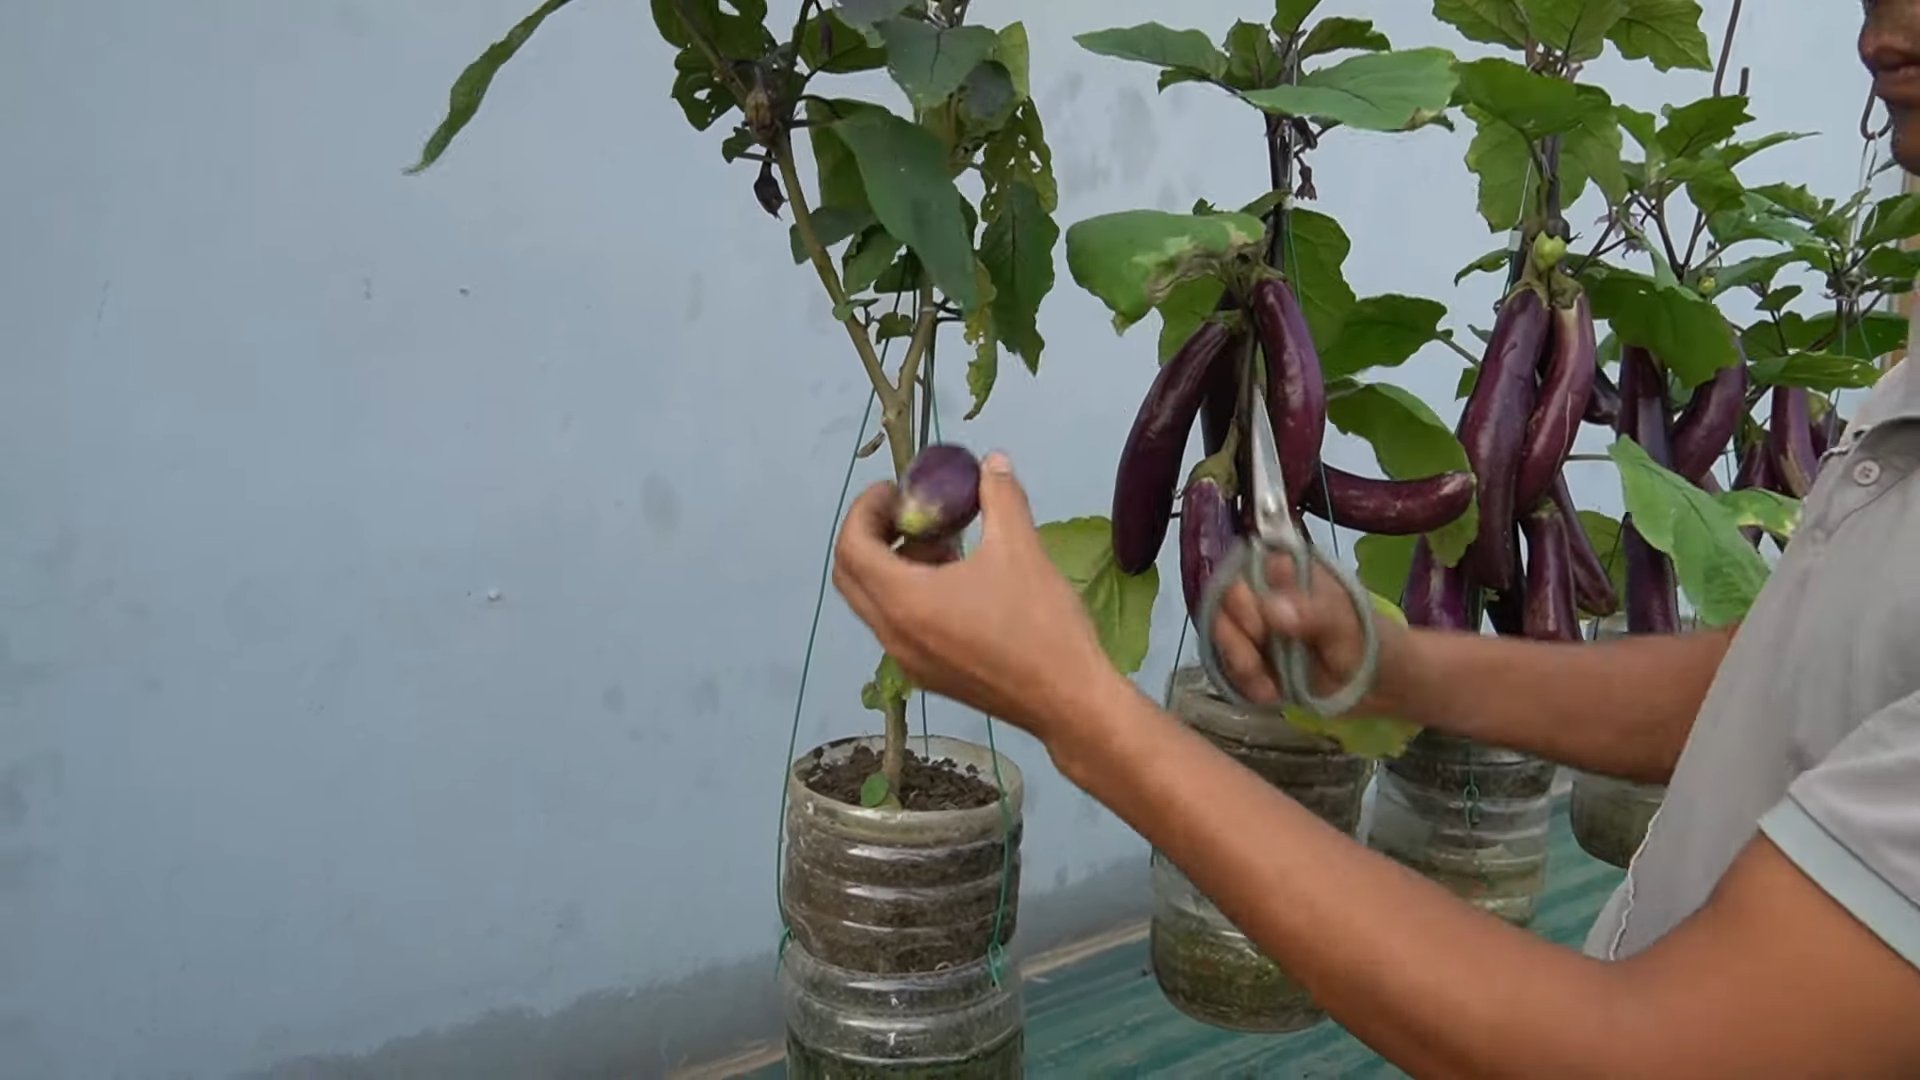
4. Remove the Seedling from the Bottle: This is where the hinged bottle design comes in handy! Carefully open the bottle and gently remove the seedling, being careful not to damage the roots. The root ball should come out easily.
5. Plant the Seedling: Place the seedling in the hole and backfill with soil, gently firming it around the base of the plant.
6. Water Thoroughly: Water the newly transplanted seedling thoroughly.
7. Mulch: Apply a layer of mulch around the base of the plant to help retain moisture and suppress weeds.
8. Provide Support: As your eggplant grows, it may need support. You can use stakes or cages to keep the plant upright.
Ongoing Care
Once your eggplant is in the garden, it’s important to provide it with ongoing care to ensure a bountiful harvest.
* Water Regularly: Eggplants need consistent moisture, especially during hot, dry weather. Water deeply whenever the top inch of soil feels dry to the touch.
* Fertilize: Continue to fertilize your eggplant every few weeks with a balanced fertilizer.
* Pest Control: Keep an eye out for pests, such as aphids, flea beetles, and spider mites. Treat infestations promptly with insecticidal soap or neem oil.
* Weed Control: Keep the area around your eggplant free of weeds.
* Harvest: Harvest your eggplants
Conclusion
So, there you have it! Growing your own eggplants in bottles – a surprisingly simple and incredibly rewarding way to enjoy an early harvest. This DIY trick isn’t just about saving space; it’s about taking control of your food source, minimizing waste, and experiencing the pure joy of nurturing life from a tiny seed to a delicious, homegrown eggplant.
Why is this a must-try? Because it democratizes gardening. You don’t need acres of land or a green thumb passed down through generations. All you need is a bottle, some soil, a seed, and a little bit of patience. It’s a fantastic project for apartment dwellers, balcony gardeners, or anyone looking to add a touch of green to their lives. Plus, the early harvest you’ll achieve with this method means you’ll be enjoying fresh, flavorful eggplants weeks before your neighbors with traditional gardens.
But the benefits extend beyond convenience and early produce. Bottle gardening allows for better control over the growing environment. You can easily move your eggplant to chase the sun, protect it from harsh weather, and monitor its health more closely. This focused attention often translates to healthier plants and a more abundant yield.
Ready to take your bottle-grown eggplant experience to the next level? Consider these variations:
* Experiment with different eggplant varieties: From the classic Black Beauty to the slender Japanese eggplant, each variety offers a unique flavor and texture. See which one thrives best in your bottle garden.
* Companion planting: Add herbs like basil or thyme to the bottle alongside your eggplant. These herbs can help deter pests and enhance the flavor of your eggplant.
* Vertical gardening: Create a stunning vertical display by hanging multiple bottle gardens on a wall or fence. This not only saves space but also adds a beautiful aesthetic to your outdoor area.
* Upcycled materials: Get creative with your bottle selection. Use different sizes and shapes to create a visually interesting garden. Just be sure to clean them thoroughly before planting.
This DIY project is more than just a gardening hack; it’s an invitation to connect with nature, learn new skills, and enjoy the satisfaction of growing your own food. We are confident that you will be amazed at the results.
Don’t just take our word for it. We wholeheartedly encourage you to try this bottle-grown eggplant method for yourself. Start small, experiment, and most importantly, have fun! And once you’ve harvested your first eggplant, we’d love to hear about your experience. Share your photos, tips, and stories in the comments below. Let’s build a community of bottle gardeners and inspire others to embrace this simple yet powerful technique. Happy gardening!
Frequently Asked Questions (FAQ)
What type of bottle is best for growing eggplants?
The ideal bottle is a large, sturdy plastic bottle, such as a 2-liter soda bottle or a gallon-sized water jug. Clear or translucent bottles are preferable as they allow you to monitor the soil moisture levels. Ensure the bottle is thoroughly cleaned before use to remove any residue that could harm the plant. Darker bottles can also be used, but you’ll need to be extra vigilant about checking the soil moisture.
How do I prepare the bottle for planting?
First, thoroughly clean the bottle with soap and water. Then, cut the bottle in half horizontally. The top half will be inverted and placed inside the bottom half, creating a self-watering system. Drill drainage holes in the bottom of the bottle to prevent waterlogging. You can also add a layer of gravel or small stones to the bottom for improved drainage.
What type of soil should I use?
Use a well-draining potting mix specifically formulated for vegetables. Avoid using garden soil, as it can be too heavy and compact, hindering root growth. A mix of peat moss, perlite, and vermiculite is a good option. You can also add compost to enrich the soil with nutrients.
How often should I water my bottle-grown eggplant?
Water your eggplant regularly, keeping the soil consistently moist but not waterlogged. The frequency of watering will depend on the weather conditions and the size of the bottle. Check the soil moisture level daily by sticking your finger into the soil. If the top inch feels dry, it’s time to water. When watering, pour water into the bottom half of the bottle, allowing the soil to absorb it from the bottom up. This encourages deeper root growth.
How much sunlight does my bottle-grown eggplant need?
Eggplants need at least 6-8 hours of direct sunlight per day to thrive. Place your bottle garden in a sunny location, such as a south-facing balcony or windowsill. If you don’t have enough natural sunlight, you can supplement with grow lights.
How do I fertilize my bottle-grown eggplant?
Eggplants are heavy feeders and require regular fertilization. Use a balanced liquid fertilizer specifically formulated for vegetables. Follow the instructions on the fertilizer label for application rates and frequency. Fertilize every 2-3 weeks during the growing season. You can also add compost tea to the soil for an extra boost of nutrients.
How do I protect my bottle-grown eggplant from pests and diseases?
Monitor your eggplant regularly for signs of pests and diseases. Common pests include aphids, spider mites, and flea beetles. You can control these pests with insecticidal soap or neem oil. Diseases such as powdery mildew and blight can be prevented by ensuring good air circulation and avoiding overwatering. Remove any infected leaves promptly.
When can I harvest my bottle-grown eggplant?
The time to harvest will depend on the variety of eggplant you are growing. Generally, eggplants are ready to harvest when they are firm, glossy, and have reached their mature size. Gently twist the eggplant from the plant, using pruning shears if necessary. Regular harvesting encourages the plant to produce more fruit.
Can I grow other vegetables in bottles?
Yes, many other vegetables can be successfully grown in bottles, including tomatoes, peppers, herbs, and lettuce. The key is to choose varieties that are well-suited to container gardening and to provide them with adequate sunlight, water, and nutrients.
What are the benefits of growing eggplants in bottles?
Growing eggplants in bottles offers several benefits, including:
* Space-saving: Ideal for small spaces like balconies and patios.
* Early harvest: Bottles warm up quickly, promoting faster growth.
* Pest control: Easier to monitor and protect plants from pests.
* Water conservation: Self-watering system reduces water waste.
* Aesthetic appeal: Adds a unique and decorative touch to your garden.
* Upcycling: Reduces waste by repurposing plastic bottles.
Can I reuse the soil from my bottle-grown eggplant?
It’s generally not recommended to reuse soil from a previous growing season, as it may be depleted of nutrients and harbor pests or diseases. However, if you choose to reuse the soil, you can amend it with compost and fertilizer to replenish the nutrients. Sterilizing the soil by baking it in the oven can also help to kill any harmful organisms.
What if my bottle-grown eggplant is not producing fruit?
There are several reasons why your eggplant may not be producing fruit. Ensure that it is receiving enough sunlight, water, and nutrients. Pollination can also be an issue, especially if you are growing your eggplant indoors. You can hand-pollinate the flowers by gently shaking the plant or using a small brush to transfer pollen from one flower to another. Also, make sure the temperature is within the optimal range for eggplant growth (70-85°F).
How do I overwinter my bottle-grown eggplant?
Eggplants are typically grown as annuals, meaning they complete their life cycle in one growing season. However, in warmer climates, you may be able to overwinter your eggplant by bringing it indoors before the first frost. Prune the plant back to about 6 inches and place it in a sunny location. Water sparingly and fertilize occasionally. The plant may go dormant during the winter months, but it should resume growth in the spring.
Leave a Comment