
Container Bitter Melon: Ever dreamt of harvesting your own vibrant, knobbly bitter melons right from your patio or balcony? I know I have! It might sound intimidating, but trust me, growing this unique and nutritious vegetable in containers is totally achievable, even if you’re a beginner gardener like I once was.
Bitter melon, also known as bitter gourd, has a rich history deeply rooted in Asian cultures, where it’s been used for centuries, not just as a food source but also for its medicinal properties. From stir-fries to teas, it’s a staple ingredient in many traditional dishes. But you don’t need a sprawling farm to enjoy its benefits.
Why should you try this DIY project? Well, for starters, growing your own food is incredibly rewarding! Plus, store-bought bitter melon can sometimes be hard to find and quite expensive. With a few simple tricks and a little bit of effort, you can have a steady supply of fresh, organic container bitter melon right at your fingertips. This article will guide you through every step, from choosing the right container and soil to providing the perfect support for your climbing vines. Get ready to embark on a fun and fruitful gardening adventure!
Growing Bitter Melon in Containers: A Comprehensive DIY Guide
Hey there, fellow gardening enthusiasts! I’m so excited to share my experience with growing bitter melon (also known as bitter gourd) in containers. It might seem intimidating, but trust me, with a little patience and the right guidance, you can successfully cultivate this unique and nutritious vegetable right on your patio or balcony. I’ve learned a lot through trial and error, and I’m here to walk you through every step, from choosing the right container to harvesting your own bitter melons. Let’s get started!
What You’ll Need
Before we dive into the nitty-gritty, let’s gather all the necessary materials. Having everything on hand will make the process much smoother.
* Bitter Melon Seeds: Purchase high-quality seeds from a reputable source. Look for varieties that are well-suited for container gardening.
* Large Container: Bitter melon vines need space! Choose a container that is at least 12 inches in diameter and 12 inches deep. Larger is always better.
* Well-Draining Potting Mix: Avoid using garden soil, as it can become compacted in containers. Opt for a high-quality potting mix that retains moisture but also drains well.
* Trellis or Support Structure: Bitter melon is a climbing vine, so you’ll need a trellis, bamboo stakes, or a similar structure for it to grow on.
* Fertilizer: A balanced, slow-release fertilizer or liquid fertilizer formulated for vegetables.
* Watering Can or Hose: For regular watering.
* Gardening Gloves: To protect your hands.
* Hand Trowel: For planting and transplanting.
* Pruning Shears or Scissors: For trimming and harvesting.
* Optional: Seed Starting Tray and Dome: If you prefer to start your seeds indoors.
Phase 1: Starting Your Bitter Melon Seeds
You can directly sow bitter melon seeds into your container, but I’ve found that starting them indoors gives them a head start, especially in cooler climates.
1. Soaking the Seeds: Bitter melon seeds have a tough outer shell, so soaking them in warm water for 24 hours will help them germinate faster. I usually put them in a small bowl and cover them with water.
2. Preparing the Seed Starting Tray: Fill your seed starting tray with a seed starting mix. This mix is lighter and more sterile than regular potting mix, which helps prevent fungal diseases.
3. Sowing the Seeds: Make a small hole (about ½ inch deep) in each cell of the tray. Place one seed in each hole and cover it gently with the seed starting mix.
4. Watering and Covering: Water the tray gently until the soil is moist but not soggy. Cover the tray with a humidity dome to create a warm and humid environment.
5. Finding the Right Spot: Place the tray in a warm location with indirect sunlight. A heat mat can also help speed up germination.
6. Monitoring and Watering: Check the tray daily and water as needed to keep the soil moist. Germination usually takes 7-14 days.
7. Removing the Dome: Once the seedlings emerge, remove the humidity dome to prevent damping off (a fungal disease).
8. Providing Light: Move the seedlings to a sunny location or under grow lights. They need at least 6 hours of sunlight per day.
Phase 2: Preparing the Container and Transplanting
Once your seedlings have developed a few sets of true leaves (the leaves that look like miniature versions of the adult leaves), they’re ready to be transplanted into their permanent container.
1. Choosing the Right Container: As I mentioned earlier, a large container is crucial. Make sure it has drainage holes to prevent waterlogging.
2. Filling the Container: Fill the container with your well-draining potting mix, leaving about an inch of space at the top.
3. Creating a Planting Hole: Dig a hole in the center of the container that is large enough to accommodate the root ball of the seedling.
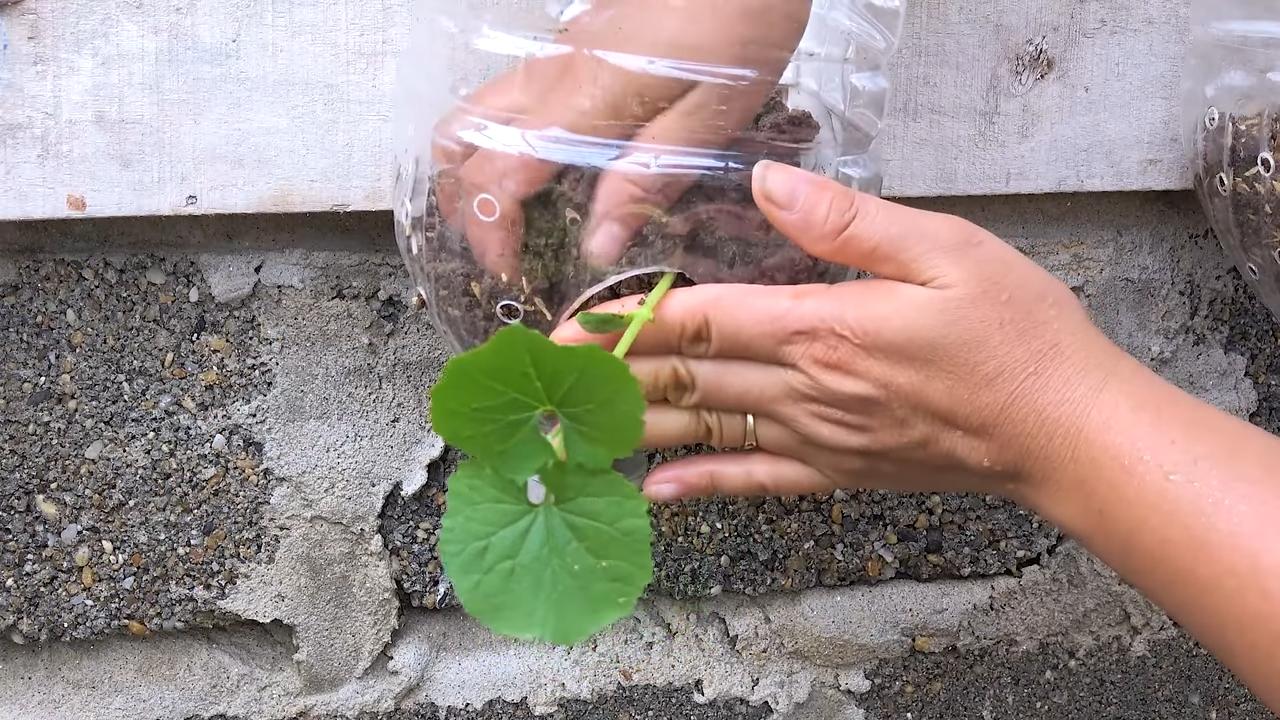
4. Carefully Removing the Seedling: Gently remove the seedling from the seed starting tray, being careful not to damage the roots. I usually use a small spoon or trowel to loosen the soil around the seedling.
5. Transplanting the Seedling: Place the seedling in the planting hole and gently backfill with potting mix. Press the soil down lightly to secure the seedling.
6. Watering Thoroughly: Water the seedling thoroughly after transplanting. This will help settle the soil and reduce transplant shock.
7. Adding Support: Install your trellis or support structure near the seedling. The vine will eventually need something to climb on.
Phase 3: Caring for Your Bitter Melon Plant
Now that your bitter melon plant is in its permanent home, it’s time to provide the care it needs to thrive.
1. Watering: Bitter melon plants need consistent moisture, especially during hot weather. Water deeply whenever the top inch of soil feels dry to the touch. Avoid overwatering, as this can lead to root rot.
2. Fertilizing: Feed your bitter melon plant every 2-3 weeks with a balanced, slow-release fertilizer or a liquid fertilizer formulated for vegetables. Follow the instructions on the fertilizer package.
3. Sunlight: Bitter melon plants need at least 6 hours of sunlight per day. Place your container in a sunny location.
4. Pruning: Pruning can help encourage bushier growth and more fruit production. Pinch off the tips of the vines to promote branching. You can also remove any yellowing or dead leaves.
5. Training the Vine: As the vine grows, gently guide it onto the trellis or support structure. You may need to tie it in place with soft twine or plant ties.
6. Pollination: Bitter melon plants produce both male and female flowers. The female flowers have a small fruit behind them. If you’re not seeing fruit develop, you may need to hand-pollinate the flowers. To do this, use a small paintbrush to transfer pollen from the male flowers to the female flowers.
7. Pest and Disease Control: Keep an eye out for pests such as aphids, spider mites, and whiteflies. You can control these pests with insecticidal soap or neem oil. Bitter melon plants can also be susceptible to fungal diseases such as powdery mildew. To prevent these diseases, provide good air circulation and avoid overwatering.
Phase 4: Harvesting Your Bitter Melons
The moment you’ve been waiting for! Harvesting your own homegrown bitter melons is incredibly rewarding.
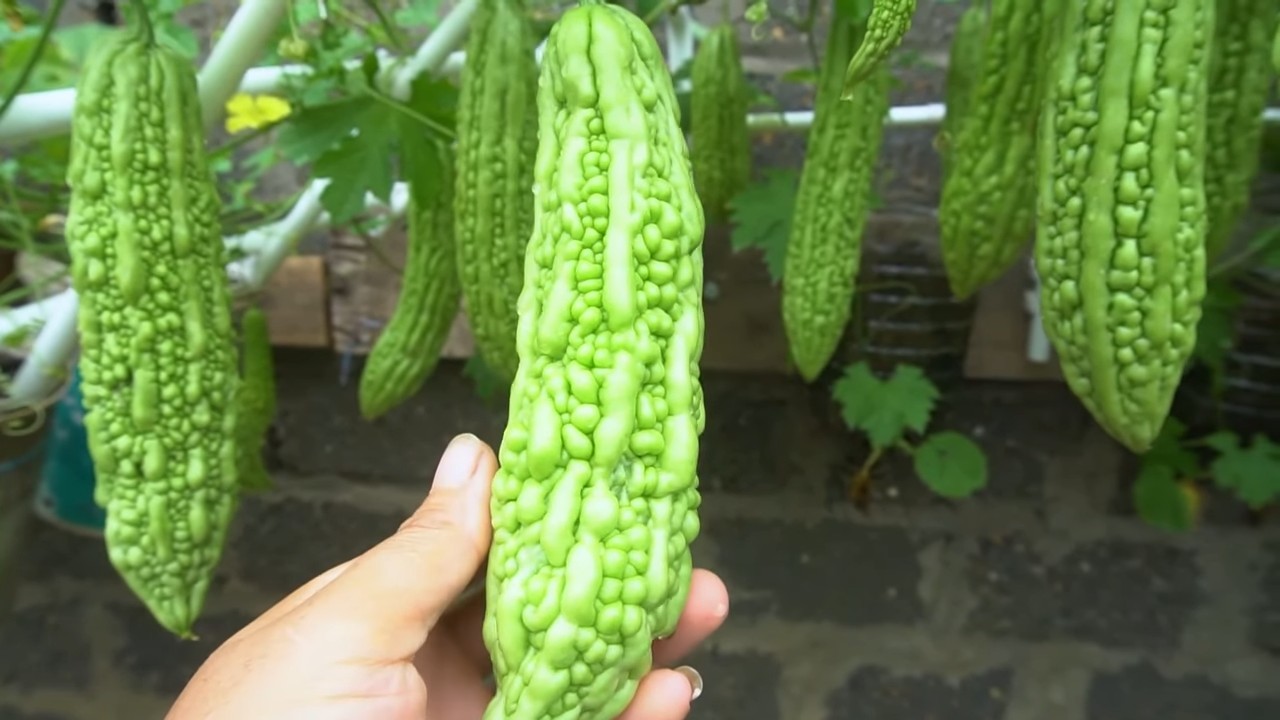
1. Knowing When to Harvest: Bitter melons are typically ready to harvest about 2-3 months after planting. The fruit should be firm and green, with a slightly waxy coating. The size of the fruit will vary depending on the variety.
2. Harvesting the Fruit: Use pruning shears or scissors to cut the fruit from the vine, leaving a short stem attached.
3. Taste and Maturity: The longer you leave the fruit on the vine, the more bitter it will become. If you prefer a milder flavor, harvest the fruit when it is still young and green.
4. Successive Harvesting: Bitter melon plants will continue to produce fruit throughout the growing season if you harvest regularly.
Troubleshooting Common Problems
Even with the best care, you might encounter some challenges along the way. Here are a few common problems and how to address them:
* Yellowing Leaves: This could be a sign of overwatering, underwatering, nutrient deficiency, or pest infestation. Check the soil moisture, fertilize if necessary, and inspect the plant for pests.
* Lack of Fruit Production: This could be due to poor pollination, insufficient sunlight, or nutrient deficiency. Try hand-pollinating the flowers, move the plant to a sunnier location, and fertilize regularly.
* Pest Infestation: Treat infestations with insecticidal soap or neem oil.
* Fungal Diseases: Provide good air circulation and avoid overwatering. You can also use a fungicide if necessary.
Tips for Success
Here are a few extra tips to help you succeed with growing bitter melon in containers:
* Choose the Right Variety: Some varieties of bitter melon are better suited for container gardening than others. Look for compact or dwarf varieties.
* Provide Adequate Support: A sturdy trellis or support structure is essential for bitter melon vines.
* Water Regularly: Bitter melon plants need consistent moisture, especially during hot weather.
* Fertilize Regularly: Bitter melon plants are heavy feeders and need regular fertilization.
* Protect from Frost: Bitter melon is a tropical plant and is sensitive to frost. If you live in a cold climate, you’ll need to protect your plant from frost or bring it indoors during the winter.
* Be Patient: Growing bitter melon takes time and patience. Don’t get discouraged if you don’t see results immediately.
Growing
Conclusion
So, there you have it! Growing your own bitter melon in containers is not just a gardening project; it’s an investment in your health, a testament to your resourcefulness, and a surprisingly rewarding experience. We’ve walked you through the process, from selecting the right container and soil to nurturing your plant and harvesting those uniquely flavored fruits.
Why is this DIY trick a must-try? Because it puts you in control. You know exactly what goes into your food, avoiding potentially harmful pesticides and ensuring the freshest possible ingredients. Store-bought bitter melon simply can’t compare to the vibrant flavor and nutritional benefits of a homegrown harvest. Plus, let’s be honest, there’s a certain satisfaction that comes from nurturing a plant from seed to table.
But the beauty of container gardening lies in its adaptability. Feel free to experiment! Try different varieties of bitter melon – some are more compact and better suited for smaller spaces. Consider adding companion plants like basil or marigolds to deter pests naturally. You can also adjust the soil mix to suit your specific climate and growing conditions. If you live in a particularly hot area, consider providing some afternoon shade to prevent the leaves from scorching. Conversely, if you’re in a cooler climate, a south-facing location will maximize sunlight exposure.
Don’t be afraid to get creative with your container choices, either. While a standard pot works perfectly well, you could also repurpose old buckets, tubs, or even grow bags. Just ensure that whatever you choose has adequate drainage.
And speaking of drainage, remember that consistent watering is key, especially during the fruiting stage. However, avoid overwatering, which can lead to root rot. A good rule of thumb is to water deeply when the top inch of soil feels dry to the touch.
The most important thing is to jump in and give it a try. Growing bitter melon in containers is easier than you might think, and the rewards are well worth the effort. Imagine the delicious stir-fries, soups, and juices you can create with your own homegrown bitter melon.
We’re confident that you’ll find this DIY project both enjoyable and fulfilling. So, grab your seeds, prepare your containers, and get ready to embark on a gardening adventure. And once you’ve harvested your first crop, we’d love to hear about your experience! Share your tips, tricks, and photos in the comments below. Let’s build a community of container gardening enthusiasts and inspire others to grow their own food. Let’s all enjoy the benefits of growing **container bitter melon**!
Frequently Asked Questions (FAQ)
What is the best size container for growing bitter melon?
A container that is at least 12 inches in diameter and 12 inches deep is generally recommended for growing bitter melon. However, a larger container, such as a 15-gallon pot, will provide even more room for the roots to grow and will result in a healthier, more productive plant. The larger the container, the less frequently you’ll need to water, which can be especially helpful during hot summer months. Consider the mature size of the specific bitter melon variety you’re growing when choosing your container size. Bushier varieties might benefit from a slightly wider container.
How often should I water my container bitter melon plant?
Watering frequency depends on several factors, including the size of the container, the type of soil, the climate, and the stage of growth of the plant. As a general rule, water deeply when the top inch of soil feels dry to the touch. During hot, dry weather, you may need to water daily, or even twice a day. In cooler, more humid conditions, you may only need to water every few days. Avoid overwatering, as this can lead to root rot. Ensure that your container has adequate drainage to prevent water from pooling at the bottom. A good way to check if your plant needs water is to lift the container. If it feels light, it’s likely time to water.
What kind of soil is best for growing bitter melon in containers?
A well-draining potting mix that is rich in organic matter is ideal for growing bitter melon in containers. Avoid using garden soil, as it can become compacted in containers and does not drain well. A good potting mix will contain a blend of peat moss, perlite, and vermiculite. You can also amend your potting mix with compost or aged manure to provide additional nutrients. Consider adding a slow-release fertilizer to the potting mix at planting time to provide a steady supply of nutrients throughout the growing season.
How much sunlight does bitter melon need?
Bitter melon requires at least 6-8 hours of direct sunlight per day to thrive. Choose a location for your container that receives plenty of sunlight throughout the day. If you live in a particularly hot climate, you may want to provide some afternoon shade to prevent the leaves from scorching. If you’re growing bitter melon indoors, you’ll need to supplement with grow lights to provide adequate light. Rotate the container regularly to ensure that all sides of the plant receive equal sunlight.
How do I fertilize my container bitter melon plant?
Bitter melon is a heavy feeder and requires regular fertilization to produce a good crop. Use a balanced fertilizer, such as a 10-10-10 or 20-20-20, every 2-3 weeks. You can also use a liquid fertilizer, such as fish emulsion or seaweed extract, to provide a quick boost of nutrients. Avoid over-fertilizing, as this can burn the roots and damage the plant. Follow the instructions on the fertilizer label carefully. Consider using a fertilizer that is specifically formulated for vegetables.
How do I deal with pests and diseases on my container bitter melon plant?
Regularly inspect your plant for pests and diseases. Common pests that attack bitter melon include aphids, spider mites, and whiteflies. You can control these pests with insecticidal soap, neem oil, or by handpicking them off the plant. Common diseases that affect bitter melon include powdery mildew and downy mildew. You can prevent these diseases by providing good air circulation and avoiding overhead watering. If your plant does develop a disease, you can treat it with a fungicide. Companion planting with herbs like basil or marigolds can also help deter pests naturally.
When is the best time to harvest bitter melon?
Bitter melon is typically ready to harvest about 2-3 months after planting. The fruits should be firm and green, and the skin should be slightly bumpy. Harvest the fruits when they are about 6-8 inches long. If you wait too long, the fruits will turn yellow and become bitter. Use a sharp knife or scissors to cut the fruits from the vine. Regular harvesting will encourage the plant to produce more fruits.
Can I grow bitter melon from seeds saved from store-bought fruits?
While technically possible, it’s generally not recommended to grow bitter melon from seeds saved from store-bought fruits. The seeds may not be true to type, meaning that the resulting plants may not produce fruits that are identical to the parent plant. Additionally, store-bought fruits may have been treated with chemicals that can affect seed germination. It’s best to purchase seeds from a reputable seed supplier to ensure that you’re getting a high-quality product.
My bitter melon plant is flowering, but not producing fruit. What could be the problem?
There are several reasons why your bitter melon plant may be flowering but not producing fruit. One possibility is that the plant is not being pollinated properly. Bitter melon is a monoecious plant, meaning that it has separate male and female flowers on the same plant. The female flowers need to be pollinated by the male flowers in order to produce fruit. You can hand-pollinate the flowers by using a small brush to transfer pollen from the male flowers to the female flowers. Another possibility is that the plant is not getting enough sunlight or nutrients. Ensure that your plant is receiving at least 6-8 hours of direct sunlight per day and that you are fertilizing it regularly. Stress from extreme temperatures or inconsistent watering can also affect fruit production.
Can I grow bitter melon indoors?
Yes, you can grow bitter melon indoors, but it requires some extra effort. You’ll need to provide adequate light, either through a sunny window or with grow lights. You’ll also need to ensure that the plant is properly pollinated, either by hand or by using a small fan to circulate air. Indoor growing can be a great option if you live in an area with a short growing season or if you want to protect your plant from pests and diseases.
Leave a Comment