
Container Brussel Sprouts: Ever dreamt of harvesting your own miniature cabbages right from your patio? I know I have! There’s something incredibly satisfying about growing your own food, and Brussel sprouts, with their unique flavor and nutritional punch, are a fantastic choice. But let’s be honest, the idea of cultivating these little green gems can seem a bit daunting, especially if you’re short on space.
For centuries, Brussel sprouts have been a staple in European cuisine, with evidence suggesting their cultivation dates back to 13th-century Belgium – hence the name! They were traditionally grown in large fields, requiring ample space and specific soil conditions. But times have changed, and so have our gardening techniques.
That’s where the magic of DIY comes in! This article is your ultimate guide to successfully growing container Brussel sprouts, even if you only have a small balcony or patio. I’ll share my tried-and-true tricks and hacks that will transform you into a container gardening pro. Forget the sprawling fields; we’re bringing the farm to your doorstep! Imagine the joy of serving up fresh, homegrown Brussel sprouts to your family and friends. Not only will you impress them with your gardening skills, but you’ll also be providing them with a healthy and delicious side dish. So, grab your gardening gloves, and let’s get started on this exciting journey of growing your own Brussel sprouts in containers!
Growing Brussels Sprouts in Containers: A DIY Guide for Urban Gardeners
Hey there, fellow green thumbs! Ever thought about growing your own Brussels sprouts but felt limited by space? Well, I’m here to tell you that you absolutely can cultivate these mini cabbages right in containers! It’s a rewarding experience, and nothing beats the taste of homegrown veggies. Let’s dive into how you can successfully grow Brussels sprouts in containers, even if you’re a beginner.
Choosing the Right Container and Soil
First things first, let’s talk about the foundation of your Brussels sprouts garden: the container and the soil. This is crucial for healthy growth, so let’s get it right!
* Container Size: Brussels sprouts need room to grow, both above and below the soil. I recommend a container that’s at least 12 inches in diameter and 12 inches deep. A 5-gallon bucket or a large planter pot works perfectly. Bigger is generally better, as it gives the roots more space to spread out and absorb nutrients.
* Drainage: Excellent drainage is non-negotiable. Brussels sprouts hate sitting in soggy soil, which can lead to root rot. Make sure your container has plenty of drainage holes at the bottom. If it doesn’t, you can drill some yourself.
* Soil Mix: Forget using garden soil straight from the ground. It’s often too heavy and doesn’t drain well in containers. Instead, opt for a high-quality potting mix. I like to use a mix that’s specifically formulated for vegetables, as it usually contains the right balance of nutrients. You can also create your own mix by combining equal parts of:
* Compost: This provides essential nutrients and improves soil structure.
* Peat moss or coco coir: These help retain moisture.
* Perlite or vermiculite: These improve drainage and aeration.
Planting Your Brussels Sprouts
Now that we’ve got the container and soil sorted, let’s get those Brussels sprouts planted! You have two main options: starting from seeds or transplanting seedlings.
* Starting from Seeds: This gives you more control over the entire process, but it requires a bit more patience.
1. Sow Seeds Indoors: About 6-8 weeks before the last expected frost, sow your Brussels sprouts seeds indoors in seed trays or small pots filled with seed-starting mix. Plant the seeds about ½ inch deep.
2. Keep Soil Moist: Keep the soil consistently moist but not waterlogged. A spray bottle works well for this.
3. Provide Light: Place the seed trays under grow lights or in a sunny window. Brussels sprouts need plenty of light to germinate and grow strong seedlings.
4. Harden Off Seedlings: Once the seedlings have developed a few sets of true leaves, it’s time to harden them off. This means gradually exposing them to outdoor conditions over a period of 1-2 weeks. Start by placing them outside for an hour or two each day, gradually increasing the time until they can stay outside all day.
* Transplanting Seedlings: This is the easier and faster option, especially if you’re a beginner. You can purchase Brussels sprouts seedlings from your local garden center.
1. Choose Healthy Seedlings: Look for seedlings that are healthy and vigorous, with sturdy stems and green leaves. Avoid seedlings that are leggy or have yellowing leaves.
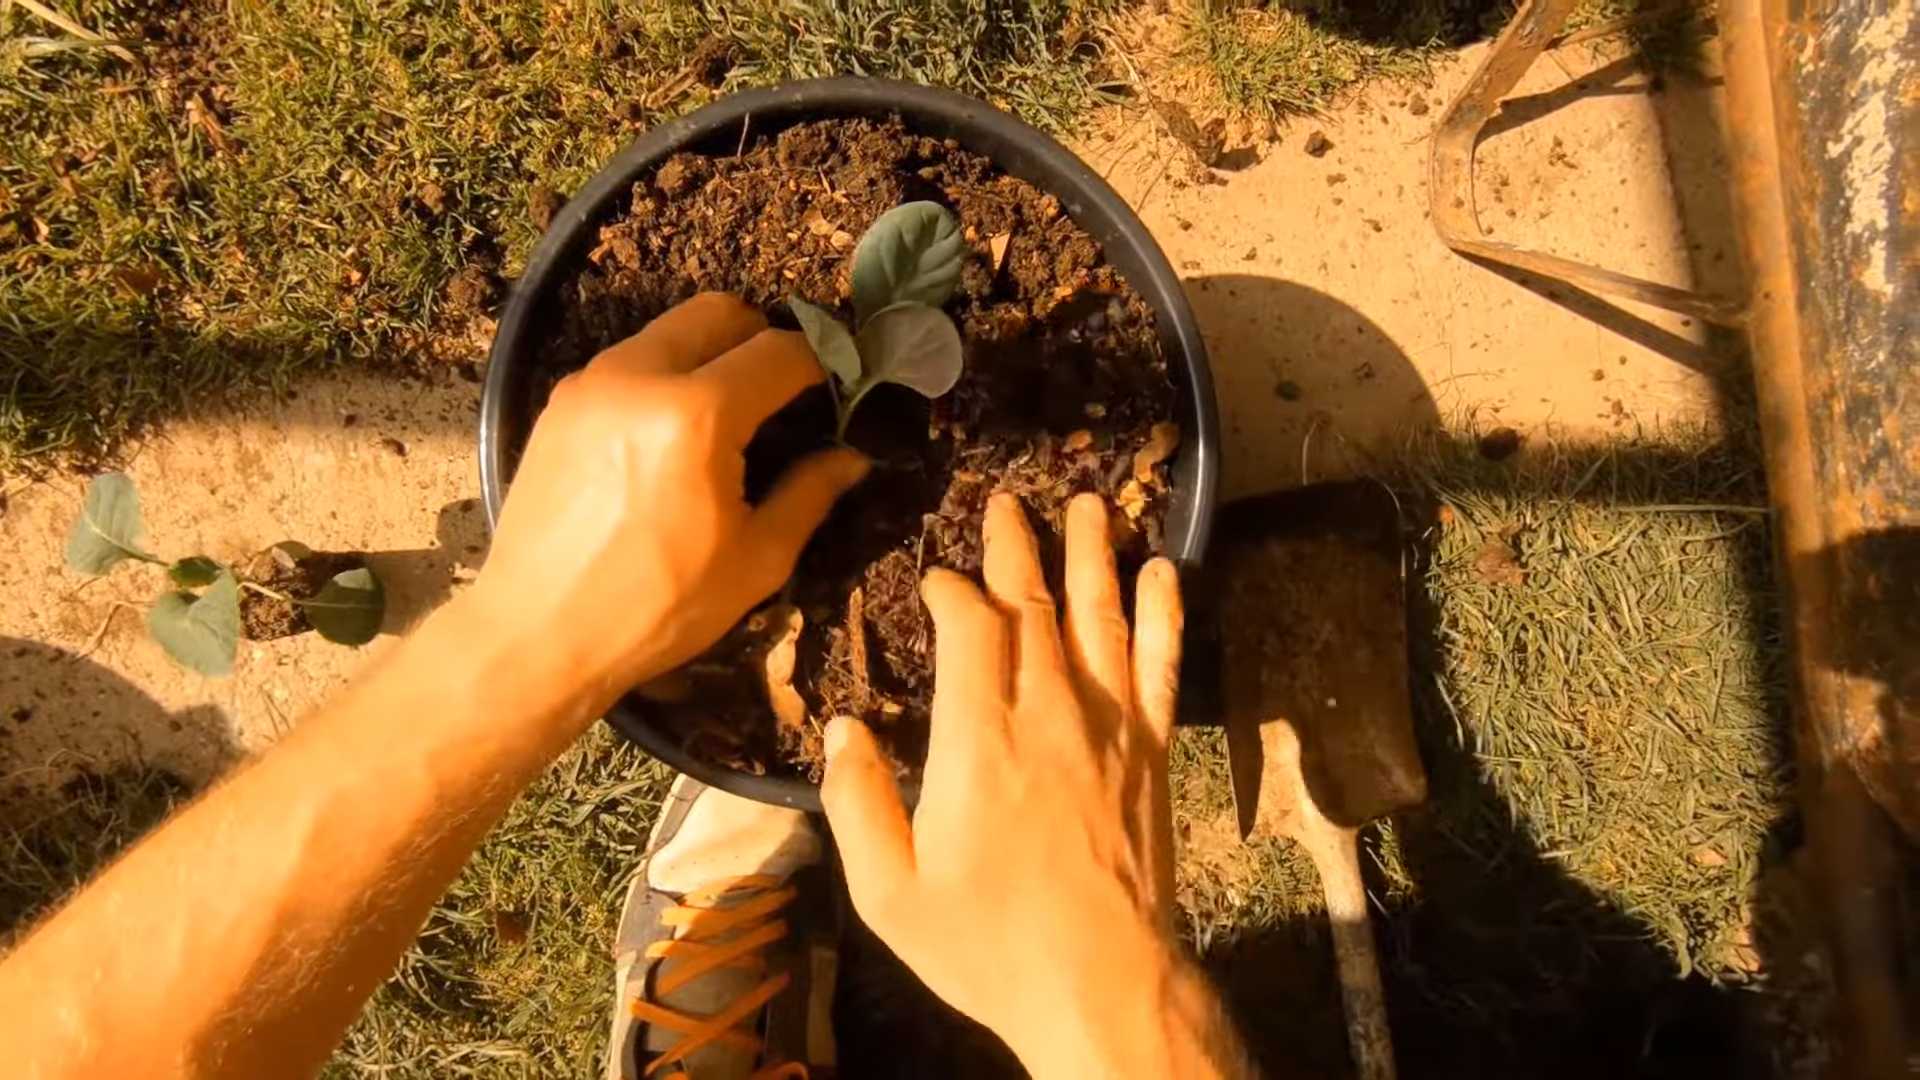
2. Dig a Hole: Dig a hole in the center of your container that’s large enough to accommodate the root ball of the seedling.
3. Gently Remove Seedling: Gently remove the seedling from its container, being careful not to damage the roots.
4. Place Seedling in Hole: Place the seedling in the hole and backfill with potting mix. Gently firm the soil around the base of the plant.
5. Water Thoroughly: Water the seedling thoroughly after planting.
Caring for Your Brussels Sprouts
Once your Brussels sprouts are planted, it’s time to provide them with the care they need to thrive.
* Sunlight: Brussels sprouts need at least 6 hours of sunlight per day. Place your container in a sunny location where it will receive plenty of direct sunlight.
* Watering: Water your Brussels sprouts regularly, especially during hot, dry weather. The soil should be consistently moist but not waterlogged. Check the soil moisture by sticking your finger into the soil. If the top inch feels dry, it’s time to water.
* Fertilizing: Brussels sprouts are heavy feeders, so they need regular fertilization. I recommend using a balanced fertilizer that’s specifically formulated for vegetables. Follow the instructions on the fertilizer package for application rates. You can also use organic fertilizers like compost tea or fish emulsion.
* Support: As Brussels sprouts grow, they can become quite tall and top-heavy. This can cause them to topple over, especially in windy conditions. To prevent this, you may need to provide support for your plants. You can use stakes, tomato cages, or other supports to keep them upright.
* Pest Control: Brussels sprouts are susceptible to a few common pests, such as aphids, cabbage worms, and flea beetles. Inspect your plants regularly for signs of pests. If you find any, you can control them with organic pest control methods, such as insecticidal soap or neem oil. You can also handpick pests off the plants.
* Remove Yellowing Leaves: As your Brussels sprouts grow, the lower leaves may start to yellow and die. This is normal. Remove these leaves to improve air circulation and prevent disease.
Harvesting Your Brussels Sprouts
The moment we’ve all been waiting for! Harvesting your homegrown Brussels sprouts is the most rewarding part of the process.
* Timing: Brussels sprouts are typically ready to harvest in the fall, after they’ve been exposed to a few light frosts. The cold weather helps to sweeten the sprouts.
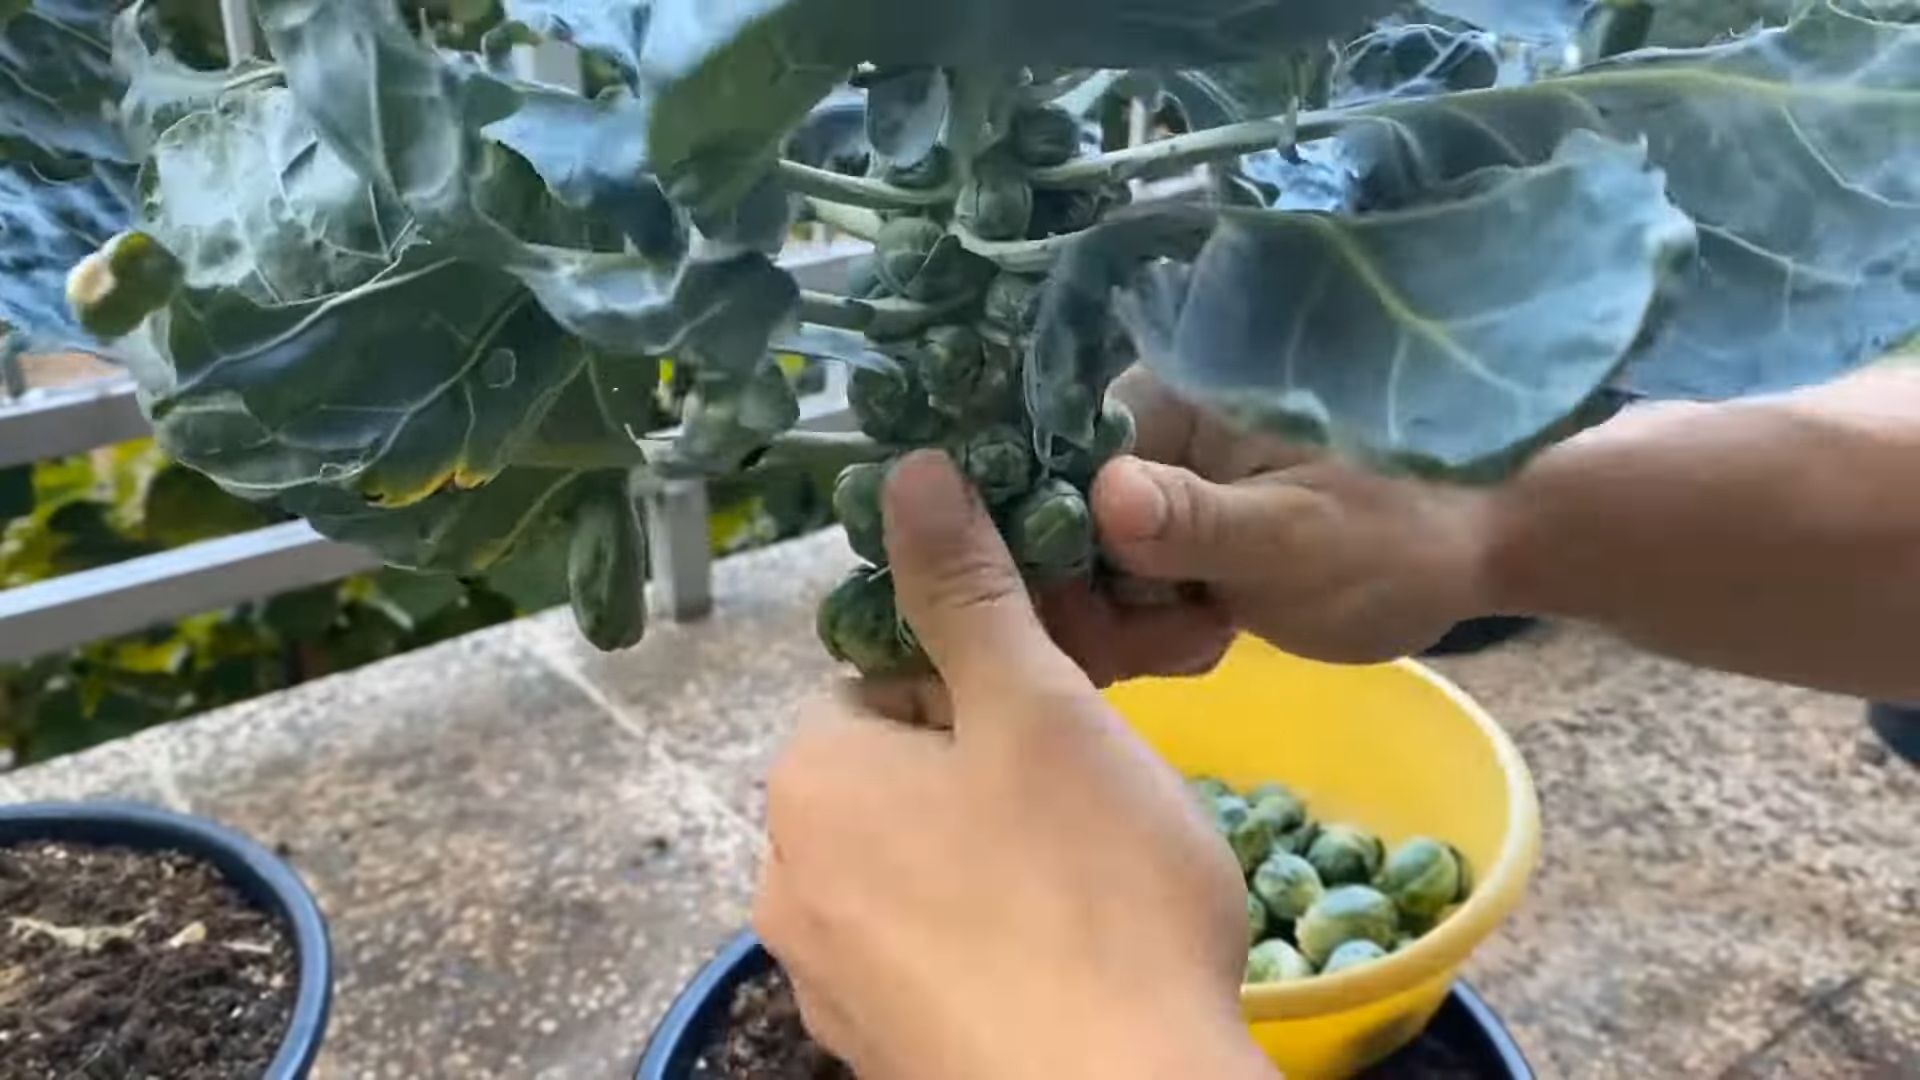
* Harvesting Technique: Start harvesting the sprouts from the bottom of the plant first. They should be firm and about 1-2 inches in diameter. To harvest, simply twist the sprouts off the stem.
* Continue Harvesting: Continue harvesting the sprouts as they mature, working your way up the stem. You can harvest all the sprouts at once, or you can harvest them gradually over a period of several weeks.
* Storage: Freshly harvested Brussels sprouts can be stored in the refrigerator for up to a week.
Troubleshooting Common Problems
Even with the best care, you may encounter some problems while growing Brussels sprouts in containers. Here are a few common issues and how to address them:
* Yellowing Leaves: This can be caused by a variety of factors, such as overwatering, underwatering, nutrient deficiencies, or pests. Check the soil moisture and adjust your watering accordingly. Fertilize your plants with a balanced fertilizer. Inspect your plants for pests and treat them as needed.
* Sprouts Not Forming: This can be caused by a lack of sunlight, poor soil, or insufficient fertilization. Make sure your plants are getting at least 6 hours of sunlight per day. Amend your soil with compost or other organic matter. Fertilize your plants regularly with a balanced fertilizer.
* Sprouts Splitting: This can be caused by inconsistent watering. Water your plants regularly and consistently, especially during hot, dry weather.
* Pest Infestations: As mentioned earlier, Brussels sprouts are susceptible to a few common pests. Inspect your plants regularly for signs of pests and treat them with organic pest control methods.
Choosing the Right Brussels Sprouts Variety
Selecting the right variety of Brussels sprouts is key for container gardening success. Some varieties are more compact and better suited for smaller spaces. Here are a few I recommend:
* ‘Jade Cross’: This is a classic variety that produces high yields of uniform, medium-sized sprouts. It’s relatively early maturing, making it a good choice for shorter growing seasons.
* ‘Long Island Improved’: Another reliable variety, ‘Long Island Improved’ is known for its good flavor and disease resistance. It produces smaller sprouts, which are perfect for roasting or sautéing.
* ‘Redarling’: If you’re looking for something a little different, try ‘Redarling’. This variety produces beautiful red-purple sprouts that add a pop of color to your garden and your plate.
* ‘Dwarf Gem’: As the name suggests, this is a compact variety that’s ideal for container gardening. It produces small, tightly packed sprouts.
Extra Tips for Success
Here are a few extra tips to help you grow the best Brussels sprouts possible in containers:
* Rotate Your Crops: Don’t plant Brussels sprouts in the same container year after year. Rotating your crops helps to prevent the buildup of soilborne diseases and pests.
* Mulch Your Plants: Mulching around your Brussels sprouts helps to retain moisture, suppress weeds, and regulate soil temperature. Use organic mulches like straw, wood chips, or shredded leaves.
* Pinch Out the Top:
Conclusion
So, there you have it! Growing your own container Brussel sprouts is not only achievable, but it’s also a deeply rewarding experience. Forget the bland, often overcooked sprouts you might have encountered in the past. Imagine instead, plump, vibrant, and incredibly flavorful Brussel sprouts, harvested fresh from your own patio or balcony. This DIY trick transforms the often-dreaded vegetable into a culinary delight.
Why is this a must-try? Because it puts you in control. You control the soil, the sunlight, the watering, and ultimately, the taste. Store-bought Brussel sprouts often travel long distances, losing freshness and flavor along the way. By growing your own, you’re guaranteeing the freshest, most nutritious, and most delicious Brussel sprouts possible. Plus, there’s a certain satisfaction that comes from nurturing a plant from seedling to harvest, a connection to nature that’s often missing in our modern lives.
But the benefits don’t stop there. Growing container Brussel sprouts is also a fantastic way to maximize space, especially if you have limited gardening area. Even a small balcony can accommodate a few containers, providing you with a steady supply of these nutritious vegetables. And let’s not forget the aesthetic appeal! The tall, leafy stalks of Brussel sprouts plants add a touch of greenery and visual interest to any outdoor space.
Ready to take your container Brussel sprouts game to the next level? Consider experimenting with different varieties. ‘Long Island Improved’ is a classic choice, known for its reliable yields and excellent flavor. For a sweeter taste, try ‘Rubine,’ a beautiful purple variety that adds a pop of color to your garden. You can also adjust the soil composition to influence the flavor. Adding a bit of lime to the soil can help to reduce bitterness, while incorporating compost can enhance the overall sweetness.
Another variation to consider is companion planting. Marigolds, for example, can help to deter pests, while herbs like rosemary and thyme can improve the flavor of your Brussel sprouts. Experiment with different combinations to find what works best for your growing conditions and taste preferences.
Don’t be intimidated by the prospect of growing your own Brussel sprouts. With a little bit of planning and effort, you can enjoy a bountiful harvest of these delicious and nutritious vegetables. The key is to start with good quality seeds or seedlings, provide adequate sunlight and water, and protect your plants from pests and diseases.
We encourage you to give this DIY trick a try. It’s a fun, rewarding, and delicious way to connect with nature and enjoy the freshest possible Brussel sprouts. And most importantly, don’t forget to share your experience with us! We’d love to hear about your successes, your challenges, and any tips or tricks you’ve discovered along the way. Share your photos and stories on social media using [Your Hashtag] and let’s inspire others to grow their own container Brussel sprouts! Let’s all embrace the joy of homegrown goodness and rediscover the deliciousness of fresh, homegrown Brussel sprouts.
Frequently Asked Questions (FAQ)
What is the best time of year to plant container Brussel sprouts?
The best time to plant Brussel sprouts depends on your climate. In general, they are a cool-season crop, meaning they thrive in cooler temperatures. For most regions, the ideal planting time is in late spring or early summer for a fall harvest. In areas with mild winters, you can also plant them in late summer or early fall for a winter harvest. The key is to ensure they have enough time to mature before the first hard frost. Check your local frost dates to determine the optimal planting time for your area.
What size container is needed for growing Brussel sprouts?
Brussel sprouts need a fairly large container to accommodate their extensive root system. A container that is at least 12 inches in diameter and 12 inches deep is recommended. However, a larger container, such as a 5-gallon bucket or a half-barrel planter, will provide even more room for the roots to grow and will result in a healthier and more productive plant. Make sure the container has drainage holes to prevent waterlogging.
What type of soil is best for container Brussel sprouts?
Brussel sprouts prefer well-draining, fertile soil with a slightly acidic to neutral pH (around 6.0 to 7.0). A good potting mix specifically formulated for vegetables is a great option. You can also create your own mix by combining equal parts of compost, peat moss (or coconut coir), and perlite or vermiculite. Compost provides essential nutrients, peat moss or coconut coir helps retain moisture, and perlite or vermiculite improves drainage. Avoid using garden soil in containers, as it can become compacted and doesn’t drain well.
How much sunlight do container Brussel sprouts need?
Brussel sprouts need at least 6 hours of direct sunlight per day to thrive. Choose a location for your container that receives plenty of sunlight throughout the day. If you live in a particularly hot climate, some afternoon shade may be beneficial to prevent the plants from overheating. If you don’t have a sunny spot, you can supplement with grow lights.
How often should I water my container Brussel sprouts?
Water your container Brussel sprouts regularly, especially during hot and dry weather. The soil should be kept consistently moist, but not waterlogged. Check the soil moisture by sticking your finger about an inch into the soil. If it feels dry, it’s time to water. Water deeply, until water drains out of the drainage holes. Avoid overhead watering, as this can promote fungal diseases.
How do I fertilize my container Brussel sprouts?
Brussel sprouts are heavy feeders and require regular fertilization. Start by incorporating a slow-release fertilizer into the potting mix at planting time. Then, supplement with a liquid fertilizer every 2-3 weeks throughout the growing season. Choose a fertilizer that is high in nitrogen, phosphorus, and potassium (NPK). You can also use organic fertilizers, such as compost tea or fish emulsion.
What are some common pests and diseases that affect Brussel sprouts?
Common pests that affect Brussel sprouts include aphids, cabbage worms, and flea beetles. Aphids can be controlled with insecticidal soap or neem oil. Cabbage worms can be handpicked or treated with Bacillus thuringiensis (Bt). Flea beetles can be deterred with row covers or diatomaceous earth. Common diseases include clubroot and black rot. Clubroot can be prevented by maintaining a slightly acidic soil pH and practicing crop rotation. Black rot can be prevented by using disease-free seeds and avoiding overhead watering.
When are Brussel sprouts ready to harvest?
Brussel sprouts are typically ready to harvest about 90-100 days after planting. The sprouts should be firm, green, and about 1-2 inches in diameter. Start harvesting from the bottom of the stalk, as these sprouts will mature first. Twist or cut the sprouts off the stalk. You can continue to harvest sprouts as they mature up the stalk. The flavor of Brussel sprouts improves after a light frost.
Can I grow Brussel sprouts indoors?
While it’s possible to start Brussel sprouts indoors, they are best grown outdoors due to their need for ample sunlight and space. If you want to try growing them indoors, you’ll need to provide them with at least 6 hours of direct sunlight per day or supplement with grow lights. You’ll also need a large container and plenty of space for the plants to grow.
How do I store harvested Brussel sprouts?
Harvested Brussel sprouts can be stored in the refrigerator for up to a week. Store them in a plastic bag or container to prevent them from drying out. You can also freeze Brussel sprouts for longer storage. To freeze them, blanch them in boiling water for 3-5 minutes, then plunge them into ice water to stop the cooking process. Drain them well and then freeze them in a single layer on a baking sheet. Once they are frozen, transfer them to a freezer bag or container.
Leave a Comment