
Container strawberry growing routine doesn’t have to be a daunting task! Imagine plucking juicy, sun-ripened strawberries straight from your own patio, balcony, or even windowsill. Sounds idyllic, right? For centuries, cultivating strawberries has been a cherished tradition, with evidence suggesting their cultivation dates back to ancient Rome. But you don’t need acres of land to enjoy this delicious fruit.
In this article, I’m going to share some simple yet effective DIY tricks and hacks that will transform you into a container strawberry growing pro, even if you’ve never gardened before. We’ll explore everything from choosing the right container and soil to mastering watering techniques and pest control.
Why is mastering a container strawberry growing routine so important? Because fresh, homegrown strawberries taste infinitely better than anything you can buy in the store! Plus, it’s a fantastic way to connect with nature, reduce your carbon footprint, and enjoy a rewarding hobby. So, grab your gardening gloves, and let’s get started on this exciting journey to strawberry-filled success!
DIY Container Strawberry Growing: A Bountiful Harvest on Your Patio!
Hey there, fellow gardening enthusiasts! I’m so excited to share my tried-and-true method for growing delicious, juicy strawberries right in containers. Forget those sad, bland supermarket berries – with a little effort, you can have a constant supply of sweet, homegrown goodness just steps from your door. This guide will walk you through every step, from choosing the right container to harvesting your bounty. Let’s get started!
Choosing the Right Container and Location
Before we even think about planting, let’s talk about the home for your future strawberry plants. This is crucial for success!
* Container Size: Strawberries need room to spread their roots. I recommend a container that’s at least 12 inches in diameter and 8 inches deep. Larger is always better, especially if you plan on growing multiple plants in one container. Think about using a half-barrel planter, a large pot, or even a hanging basket!
* Drainage: This is non-negotiable! Strawberries hate soggy feet. Make sure your container has plenty of drainage holes. If it doesn’t, you can easily drill some.
* Material: Plastic, terracotta, or even fabric pots will work. Terracotta pots dry out faster, so you’ll need to water more frequently. Fabric pots are great for air pruning roots, which encourages healthier growth.
* Location, Location, Location: Strawberries are sun worshippers! They need at least 6-8 hours of direct sunlight per day to produce a good crop. Choose a sunny spot on your patio, balcony, or deck. South-facing locations are usually ideal.
Selecting the Right Strawberry Variety
Not all strawberries are created equal! Choosing the right variety for your climate and growing conditions is key.
* June-Bearing Strawberries: These produce one large crop of berries in the spring or early summer. They’re great if you want a big harvest all at once for making jam or freezing. Popular varieties include ‘Chandler’, ‘Honeoye’, and ‘Earliglow’.
* Everbearing Strawberries: These produce two or three smaller crops throughout the growing season – spring, summer, and fall. They’re perfect for a continuous supply of berries. ‘Seascape’, ‘Albion’, and ‘Ozark Beauty’ are excellent choices.
* Day-Neutral Strawberries: These are similar to everbearing varieties, producing berries throughout the growing season, but they’re less sensitive to day length. ‘Tristar’ and ‘Tribute’ are popular day-neutral options.
* Consider Your Climate: Check the plant tags or online descriptions to make sure the variety you choose is suitable for your region’s climate. Some varieties are more cold-hardy than others.
Preparing the Soil
Strawberries thrive in well-draining, slightly acidic soil. Here’s how I prepare my potting mix:
* Start with a Good Quality Potting Mix: Don’t use garden soil! It’s too heavy and doesn’t drain well in containers. I like to use a mix specifically formulated for containers.
* Amend with Compost: Compost adds nutrients and improves drainage. Mix in about 25% compost to your potting mix.
* Add Perlite or Vermiculite: These help improve drainage and aeration. Add about 10% perlite or vermiculite to your mix.
* Check the pH: Strawberries prefer a pH between 5.5 and 6.5. You can test your soil’s pH with a soil testing kit. If it’s too alkaline, you can add sulfur to lower the pH.
Planting Your Strawberry Plants
Now for the fun part! Let’s get those strawberry plants in their new home.
1. Water the Plants: Before planting, thoroughly water your strawberry plants in their original containers. This will help them transplant more easily.
2. Fill the Container: Fill your container with your prepared potting mix, leaving about an inch or two of space at the top.
3. Dig a Hole: Dig a hole in the soil that’s large enough to accommodate the root ball of your strawberry plant.
4. Gently Remove the Plant: Gently remove the strawberry plant from its container. Be careful not to damage the roots. If the roots are tightly bound, gently loosen them with your fingers.
5. Plant the Strawberry Plant: Place the strawberry plant in the hole, making sure the crown (the point where the stems meet the roots) is level with the soil surface. Don’t bury the crown, as this can cause the plant to rot.
6. Backfill with Soil: Backfill the hole with soil, gently firming it around the plant.
7. Water Thoroughly: Water the newly planted strawberry plant thoroughly.
8. Mulch (Optional): Add a layer of mulch around the base of the plant to help retain moisture and suppress weeds. Straw, pine needles, or wood chips work well.
Caring for Your Strawberry Plants
Consistent care is essential for a bountiful harvest.
* Watering: Strawberries need consistent moisture, especially when they’re fruiting. Water deeply whenever the top inch of soil feels dry to the touch. Avoid overwatering, as this can lead to root rot. I usually water every other day, but this depends on the weather.
* Fertilizing: Strawberries are heavy feeders. Fertilize them every 2-3 weeks with a balanced fertilizer, such as a 10-10-10 or a fertilizer specifically formulated for berries. Follow the instructions on the fertilizer label. I like to use a liquid fertilizer diluted in water for easy application.
* Sunlight: Remember, strawberries need at least 6-8 hours of direct sunlight per day.
* Pruning: Remove any dead or yellowing leaves to keep your plants healthy.
* Pest and Disease Control: Keep an eye out for pests like aphids, slugs, and spider mites. You can control these with insecticidal soap or neem oil. Strawberries can also be susceptible to fungal diseases like powdery mildew. Ensure good air circulation and avoid overhead watering to prevent these problems. If you notice any signs of disease, treat with a fungicide.
* Protecting from Birds: Birds love strawberries just as much as we do! Protect your plants with netting or bird repellent.
* Winter Protection: In colder climates, you’ll need to protect your strawberry plants from frost. You can move the containers to a sheltered location, such as a garage or shed, or cover them with a layer of mulch or burlap.
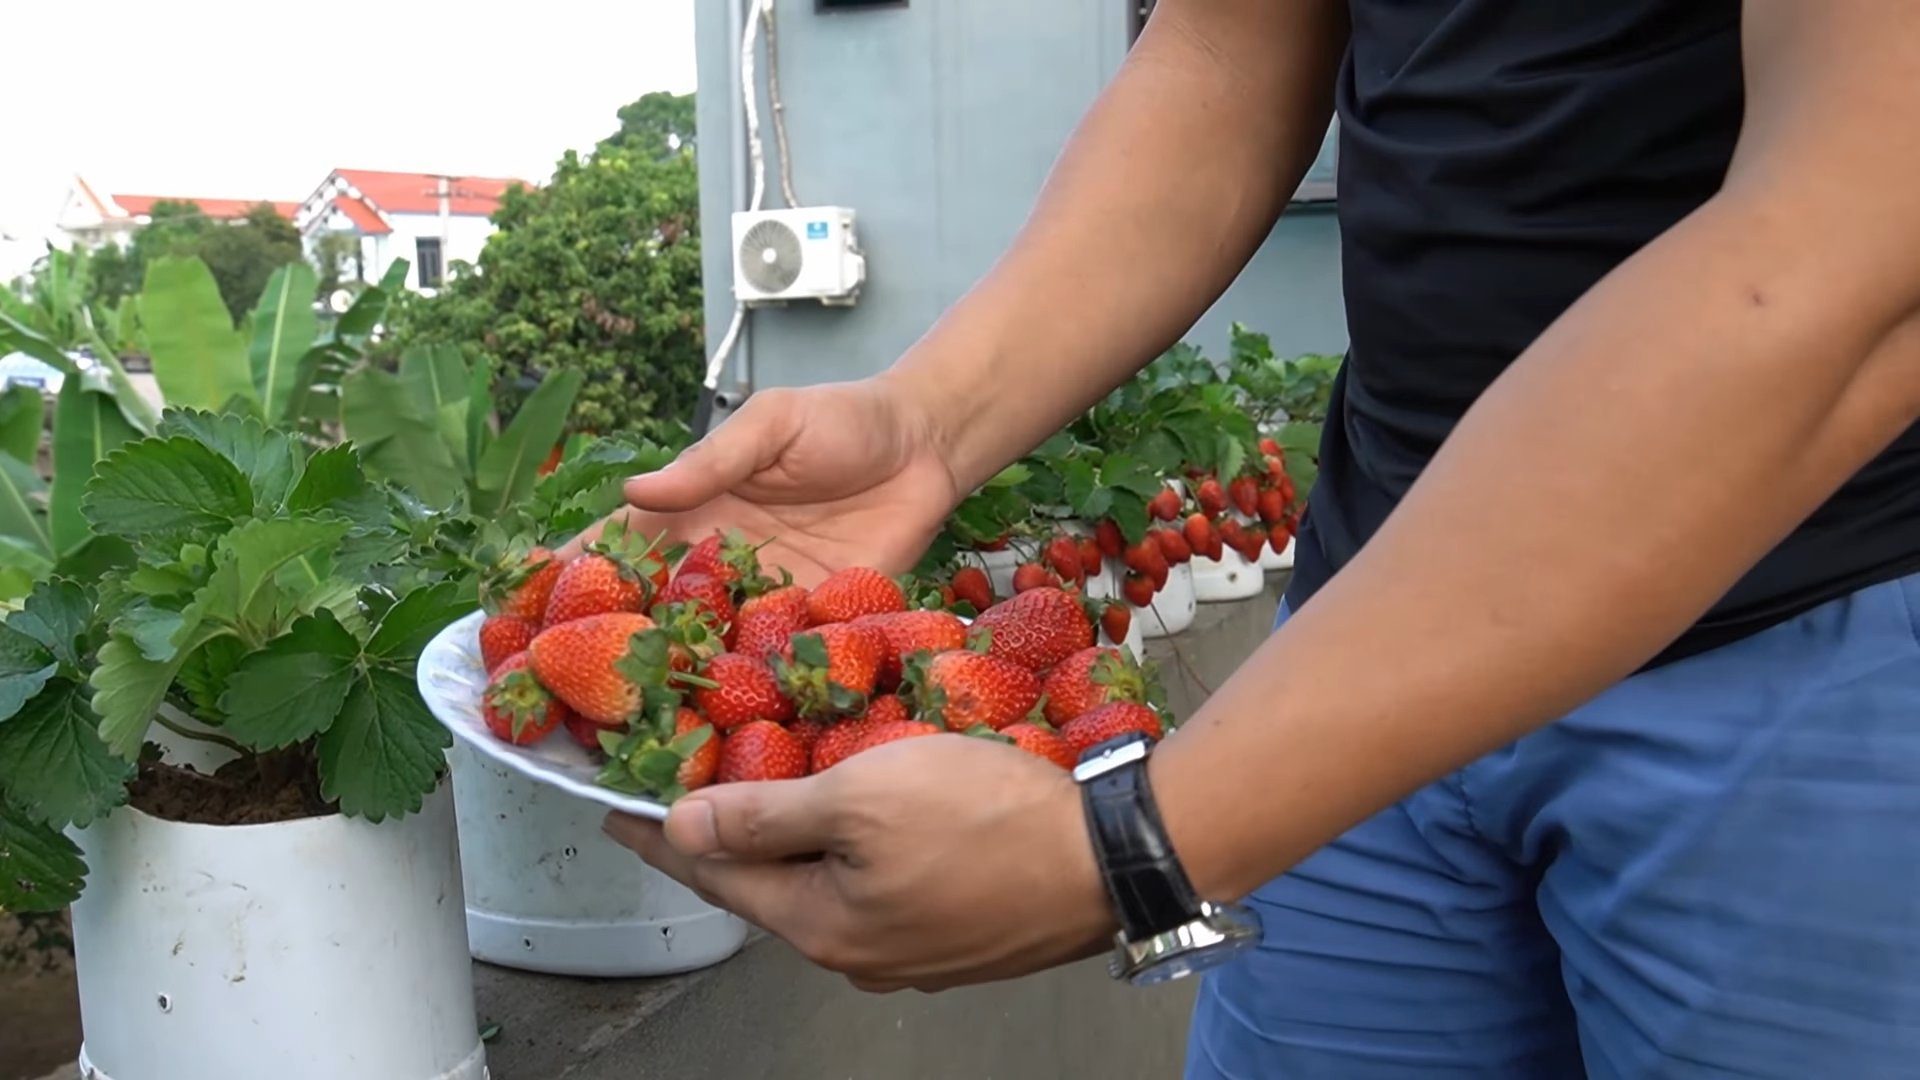
Harvesting Your Strawberries
The moment we’ve all been waiting for!
* When to Harvest: Strawberries are ready to harvest when they’re fully red and slightly soft to the touch. They should also detach easily from the plant.
* How to Harvest: Gently twist or cut the strawberry from the plant, leaving a small piece of the stem attached.
* Enjoy Your Harvest: Eat your strawberries fresh, use them in recipes, or freeze them for later.
Dealing with Runners
Strawberry plants produce runners, which are long stems that grow horizontally and develop new plantlets at the nodes.
* For June-Bearing Varieties: Remove the runners to encourage the plant to focus its energy on producing fruit.
* For Everbearing and Day-Neutral Varieties: You can allow some runners to develop if you want to propagate new plants. Simply let the plantlets root in small pots filled with potting mix. Once they’ve developed a good root system, you can separate them from the mother plant.
Troubleshooting
Even with the best care, you might encounter some problems. Here are a few common issues and how to address them:
* Small Berries: This could be due to insufficient sunlight, water, or fertilizer. Make sure your plants are getting enough of all three.
* No Berries: This could be due to a lack of pollination. If you’re growing your strawberries indoors, you may need to hand-pollinate them with a small brush.
* Yellowing Leaves: This could be a sign of overwatering, nutrient deficiency, or disease. Adjust your watering schedule, fertilize your plants, and check for signs of disease.
* Pests: Inspect your plants regularly for pests and treat them promptly.
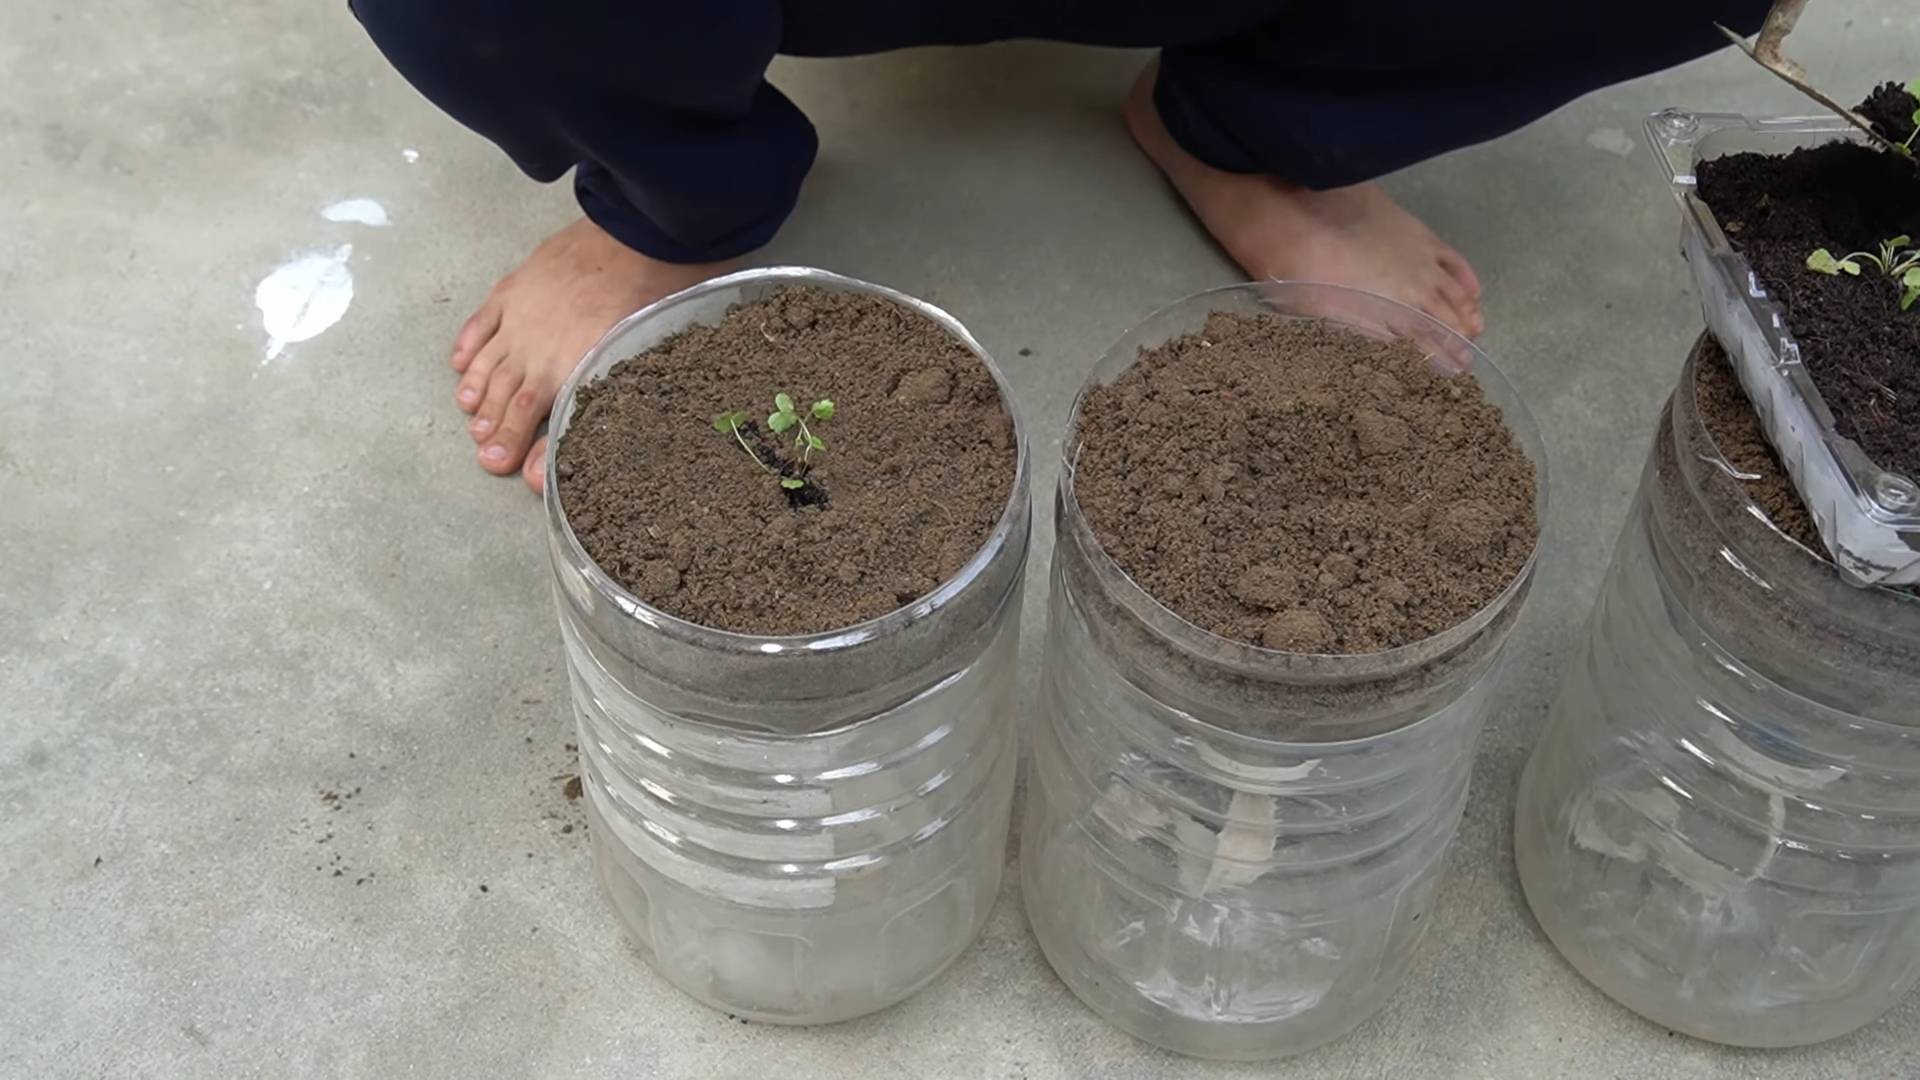
Propagating New Plants
As mentioned earlier, you can easily propagate new strawberry plants from runners. This is a great way to expand your strawberry patch without spending any money.
1. Allow Runners to Develop: Let the runners grow from your everbearing or day-neutral strawberry plants.
2. Root the Plantlets: Place small pots filled with potting mix near the mother plant. Position the plantlets on top of the soil in the pots and secure them with paperclips or small rocks.
3. Water Regularly: Keep the soil in the pots moist.
4. Separate the Plantlets: Once the plantlets have developed a good
Conclusion
So, there you have it! Transforming your container strawberry growing routine with this simple, yet incredibly effective DIY trick is a game-changer. We’ve walked you through the process, highlighting how it can boost your yield, improve the health of your plants, and ultimately, bring you closer to enjoying the sweetest, juiciest strawberries you’ve ever tasted, all from the comfort of your own patio or balcony.
But why is this DIY trick a must-try? It’s more than just a fun project; it’s an investment in the success of your strawberry plants. By optimizing drainage, aeration, and nutrient delivery, you’re creating an environment where your strawberries can truly thrive. Forget about struggling with waterlogged soil, nutrient deficiencies, or stunted growth. This method addresses these common issues head-on, setting your plants up for a season of abundant harvests.
And the best part? It’s adaptable! Feel free to experiment with variations to suit your specific needs and preferences. For instance, if you live in a particularly hot climate, consider adding a layer of mulch to the top of your container to help retain moisture and keep the soil cool. You could also incorporate slow-release fertilizer pellets into the soil mix for a continuous supply of nutrients throughout the growing season. Another variation is to use different types of containers. While we focused on standard pots, you could adapt this technique for hanging baskets or even repurposed containers like old buckets or crates. Just ensure that whatever container you choose has adequate drainage holes.
Don’t be afraid to get creative with your soil mix, too. While the recommended blend of potting soil, compost, and perlite works well for most situations, you can tailor it to your specific soil conditions. If your soil is naturally acidic, you might want to add a bit of lime to raise the pH. Conversely, if your soil is alkaline, you could incorporate some sulfur to lower it.
Remember, gardening is all about experimentation and learning. There’s no one-size-fits-all solution, so don’t be afraid to try new things and see what works best for you. The key is to pay attention to your plants and adjust your approach as needed.
We’re confident that this DIY trick will revolutionize your container strawberry growing routine. But don’t just take our word for it! We encourage you to give it a try and see the results for yourself. Once you’ve experienced the difference it makes, we’d love to hear about your journey. Share your photos, tips, and experiences in the comments section below. Let’s create a community of strawberry enthusiasts who are passionate about growing the best possible berries!
So, grab your gardening gloves, gather your supplies, and get ready to transform your container strawberry growing routine. The sweetest, juiciest strawberries are just a DIY project away! Happy gardening!
FAQ
What type of container is best for this DIY strawberry growing method?
The best type of container for this method is one that is appropriately sized for strawberry plants and has adequate drainage. A container that is at least 12 inches in diameter and 8 inches deep is generally recommended for a single strawberry plant. You can use plastic pots, terracotta pots, or even repurposed containers like buckets or crates, as long as they have drainage holes. Hanging baskets are also a great option, especially for everbearing varieties that produce runners. The material of the container isn’t as crucial as the drainage and size, but terracotta pots can dry out faster than plastic ones, so you may need to water more frequently.
How often should I water my strawberries grown using this DIY method?
Watering frequency depends on several factors, including the weather, the type of container you’re using, and the stage of growth of your plants. As a general rule, you should water your strawberries whenever the top inch of soil feels dry to the touch. During hot, dry weather, you may need to water daily, while during cooler, wetter periods, you may only need to water every few days. Avoid overwatering, as this can lead to root rot. When watering, water deeply and thoroughly, ensuring that the water reaches the roots of the plants. It’s best to water in the morning to allow the foliage to dry before nightfall, which can help prevent fungal diseases.
What kind of fertilizer should I use for my container strawberries?
Strawberries are heavy feeders, so regular fertilization is essential for optimal growth and fruit production. You can use a balanced fertilizer specifically formulated for strawberries, or a general-purpose fertilizer with an NPK ratio of around 10-10-10. Slow-release fertilizers are a great option for container strawberries, as they provide a continuous supply of nutrients over an extended period. Alternatively, you can use a liquid fertilizer every two to four weeks during the growing season. Be sure to follow the instructions on the fertilizer packaging carefully, as over-fertilizing can damage your plants. Organic options like compost tea or fish emulsion are also excellent choices for feeding your strawberries.
How do I protect my strawberries from pests and diseases?
Protecting your strawberries from pests and diseases is crucial for a successful harvest. Common pests that affect strawberries include aphids, spider mites, and slugs. You can control aphids and spider mites with insecticidal soap or neem oil. Slugs can be deterred with beer traps or copper tape around the container. Fungal diseases like powdery mildew and gray mold can be prevented by ensuring good air circulation around the plants and avoiding overhead watering. If you notice signs of disease, remove the affected leaves or fruit immediately. You can also use a fungicide specifically formulated for strawberries, but be sure to follow the instructions carefully. Regularly inspect your plants for any signs of pests or diseases and take action promptly to prevent them from spreading.
Can I grow strawberries in containers indoors using this method?
Yes, you can grow strawberries in containers indoors using this DIY method, but you’ll need to provide them with adequate light. Strawberries require at least six to eight hours of direct sunlight per day to produce fruit. If you don’t have a sunny window, you’ll need to supplement with grow lights. LED grow lights are a great option, as they are energy-efficient and provide the full spectrum of light that plants need to thrive. You’ll also need to ensure that your indoor strawberries have good air circulation to prevent fungal diseases. A small fan can help with this. Other than that, the same principles of watering, fertilizing, and pest control apply to indoor strawberries as they do to outdoor strawberries.
What are some common mistakes to avoid when growing strawberries in containers?
Several common mistakes can hinder the success of your container strawberry growing routine. Overwatering is a frequent culprit, leading to root rot and other problems. Ensure your containers have adequate drainage and allow the soil to dry slightly between waterings. Underwatering is another issue, especially during hot weather. Check the soil moisture regularly and water deeply when needed. Neglecting to fertilize your plants can also result in poor growth and fruit production. Use a balanced fertilizer regularly throughout the growing season. Finally, failing to protect your plants from pests and diseases can lead to significant losses. Inspect your plants regularly and take action promptly to address any problems. By avoiding these common mistakes, you can significantly increase your chances of a successful strawberry harvest.

Leave a Comment