
DIY Grape Growing System: Unleash Your Inner Vintner!
Ever dreamt of plucking juicy, sun-ripened grapes straight from your own backyard? Imagine the satisfaction of crafting homemade jams, jellies, or even venturing into the art of winemaking with grapes you nurtured yourself. It’s more attainable than you think! This article is your ultimate guide to creating your very own DIY grape growing system, transforming your garden into a miniature vineyard.
Grape cultivation boasts a rich history, dating back thousands of years to ancient civilizations like the Egyptians and Romans, who revered grapes not only for their delicious fruit but also for their symbolic significance. Today, the allure of growing your own grapes remains strong. But let’s face it, the thought of setting up a traditional vineyard can be daunting and expensive. That’s where our DIY grape growing system comes in!
I understand that not everyone has acres of land or a green thumb. That’s why I’m excited to share simple, cost-effective methods for cultivating grapes, even in small spaces. Whether you have a sprawling garden or a cozy balcony, I’ll show you how to build a system that suits your needs and budget. From selecting the right grape variety to constructing a sturdy trellis, I’ll guide you through every step of the process. So, ditch the store-bought grapes and get ready to embark on a rewarding journey of growing your own delicious, homegrown fruit. Let’s get started!
DIY Grape Growing System: From Seedling to Sweet Harvest
Hey there, fellow gardening enthusiasts! Ever dreamt of plucking juicy grapes straight from your own backyard? Well, you’re in the right place! I’m going to walk you through building your very own DIY grape growing system. It might seem daunting at first, but trust me, with a little elbow grease and this guide, you’ll be enjoying homemade wine (or grape juice!) in no time. This system focuses on maximizing space and sunlight, perfect for smaller gardens or patios.
Choosing Your Grape Variety
Before we dive into the construction, let’s talk grapes! Selecting the right variety is crucial for success. Consider your climate, the available sunlight, and your personal taste preferences.
* Climate Considerations: Some grape varieties thrive in warmer climates, while others are more cold-hardy. Research which varieties are best suited for your USDA hardiness zone. Local nurseries are a great resource for this!
* Sunlight Requirements: Grapes need at least 6-8 hours of direct sunlight per day. Choose a location that receives ample sunlight throughout the growing season.
* Taste Preferences: Do you prefer sweet table grapes, tart wine grapes, or something in between? Explore different varieties and read reviews to find the perfect match for your palate. Some popular choices include:
* Thompson Seedless: A classic table grape, known for its sweetness and seedless nature.
* Concord: A popular choice for juice and jelly, with a distinctive flavor.
* Cabernet Sauvignon: A red wine grape, known for its complex flavors.
* Chardonnay: A white wine grape, known for its versatility.
* Disease Resistance: Look for varieties that are resistant to common grape diseases, such as powdery mildew and black rot. This will save you a lot of headaches (and fungicide applications!) down the road.
Materials You’ll Need
Okay, now for the fun part – gathering our supplies! Here’s a comprehensive list of everything you’ll need to build your grape growing system:
* Grape Seedling(s): Choose healthy, well-rooted seedlings from a reputable nursery.
* Large Planters (at least 24 inches in diameter): These will provide ample space for the grapevines to grow. Make sure they have drainage holes!
* Potting Mix: Use a well-draining potting mix specifically formulated for containers. Avoid using garden soil, as it can become compacted and restrict root growth.
* Trellis System: This is crucial for supporting the grapevines as they grow. You can build your own or purchase a pre-made trellis. I’ll show you how to build a simple, sturdy trellis in this guide.
* Wooden Posts (4×4 inches): These will serve as the main supports for your trellis. The height will depend on how tall you want your trellis to be (I recommend at least 6 feet).
* Horizontal Wires (12-gauge galvanized steel wire): These will provide the framework for the grapevines to climb.
* Wire Tensioners: These will allow you to tighten the wires and keep them taut.
* Eye Bolts: To attach the wires to the posts.
* Concrete Mix: To secure the wooden posts in the ground.
* Gravel: For drainage at the bottom of the planters.
* Pruning Shears: Essential for maintaining the grapevines.
* Gloves: To protect your hands.
* Measuring Tape: For accurate measurements.
* Drill: For drilling holes in the wooden posts.
* Level: To ensure the posts are plumb.
* Shovel: For digging holes for the posts.
* Safety Glasses: Always protect your eyes!
Building the Trellis System
This is where we get our hands dirty! Building a sturdy trellis is essential for supporting the weight of the grapevines and ensuring they receive adequate sunlight.
Step 1: Preparing the Wooden Posts
1. Cut the Posts: Cut the wooden posts to the desired height. I recommend at least 6 feet above ground, but you can adjust this based on your preferences. Remember to factor in the portion of the post that will be buried in the ground (at least 2 feet).
2. Drill Holes for Eye Bolts: Drill holes through the posts at regular intervals (e.g., every 12 inches) to accommodate the eye bolts. These holes should be slightly larger than the diameter of the eye bolts. Make sure the holes are aligned on all posts.
3. Install Eye Bolts: Insert the eye bolts into the drilled holes and secure them tightly with washers and nuts.
Step 2: Setting the Posts in Concrete
1. Dig Holes: Dig holes for the wooden posts, ensuring they are deep enough to provide adequate support (at least 2 feet). The distance between the posts will depend on the size of your planters and the desired width of your trellis. I recommend spacing them about 6-8 feet apart.
2. Add Gravel: Pour a layer of gravel into the bottom of each hole for drainage.
3. Position the Posts: Place the wooden posts into the holes, ensuring they are plumb (perfectly vertical). Use a level to check the alignment.
4. Mix Concrete: Prepare the concrete mix according to the manufacturer’s instructions.
5. Pour Concrete: Pour the concrete mix into the holes around the posts, filling them to ground level.
6. Level and Smooth: Use a trowel to level and smooth the surface of the concrete.
7. Cure the Concrete: Allow the concrete to cure for at least 24-48 hours before proceeding to the next step. This will ensure it is strong enough to support the weight of the trellis.
Step 3: Installing the Horizontal Wires
1. Thread the Wire: Thread the galvanized steel wire through the eye bolts on each post, starting at the bottom and working your way up.
2. Attach Wire Tensioners: Attach wire tensioners to one end of each wire. These will allow you to tighten the wires and keep them taut.
3. Tighten the Wires: Use the wire tensioners to tighten the wires, ensuring they are taut and evenly spaced. This will provide a strong and stable framework for the grapevines to climb.
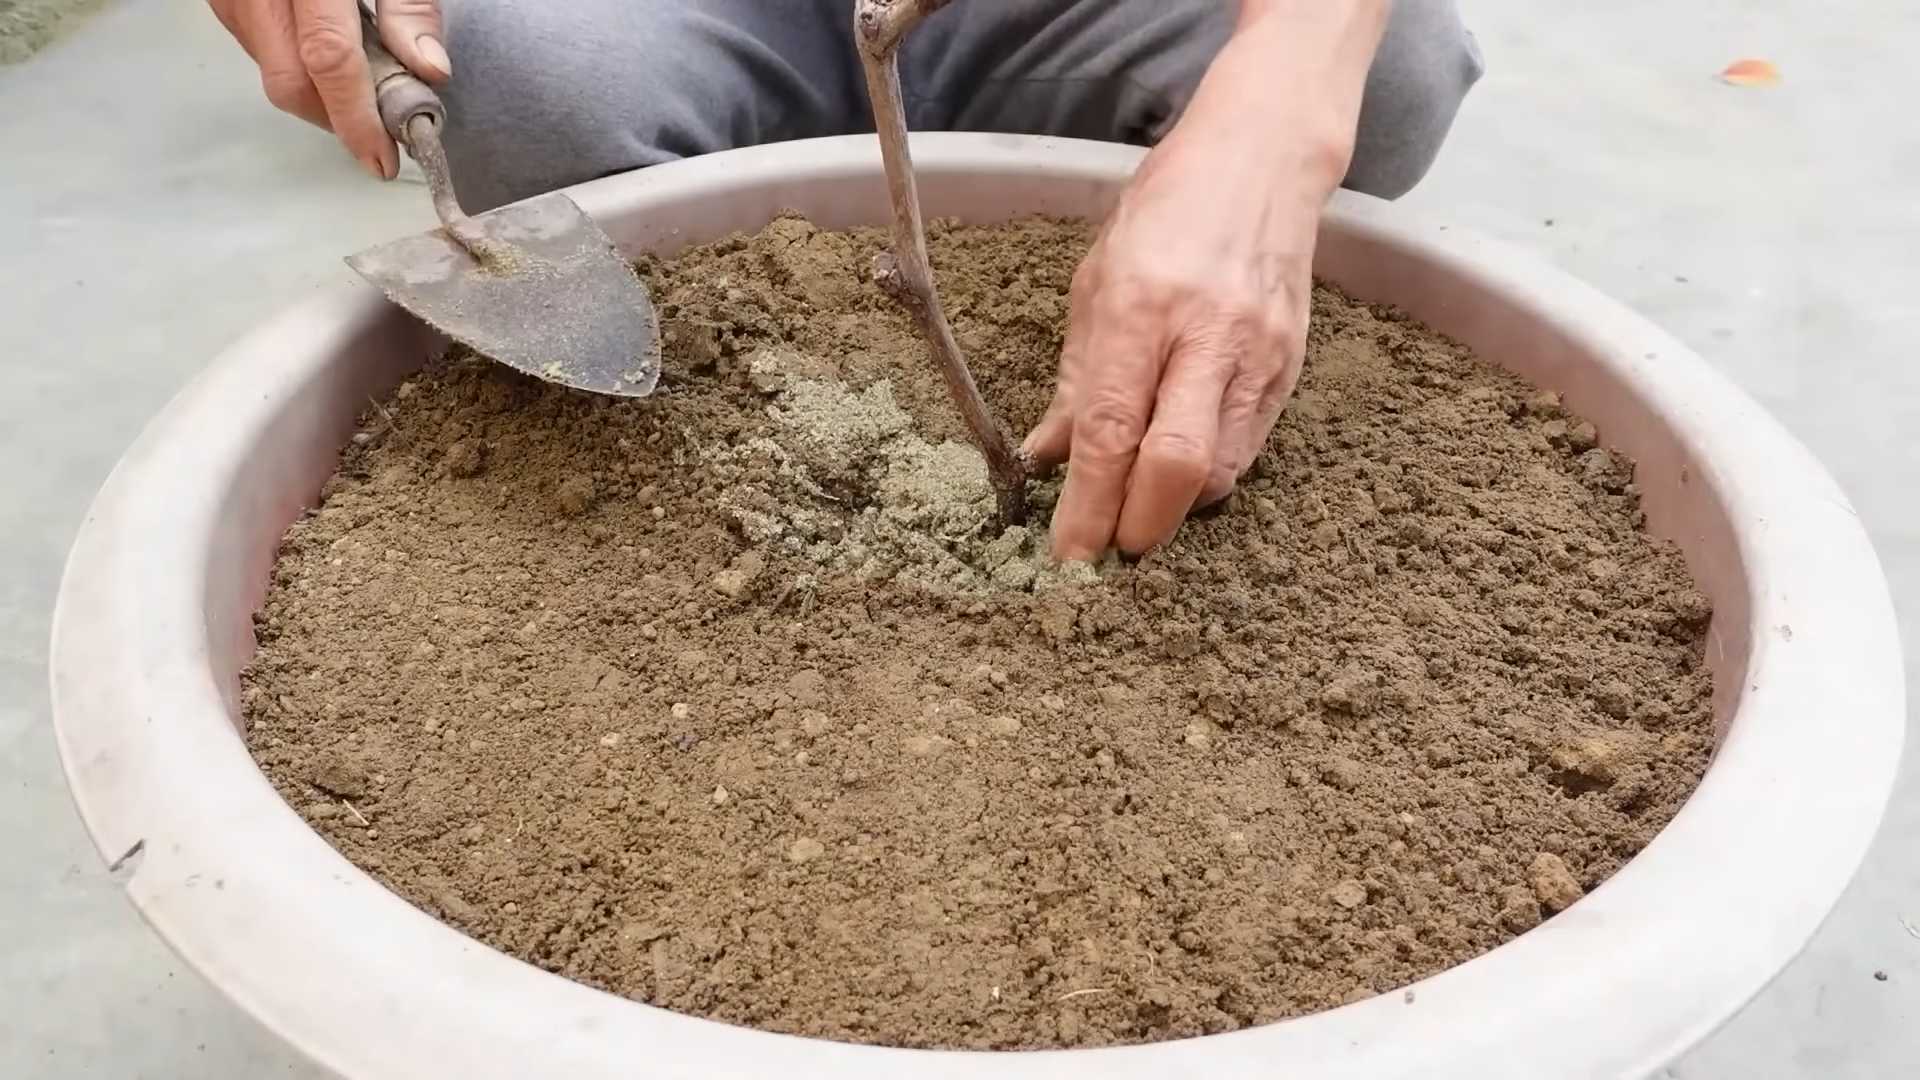
Planting Your Grape Seedling
Now that our trellis is ready, it’s time to plant our grape seedling!
Step 1: Preparing the Planter
1. Add Gravel: Pour a layer of gravel into the bottom of the planter for drainage.
2. Add Potting Mix: Fill the planter with a well-draining potting mix, leaving a few inches of space at the top.
Step 2: Planting the Seedling
1. Dig a Hole: Dig a hole in the center of the potting mix, large enough to accommodate the root ball of the grape seedling.
2. Remove the Seedling: Gently remove the grape seedling from its container, being careful not to damage the roots.
3. Loosen the Roots: Gently loosen the roots of the seedling to encourage them to spread out into the potting mix.
4. Place the Seedling: Place the seedling into the hole, ensuring the top of the root ball is level with the surface of the potting mix.
5. Fill the Hole: Fill the hole with potting mix, gently firming it around the roots.
6. Water Thoroughly: Water the seedling thoroughly to help settle the potting mix and encourage root growth.
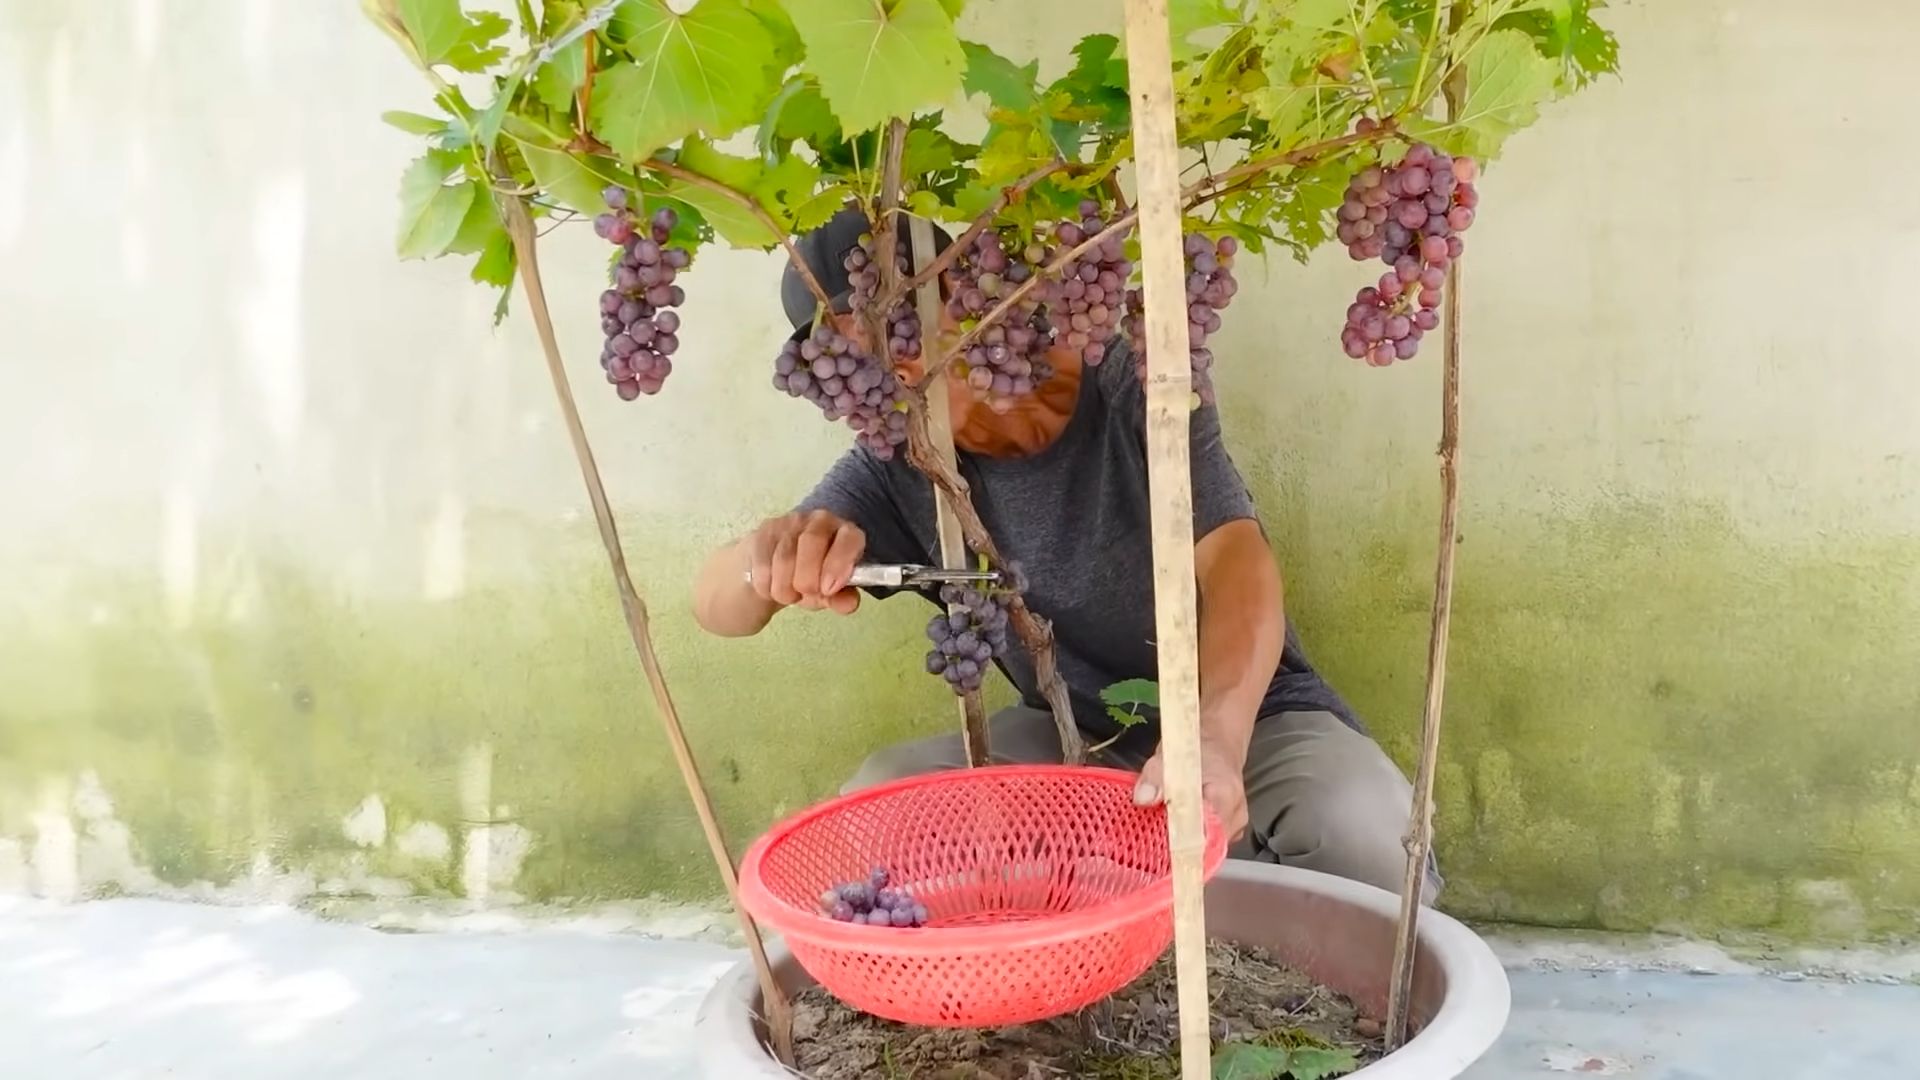
Training and Pruning Your Grapevine
Training and pruning are essential for shaping the grapevine and maximizing fruit production.
Training
* First Year: Focus on establishing a strong trunk. Select the strongest shoot and tie it to the trellis. Remove any other shoots that emerge from the base of the plant.
* Second Year: Continue training the main shoot vertically. Once it reaches the top of the trellis, prune it back to encourage lateral growth. Select two or four lateral shoots to form the arms of the grapevine.
* Subsequent Years: Train the lateral shoots along the horizontal wires of the trellis. Prune regularly to maintain the desired shape and promote fruit production.
Pruning
* Dormant Pruning (Late Winter/Early Spring): This is the most important pruning of the year. Remove any dead, damaged, or diseased wood. Shorten the lateral shoots (canes) to encourage fruit production. The specific pruning technique will depend on the grape variety and the desired training system.
* Summer Pruning: Remove any suckers (shoots that emerge from the base of the plant) and water sprouts (vigorous, non-fruiting shoots). This will help to improve air circulation and sunlight penetration.
Caring for Your Grapevine
Proper care is
Conclusion
So, there you have it – your very own DIY grape growing system, ready to transform your backyard, balcony, or even a sunny windowsill into a miniature vineyard! We’ve walked you through the steps, from selecting the right grape variety to constructing a simple yet effective support structure. But why is this DIY project a must-try?
Firstly, it’s about control. You dictate the environment, the nutrients, and the care your grapes receive. This translates to healthier vines and, ultimately, more delicious, organically grown grapes. Imagine the satisfaction of harvesting your own fruit, knowing exactly where it came from and what went into its cultivation. No pesticides, no hidden ingredients, just pure, unadulterated grape goodness.
Secondly, it’s incredibly rewarding. Watching your tiny grape vine sprout, climb, and eventually bear fruit is an experience that connects you to nature in a profound way. It’s a lesson in patience, perseverance, and the magic of the natural world. Plus, it’s a fantastic conversation starter!
Thirdly, it’s adaptable. This DIY grape growing system isn’t a one-size-fits-all solution. Feel free to experiment with different container sizes, trellising methods, and grape varieties to find what works best for your space and climate.
Variations and Suggestions:
* Vertical Gardening: If space is truly limited, consider a vertical grape growing system. Use a tall trellis or even a repurposed pallet to train your vines upwards. This maximizes space and adds a beautiful green wall to your outdoor area.
* Container Choices: While we suggested specific container sizes, don’t be afraid to get creative. Repurpose old barrels, buckets, or even large planters. Just ensure they have adequate drainage.
* Grape Variety Selection: Explore different grape varieties beyond the common table grapes. Consider wine grapes like Cabernet Sauvignon or Chardonnay if you’re feeling ambitious. Research which varieties thrive in your local climate.
* Nutrient Boost: Supplement your soil with organic fertilizers like compost tea or bone meal to provide your vines with the nutrients they need to flourish.
* Pest Control: Keep an eye out for common grape pests like aphids and Japanese beetles. Use organic pest control methods like neem oil or insecticidal soap to protect your vines.
* Winter Protection: In colder climates, protect your grape vines from frost damage by wrapping them in burlap or moving them to a sheltered location during the winter months.
This DIY grape growing system is more than just a project; it’s an investment in your health, your well-being, and your connection to the natural world. It’s a chance to learn, to experiment, and to enjoy the fruits (literally!) of your labor.
So, what are you waiting for? Gather your materials, choose your grape variety, and embark on this exciting DIY adventure. We’re confident that you’ll be amazed by the results.
We encourage you to try this DIY grape growing system and share your experiences with us! Post photos of your progress, ask questions, and let us know what worked (and what didn’t) for you. Together, we can create a community of grape-growing enthusiasts and inspire others to cultivate their own little piece of paradise. Happy growing!
Frequently Asked Questions (FAQ)
What type of grapes are best for a DIY growing system?
The best type of grapes for a DIY growing system depends largely on your climate and the amount of space you have available. For beginners, table grapes like Thompson Seedless, Concord, or Flame Seedless are excellent choices. They are relatively easy to grow and produce delicious fruit. If you’re in a colder climate, consider varieties like Valiant or Marquette, which are known for their cold hardiness. For wine grapes, research varieties that are well-suited to your region and have a shorter growing season if you live in an area with early frosts. Remember to check with your local agricultural extension office for recommendations specific to your area.
How much sunlight do grape vines need?
Grape vines require at least 6-8 hours of direct sunlight per day to thrive and produce a good crop of grapes. Insufficient sunlight can lead to weak growth, poor fruit production, and increased susceptibility to diseases. Choose a location for your DIY grape growing system that receives ample sunlight throughout the day. If you’re growing grapes indoors, supplement with grow lights if necessary.
What kind of soil is best for growing grapes?
Grapes prefer well-draining soil that is slightly acidic to neutral (pH 6.0-7.0). Heavy clay soils can retain too much water and lead to root rot, while sandy soils may drain too quickly and not retain enough nutrients. Amend your soil with organic matter like compost or well-rotted manure to improve drainage and fertility. You can also purchase a soil testing kit to determine the pH of your soil and adjust it accordingly.
How often should I water my grape vines?
Watering frequency depends on the climate, soil type, and the age of the vine. Young grape vines need more frequent watering than established vines. In general, water deeply and less frequently, allowing the soil to dry out slightly between waterings. Avoid overwatering, as this can lead to root rot. During hot, dry weather, you may need to water more frequently. Check the soil moisture regularly by sticking your finger into the soil a few inches deep. If the soil feels dry, it’s time to water.
How do I prune my grape vines?
Pruning is essential for maintaining the health and productivity of your grape vines. The best time to prune is during the dormant season, typically in late winter or early spring before new growth begins. The specific pruning method will depend on the grape variety and the training system you’re using. In general, you’ll want to remove dead, damaged, or diseased wood, as well as any suckers that are growing from the base of the vine. Consult a grape growing guide or watch videos online to learn the proper pruning techniques for your specific grape variety.
How do I protect my grapes from pests and diseases?
Grapes are susceptible to a variety of pests and diseases, including aphids, Japanese beetles, powdery mildew, and black rot. To protect your vines, practice good sanitation by removing fallen leaves and debris from around the base of the plant. Use organic pest control methods like neem oil or insecticidal soap to control pests. Apply fungicides preventatively to protect against fungal diseases. Choose disease-resistant grape varieties whenever possible. Regularly inspect your vines for signs of pests or diseases and take action promptly to prevent them from spreading.
How long does it take for grape vines to produce fruit?
It typically takes 2-3 years for grape vines to start producing fruit after planting. The first year, the vine will focus on establishing its root system. In the second year, you may see some flowers, but it’s best to remove them to encourage vegetative growth. In the third year, you should start to see a significant crop of grapes. The amount of fruit will increase as the vine matures.
Can I grow grapes indoors?
Yes, you can grow grapes indoors, but it requires careful planning and attention to detail. Choose a grape variety that is well-suited to container growing and has a shorter growing season. Provide ample sunlight, either through a sunny window or with grow lights. Ensure that the container has good drainage and use a well-draining potting mix. Water regularly and fertilize as needed. Prune the vine to maintain its shape and encourage fruit production. Be aware that indoor grape vines may not produce as much fruit as those grown outdoors.
What kind of support system do grapes need?
Grape vines need a strong support system to climb and spread. A simple trellis made of wood or metal is a good option for a DIY grape growing system. You can also use a fence, arbor, or pergola as a support structure. The support system should be sturdy enough to support the weight of the vine and the fruit. Train the vines to grow along the support system by tying them with twine or plant ties.
How do I know when my grapes are ripe?
The best way to determine if your grapes are ripe is to taste them. Ripe grapes will be sweet and juicy, with a pleasant flavor. The color of the grapes will also change as they ripen, depending on the variety. The grapes should also be easy to pluck from the vine. If the grapes are still sour or difficult to remove, they are not yet ripe.

Leave a Comment