
Easy Cleaning Hacks: Who doesn’t love a sparkling clean home? But let’s be honest, the thought of spending hours scrubbing and tidying can be a major mood killer. I totally get it! We all crave that fresh, clean feeling, but nobody wants to sacrifice their entire weekend to achieve it.
Throughout history, keeping a clean home has been a sign of prosperity and well-being. From ancient civilizations using natural remedies to modern innovations in cleaning technology, the quest for a spotless living space has always been a priority. But in today’s fast-paced world, time is of the essence. That’s where these easy cleaning hacks come in!
This article is your ultimate guide to transforming your cleaning routine from a dreaded chore into a breeze. I’m going to share some of my favorite DIY cleaning tricks and hacks that will save you time, money, and energy. Imagine spending less time cleaning and more time doing the things you love! From tackling stubborn stains to organizing clutter, these simple solutions will help you maintain a clean and comfortable home without breaking a sweat. So, grab your cleaning supplies, and let’s get started on making your home shine with these amazing DIY cleaning hacks!
Easy Cleaning Hacks to Make Your Life Easier!
Okay, let’s be honest, cleaning isn’t exactly anyone’s favorite pastime. But a clean home is a happy home, right? So, I’m going to share some of my absolute favorite cleaning hacks that will save you time, effort, and maybe even a little bit of sanity! These are tried and true methods I use myself, and I promise they’ll make a difference.
Cleaning Your Microwave Like a Pro (Without Scrubbing!)
This is one of those hacks that feels like magic. Seriously, say goodbye to scrubbing baked-on food splatters!
* The Goal: To loosen all the grime inside your microwave so you can wipe it clean with minimal effort.
* What You’ll Need:
* A microwave-safe bowl
* 1 cup of water
* 1-2 tablespoons of white vinegar or lemon juice (vinegar is my go-to!)
* A clean sponge or cloth
Step-by-Step Instructions:
1. Combine Water and Vinegar (or Lemon Juice): Pour the water into the microwave-safe bowl and add the vinegar or lemon juice. The vinegar helps to break down grease and odors, while lemon juice adds a fresh scent.
2. Microwave the Mixture: Place the bowl in the microwave and heat it on high for 5-7 minutes. You want the water to boil and create steam. Don’t open the microwave immediately!
3. Let it Steam: Leave the microwave door closed for another 2-3 minutes. This allows the steam to thoroughly saturate the inside and loosen all the gunk.
4. Carefully Remove the Bowl: Be careful when removing the bowl, as it will be hot. Use oven mitts or a towel to protect your hands.
5. Wipe it Clean: Now, the fun part! Use your clean sponge or cloth to easily wipe away all the loosened food particles. You’ll be amazed at how easily everything comes off. For stubborn spots, you might need a little extra elbow grease, but it should be minimal.
6. Dry the Interior: Finally, dry the inside of the microwave with a clean cloth. And voila! A sparkling clean microwave with minimal effort.
De-Gunking Your Showerhead for Better Water Pressure
Hard water can wreak havoc on your showerhead, leading to mineral buildup and reduced water pressure. This hack is a simple and effective way to restore your showerhead to its former glory.
* The Goal: To dissolve mineral deposits and unclog the showerhead nozzles.
* What You’ll Need:
* A plastic bag (a sandwich bag or a small trash bag works well)
* White vinegar
* A rubber band or twist tie
* An old toothbrush (optional, for extra scrubbing)
Step-by-Step Instructions:
1. Fill the Bag with Vinegar: Pour enough white vinegar into the plastic bag to completely submerge the showerhead.
2. Attach the Bag to the Showerhead: Carefully position the bag over the showerhead, ensuring that the entire showerhead is immersed in the vinegar.
3. Secure the Bag: Use a rubber band or twist tie to tightly secure the bag around the showerhead neck. Make sure it’s snug enough to prevent leaks.
4. Soak Overnight: Let the showerhead soak in the vinegar overnight (or for at least a few hours). This allows the vinegar to effectively dissolve the mineral deposits.
5. Remove the Bag: Carefully remove the bag and discard the vinegar.
6. Rinse Thoroughly: Turn on the shower and let the water run for a few minutes to flush out any remaining vinegar and loosened debris.
7. Scrub (Optional): If you still see some stubborn mineral deposits, use an old toothbrush to gently scrub the showerhead nozzles.
8. Enjoy Improved Water Pressure: You should now notice a significant improvement in your shower’s water pressure!
Cleaning Your Blender Easily (No Disassembly Required!)
Cleaning a blender can be a pain, especially if you have to take it apart. This hack simplifies the process and gets your blender clean in seconds.
* The Goal: To quickly and easily clean your blender without disassembling it.
* What You’ll Need:
* Warm water
* Dish soap
Step-by-Step Instructions:
1. Rinse Out Excess Food: After using your blender, rinse out any large chunks of food with warm water.
2. Fill with Warm Water and Soap: Fill the blender jar about halfway with warm water and add a squirt of dish soap.
3. Blend: Secure the lid and blend on high speed for about 30-60 seconds. This will create a soapy vortex that cleans the blades and the inside of the jar.
4. Rinse Thoroughly: Pour out the soapy water and rinse the blender jar thoroughly with clean water.
5. Dry: Let the blender jar air dry or dry it with a clean towel.
Freshening Up Your Garbage Disposal
A smelly garbage disposal can stink up your entire kitchen. Here’s how to freshen it up naturally.
* The Goal: To eliminate odors and clean the garbage disposal.
* What You’ll Need:
* Ice cubes
* Lemon or lime wedges
* Salt
Step-by-Step Instructions:
1. Prepare the Ingredients: Gather a handful of ice cubes, a few lemon or lime wedges, and a tablespoon of salt.
2. Pour Ice and Salt into the Disposal: Pour the ice cubes and salt into the garbage disposal.
3. Turn on the Disposal: Turn on the cold water and run the garbage disposal for about 30-60 seconds. The ice helps to scrub the blades and dislodge any food particles, while the salt acts as a mild abrasive.
4. Add Citrus Wedges: Turn off the disposal and add the lemon or lime wedges.
5. Run the Disposal Again: Turn on the cold water and run the garbage disposal again for another 30 seconds. The citrus wedges will help to freshen the disposal and leave a pleasant scent.
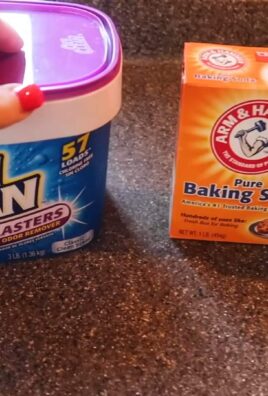
Cleaning Burnt Food from Pots and Pans
Burnt food in pots and pans is a common kitchen mishap. Don’t throw away your favorite cookware! This hack can help you salvage it.
* The Goal: To loosen and remove burnt food from pots and pans without excessive scrubbing.
* What You’ll Need:
* Water
* Baking soda
* Dish soap
* A non-abrasive sponge or scraper
Step-by-Step Instructions:
1. Fill the Pot/Pan with Water: Fill the burnt pot or pan with enough water to cover the burnt food.
2. Add Baking Soda: Add 2-3 tablespoons of baking soda to the water.
3. Boil the Mixture: Bring the water and baking soda mixture to a boil on the stovetop.
4. Simmer: Reduce the heat and let the mixture simmer for 15-20 minutes. The baking soda will help to loosen the burnt food.
5. Let it Cool: Remove the pot/pan from the heat and let it cool slightly.
6. Scrub Gently: Use a non-abrasive sponge or scraper to gently scrub away the loosened burnt food. You should find that it comes off much easier than before.
7. Wash as Usual: Wash the pot/pan with dish soap and water as usual. For particularly stubborn burnt spots, you may need to repeat the process.
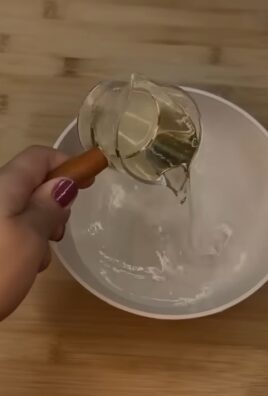
Making Your Own All-Purpose Cleaner
Why spend money on expensive cleaning products when you can make your own effective all-purpose cleaner with just a few simple ingredients?
* The Goal: To create a safe, effective, and affordable all-purpose cleaner.
* What You’ll Need:
* Spray bottle
* Water
* White vinegar
* Essential oil (optional, for scent)
Step-by-Step Instructions:
1. Combine Ingredients: In a spray bottle, combine equal parts water and white vinegar. For example, you could use 1 cup of water and 1 cup of white vinegar.
2. Add Essential Oil (Optional): If you want to add a pleasant scent, add a few drops of your favorite essential oil. Lavender, lemon, and tea tree oil are all good choices.
3. Shake Well: Shake the spray bottle well to mix the ingredients.
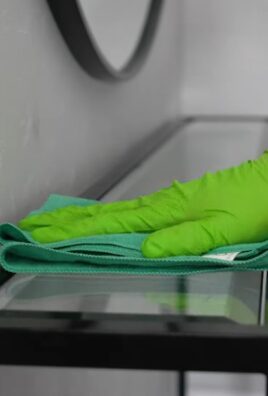
4. Use as Needed: Spray the cleaner onto surfaces and wipe clean with a cloth or sponge. This cleaner is great for countertops, sinks, and other non-porous surfaces.
Important Note: Do not use
Conclusion
So, there you have it! This simple yet incredibly effective DIY cleaning hack is more than just a trend; it’s a game-changer for anyone looking to streamline their cleaning routine and achieve sparkling results without harsh chemicals or breaking the bank. We’ve shown you how to create a powerful cleaning solution using everyday ingredients, saving you time, money, and the potential health risks associated with commercial cleaners.
Why is this DIY trick a must-try? Because it’s versatile, eco-friendly, and undeniably effective. It tackles grime, grease, and everyday messes with ease, leaving your home feeling fresh and revitalized. Plus, the satisfaction of creating your own cleaning solution is surprisingly rewarding. You know exactly what’s going into it, giving you peace of mind, especially if you have children or pets.
But the beauty of this DIY cleaning hack lies in its adaptability. Feel free to experiment with different essential oils to create your own signature scent. Lavender, lemon, tea tree, and eucalyptus are all excellent choices, each offering unique aromatherapy benefits alongside their cleaning properties. For tougher stains, consider adding a bit more vinegar or baking soda to the mixture. Remember to always test in an inconspicuous area first to ensure it doesn’t damage the surface.
Another variation you might want to explore is infusing your vinegar with citrus peels. Simply save the peels from your oranges, lemons, or grapefruits and soak them in vinegar for a few weeks. This will create a naturally scented and even more potent cleaning solution. The citrus oils will help to cut through grease and leave a refreshing aroma.
Furthermore, consider using this DIY cleaner in different applications. It’s fantastic for cleaning countertops, sinks, showers, toilets, and even floors (just be sure to dilute it properly for delicate surfaces like hardwood). You can also use it to freshen up your laundry by adding a cup to the washing machine. The possibilities are truly endless!
We are confident that once you try this DIY cleaning hack, you’ll be hooked. It’s a simple, sustainable, and satisfying way to keep your home clean and healthy. So, ditch the expensive and potentially harmful commercial cleaners and embrace the power of DIY.
We encourage you to give this DIY cleaning hack a try and share your experience with us! Let us know what variations you’ve tried, what surfaces you’ve used it on, and what results you’ve achieved. Your feedback is invaluable and helps us to refine and improve our recipes. Share your tips and tricks in the comments section below – we can all learn from each other! Let’s create a community of DIY cleaning enthusiasts who are passionate about keeping their homes clean, green, and healthy. This **easy cleaning hack** is waiting for you to try it!
FAQ
What exactly makes this DIY cleaning hack so effective?
This DIY cleaning hack’s effectiveness stems from the synergistic action of its ingredients. Vinegar, a natural acid, is excellent at cutting through grease, dissolving mineral deposits, and killing bacteria. Baking soda, a mild alkali, acts as a gentle abrasive, helping to scrub away dirt and grime without scratching surfaces. The combination of these two creates a powerful cleaning solution that is both effective and safe for most surfaces. Essential oils, if added, provide additional cleaning and disinfecting properties, as well as a pleasant scent.
Is this DIY cleaner safe to use on all surfaces?
While this DIY cleaner is generally safe for most surfaces, it’s always a good idea to test it in an inconspicuous area first, especially on delicate materials like marble, granite, or waxed wood. The acidity of vinegar can potentially damage these surfaces over time. For these surfaces, consider diluting the cleaner further or using a different cleaning solution altogether. Always avoid using this cleaner on porous surfaces that could absorb the vinegar and leave a lingering odor.
How long does this DIY cleaning solution last?
This DIY cleaning solution typically lasts for several weeks when stored in a cool, dark place. However, it’s best to use it within a month for optimal effectiveness. Over time, the essential oils may lose their potency, and the solution may become less effective at cleaning. To ensure the longest shelf life, store the cleaner in an airtight container away from direct sunlight and heat.
Can I use different types of vinegar for this DIY cleaner?
While white vinegar is the most commonly used type of vinegar for cleaning, you can also use apple cider vinegar. Apple cider vinegar has a slightly milder scent and contains additional enzymes and acids that may enhance its cleaning properties. However, avoid using balsamic vinegar or other flavored vinegars, as they may stain surfaces.
What essential oils are best to use in this DIY cleaning solution?
The best essential oils to use in this DIY cleaning solution depend on your personal preferences and the desired cleaning properties. Some popular choices include:
* **Lemon:** Known for its degreasing and disinfecting properties, as well as its uplifting scent.
* **Lavender:** Offers a calming and relaxing aroma, as well as antibacterial and antifungal properties.
* **Tea Tree:** A powerful antiseptic and antifungal agent, ideal for cleaning bathrooms and kitchens.
* **Eucalyptus:** Provides a refreshing and invigorating scent, as well as antibacterial and antiviral properties.
* **Peppermint:** Offers a cooling and refreshing aroma, as well as antibacterial and insect-repelling properties.
Feel free to experiment with different essential oil blends to create your own signature scent.
Can I use this DIY cleaner to clean my oven?
Yes, you can use this DIY cleaner to clean your oven, but it may require a bit more effort than commercial oven cleaners. First, sprinkle baking soda generously over the bottom of your oven. Then, spray the baking soda with the DIY cleaning solution until it is damp. Let the mixture sit overnight. The next day, scrub the oven with a sponge or brush to remove the loosened grime. Rinse thoroughly with water. For stubborn stains, you may need to repeat the process.
Is this DIY cleaner safe for septic systems?
Yes, this DIY cleaner is generally safe for septic systems. The ingredients are biodegradable and do not contain harsh chemicals that can harm the beneficial bacteria in your septic tank. However, it’s always a good idea to use cleaning products sparingly, regardless of whether they are commercial or DIY.
What if I don’t have essential oils? Can I still make this DIY cleaner?
Yes, you can absolutely make this DIY cleaner without essential oils. The vinegar and baking soda combination is still a powerful cleaning solution on its own. The essential oils are primarily added for their scent and additional cleaning properties, but they are not essential for the cleaner to be effective.
How do I adjust the recipe for larger or smaller batches?
Adjusting the recipe for larger or smaller batches is simple. Just maintain the same ratio of ingredients. For example, if the original recipe calls for 1 cup of vinegar and 1/2 cup of baking soda, you can double the recipe to 2 cups of vinegar and 1 cup of baking soda, or halve it to 1/2 cup of vinegar and 1/4 cup of baking soda.
What if the vinegar smell is too strong?
If the vinegar smell is too strong, you can try a few things. First, add more essential oils to the mixture. Second, dilute the cleaner with more water. Third, open windows and ventilate the area while cleaning. The vinegar smell will dissipate quickly once the surface is dry. You can also try infusing your vinegar with citrus peels as mentioned above, which helps to mask the vinegar scent.
Leave a Comment