
Grow ginger at home? Absolutely! Imagine stepping into your kitchen and snipping fresh, fragrant ginger root straight from your own little garden. No more last-minute grocery store runs or settling for dried-out, lackluster ginger. This isn’t just a dream; it’s a deliciously achievable reality with a few simple DIY tricks.
Ginger, with its fiery zest and incredible health benefits, has been cherished for centuries. Originating in South Asia, it has been used in traditional medicine and culinary practices across cultures for thousands of years. From ancient Ayurvedic remedies to modern-day stir-fries, ginger’s versatility is undeniable.
But why should you bother to grow ginger at home? Well, for starters, it’s incredibly rewarding to nurture your own food. Plus, homegrown ginger boasts a flavor that’s far superior to anything you’ll find in the supermarket. More importantly, it’s a fantastic way to ensure you always have this powerful ingredient on hand for teas, soups, and countless other dishes. I’m going to show you how easy it is to cultivate this amazing spice right in your own home, regardless of your gardening experience. Get ready to unleash your inner green thumb and enjoy the fresh, vibrant taste of homegrown ginger!
Grow Your Own Ginger: A Beginner’s Guide to Indoor Ginger Farming
Hey there, fellow plant enthusiasts! Ever thought about growing your own ginger? It’s surprisingly easy and rewarding, and nothing beats the fresh, zesty flavor of homegrown ginger in your cooking. Plus, it’s a fun project that can brighten up your kitchen windowsill. I’m going to walk you through the whole process, from choosing the right ginger to harvesting your very own rhizomes. Let’s get started!
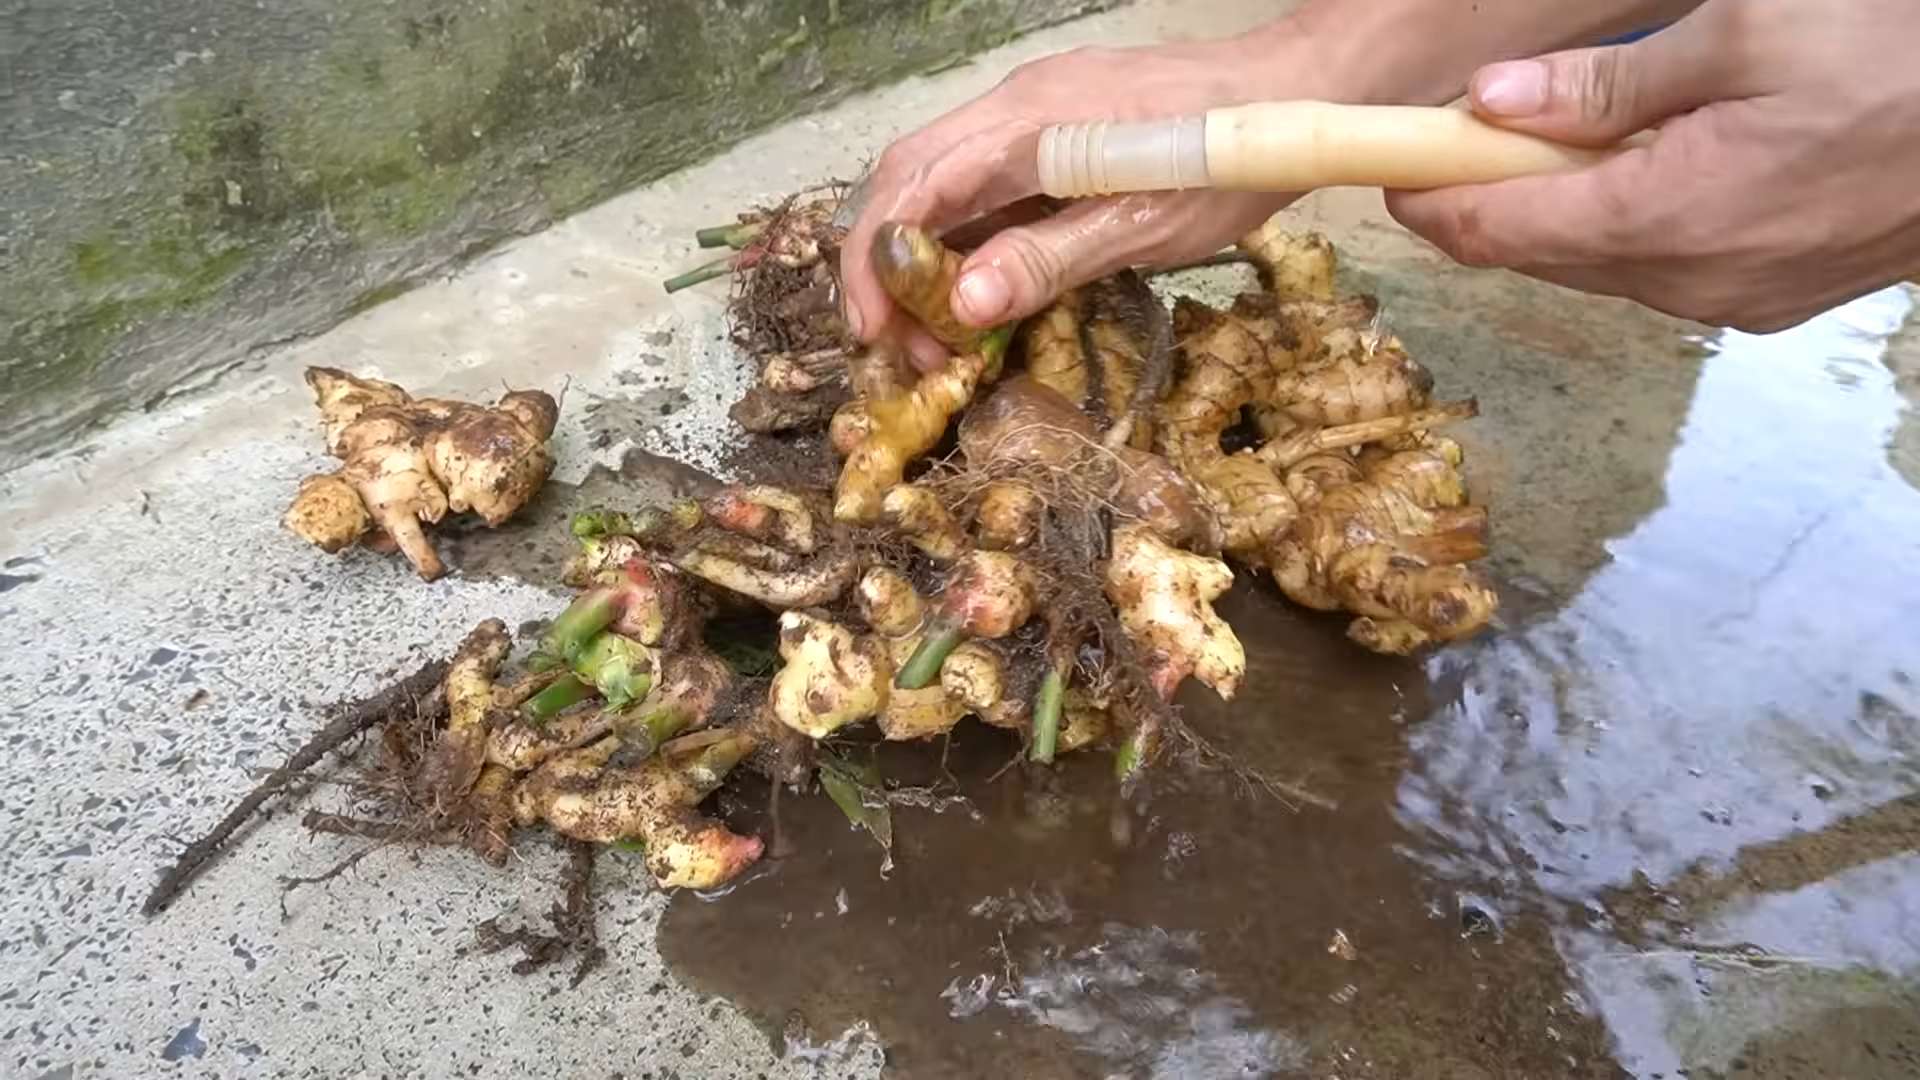
Choosing Your Ginger Rhizome
Before we dive into the planting process, let’s talk about selecting the perfect ginger rhizome. This is crucial for a successful harvest.
* Look for plump, healthy rhizomes: You want ginger that looks fresh and vibrant, not shriveled or dried out.
* Avoid smooth, perfect ginger: Organic ginger is preferable, as it’s less likely to have been treated with growth inhibitors. The knobbly, slightly imperfect ones are often the best.
* Check for “eyes”: These are small, green buds or nodes on the rhizome. They’re where the new shoots will emerge, so the more eyes, the better!
* Source matters: Buy your ginger from a reputable grocery store or nursery. Avoid ginger that looks like it’s been sitting around for too long.
Preparing Your Ginger for Planting
Okay, you’ve got your ginger. Now it’s time to prepare it for planting. This step is all about giving your ginger the best possible start.
* Soaking (Optional but Recommended): I like to soak my ginger in lukewarm water for 12-24 hours before planting. This helps to rehydrate the rhizome and encourage those “eyes” to sprout.
* Cutting (If Necessary): If your ginger rhizome is large, you can cut it into smaller pieces, ensuring each piece has at least one or two “eyes.” Let the cut ends callous over for a day or two before planting to prevent rot. This is especially important if you live in a humid climate.
* Callousing: Place the cut pieces in a dry, well-ventilated area. This allows the cut surfaces to dry and form a protective layer, reducing the risk of fungal infections.
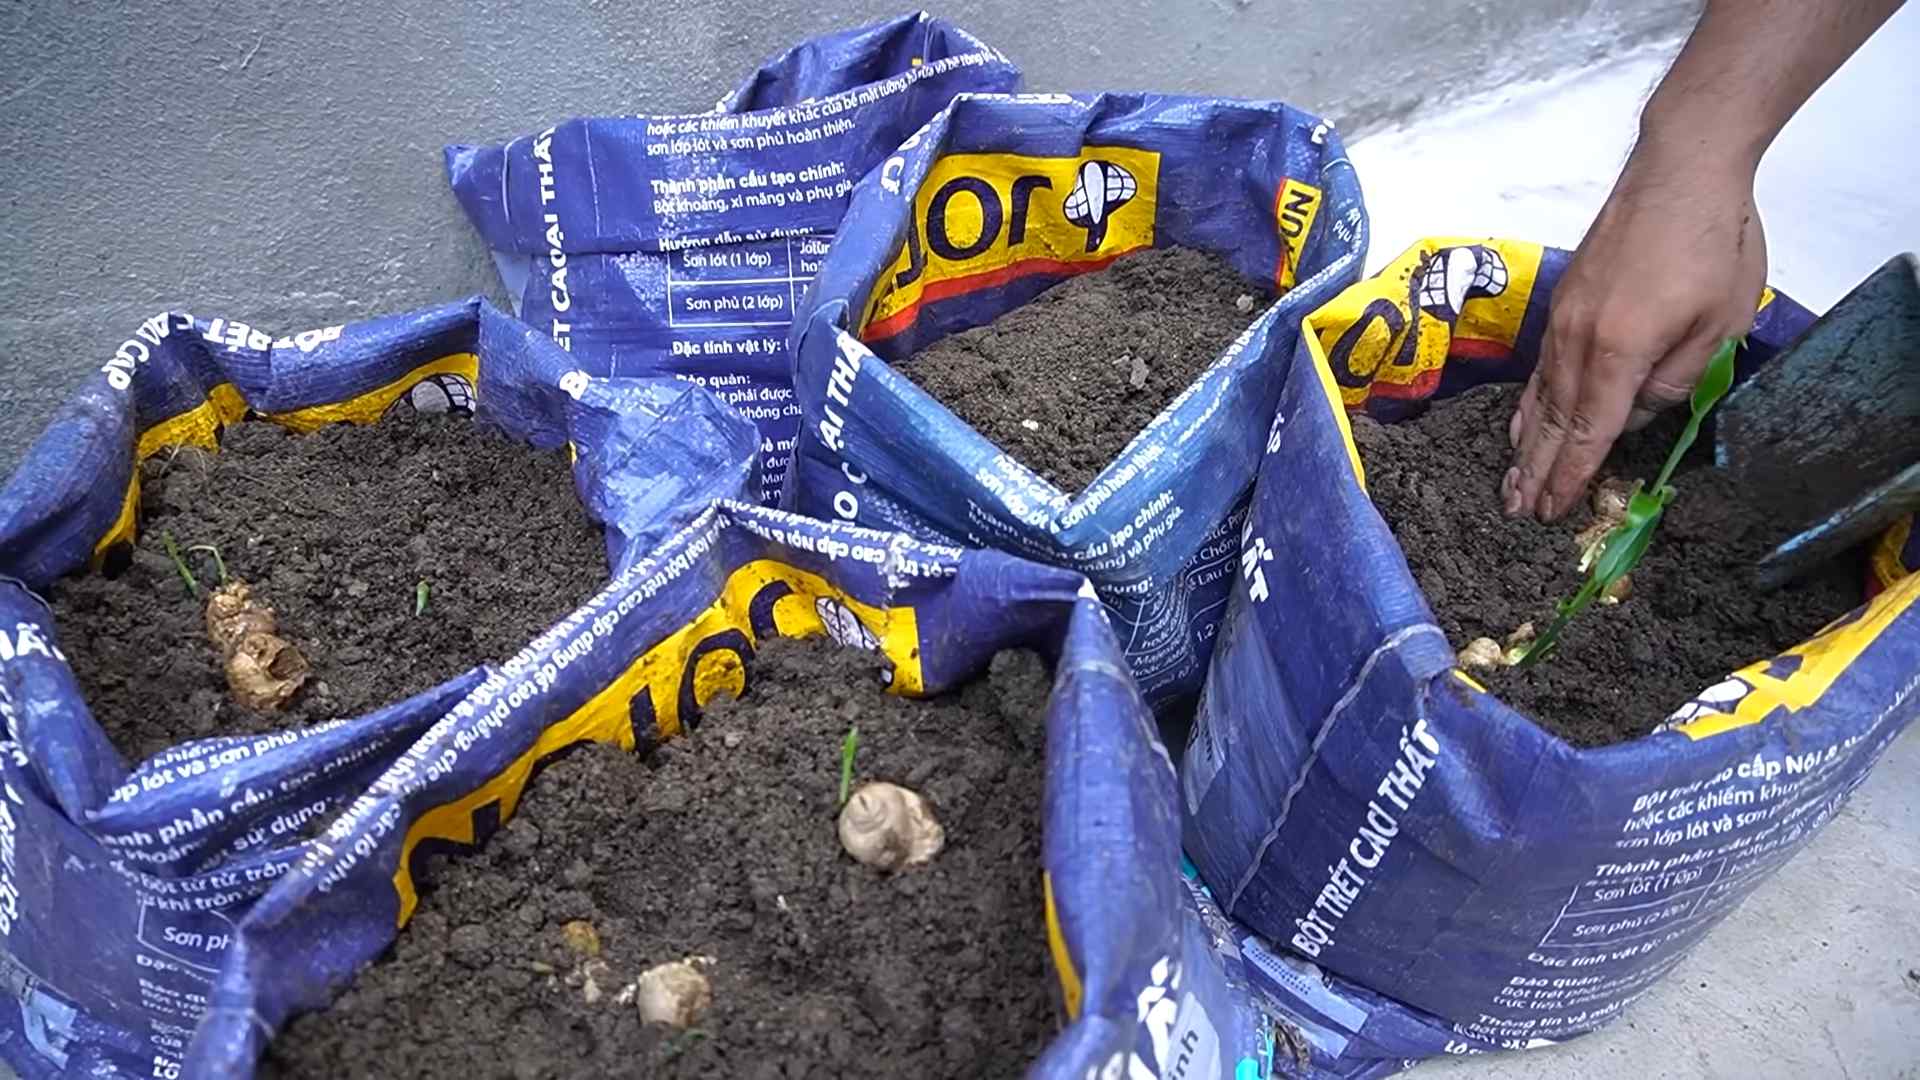
Planting Your Ginger
Now for the fun part! Let’s get that ginger in the soil.
1. Choose the Right Pot: Ginger needs room to spread, so select a pot that’s at least 12 inches in diameter and 12 inches deep. A wider pot is better than a deeper one. Make sure it has drainage holes!
2. Prepare the Soil: Ginger thrives in well-draining, nutrient-rich soil. I like to use a mix of potting soil, compost, and perlite. The perlite helps with drainage, which is essential for preventing root rot. Aim for a slightly acidic pH (around 6.0-6.5).
3. Planting Depth: Fill the pot with your soil mixture, leaving a few inches of space at the top. Place the ginger rhizome horizontally on top of the soil, with the “eyes” facing upwards. Cover the rhizome with about 1-2 inches of soil.
4. Watering: Water the soil thoroughly after planting, but be careful not to overwater. The soil should be moist but not soggy.
5. Location, Location, Location: Place your pot in a warm, bright location that receives indirect sunlight. Ginger loves warmth and humidity, so avoid direct sunlight, which can scorch the leaves. A spot near a south-facing window is usually ideal.
Caring for Your Ginger Plant
Once your ginger is planted, it’s time to provide it with the care it needs to thrive.
* Watering: Water regularly, keeping the soil consistently moist but not waterlogged. Check the soil moisture by sticking your finger about an inch into the soil. If it feels dry, it’s time to water. Reduce watering during the winter months when the plant’s growth slows down.
* Humidity: Ginger loves humidity. If you live in a dry climate, you can increase humidity by misting the plant regularly, placing the pot on a tray filled with pebbles and water (making sure the bottom of the pot isn’t sitting directly in the water), or using a humidifier.
* Fertilizing: Feed your ginger plant every 2-3 weeks with a balanced liquid fertilizer during the growing season (spring and summer). Dilute the fertilizer to half strength to avoid burning the roots.
* Temperature: Ginger prefers temperatures between 65°F and 85°F (18°C and 29°C). Avoid exposing your plant to temperatures below 50°F (10°C).
* Pest Control: Keep an eye out for pests like aphids and spider mites. If you notice any infestations, treat them with insecticidal soap or neem oil.
* Repotting (If Necessary): If your ginger plant becomes root-bound (the roots are circling the inside of the pot), you may need to repot it into a larger container.
Harvesting Your Ginger
The moment you’ve been waiting for! Harvesting your homegrown ginger is incredibly satisfying.
* When to Harvest: You can start harvesting ginger about 8-10 months after planting. The leaves will start to turn yellow and die back, which is a sign that the rhizomes are mature.
* Partial Harvest: If you only need a small amount of ginger, you can carefully dig around the edges of the pot and harvest a few rhizomes, leaving the rest of the plant to continue growing.
* Full Harvest: To harvest the entire plant, gently tip the pot over and remove the soil. Separate the rhizomes from the plant.
* Cleaning and Storing: Wash the harvested ginger rhizomes thoroughly to remove any dirt. You can store fresh ginger in the refrigerator for several weeks. For longer storage, you can freeze it or pickle it.
Troubleshooting
Even with the best care, you might encounter a few challenges along the way. Here are some common problems and how to address them:
* Yellowing Leaves: This could be a sign of overwatering, underwatering, nutrient deficiency, or pest infestation. Check the soil moisture, fertilize if necessary, and inspect the plant for pests.
* Root Rot: This is usually caused by overwatering. Make sure your pot has good drainage and allow the soil to dry out slightly between waterings. If root rot is severe, you may need to repot the plant with fresh soil.
* Lack of Growth: This could be due to insufficient light, temperature, or nutrients. Make sure your plant is getting enough light and warmth, and fertilize regularly during the growing season.
* Pests: Aphids and spider mites are common pests that can attack ginger plants. Treat infestations with insecticidal soap or neem oil.
Enjoying Your Homegrown Ginger
Now that you’ve harvested your ginger, it’s time to enjoy the fruits (or rather, rhizomes) of your labor! Here are just a few ways to use your homegrown ginger:
* Cooking: Add fresh ginger to stir-fries, soups, curries, and marinades.
* Tea: Brew a soothing and flavorful ginger tea by steeping sliced ginger in hot water.
* Baking: Use grated ginger in cookies, cakes, and breads.
* Pickling: Pickle ginger to enjoy as a condiment or snack.
* Smoothies: Add a small piece of ginger to your smoothies for a zesty kick.
Growing your own ginger is a rewarding experience that allows you to enjoy fresh, flavorful ginger right from your own home. With a little patience and care, you can have a thriving ginger plant that provides you with a continuous supply of this versatile spice. Happy gardening!
Conclusion
So, there you have it! Growing ginger at home is not only achievable, but it’s also incredibly rewarding. Forget those expensive trips to the grocery store for a knob of fresh ginger. Imagine the satisfaction of harvesting your own vibrant, aromatic ginger root, knowing exactly where it came from and how it was grown. This DIY project is a game-changer for anyone who loves to cook with fresh ingredients, appreciates sustainable practices, or simply enjoys the magic of watching something grow.
Why is this a must-try? Because it puts you in control. You control the quality of the ginger, ensuring it’s organic and free from harmful pesticides. You control the quantity, harvesting only what you need, when you need it. And you control the flavor, as homegrown ginger often boasts a more intense and nuanced taste than store-bought varieties. Plus, it’s a fantastic conversation starter!
But the fun doesn’t stop there. Once you’ve mastered the basics, you can experiment with different varieties of ginger. Try growing baby ginger, which is milder and more tender, or explore the unique flavors of ornamental gingers. You can also experiment with different growing mediums, such as coco coir or perlite, to see what works best for your climate and growing conditions. Consider adding companion plants like marigolds to deter pests naturally.
And don’t limit yourself to just growing ginger for culinary purposes. The beautiful foliage of the ginger plant can also add a touch of tropical elegance to your indoor or outdoor space. Plant it in decorative pots and enjoy its lush greenery year-round.
We wholeheartedly encourage you to embark on this exciting journey of growing ginger at home. It’s a simple, cost-effective, and incredibly satisfying way to connect with nature and enhance your culinary creations. Don’t be intimidated if you’re a beginner gardener; ginger is surprisingly resilient and forgiving.
Once you’ve harvested your first batch of homegrown ginger, we’d love to hear about your experience! Share your tips, tricks, and photos with us in the comments below. Let’s create a community of ginger-growing enthusiasts and inspire others to embrace this rewarding DIY project. Let us know what challenges you faced and what you learned along the way. Did you try any variations? What was your yield? Your insights will be invaluable to other aspiring ginger growers. So, get your hands dirty, nurture your ginger, and savor the delicious rewards of your labor. Happy growing!
Frequently Asked Questions (FAQ)
What kind of ginger should I plant?
The best type of ginger to plant is culinary ginger, also known as *Zingiber officinale*. Look for ginger rhizomes (the underground stems) that are plump, firm, and have visible “eyes” or buds. Organic ginger is often recommended, as it’s less likely to have been treated with growth inhibitors. You can typically find suitable ginger at your local grocery store or farmers market. Avoid using powdered ginger or ginger from processed products, as these won’t sprout.
How long does it take to grow ginger?
Ginger typically takes around 8-10 months to mature fully. However, you can start harvesting baby ginger (which has a milder flavor) after about 4-6 months. The exact time will depend on your climate, growing conditions, and the variety of ginger you’re growing. Be patient, and you’ll be rewarded with a bountiful harvest.
What is the best soil for growing ginger?
Ginger thrives in well-draining, nutrient-rich soil. A mixture of potting soil, compost, and perlite or vermiculite is ideal. The soil should be slightly acidic to neutral (pH 6.0-6.5). Good drainage is crucial to prevent root rot, which is a common problem with ginger. Avoid heavy clay soils, as they tend to retain too much moisture.
How much sunlight does ginger need?
Ginger prefers partial shade, especially in hot climates. Direct sunlight can scorch the leaves. Aim for about 2-5 hours of indirect sunlight per day. If you’re growing ginger indoors, place it near a bright window but away from direct sunbeams. You can also use grow lights to supplement natural light, especially during the winter months.
How often should I water ginger?
Water ginger regularly, keeping the soil consistently moist but not waterlogged. Allow the top inch of soil to dry out slightly between waterings. Overwatering can lead to root rot, while underwatering can stunt growth. Adjust your watering schedule based on the weather and the moisture content of the soil. During hot, dry periods, you may need to water more frequently.
How do I fertilize ginger?
Ginger is a heavy feeder and benefits from regular fertilization. Use a balanced organic fertilizer, such as compost tea or fish emulsion, every 2-3 weeks during the growing season. Avoid over-fertilizing, as this can burn the roots. You can also amend the soil with compost or well-rotted manure before planting to provide a slow-release source of nutrients.
What are some common pests and diseases that affect ginger?
Common pests that can affect ginger include aphids, spider mites, and nematodes. You can control these pests with insecticidal soap, neem oil, or by introducing beneficial insects like ladybugs. Root rot is a common disease, caused by overwatering or poor drainage. To prevent root rot, ensure your soil is well-draining and avoid overwatering. You can also use a fungicide if necessary.
Can I grow ginger indoors?
Yes, you can absolutely grow ginger indoors! Choose a pot that is at least 12 inches in diameter and has drainage holes. Use a well-draining potting mix and place the pot in a location that receives bright, indirect sunlight. Water regularly and fertilize every 2-3 weeks. You may need to supplement natural light with grow lights, especially during the winter months.
How do I harvest ginger?
You can harvest ginger at any time, depending on your needs. For baby ginger, harvest after about 4-6 months. For mature ginger, wait until the plant is about 8-10 months old. To harvest, gently dig around the plant and lift the rhizomes from the soil. You can harvest the entire plant or just a portion of the rhizomes, leaving the rest to continue growing.
How do I store ginger?
Fresh ginger can be stored in the refrigerator for several weeks. Wrap it in a paper towel and place it in a plastic bag. You can also freeze ginger for longer storage. Peel and chop the ginger into small pieces, then freeze it in a single layer on a baking sheet. Once frozen, transfer the ginger to a freezer bag. Frozen ginger can be grated directly into your recipes. You can also pickle ginger or make ginger syrup for longer-term preservation.
Leave a Comment