
Grow Mushrooms at Home – imagine plucking fresh, flavorful mushrooms right from your own kitchen! For centuries, mushrooms have been prized for their culinary and medicinal properties, playing a significant role in various cultures around the world. From ancient Roman feasts to traditional Chinese medicine, these fascinating fungi have always held a special place. But did you know that you don’t need a sprawling farm or a degree in mycology to enjoy the delights of homegrown mushrooms?
I’m here to tell you that cultivating your own mushrooms is easier than you might think! In this DIY guide, I’ll share simple, effective tricks and hacks to help you grow mushrooms at home, even if you’re a complete beginner. Forget expensive grocery store prices and questionable freshness. With a few readily available materials and a little patience, you can unlock a world of delicious possibilities.
Why should you embark on this mushroom-growing adventure? Because fresh, homegrown mushrooms are not only incredibly flavorful but also packed with nutrients. Plus, it’s a rewarding and sustainable way to add a unique touch to your culinary creations. So, let’s dive in and discover the secrets to successful home mushroom cultivation!
Grow Your Own Gourmet Mushrooms: A Beginner’s Guide
Hey there, fellow fungi fanatics! Ever dreamt of harvesting your own delicious mushrooms right in your kitchen? It’s easier than you think! This guide will walk you through the process of growing oyster mushrooms at home using a simple and affordable method: the bucket tek. Get ready to impress your friends and family with your homegrown culinary creations!
What You’ll Need
Before we dive in, let’s gather our supplies. Don’t worry, you probably already have some of these lying around!
* Oyster Mushroom Spawn: This is the “seed” of your mushrooms. You can find it online or at a local mushroom farm. Make sure to get a reputable source to ensure healthy spawn. I recommend looking for grain spawn, as it’s easy to work with.
* A 5-Gallon Bucket: A clean, food-grade bucket is essential. You can often find these at hardware stores or even reuse one you already have. Just make sure it’s thoroughly cleaned and sanitized.
* Straw: This will be our substrate, the food source for the mushrooms. Wheat straw is ideal, but other types of straw can work too. You’ll need enough to fill your bucket.
* Lime (Hydrated Lime or Garden Lime): This helps pasteurize the straw and prevent contamination. You can find it at garden centers.
* Large Pot or Tub: For pasteurizing the straw. It needs to be big enough to submerge all the straw.
* Drill with a 1/4-inch Drill Bit: To create holes in the bucket for the mushrooms to grow from.
* Gloves: To keep things sanitary.
* Spray Bottle: Filled with clean water, for maintaining humidity.
* Optional: A thermometer to monitor the pasteurization temperature.
Phase 1: Preparing the Substrate (Straw Pasteurization)
This is arguably the most crucial step. We need to eliminate competing organisms in the straw so the oyster mushrooms can thrive. We’ll do this through pasteurization, which is less intense than sterilization and preserves some beneficial microbes.
1. Chop the Straw: Cut the straw into smaller pieces, about 2-4 inches long. This makes it easier to pack into the bucket and allows the mycelium (the mushroom’s root system) to colonize it more effectively. I like to use garden shears for this, but you can also use a lawnmower or even just your hands.
2. Lime Bath: In your large pot or tub, mix water and lime. The ratio is typically 1 tablespoon of lime per gallon of water. The goal is to raise the pH of the water to around 12, which will kill off most unwanted bacteria and fungi. Wear gloves during this step, as lime can be irritating to the skin.
3. Soak the Straw: Submerge the chopped straw in the lime water. Make sure all the straw is completely covered. You might need to weigh it down with a brick or rock to keep it submerged.
4. Pasteurize: Let the straw soak in the lime water for at least 12-24 hours. This allows the lime to work its magic and kill off any contaminants.
5. Drain the Straw: After soaking, drain the straw thoroughly. You want it to be moist but not dripping wet. I usually let it sit in a colander or on a wire rack for a few hours to drain properly. Squeeze out excess water if needed. The straw should feel like a wrung-out sponge.
Phase 2: Inoculating the Bucket
Now comes the fun part: introducing the mushroom spawn to the prepared straw!
1. Drill Holes in the Bucket: Using your drill and 1/4-inch drill bit, create holes around the bucket. Space them about 4-6 inches apart, both horizontally and vertically. These holes are where the mushrooms will eventually grow from. I usually drill about 20-30 holes in a 5-gallon bucket.
2. Layering: Now, we’ll layer the pasteurized straw and mushroom spawn in the bucket. Start with a layer of straw at the bottom, about 2-3 inches thick.
3. Add Spawn: Sprinkle a generous layer of mushroom spawn over the straw. Aim for about 1/2 cup of spawn per layer.
4. Repeat: Continue layering straw and spawn, making sure to distribute the spawn evenly throughout the bucket. The final layer should be straw.
5. Pack it Down: Gently pack down the straw and spawn mixture in the bucket. This helps to create good contact between the spawn and the substrate.
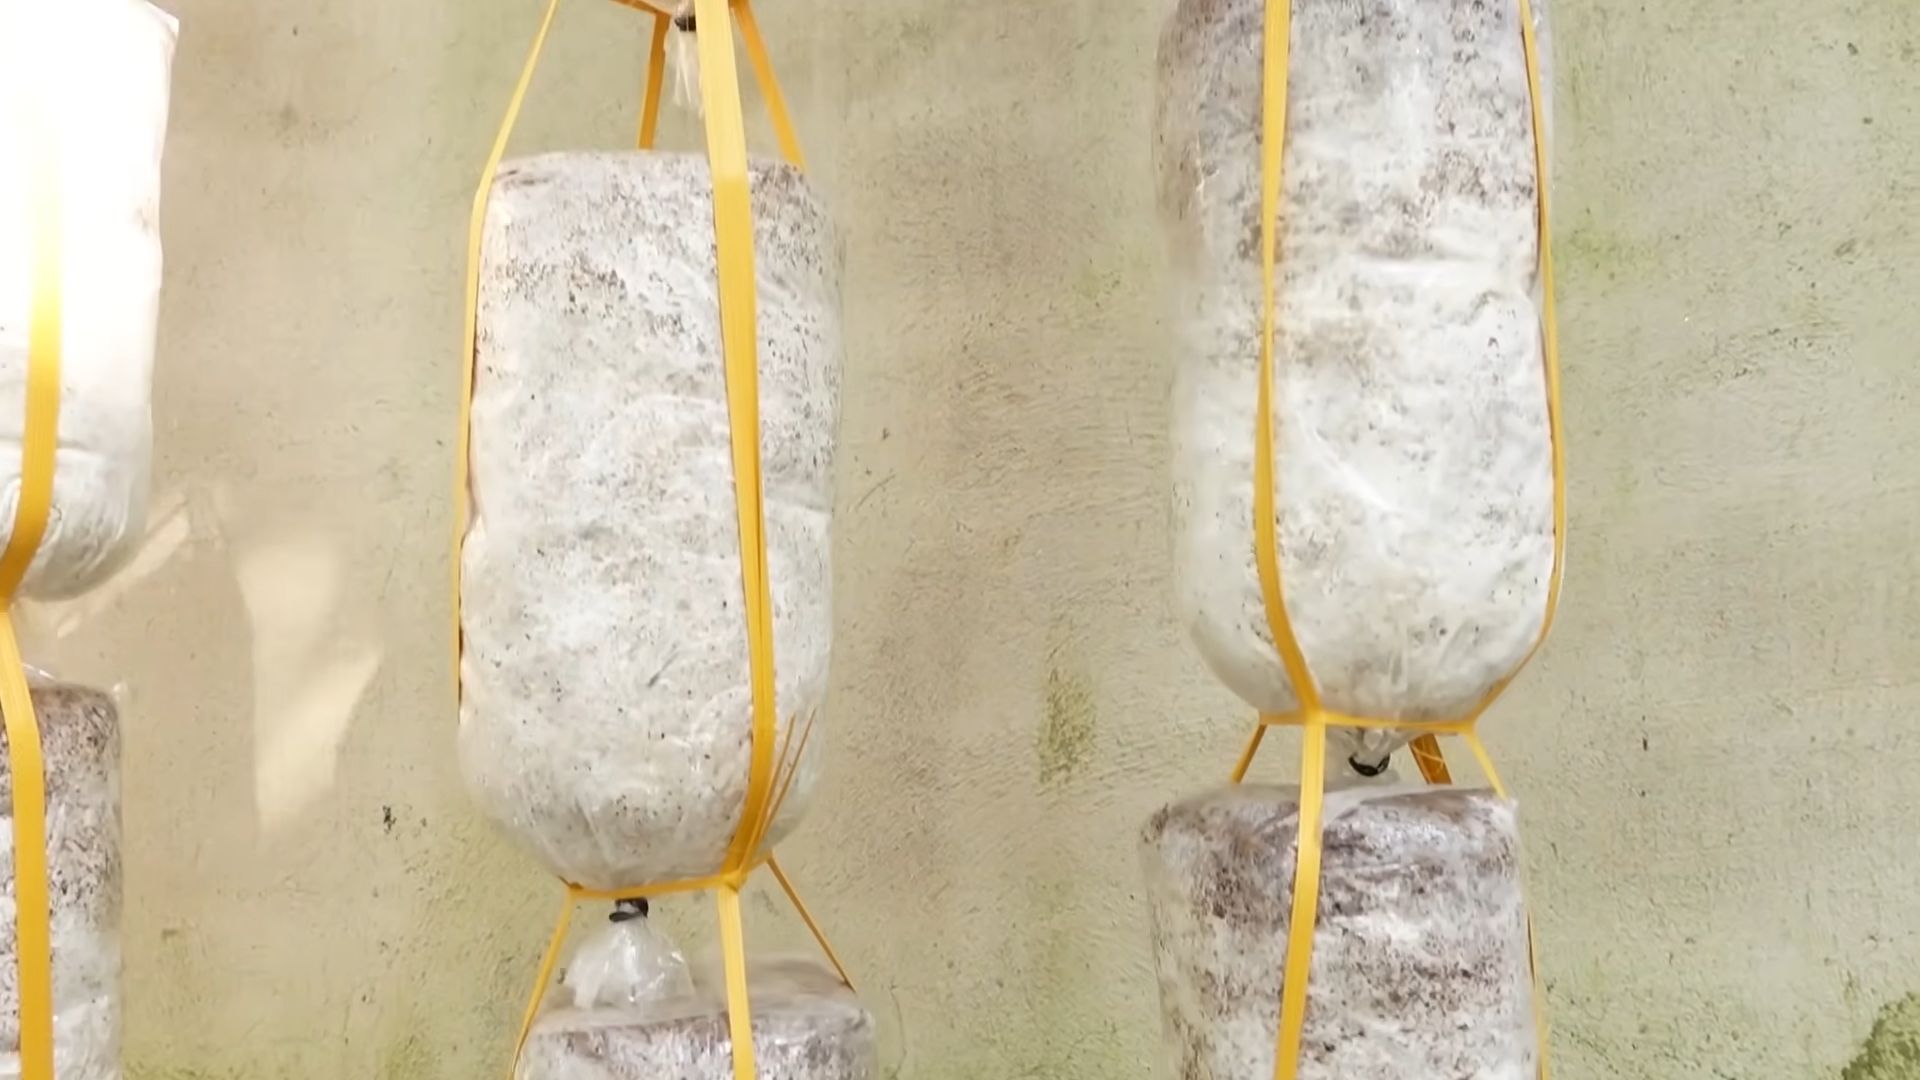
Phase 3: Incubation
This is the waiting game! During incubation, the mycelium will colonize the straw, forming a network of white, thread-like structures.
1. Find a Suitable Location: Place the inoculated bucket in a dark, humid, and well-ventilated location. A basement, closet, or spare room works well. The ideal temperature is between 65-75°F (18-24°C).
2. Maintain Humidity: Oyster mushrooms need high humidity to thrive. You can increase humidity by spraying the inside of the bucket with water daily, or by placing a plastic bag loosely over the bucket (make sure there’s still some airflow). I often use a humidity dome if my space is particularly dry.
3. Monitor Colonization: Check the bucket regularly for signs of colonization. You should start to see white, fuzzy mycelium spreading throughout the straw within a week or two.
4. Patience is Key: The incubation process can take anywhere from 2-4 weeks, depending on the temperature and humidity. Be patient and let the mycelium do its thing!
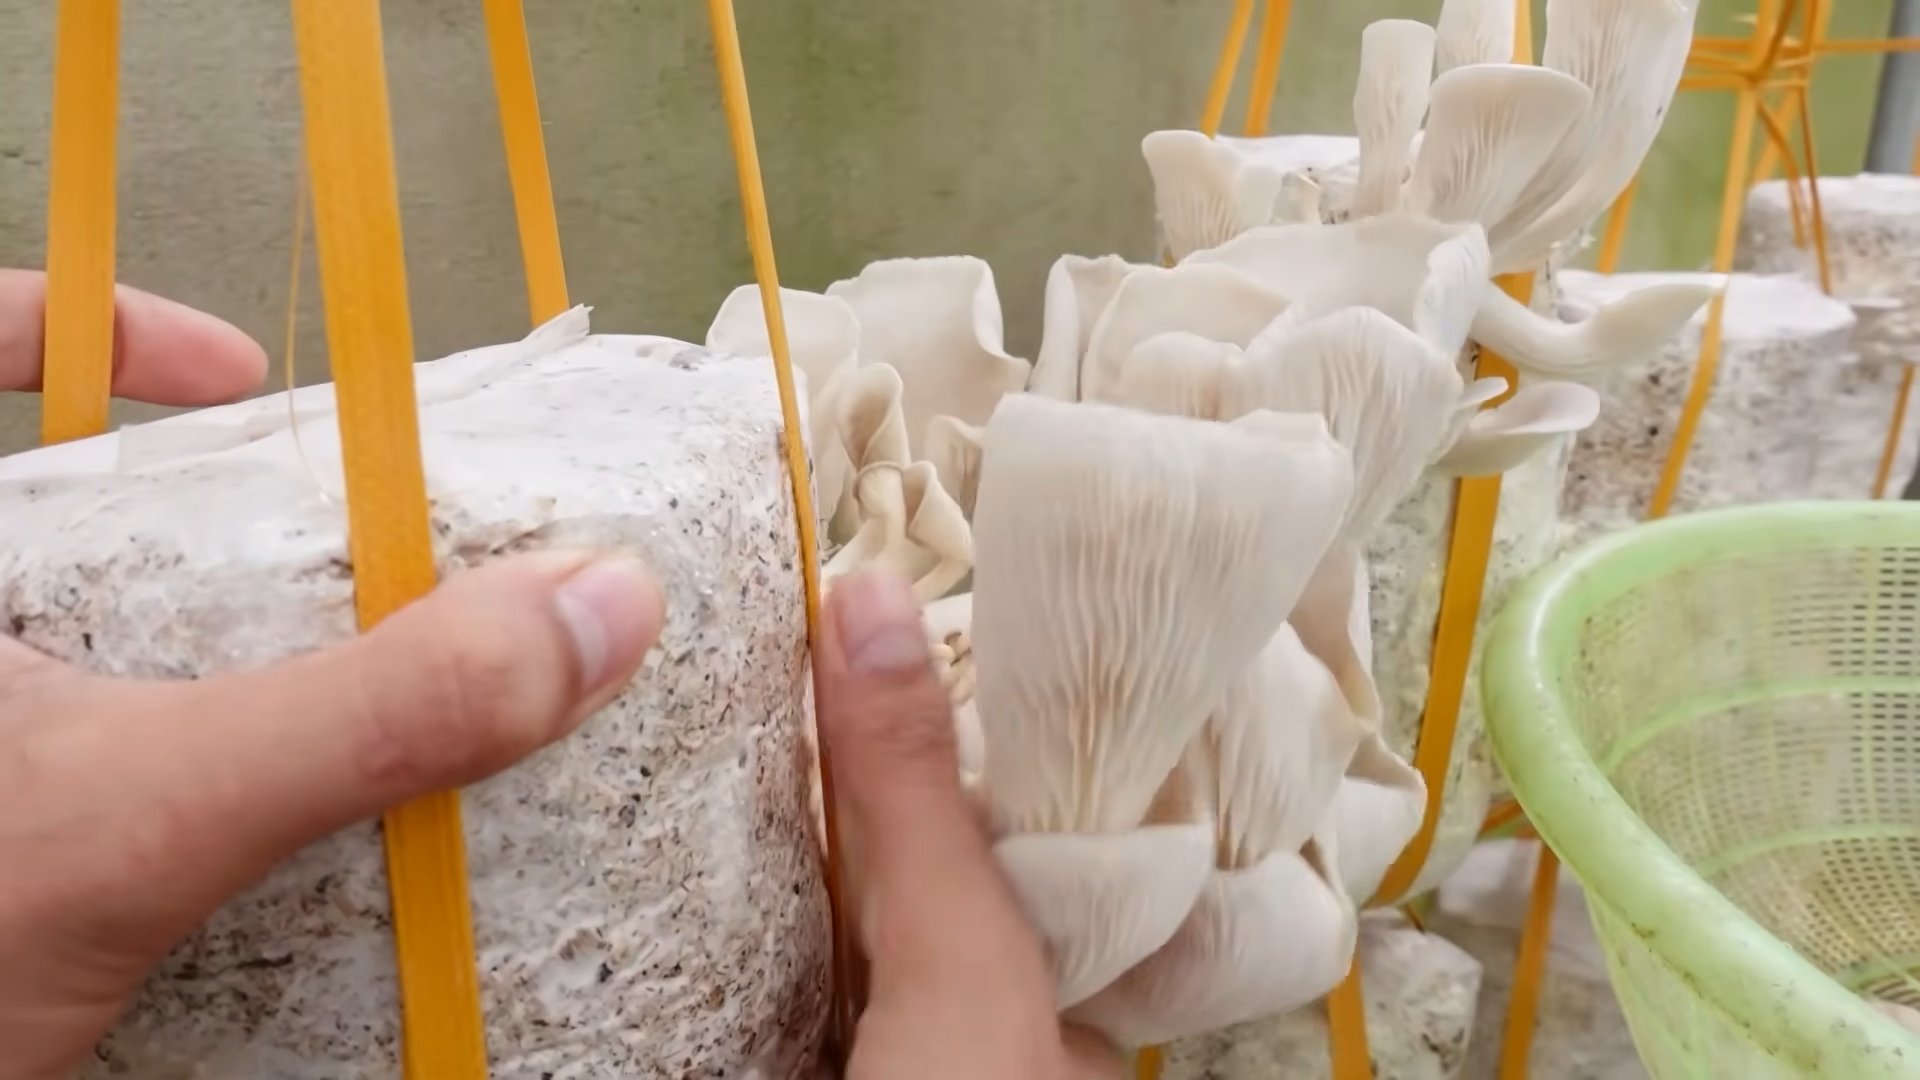
Phase 4: Fruiting
Finally, the moment we’ve been waiting for! Once the straw is fully colonized (it will be almost entirely white), it’s time to initiate fruiting.
1. Introduce Light: Move the bucket to a location with indirect light. Direct sunlight can dry out the mushrooms.
2. Increase Ventilation: Oyster mushrooms need fresh air to fruit properly. Make sure the bucket is in a well-ventilated area. You can even use a small fan to circulate air.
3. Maintain Humidity: Continue to spray the bucket with water daily to maintain high humidity. You can also mist the surrounding area.
4. Watch for Pins: After a few days, you should start to see small mushroom “pins” forming around the holes in the bucket. These are the baby mushrooms!
5. Harvest Time: The mushrooms will grow rapidly and be ready to harvest in about a week. Harvest them when the caps are still slightly curled downwards. To harvest, simply twist and pull the mushrooms from the bucket.
Phase 5: Subsequent Flushes
Congratulations, you’ve harvested your first flush of oyster mushrooms! But the fun doesn’t have to end there. You can often get multiple flushes from the same bucket.
1. Soak the Bucket: After harvesting, soak the bucket in cold water for 12-24 hours. This rehydrates the substrate and encourages another flush of mushrooms.
2. Repeat the Fruiting Process: After soaking, return the bucket to its fruiting location and repeat the steps for fruiting.
3. Expect Diminishing Returns: Each subsequent flush will likely produce fewer mushrooms than the previous one. After 2-3 flushes, the substrate will be depleted, and it’s time to start a new bucket.
Troubleshooting
Even with the best intentions, things can sometimes go wrong. Here are a few common problems and how to address them:
* Contamination: If you see green, black, or other colored molds growing in the bucket, it’s likely contaminated. Unfortunately, there’s not much you can do at this point except discard the bucket and start over. Make sure to sterilize your equipment and use clean materials to prevent contamination.
* Slow Colonization: If the mycelium is slow to colonize the straw, it could be due to low temperature or humidity. Try moving the bucket to a warmer location and increasing humidity.
* No Fruiting: If the straw is fully colonized but no mushrooms are forming, it could be due to lack of light or ventilation. Make sure the bucket is in a location with indirect light and good airflow.
* Small Mushrooms: If the mushrooms are small and stunted, it could be due to low humidity or lack of nutrients. Try increasing humidity and consider adding a small amount of nutrient-rich material to the substrate, such as coffee grounds.
Tips for Success
* Start Small: Don’t be afraid to start with just one bucket. Once you get the hang of it, you can expand your operation.
* Keep it Clean: Sanitation is key to preventing contamination. Sterilize your equipment and use clean materials.
* Experiment: Don’t be afraid to experiment
Conclusion
So, there you have it! Cultivating your own mushrooms at home is not only achievable but also incredibly rewarding. From the satisfaction of nurturing life to the unparalleled freshness and flavor of homegrown fungi, the benefits are undeniable. This DIY approach to growing mushrooms offers a unique connection to your food, allowing you to control every aspect of the process, from substrate selection to environmental conditions.
Why is this a must-try? Because it empowers you to bypass the grocery store and access a sustainable, delicious, and often more affordable source of food. Imagine the pride of serving a dish featuring mushrooms you personally cultivated! Plus, you’ll gain a fascinating understanding of fungal biology and the intricate processes that bring these culinary delights to your table.
But the adventure doesn’t stop here. Experiment with different mushroom varieties! Oyster mushrooms are a fantastic starting point, but once you’ve mastered the basics, consider branching out to shiitake, lion’s mane, or even wine cap mushrooms. Each variety offers a unique flavor profile and growing requirements, providing endless opportunities for exploration.
Furthermore, don’t be afraid to tweak the substrate recipe to suit your local resources and preferences. Coffee grounds, straw, and hardwood sawdust are all viable options, and combining them in different ratios can yield surprising results. Document your experiments, take notes on what works and what doesn’t, and share your findings with the growing community.
This DIY project is more than just a recipe; it’s an invitation to connect with nature, learn new skills, and enjoy the fruits (or rather, fungi) of your labor. We strongly encourage you to embark on this journey of growing mushrooms at home. The initial setup might seem daunting, but the process is surprisingly straightforward, and the rewards are well worth the effort.
Ready to transform your kitchen into a miniature mushroom farm? Give it a try! And most importantly, we want to hear about your experiences. Share your successes, your challenges, and your tips with us in the comments below. Let’s build a community of home mushroom growers and learn from each other’s adventures. Your insights could inspire others to take the plunge and discover the joy of cultivating their own delicious and nutritious mushrooms. Happy growing!
Frequently Asked Questions (FAQ)
What are the easiest types of mushrooms to grow at home for beginners?
Oyster mushrooms are generally considered the easiest for beginners due to their rapid growth, tolerance of various substrates, and relatively simple cultivation requirements. They are also quite forgiving of minor environmental fluctuations, making them an excellent choice for those new to mushroom cultivation. Shiitake mushrooms are another popular option, although they require a bit more patience and attention to detail.
What kind of space do I need to grow mushrooms at home?
You don’t need a lot of space! A small closet, a spare room, or even a corner of your basement can be sufficient. The key is to provide a dark, humid environment with good ventilation. A dedicated grow tent can be helpful for maintaining optimal conditions, but it’s not essential, especially when starting with oyster mushrooms.
What is the best substrate for growing mushrooms?
The best substrate depends on the type of mushroom you’re growing. Oyster mushrooms thrive on a variety of substrates, including straw, coffee grounds, and hardwood sawdust. Shiitake mushrooms prefer hardwood logs or sawdust. Research the specific needs of the mushroom variety you choose to ensure optimal growth.
How long does it take to grow mushrooms at home?
The time it takes to grow mushrooms varies depending on the variety and the growing conditions. Oyster mushrooms can often be harvested within a few weeks of inoculation, while shiitake mushrooms may take several months to produce their first flush. Patience is key!
How do I maintain the humidity levels required for mushroom growth?
Maintaining adequate humidity is crucial for successful mushroom cultivation. You can use a humidifier, a spray bottle, or a humidity dome to increase the moisture levels in your growing area. Regularly misting the substrate and the surrounding air can also help. Aim for a humidity level of 80-90% for most mushroom varieties.
How do I know when my mushrooms are ready to harvest?
The signs of maturity vary depending on the mushroom variety. Oyster mushrooms are typically ready to harvest when the caps have fully expanded and the edges are still slightly curled downwards. Shiitake mushrooms are ready when the caps have flattened out and the gills are visible. It’s always best to research the specific characteristics of the mushroom you’re growing to ensure you harvest them at the peak of their flavor and texture.
What if my mushrooms don’t grow?
Several factors can contribute to mushroom growing failure. Common issues include insufficient humidity, inadequate ventilation, contamination, and improper substrate preparation. Carefully review your growing conditions and adjust them as needed. If you suspect contamination, discard the affected substrate and start fresh with a new batch.
Can I reuse the substrate after harvesting mushrooms?
Yes, you can often get multiple flushes of mushrooms from the same substrate. After harvesting, soak the substrate in water for a few hours to rehydrate it. This will encourage another flush of mushrooms. However, the yield of subsequent flushes may be lower than the first. Eventually, the substrate will become depleted of nutrients and will need to be replaced.
Is it safe to eat mushrooms grown at home?
Yes, as long as you are certain of the mushroom species you are growing and have followed proper cultivation techniques. It’s crucial to only consume mushrooms that you have positively identified as edible. If you are unsure about the identity of a mushroom, do not eat it. When you **grow mushrooms at home**, you have control over the process, ensuring they are free from harmful chemicals and contaminants.
How can I prevent contamination in my mushroom growing setup?
Maintaining a clean and sterile environment is essential for preventing contamination. Sterilize your substrate before inoculation, use sterile tools, and avoid introducing contaminants into your growing area. Regularly clean your grow space and monitor for signs of mold or other unwanted organisms. Using a HEPA filter in your grow room can also help to reduce the risk of contamination.
Leave a Comment