
Grow Onions Easily, even if you think you have a black thumb! Let’s face it, store-bought onions are fine, but there’s nothing quite like the satisfaction (and flavor!) of pulling a plump, juicy onion from your own backyard. For centuries, onions have been a staple in cuisines around the world, from the humble French onion soup to the vibrant curries of India. They’re not just delicious; they’re packed with nutrients and have even been used in traditional medicine.
But here’s the thing: many people shy away from growing their own onions, thinking it’s too complicated or time-consuming. That’s where I come in! I’m here to share some incredibly simple, yet effective, DIY tricks and hacks that will have you harvesting a bumper crop of onions in no time. Whether you’re a seasoned gardener or a complete beginner, these tips will help you grow onions easily and avoid common pitfalls. Imagine adding freshly grown onions to your favorite dishes, knowing you nurtured them from tiny seedlings to flavorful bulbs. Ready to ditch the grocery store onions and embrace the joy of homegrown goodness? Let’s get started!
DIY Concrete Countertops: A Step-by-Step Guide
Hey there, fellow DIY enthusiasts! I’m so excited to share one of my favorite home improvement projects with you: creating your own concrete countertops. It might seem intimidating, but trust me, with a little patience and these detailed instructions, you can achieve a stunning, modern look for your kitchen or bathroom without breaking the bank. Let’s get started!
Materials You’ll Need
Before we dive in, let’s gather all the necessary materials. Having everything on hand will make the process much smoother.
* Concrete Mix: I recommend a high-strength concrete mix specifically designed for countertops. Look for a mix with fibers already added to minimize cracking. You’ll need to calculate how much you need based on the dimensions of your countertop. A good rule of thumb is to estimate a little extra – it’s always better to have too much than not enough!
* Melamine Boards: These will form the mold for your countertop. I usually go for ¾-inch thick melamine for sturdiness.
* Screws: Use screws to assemble the melamine mold. I prefer 1 ¼-inch screws.
* Silicone Caulk: This is crucial for sealing the seams of the mold and preventing concrete from leaking out. Choose a paintable silicone caulk.
* Reinforcement: You can use wire mesh or rebar for reinforcement. Wire mesh is easier to work with for smaller countertops, while rebar is better for larger ones.
* Concrete Sealer: This protects your countertop from stains and water damage. Choose a food-safe sealer if you’re using the countertop in your kitchen.
* Concrete Pigment (Optional): If you want to add color to your countertop, you’ll need concrete pigment.
* Release Agent: This helps you remove the concrete countertop from the mold. You can use a commercial release agent or even vegetable oil.
* Mixing Tools: You’ll need a concrete mixer (rent one if you don’t have one), a wheelbarrow or large mixing tub, a shovel, and a mixing paddle.
* Finishing Tools: These include a concrete trowel, a sponge, sandpaper (various grits), and a concrete grinder/polisher (optional, but highly recommended for a smooth finish).
* Safety Gear: Always wear safety glasses, gloves, and a dust mask when working with concrete.
Building the Mold
The mold is the foundation of your concrete countertop. Accuracy is key here, so take your time and double-check your measurements.
1. Measure and Cut the Melamine: Carefully measure the dimensions of your desired countertop. Remember to account for any overhangs or special features. Cut the melamine boards to size using a circular saw or table saw. I always add an extra inch or two to the length and width of the mold to give myself some wiggle room. You can always trim the excess later.
2. Assemble the Mold: Screw the melamine boards together to form a box. The bottom of the mold will be the top surface of your countertop, so make sure it’s smooth and free of imperfections. Use screws every 6-8 inches to ensure a tight seal.
3. Seal the Seams: Apply a generous bead of silicone caulk to all the inside seams of the mold. Smooth the caulk with your finger or a caulk smoothing tool. This will prevent concrete from leaking out and creating unsightly blemishes on your countertop. Let the caulk dry completely before moving on to the next step.
4. Create Cutouts (If Needed): If you need to create cutouts for sinks, faucets, or other fixtures, now’s the time to do it. Build smaller melamine boxes to the exact dimensions of the cutouts and attach them to the inside of the main mold with screws and silicone caulk. Remember to factor in the thickness of your sink or faucet when determining the size of the cutout.
5. Apply Release Agent: Apply a generous coat of release agent to the inside of the mold. This will make it much easier to remove the concrete countertop once it’s cured. I usually apply two coats, just to be safe.
Mixing and Pouring the Concrete
This is where the magic happens! Proper mixing and pouring are crucial for a strong and durable countertop.
1. Prepare the Concrete Mix: Follow the manufacturer’s instructions for mixing the concrete. Add water gradually until you achieve a thick, oatmeal-like consistency. If you’re using concrete pigment, add it to the water before mixing it with the concrete. I always mix a small test batch first to make sure I like the color.
2. Pour the First Layer: Pour a layer of concrete into the mold, about halfway up. Vibrate the mold with a rubber mallet or orbital sander (without sandpaper) to remove any air bubbles. This will help create a smoother, more durable surface.
3. Add Reinforcement: Place the wire mesh or rebar into the mold, ensuring it’s fully embedded in the concrete. The reinforcement will add strength and prevent cracking.
4. Pour the Second Layer: Pour the remaining concrete into the mold, filling it to the top. Again, vibrate the mold to remove any air bubbles.
5. Screed the Surface: Use a concrete trowel to screed the surface of the concrete, removing any excess and creating a level surface.
6. Trowel the Surface: Use a concrete trowel to smooth the surface of the concrete. This will help create a professional-looking finish. I usually trowel the surface several times over the course of a few hours, as the concrete begins to set.
Curing and Demolding
Patience is key during the curing process. Rushing this step can lead to cracking and other problems.
1. Cure the Concrete: Cover the mold with plastic sheeting to prevent the concrete from drying out too quickly. Keep the concrete moist for at least 7 days. You can do this by misting it with water several times a day.
2. Demold the Countertop: After 7 days, carefully remove the screws from the mold. Gently tap the sides of the mold with a rubber mallet to loosen the concrete. Carefully lift the countertop out of the mold. This might require some effort, so be patient.
Finishing and Sealing
Now for the final touches! This is where you’ll transform your rough concrete slab into a beautiful, functional countertop.
1. Grind and Polish (Optional): If you want a super smooth finish, you can grind and polish the concrete countertop. Start with a coarse grit diamond polishing pad and gradually work your way up to a finer grit. This process can be time-consuming, but it’s worth it for a truly professional-looking result.
2. Sand the Surface: If you’re not grinding and polishing, you can still sand the surface of the concrete to remove any imperfections. Start with a coarse grit sandpaper and gradually work your way up to a finer grit.
3. Clean the Surface: Thoroughly clean the surface of the concrete with a damp sponge to remove any dust or debris.
4. Apply Concrete Sealer: Apply several coats of concrete sealer, following the manufacturer’s instructions. Allow each coat to dry completely before applying the next. The sealer will protect your countertop from stains and water damage. I usually apply at least three coats of sealer for maximum protection.
5. Install the Countertop: Carefully install the countertop onto your cabinets. Use construction adhesive to secure it in place.
6. Caulk the Edges: Apply a bead of silicone caulk along the edges of the countertop where it meets the backsplash or walls. This will prevent water from seeping behind the countertop.
Troubleshooting Tips
Even with the best planning, things can sometimes go wrong. Here are a few common problems and how to fix them:
* Cracking: Cracking is a common problem with concrete countertops. To minimize cracking, use a high-strength concrete mix with fibers, reinforce the concrete with wire mesh or rebar, and cure the concrete properly. If cracks do appear, you can fill them with concrete crack filler.
* Air Bubbles: Air bubbles can create unsightly blemishes on your countertop. To minimize air bubbles, vibrate the mold with a rubber mallet or orbital sander after pouring the concrete.
* Staining: Concrete is porous and can stain easily. To prevent staining, apply several coats of concrete sealer. Clean up spills immediately.
* Uneven Surface: An uneven surface can be caused by improper screeding or troweling. To fix an uneven surface, you can grind or sand the concrete.
Final Thoughts
Creating your own concrete countertops is a rewarding project that can add a touch of modern elegance to your home. It requires some time and effort, but the results are well worth it. Don’t be afraid to experiment and get creative. With a little practice, you’ll be able to create stunning concrete countertops that you’ll be proud of for years to come. Good luck, and happy DIY-ing!
Conclusion
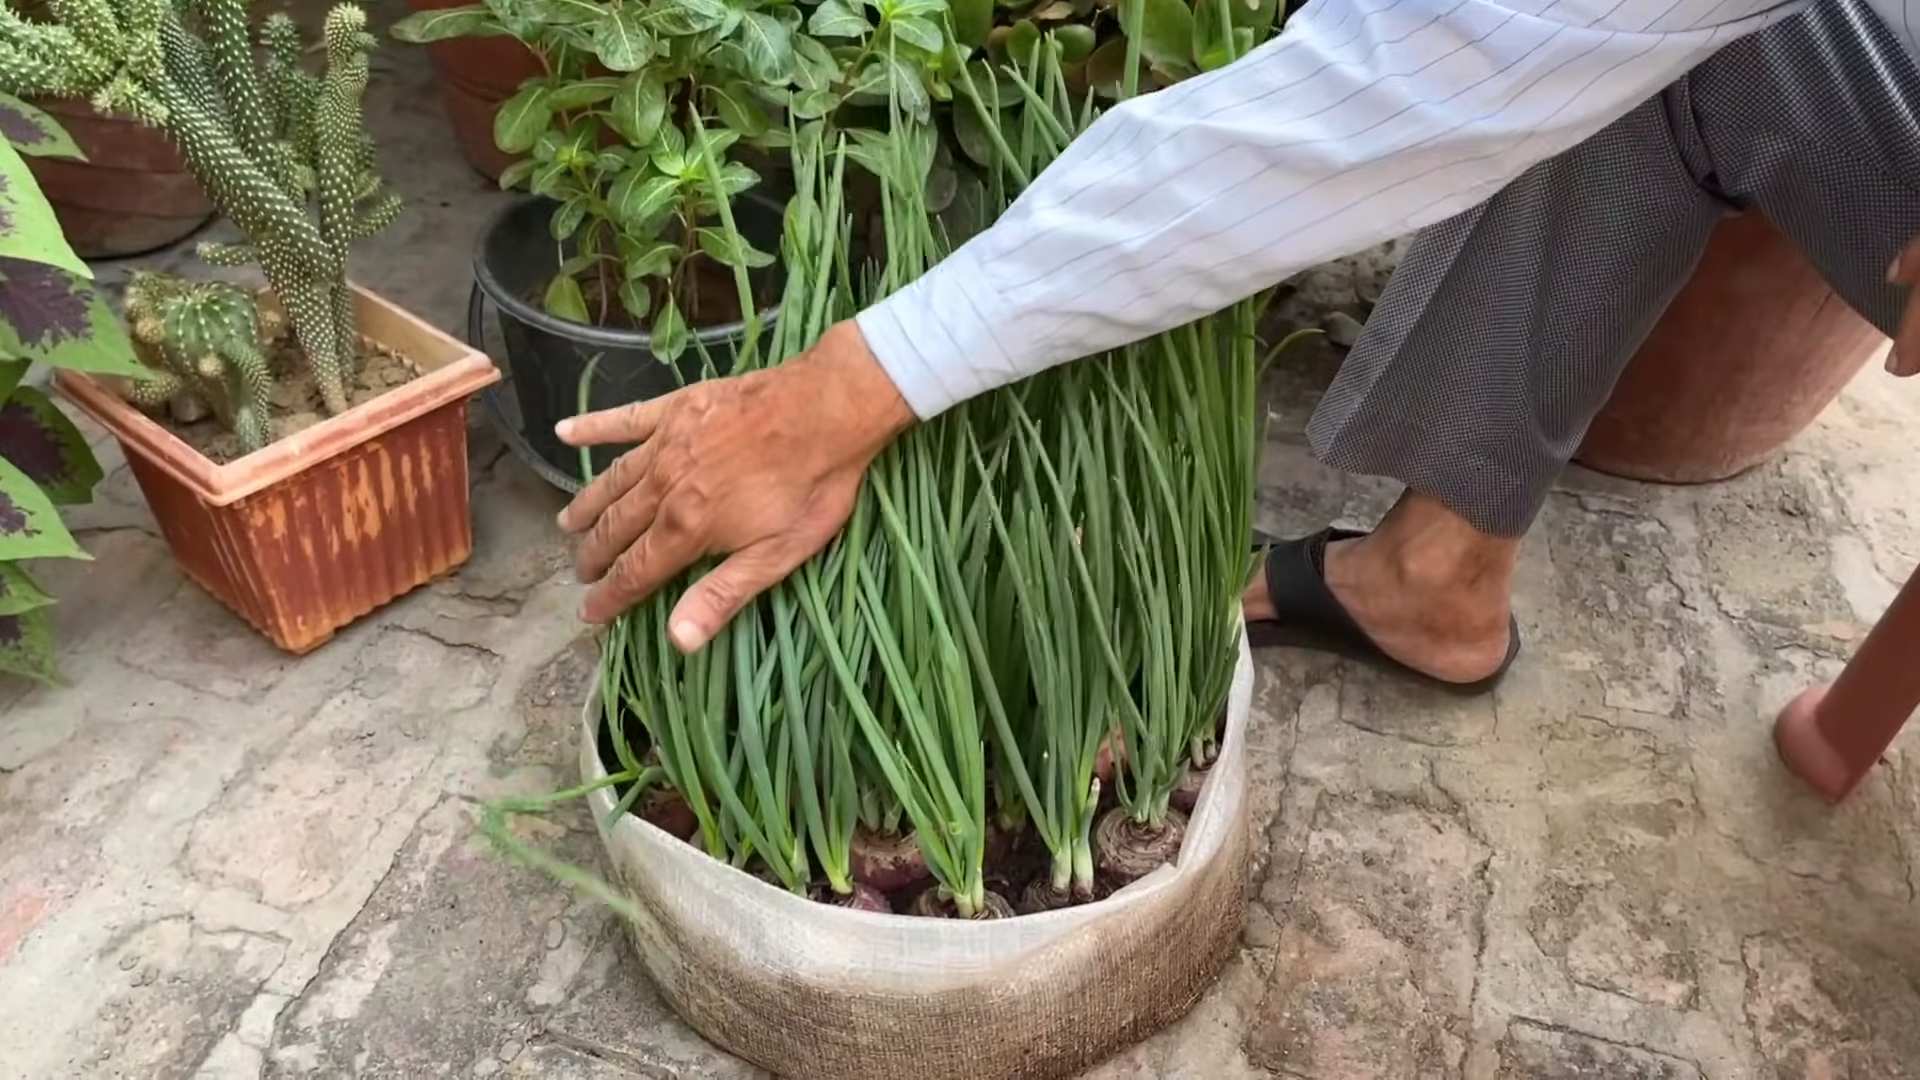
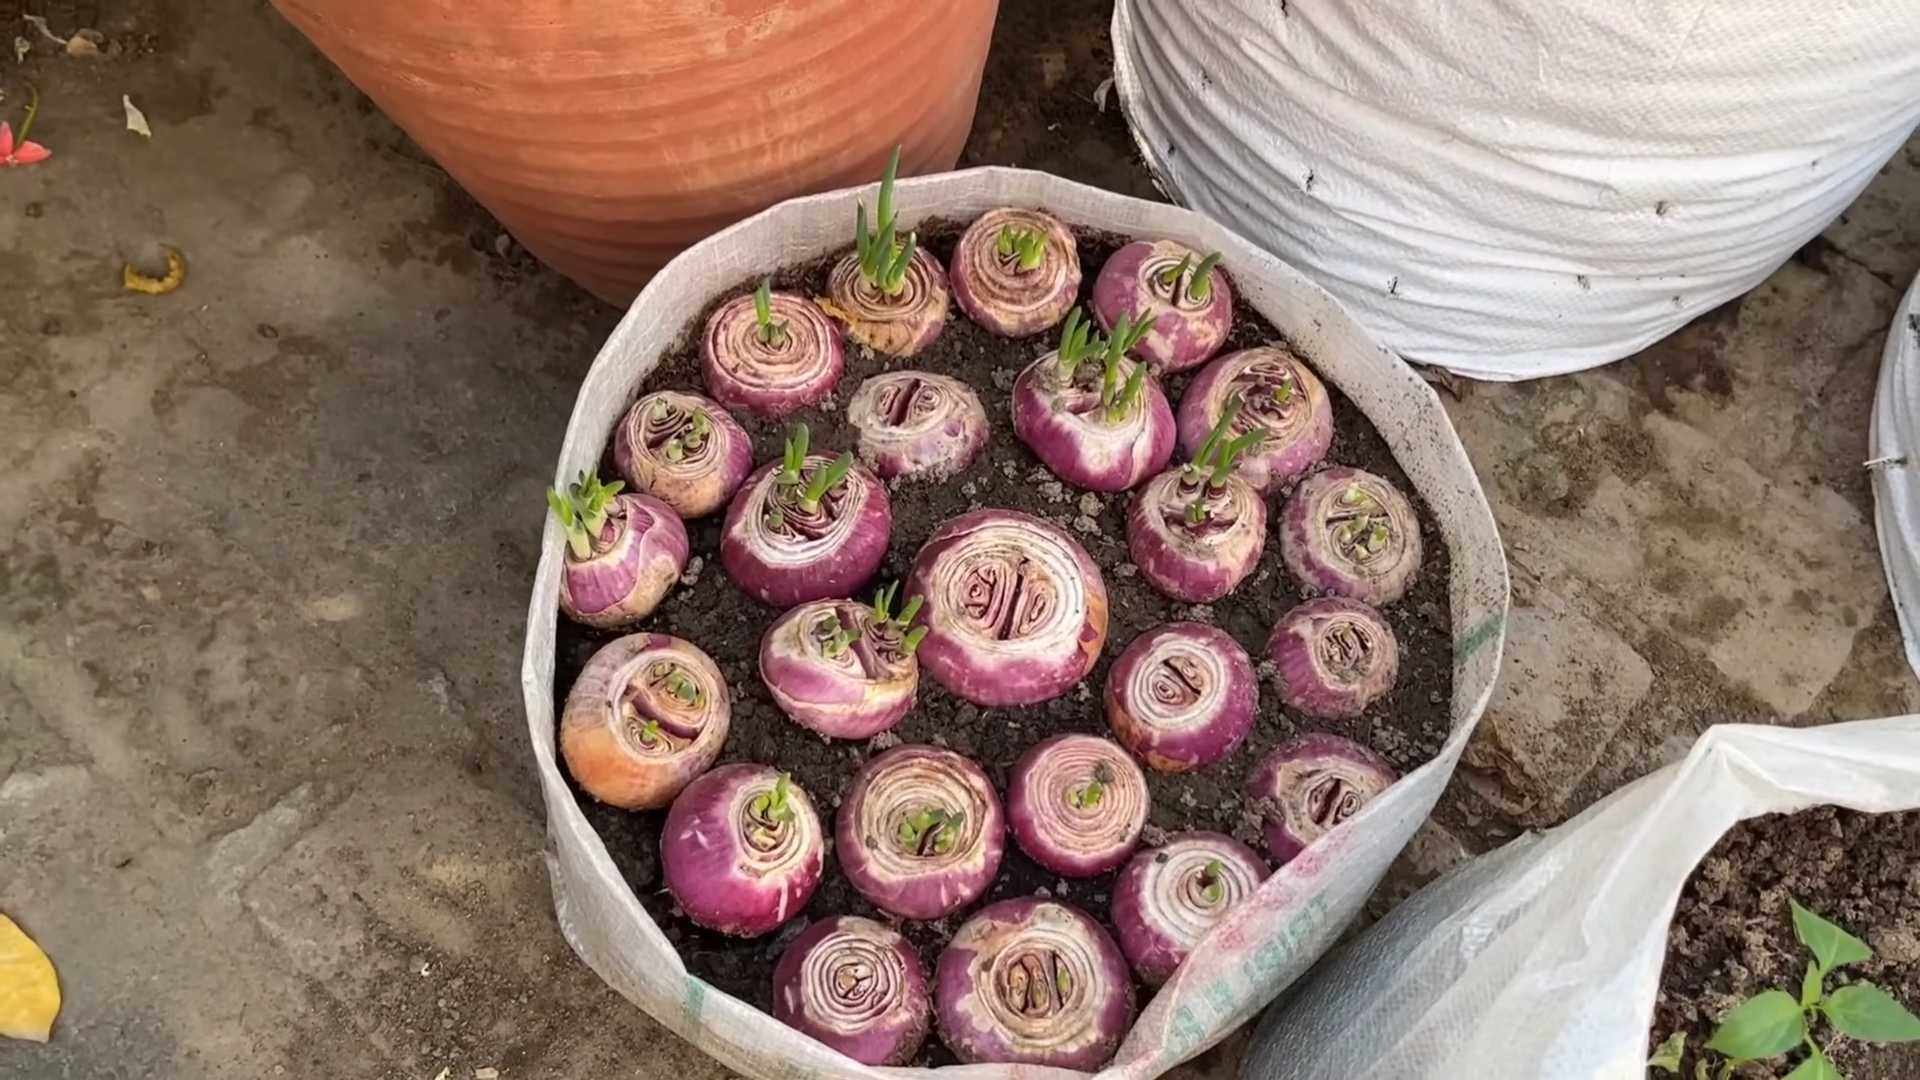
So, there you have it! Growing onions easily, right in your own home or garden, is not only achievable but also incredibly rewarding. Forget those bland, store-bought onions that lack that real, pungent flavor. With this simple DIY trick, you’ll be harvesting fresh, flavorful onions that will elevate your cooking to a whole new level.
This method isn’t just about saving money (although that’s a definite perk!). It’s about connecting with your food, understanding where it comes from, and enjoying the satisfaction of nurturing something from a tiny seed or scrap into a delicious ingredient. Plus, it’s a fantastic way to reduce food waste by utilizing those onion bottoms that would otherwise end up in the compost bin.
But the beauty of this DIY onion-growing trick lies in its adaptability. Feel free to experiment with different varieties of onions. Try growing red onions for a vibrant addition to salads, or shallots for a more delicate, garlicky flavor. You can even try growing scallions (green onions) indoors in a glass of water for a continuous supply of fresh greens.
Consider the space you have available. If you’re short on outdoor space, container gardening is your best friend. A few strategically placed pots on a balcony or patio can yield a surprisingly bountiful harvest. For those with larger gardens, dedicate a small patch specifically to onions and enjoy the abundance.
Don’t be afraid to get creative with your growing medium. While soil is the traditional choice, you can also experiment with hydroponics or aquaponics for a more modern approach. Just remember to provide your onions with plenty of sunlight and consistent moisture.
This DIY onion-growing trick is a game-changer for any home cook or gardening enthusiast. It’s easy, affordable, and incredibly satisfying. Imagine the pride you’ll feel when you can say, “I grew these onions myself!”
We wholeheartedly encourage you to give this DIY trick a try. Start small, experiment, and don’t be discouraged if you encounter a few bumps along the road. Gardening is a learning process, and every mistake is an opportunity to grow (pun intended!).
Once you’ve experienced the joy of harvesting your own homegrown onions, we’d love to hear about it! Share your experiences, tips, and photos in the comments below. Let’s create a community of onion-growing enthusiasts and inspire others to embrace the magic of homegrown food. What varieties did you try? What challenges did you face? What successes did you celebrate? Your insights could be invaluable to someone just starting out.
So, grab some onion scraps, prepare your soil, and get ready to embark on a rewarding journey of growing onions easily. Happy gardening!
Frequently Asked Questions (FAQ)
What kind of onions can I grow using this method?
You can grow almost any type of onion from scraps or sets. Yellow onions, white onions, red onions, shallots, and even scallions (green onions) are all viable options. The key is to choose varieties that are well-suited to your climate and growing conditions. Experimenting with different types is part of the fun! Consider the flavor profile you prefer and the culinary uses you have in mind when making your selection. For example, if you frequently make French onion soup, yellow onions are a great choice. If you enjoy adding a pop of color and flavor to salads, red onions are an excellent option.
How long does it take to grow onions from scraps?
The time it takes to grow onions from scraps varies depending on several factors, including the variety of onion, the growing conditions, and the size of the initial scrap. Generally, you can expect to see new growth within a week or two. However, it can take several months to reach full maturity and harvestable size. Scallions (green onions) will be ready much faster, often within a few weeks. Be patient and provide your onions with consistent care, and you’ll be rewarded with a bountiful harvest.
What kind of soil is best for growing onions?
Onions prefer well-drained, fertile soil that is rich in organic matter. A slightly acidic to neutral pH (around 6.0 to 7.0) is ideal. Amend your soil with compost or well-rotted manure to improve its fertility and drainage. Avoid heavy clay soils, as they can become waterlogged and hinder onion growth. If you’re growing onions in containers, use a high-quality potting mix specifically formulated for vegetables.
How much sunlight do onions need?
Onions are sun-loving plants and require at least 6-8 hours of direct sunlight per day. Choose a location in your garden or on your balcony that receives plenty of sunlight. If you’re growing onions indoors, supplement with grow lights if necessary. Insufficient sunlight can result in stunted growth and smaller bulbs.
How often should I water my onions?
Onions need consistent moisture, especially during bulb formation. Water deeply whenever the top inch of soil feels dry to the touch. Avoid overwatering, as this can lead to root rot. Mulching around your onions can help retain moisture and suppress weeds.
Do I need to fertilize my onions?
Yes, onions are heavy feeders and benefit from regular fertilization. Use a balanced fertilizer with a higher phosphorus content to promote bulb development. Fertilize every 2-3 weeks during the growing season. You can also use organic fertilizers such as compost tea or fish emulsion.
What are some common pests and diseases that affect onions?
Some common pests that affect onions include onion maggots, thrips, and aphids. Diseases include onion rot, downy mildew, and purple blotch. Monitor your onions regularly for signs of pests or diseases and take appropriate action. Organic pest control methods, such as neem oil or insecticidal soap, can be effective in controlling many pests. Ensure good air circulation to prevent fungal diseases.
Can I grow onions indoors year-round?
Yes, you can grow onions indoors year-round, especially scallions (green onions). Provide them with plenty of sunlight or grow lights, consistent moisture, and regular fertilization. Choose a well-draining potting mix and a container with drainage holes.
How do I know when my onions are ready to harvest?
Onions are typically ready to harvest when the tops begin to fall over and turn yellow or brown. You can also gently dig around the bulb to check its size. If the bulb is large and well-formed, it’s likely ready to harvest.
How do I store my harvested onions?
After harvesting, cure your onions by laying them out in a single layer in a warm, dry, well-ventilated place for 1-2 weeks. This allows the outer layers to dry and toughen, which helps prevent spoilage. Once cured, store your onions in a cool, dry, dark place, such as a pantry or basement. Properly stored onions can last for several months.
Can I regrow onions from store-bought onions?
Yes, you can regrow onions from store-bought onions, as long as they have a root end. Cut off the bottom inch or two of the onion, making sure to include the root end. Place the root end in a glass of water, with the cut side facing down. Change the water every day or two. After a few days, you should see new roots and green shoots emerging. Once the roots are well-developed, you can transplant the onion into soil.
What if my onion doesn’t grow a bulb?
Several factors can contribute to an onion not forming a bulb, including insufficient sunlight, poor soil, lack of nutrients, and overcrowding. Ensure your onions are receiving at least 6-8 hours of direct sunlight per day. Amend your soil with compost or well-rotted manure to improve its fertility and drainage. Fertilize regularly with a balanced fertilizer. Thin out your onions to provide them with enough space to grow.


Leave a Comment