
Grow Sage in Containers and unlock a world of aromatic possibilities right on your windowsill or balcony! Have you ever dreamed of snipping fresh herbs for your culinary creations just moments before they hit the pan? I know I have! For centuries, sage has been revered not only for its distinct flavor but also for its medicinal properties. From ancient Roman rituals to traditional herbal remedies, sage boasts a rich history that connects us to generations past.
But let’s be honest, not everyone has a sprawling garden to cultivate this wonderful herb. That’s where the magic of container gardening comes in! Growing sage in containers is a fantastic solution for apartment dwellers, urban gardeners, or anyone with limited outdoor space. It’s surprisingly easy, incredibly rewarding, and allows you to enjoy the fresh, earthy aroma and flavor of sage whenever you need it. Plus, I’m going to share some simple DIY tricks and hacks that will ensure your container-grown sage thrives, even if you don’t have a green thumb. Get ready to grow sage in containers like a pro!
Grow Your Own Sage: A Beginner’s Guide to Container Gardening
Hey there, fellow plant enthusiasts! I’m so excited to share my experience with growing sage in containers. It’s easier than you might think, and having fresh sage right outside your door is a game-changer for cooking. Plus, the silvery-green foliage is just beautiful. Let’s dive in!
Choosing the Right Sage Variety
Before we get started, let’s talk about sage varieties. While common sage (Salvia officinalis) is the most popular for culinary use, there are other options that offer unique flavors and appearances.
* Common Sage (Salvia officinalis): This is your go-to for classic sage flavor. It’s hardy and relatively easy to grow.
* Purple Sage (Salvia officinalis ‘Purpurascens’): This variety boasts beautiful purple-tinged leaves and a slightly milder flavor. It adds a lovely visual element to your garden.
* Golden Sage (Salvia officinalis ‘Aurea’): As the name suggests, this sage has golden-yellow variegated leaves. It’s a bit more delicate than common sage but adds a bright pop of color.
* Tricolor Sage (Salvia officinalis ‘Tricolor’): This variety features leaves with green, white, and pink variegation. It’s a stunning ornamental sage with a mild flavor.
I personally love growing common sage and purple sage together for a mix of flavor and visual appeal.
Materials You’ll Need
Okay, let’s gather our supplies. Here’s what you’ll need to successfully grow sage in containers:
* Sage Seeds or Seedlings: You can start from seeds or purchase established seedlings from a nursery. Seedlings are faster and easier, especially for beginners.
* Container: Choose a pot that’s at least 12 inches in diameter and 12 inches deep. Sage needs room for its roots to grow. Make sure the container has drainage holes!
* Potting Mix: Use a well-draining potting mix specifically formulated for containers. Avoid using garden soil, as it can compact and suffocate the roots.
* Watering Can or Hose: For watering your sage regularly.
* Fertilizer (Optional): A balanced, slow-release fertilizer can help your sage thrive, but it’s not essential.
* Gardening Gloves: To protect your hands.
* Trowel: For planting and transplanting.
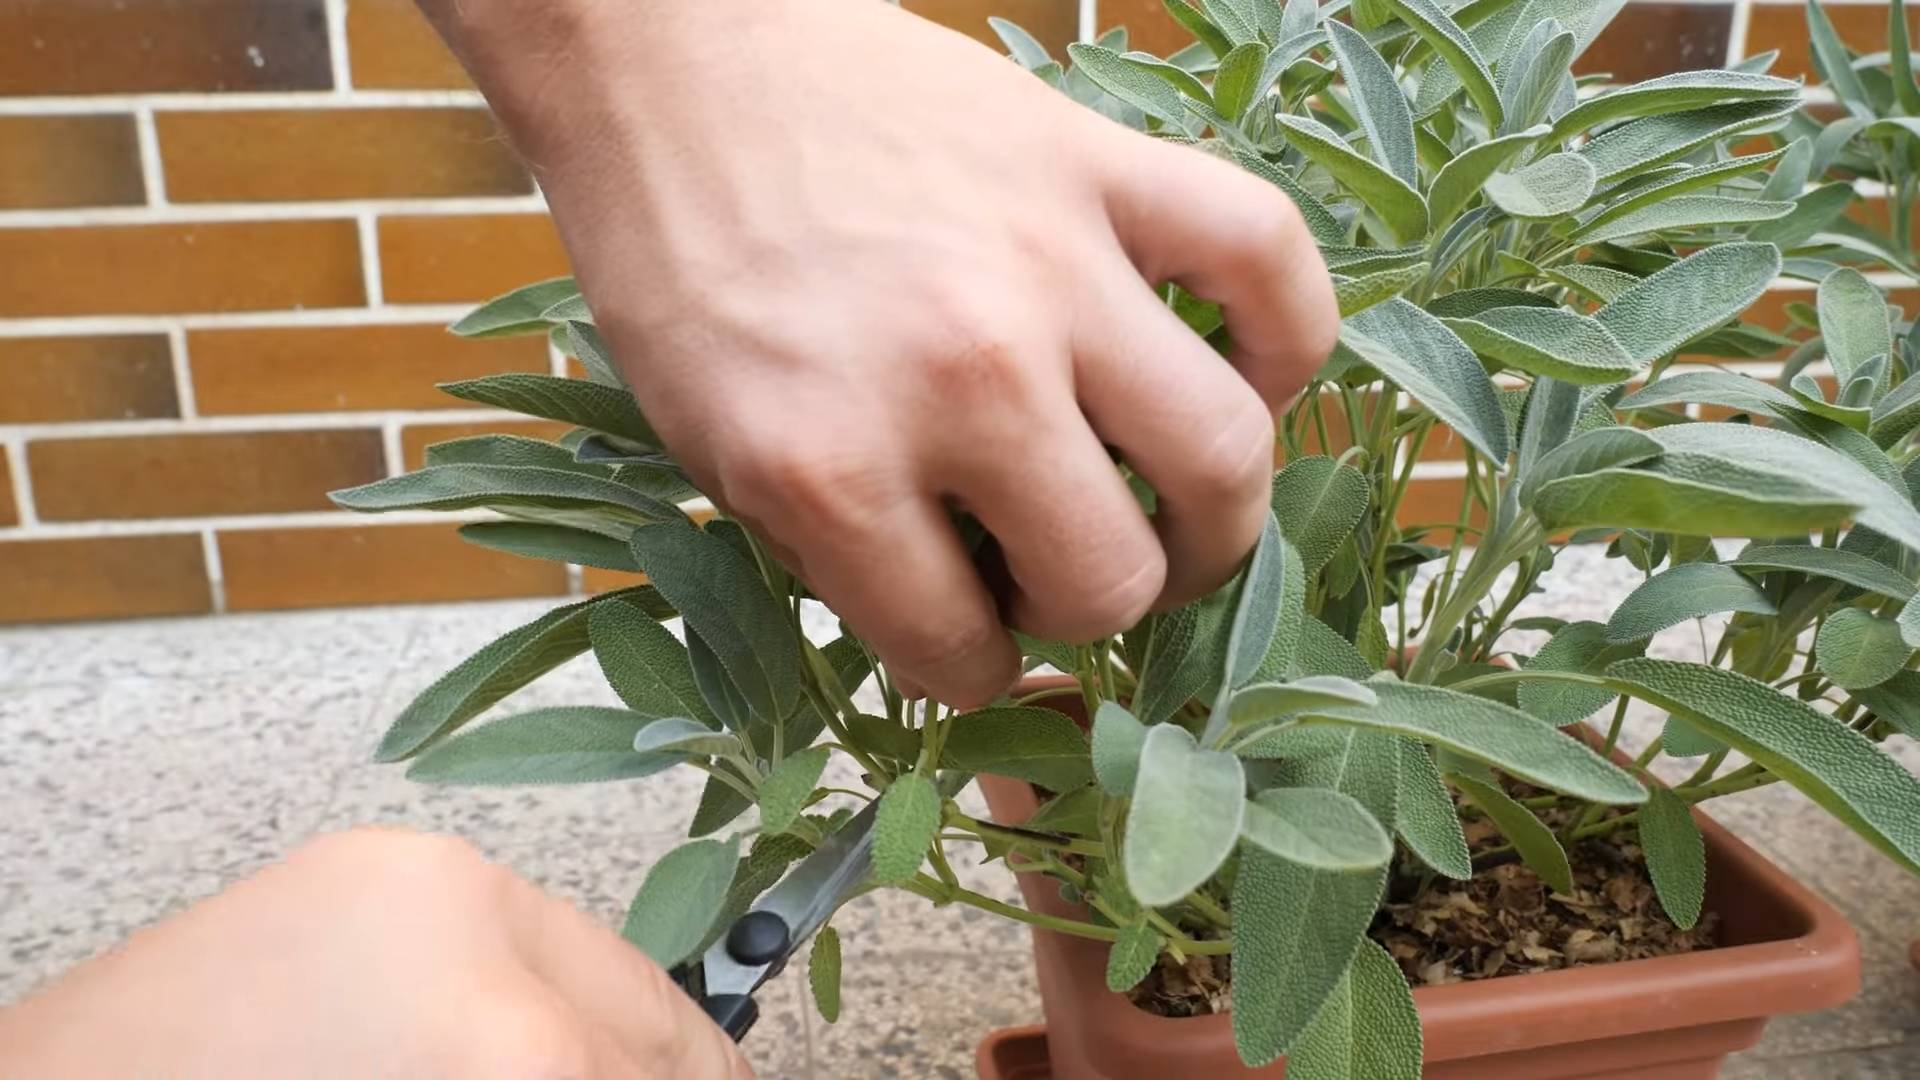
* Pruning Shears or Scissors: For harvesting and pruning.
* Mulch (Optional): Mulch helps retain moisture and suppress weeds.
Planting Your Sage
Now for the fun part – planting! Whether you’re starting from seeds or seedlings, the process is pretty straightforward.
Starting from Seeds:
1. Sow Seeds Indoors (Optional): If you want a head start, sow sage seeds indoors 6-8 weeks before the last expected frost. Fill a seed tray with seed-starting mix and sprinkle the seeds on top. Lightly cover them with soil.
2. Keep Soil Moist: Water the seed tray gently and keep the soil consistently moist but not soggy. A spray bottle works well for this.
3. Provide Light: Place the seed tray in a sunny window or under grow lights. Sage seeds need light to germinate.
4. Transplant Seedlings: Once the seedlings have a few sets of true leaves (the leaves that look like miniature sage leaves), you can transplant them into individual pots.
5. Harden Off Seedlings: Before planting outdoors, gradually acclimate the seedlings to outdoor conditions by placing them outside for a few hours each day, increasing the time over a week or two. This process is called “hardening off.”
Planting Seedlings:
1. Prepare the Container: Fill your chosen container with potting mix, leaving a few inches of space at the top.
2. Remove Seedling from Pot: Gently remove the sage seedling from its nursery pot. If the roots are tightly bound, loosen them slightly with your fingers.
3. Plant the Seedling: Dig a hole in the potting mix that’s large enough to accommodate the seedling’s root ball. Place the seedling in the hole and backfill with potting mix, gently firming the soil around the base of the plant.
4. Water Thoroughly: Water the newly planted sage thoroughly until water drains out of the drainage holes.
Caring for Your Sage
Once your sage is planted, it’s time to provide the care it needs to thrive.
Sunlight:
Sage loves sunshine! Aim for at least 6-8 hours of direct sunlight per day. If you don’t have a sunny spot, consider using grow lights.
Watering:
Water your sage when the top inch of soil feels dry to the touch. Avoid overwatering, as sage is susceptible to root rot. Let the soil dry out slightly between waterings. In hot weather, you may need to water more frequently.
Fertilizing:
Sage doesn’t need a lot of fertilizer. If you choose to fertilize, use a balanced, slow-release fertilizer in the spring. Avoid over-fertilizing, as this can lead to leggy growth and reduced flavor.
Pruning:
Pruning is essential for keeping your sage plant healthy and productive.
* Regular Pruning: Trim back the stems regularly to encourage bushier growth.
* Deadheading: Remove any spent flowers to prevent the plant from going to seed, which can reduce leaf production.
* Hard Pruning: In early spring, you can prune back the plant by about one-third to rejuvenate it.
Overwintering:
Sage is a perennial in many climates, meaning it will come back year after year. However, in colder regions, you may need to take steps to protect it during the winter.
* Move Indoors: If you live in a very cold climate, you can bring your container indoors and place it in a sunny window.
* Mulch Heavily: If you leave your sage outdoors, mulch heavily around the base of the plant to protect the roots from freezing.
* Protect from Wind: Protect the plant from harsh winter winds by placing it in a sheltered location.
Harvesting Your Sage
Harvesting sage is easy and rewarding!
1. When to Harvest: You can start harvesting sage leaves as soon as the plant is established, usually a few weeks after planting.
2. How to Harvest: Use pruning shears or scissors to snip off the leaves. Avoid removing more than one-third of the plant at a time.
3. Best Time to Harvest: The best time to harvest sage is in the morning, after the dew has dried but before the sun gets too hot. This is when the leaves have the highest concentration of essential oils and the most intense flavor.
4. Drying Sage: To dry sage, tie the stems together and hang them upside down in a cool, dry, and well-ventilated place. You can also dry sage leaves in a dehydrator or oven on low heat.
5. Storing Sage: Store dried sage leaves in an airtight container in a cool, dark place.
Troubleshooting Common Problems
Even with the best care, you might encounter some problems while growing sage. Here are a few common issues and how to address them:
* Root Rot: This is caused by overwatering. Make sure your container has good drainage and allow the soil to dry out slightly between waterings.
* Powdery Mildew: This fungal disease appears as a white, powdery coating on the leaves. Improve air circulation around the plant and treat with a fungicide if necessary.
* Aphids: These small, sap-sucking insects can infest sage plants. Spray them off with a strong stream of water or treat with insecticidal soap.
* Spider Mites: These tiny pests can cause yellowing and stippling on the leaves. Increase humidity around the plant and treat with miticide if necessary.
Using Your Fresh Sage
Now that you have a bountiful supply of fresh sage, it’s time to get creative in the kitchen! Here are a few ideas:
* Sage Butter: Sauté sage leaves in butter until crispy and fragrant. Use it to top pasta, gnocchi, or roasted vegetables.
* Sage Pesto: Blend sage leaves with Parmesan cheese, garlic, pine nuts, and olive oil to make a delicious pesto.
* Sage Tea: Steep fresh sage leaves in hot water to make a soothing and flavorful tea.
* Sage Stuffing: Add fresh sage to your favorite stuffing recipe for a classic Thanksgiving flavor.
* Sage Sausage: Use fresh sage to season homemade sausage.
* Sage Infused Oil: Infuse olive oil with sage leaves for a flavorful cooking oil.
Propagating Sage
Want to expand your sage collection? Propagating sage is easy!
* Stem Cuttings:

Conclusion
So, there you have it! Growing sage in containers is not only achievable, but it’s also incredibly rewarding. We’ve walked through the simple steps, from selecting the right container and soil to providing the proper care and harvesting your fragrant bounty. But why should you bother with this DIY project?
Simply put, having fresh sage at your fingertips elevates your cooking to a whole new level. Imagine the aroma of freshly chopped sage infusing your Thanksgiving stuffing, or the earthy notes it adds to a simple brown butter sauce for pasta. Store-bought dried sage simply can’t compare to the vibrant flavor and fragrance of homegrown. Plus, growing your own herbs is a sustainable and cost-effective way to enjoy fresh ingredients year-round.
Beyond the culinary benefits, growing sage in containers offers a touch of greenery and fragrance to your home, balcony, or patio. It’s a beautiful and practical addition to any space, no matter how small. And let’s not forget the satisfaction of nurturing a plant from a tiny seedling or cutting to a thriving herb.
This DIY sage growing trick is a must-try for anyone who loves fresh herbs, enjoys gardening, or simply wants to add a touch of natural beauty to their surroundings.
But don’t stop there! Experiment with different varieties of sage. Try growing purple sage for its striking foliage, or golden sage for its unique flavor profile. You can also companion plant your sage with other herbs like rosemary or thyme in larger containers, creating a miniature herb garden. Consider using different types of containers too – terracotta pots, repurposed buckets, or even hanging baskets can all work beautifully.
And remember, growing sage in containers is a journey, not a destination. There will be successes and challenges along the way. Don’t be afraid to experiment, learn from your mistakes, and most importantly, have fun!
We’re confident that you’ll find growing sage in containers to be a rewarding and enjoyable experience. So, grab your supplies, get your hands dirty, and start growing your own fresh sage today!
We’d love to hear about your experiences! Share your photos, tips, and questions in the comments below. Let’s build a community of container sage growers and learn from each other. Happy gardening!
Frequently Asked Questions (FAQ)
What is the best type of container for growing sage?
The best type of container for growing sage is one that is at least 12 inches in diameter and depth. This provides ample space for the roots to grow and allows for good drainage. Terracotta pots are a popular choice because they are porous and allow the soil to breathe, preventing waterlogging. Plastic pots are also a good option, but be sure to choose a dark color to help retain heat. You can also use repurposed containers like buckets or tubs, as long as they have drainage holes. The most important factor is that the container provides adequate drainage to prevent root rot.
What kind of soil should I use for growing sage in containers?
Sage thrives in well-draining soil that is slightly alkaline. A good potting mix for sage should consist of equal parts of potting soil, perlite, and compost. The potting soil provides nutrients, the perlite improves drainage, and the compost adds organic matter. Avoid using garden soil in containers, as it can become compacted and prevent proper drainage. You can also add a small amount of lime to the soil to increase its alkalinity.
How often should I water my sage plant in a container?
Water your sage plant when the top inch of soil feels dry to the touch. Avoid overwatering, as this can lead to root rot. Sage prefers to be slightly dry rather than constantly wet. During hot, dry weather, you may need to water your plant more frequently. Check the soil moisture regularly and adjust your watering schedule accordingly. When watering, water deeply until water drains out of the drainage holes.
How much sunlight does sage need?
Sage needs at least six hours of sunlight per day to thrive. Place your container in a sunny location where it will receive plenty of direct sunlight. If you live in a hot climate, you may need to provide some afternoon shade to prevent the leaves from scorching. If you are growing sage indoors, place it near a sunny window or use a grow light to supplement the natural light.
How do I fertilize my sage plant?
Sage does not require heavy fertilization. In fact, over-fertilizing can lead to leggy growth and reduced flavor. Fertilize your sage plant once or twice during the growing season with a balanced liquid fertilizer diluted to half strength. You can also add compost to the soil to provide a slow-release source of nutrients. Avoid using fertilizers that are high in nitrogen, as this can promote leafy growth at the expense of flavor.
How do I harvest sage?
You can begin harvesting sage leaves once the plant is established and has grown to a reasonable size. To harvest, simply snip off the leaves with scissors or pruning shears. Avoid removing more than one-third of the plant at a time, as this can stress the plant. The best time to harvest sage is in the morning, after the dew has dried. You can use the fresh sage leaves immediately, or you can dry them for later use.
How do I dry sage leaves?
There are several ways to dry sage leaves. One method is to tie the stems together and hang them upside down in a cool, dry, and well-ventilated place. Another method is to spread the leaves out on a screen or baking sheet and allow them to air dry. You can also use a dehydrator to dry sage leaves. Once the leaves are completely dry, store them in an airtight container in a cool, dark place.
Can I grow sage indoors?
Yes, you can grow sage indoors, but it requires plenty of sunlight. Place your container near a sunny window or use a grow light to supplement the natural light. Be sure to provide good drainage and avoid overwatering. Indoor sage plants may not grow as vigorously as outdoor plants, but you can still enjoy fresh sage leaves year-round.
How do I overwinter my sage plant?
Sage is a perennial herb, meaning it can live for several years. In cold climates, you may need to overwinter your sage plant indoors. Before the first frost, move your container to a sheltered location, such as a garage or shed. Water sparingly during the winter months, allowing the soil to dry out between waterings. In the spring, move your plant back outdoors once the danger of frost has passed.
My sage plant is leggy and not producing many leaves. What should I do?
Leggy growth in sage plants is often caused by insufficient sunlight or over-fertilizing. Make sure your plant is receiving at least six hours of sunlight per day. If you are fertilizing your plant, reduce the amount or switch to a fertilizer that is lower in nitrogen. You can also prune your sage plant to encourage bushier growth. Cut back the stems by about one-third to promote new growth.

Leave a Comment