
DIY plastic bottle garden: Ever feel like your green thumb is itching for a project, but your wallet’s feeling a little light? Or maybe you’re short on space but long on dreams of fresh herbs and vibrant flowers? Well, you’re in the right place! I’m excited to share a fantastic and eco-friendly solution that’s been gaining popularity for years: creating a thriving garden using recycled plastic bottles.
The concept of repurposing materials for gardening isn’t new. Throughout history, resourceful gardeners have found creative ways to cultivate plants using whatever was available. From ancient civilizations utilizing clay pots to modern-day urban farmers embracing upcycling, the spirit of ingenuity has always been at the heart of gardening. Today, with growing concerns about plastic waste, the DIY plastic bottle garden offers a sustainable and visually appealing way to reduce our environmental footprint while enjoying the benefits of homegrown goodness.
Why should you try this DIY trick? Because it’s incredibly versatile! Whether you live in a tiny apartment with a sunny windowsill or have a sprawling backyard, a plastic bottle garden can be adapted to suit your needs. Plus, it’s a fantastic way to teach kids about recycling and the wonders of nature. I’m going to guide you through some simple yet effective techniques to transform those discarded plastic bottles into a flourishing oasis. Get ready to unleash your creativity and cultivate a garden that’s both beautiful and beneficial!
DIY Vertical Garden from Plastic Bottles: A Step-by-Step Guide
Hey there, fellow DIY enthusiasts! I’m super excited to share this project with you – a fantastic way to recycle those pesky plastic bottles and create a beautiful, space-saving vertical garden. Not only is it eco-friendly, but it also adds a touch of green to any balcony, patio, or even an indoor wall. Let’s get started!
Materials You’ll Need
Before we dive in, let’s gather all the necessary materials. Trust me, having everything ready beforehand will make the process much smoother.
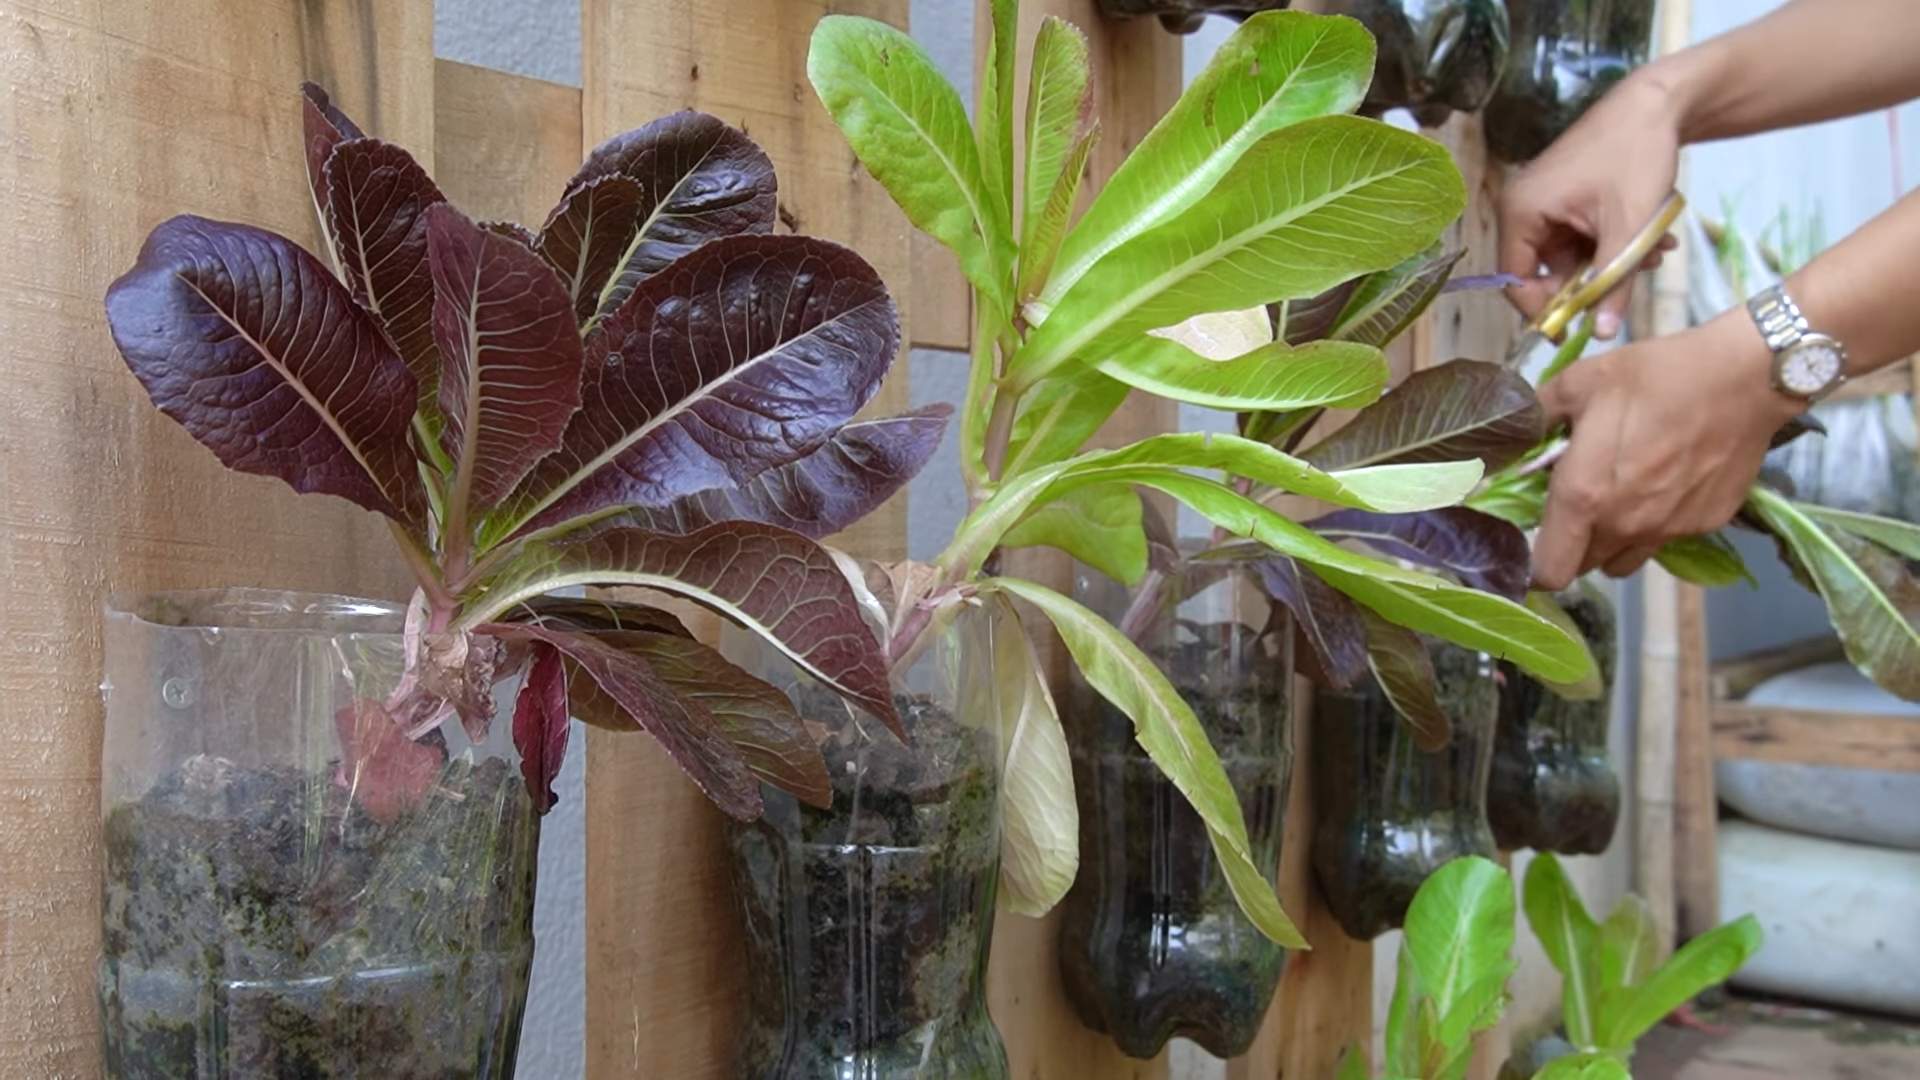
* Plastic Bottles: The star of the show! Aim for bottles of similar size and shape for a more uniform look. I usually use 1.5 or 2-liter bottles, but you can experiment with different sizes. The number of bottles depends on how big you want your garden to be.
* Scissors or Utility Knife: For cutting the bottles. Be careful and always cut away from yourself!
* Strong Rope or Twine: To hang the bottles. I prefer using nylon rope because it’s durable and weather-resistant.
* Drill or Awl: To create drainage and hanging holes. A drill is faster, but an awl works just fine if you don’t have one.
* Soil: Choose a good quality potting mix that’s suitable for the plants you want to grow.
* Plants: Herbs, succulents, strawberries, lettuce, or small flowering plants work great in vertical gardens.
* Measuring Tape or Ruler: To ensure even spacing between the bottles.
* Marker or Pen: To mark cutting and drilling points.
* Gloves: To protect your hands while working with soil and cutting plastic.
* Optional: Spray Paint: If you want to give your bottles a more polished look, grab some spray paint in your favorite colors.
Preparing the Plastic Bottles
This is where the magic begins! We’ll transform those ordinary plastic bottles into mini planters.
1. Clean the Bottles: Thoroughly wash the bottles with soap and water to remove any residue. Remove the labels and dry them completely. This will help the spray paint adhere better, if you choose to paint them.
2. Mark the Cutting Line: Decide where you want to cut the bottles. I usually cut them horizontally, leaving about two-thirds of the bottle intact. Use a marker to draw a line around the bottle at the desired height. You can use a measuring tape to ensure the line is even all the way around.
3. Cut the Bottles: Carefully cut along the marked line using scissors or a utility knife. If you’re using a utility knife, place the bottle on a stable surface and cut slowly and steadily. Be extra cautious to avoid accidents.
4. Smooth the Edges (Optional): The cut edges can be sharp, so you might want to smooth them down with sandpaper or a lighter. If using a lighter, quickly run the flame along the edge to melt and smooth it. Be very careful not to burn yourself or melt the plastic too much.
5. Paint the Bottles (Optional): If you want to add some color to your garden, now’s the time to spray paint the bottles. Choose colors that complement your plants and your outdoor space. Apply several thin coats of paint, allowing each coat to dry completely before applying the next. This will prevent drips and ensure a smooth, even finish.
6. Drill Drainage Holes: Drill or poke several small holes in the bottom of each bottle for drainage. This is crucial to prevent waterlogging and root rot. I usually make about 4-5 holes per bottle.
7. Drill Hanging Holes: Now, drill or poke two holes on opposite sides of each bottle, near the top edge. These holes will be used to thread the rope through and hang the bottles. Make sure the holes are large enough to accommodate your rope or twine.
Assembling the Vertical Garden
Now comes the fun part – putting everything together!
1. Cut the Rope: Determine the desired length of your vertical garden and cut the rope accordingly. Remember to add some extra length for tying knots and hanging the garden. I usually cut a long piece of rope and then trim it later if needed.
2. Thread the Rope: Thread the rope through the hanging holes of each bottle, starting from the bottom. Make sure the bottles are facing the same direction.
3. Secure the Bottles: Tie a knot below each bottle to secure it in place. The knot should be large enough to prevent the bottle from sliding down the rope. You can also use small pieces of wood or plastic as spacers between the bottles for a more uniform look.
4. Space the Bottles: Adjust the spacing between the bottles to your liking. I usually leave about 6-8 inches between each bottle, but you can adjust this depending on the size of your bottles and the plants you want to grow.
5. Hang the Garden: Find a suitable location to hang your vertical garden. Make sure the location receives enough sunlight for your plants. You can hang it from a balcony railing, a fence, or even a sturdy hook on a wall.
6. Test the Stability: Before adding soil and plants, test the stability of your vertical garden. Make sure the rope is strong enough to support the weight of the bottles and that the bottles are securely attached.
Planting Your Vertical Garden
Time to bring your garden to life!
1. Add Soil: Fill each bottle with potting mix, leaving some space at the top.
2. Plant Your Plants: Carefully remove your plants from their containers and gently loosen the roots. Plant them in the bottles, making sure the roots are well covered with soil.
3. Water Your Plants: Water your plants thoroughly after planting. Allow the excess water to drain out through the drainage holes.
4. Monitor and Maintain: Regularly check the soil moisture and water your plants as needed. Fertilize them occasionally to promote healthy growth. Remove any dead or yellowing leaves to keep your garden looking its best.
Alternative Hanging Methods
While the rope method is the most common, here are a few other ways you can hang your plastic bottle garden:
* Wire Mesh: Attach the bottles to a wire mesh using zip ties or wire. This creates a more structured and stable garden.
* Wooden Pallet: Attach the bottles to a wooden pallet using screws or nails. This gives your garden a rustic and charming look.
* Chain: Use chain instead of rope for a more industrial and durable look.
Choosing the Right Plants
Not all plants are created equal when it comes to vertical gardens. Here are some of my favorite plants to grow in plastic bottle gardens:
* Herbs: Mint, basil, thyme, oregano, and rosemary are all great choices for vertical gardens. They’re easy to grow, require minimal maintenance, and provide fresh herbs for your cooking.
* Succulents: Succulents are drought-tolerant and require very little watering, making them perfect for busy gardeners. They also come in a variety of shapes and colors, adding visual interest to your garden.
* Strawberries: Strawberries thrive in vertical gardens and produce delicious fruit. Just make sure to choose a variety that’s suitable for your climate.
* Lettuce: Lettuce is easy to grow and provides a continuous supply of fresh greens. Choose a variety that’s compact and doesn’t require a lot of space.
* Small Flowering Plants: Petunias, pansies, and impatiens are all great choices for adding color to your vertical garden. Choose varieties that are compact and don’t require a lot of sunlight.
Troubleshooting Tips
Even with the best planning, you might encounter a few challenges along the way. Here are some common problems and how to fix them:
* Waterlogging: If your plants are suffering from waterlogging, make sure the drainage holes are not blocked. You can also add some gravel or perlite to the bottom of the bottles to improve drainage.
* Nutrient Deficiency: If your plants are looking pale or yellow, they might be lacking nutrients. Fertilize them with a balanced fertilizer according to the package instructions.
* Pests: Keep an eye out for pests like aphids, spider mites, and whiteflies. Treat them with an organic insecticide or insecticidal soap.
* Sunlight: Make sure your plants are getting enough sunlight. If they’re not, move your garden to a sunnier location or supplement with artificial light.
Benefits of a Plastic Bottle Vertical Garden
Besides being a fun and rewarding DIY project, a plastic bottle vertical garden offers several benefits:
* Recycling: It’s a great way to recycle plastic bottles and reduce waste.
* Space-Saving: It’s perfect for small spaces like balconies and patios.
* Aesthetic Appeal: It adds a touch of green and beauty to any space.
* Fresh Herbs and Vegetables: You can grow your own fresh herbs and vegetables right at your doorstep.
*

Conclusion
So, there you have it! Transforming discarded plastic bottles into a thriving garden is not just a clever upcycling project; it’s a sustainable solution that benefits both your green thumb and the planet. This DIY plastic bottle garden method offers a fantastic way to cultivate herbs, vegetables, or flowers, even in limited spaces. It’s economical, environmentally friendly, and surprisingly easy to execute.
But why is this DIY trick a must-try? Beyond the obvious environmental benefits of reducing plastic waste, a plastic bottle garden provides excellent drainage, protects plants from ground-borne pests, and allows for vertical gardening, maximizing your growing area. It’s also a fantastic educational project for children, teaching them about recycling, plant life cycles, and the importance of sustainability. Plus, let’s be honest, it looks pretty cool!
Don’t feel limited by the basic design. Get creative! Consider painting the bottles to add a splash of color to your balcony or patio. Experiment with different bottle sizes and shapes to create unique planters. You could even link multiple bottle gardens together to form a larger, more elaborate vertical garden system. For herbs, try grouping similar varieties together for easy harvesting. For vegetables, consider the size of the mature plant and choose bottles accordingly. Think about adding a self-watering system by connecting a reservoir to the bottom bottle, making maintenance even easier. You can also use different types of soil mixes depending on the plants you are growing. Succulents, for example, thrive in well-draining soil, while vegetables prefer a nutrient-rich mix.
The possibilities are truly endless. The key is to have fun and experiment. Don’t be afraid to make mistakes – that’s how you learn! And remember, every plastic bottle you repurpose is one less bottle polluting our environment.
We wholeheartedly encourage you to give this DIY plastic bottle garden a try. It’s a rewarding project that will bring beauty and fresh produce to your life while contributing to a more sustainable future. Once you’ve created your own bottle garden, we’d love to hear about your experience! Share your photos, tips, and variations in the comments below. Let’s inspire each other to create a greener world, one plastic bottle at a time. We are confident that you will find this project to be both enjoyable and beneficial. So, grab those bottles, gather your supplies, and get gardening! You’ll be amazed at what you can create.
Frequently Asked Questions (FAQ)
What types of plants are best suited for a DIY plastic bottle garden?
Many plants thrive in plastic bottle gardens, but some are particularly well-suited due to their size and growth habits. Herbs like basil, mint, oregano, and thyme are excellent choices as they tend to stay relatively small and don’t require deep root systems. Leafy greens such as lettuce, spinach, and kale also do well. Strawberries are another popular option, as their trailing vines can cascade beautifully from the bottles. Smaller varieties of peppers and tomatoes can also be grown, but be sure to choose larger bottles to accommodate their root systems. Succulents and cacti are also great choices, especially for those who are new to gardening, as they are drought-tolerant and require minimal maintenance. Avoid plants that require a lot of space for their roots to grow, such as large root vegetables like carrots or potatoes, unless you are using very large bottles.
How do I ensure proper drainage in my plastic bottle garden?
Proper drainage is crucial to prevent root rot and ensure the health of your plants. The most important step is to create drainage holes in the bottom of each bottle. Drill or poke several holes, about ¼ inch in diameter, to allow excess water to escape. You can also add a layer of gravel or small stones to the bottom of each bottle before adding soil. This will further improve drainage and prevent the soil from becoming waterlogged. When watering, be sure to water slowly and evenly, allowing the water to drain completely before adding more. Avoid overwatering, as this can lead to root rot. If you live in a particularly rainy area, consider adding a small roof or overhang to protect your bottle garden from excessive rainfall.
What type of soil should I use for my plastic bottle garden?
The best type of soil for your plastic bottle garden depends on the plants you are growing. In general, a well-draining potting mix is a good choice for most plants. Avoid using garden soil, as it can be too heavy and compact, leading to poor drainage. You can also create your own potting mix by combining equal parts of peat moss, perlite, and vermiculite. For herbs, a slightly sandy soil mix is ideal. For vegetables, a nutrient-rich mix with added compost or aged manure is recommended. For succulents and cacti, use a well-draining cactus mix. Be sure to choose a soil mix that is appropriate for the specific plants you are growing to ensure their optimal growth and health.
How often should I water my plastic bottle garden?
The frequency of watering depends on several factors, including the type of plants you are growing, the climate, and the type of soil you are using. In general, you should water your plastic bottle garden when the top inch of soil feels dry to the touch. Avoid overwatering, as this can lead to root rot. During hot, dry weather, you may need to water more frequently. During cooler, wetter weather, you may need to water less frequently. Succulents and cacti require less frequent watering than other plants. A good rule of thumb is to check the soil moisture regularly and water only when necessary. You can also use a moisture meter to help you determine when to water.
How do I protect my plastic bottle garden from pests and diseases?
While plastic bottle gardens offer some protection from ground-borne pests, they are still susceptible to other pests and diseases. To prevent pests, inspect your plants regularly for signs of infestation, such as aphids, spider mites, or whiteflies. If you find pests, you can try spraying them with a solution of soapy water or neem oil. You can also introduce beneficial insects, such as ladybugs or lacewings, to help control pests. To prevent diseases, ensure good air circulation around your plants and avoid overwatering. Remove any dead or diseased leaves promptly. You can also use a fungicide to prevent fungal diseases. Choose organic pest control and disease prevention methods whenever possible to protect the environment and your health.
How do I fertilize my plastic bottle garden?
Fertilizing your plastic bottle garden is important to provide your plants with the nutrients they need to grow and thrive. You can use a liquid fertilizer or a slow-release granular fertilizer. Liquid fertilizers are applied directly to the soil and provide a quick boost of nutrients. Slow-release granular fertilizers release nutrients gradually over time. Choose a fertilizer that is specifically formulated for the type of plants you are growing. Follow the instructions on the fertilizer label carefully. Avoid over-fertilizing, as this can damage your plants. You can also add compost or aged manure to the soil to provide a natural source of nutrients.
Can I grow my plastic bottle garden indoors?
Yes, you can grow your plastic bottle garden indoors, but you will need to provide adequate light. Place your bottle garden near a sunny window or use grow lights to supplement natural light. Be sure to choose plants that are well-suited for indoor growing conditions. Herbs, leafy greens, and succulents are all good choices for indoor plastic bottle gardens. Monitor the soil moisture carefully and water only when necessary. Ensure good air circulation around your plants to prevent diseases.
How do I prepare my plastic bottle garden for winter?
If you live in an area with cold winters, you will need to take steps to protect your plastic bottle garden from frost and freezing temperatures. You can move your bottle garden indoors or to a sheltered location, such as a garage or shed. If you leave your bottle garden outdoors, you can wrap the bottles with burlap or blankets to insulate them. You can also add a layer of mulch around the base of the plants to protect their roots. Water your plants less frequently during the winter months. Some plants may go dormant during the winter, so don’t be alarmed if they stop growing.
What are some creative variations I can try with my DIY plastic bottle garden?
The possibilities are endless when it comes to creating variations of your DIY plastic bottle garden! You can paint the bottles with colorful designs, create vertical gardens by hanging the bottles from a wall or fence, or even build a self-watering system by connecting a reservoir to the bottom bottle. You can also experiment with different bottle sizes and shapes to create unique planters. Consider adding decorative elements, such as pebbles, shells, or small figurines, to personalize your bottle garden. You can also use different types of soil mixes to create specialized growing environments for different plants. Let your creativity run wild and have fun experimenting with different ideas!
Leave a Comment