
Grow Taro Organically at Home? Absolutely! Imagine harvesting your own creamy, nutty-flavored taro root, knowing exactly where it came from and how it was grown. It’s not just a culinary delight; it’s a connection to a tradition that stretches back thousands of years. Taro, a staple in many Pacific Island cultures, holds deep cultural significance, often associated with family, sustenance, and even spirituality. For centuries, communities have relied on taro as a primary food source, developing intricate farming techniques passed down through generations.
But you don’t need to live on a tropical island to enjoy the benefits of this amazing plant. I’m here to show you how to grow taro organically at home, no matter your experience level. In today’s world, where we’re increasingly conscious of what we eat and where it comes from, growing your own food is more important than ever. Store-bought produce can be laden with pesticides and travel long distances, impacting both our health and the environment. This DIY guide will empower you to cultivate your own healthy, delicious taro, free from harmful chemicals, right in your backyard or even in containers on your patio. Let’s get started and bring a little bit of the tropics to your home!

Growing Taro Organically at Home: A Beginner’s Guide
Hey there, fellow plant enthusiasts! Ever thought about growing your own taro? It’s surprisingly easy and rewarding, plus you get to enjoy fresh, organically grown taro right from your backyard. I’ve been growing taro for a few years now, and I’m excited to share my tips and tricks with you. Let’s dive in!
What You’ll Need
Before we get started, let’s gather all the necessary materials. This will make the process smoother and more enjoyable.
* Taro Corms (Seed Taro): You can usually find these at your local nursery or online. Make sure they look healthy and free from any signs of disease.
* Large Container or Garden Bed: Taro needs space to grow, so choose a container that’s at least 18 inches in diameter and depth, or prepare a dedicated garden bed.
* Organic Potting Mix or Soil: A well-draining, nutrient-rich soil is crucial for healthy taro growth.
* Organic Compost: This will provide essential nutrients and improve soil structure.
* Water: Taro loves water, so make sure you have a reliable water source.
* Organic Fertilizer: A slow-release organic fertilizer will help boost growth and yield.
* Mulch (Optional): Mulch helps retain moisture and suppress weeds.
* Gardening Gloves: To protect your hands.
* Trowel or Shovel: For planting and digging.
Choosing the Right Taro Variety
There are many different varieties of taro, each with its own unique characteristics. Some are better suited for certain climates or growing conditions. Do some research to find a variety that thrives in your area. I personally love the ‘Bun Long’ variety for its delicious corms and relatively compact size.
Preparing the Soil
Taro thrives in rich, well-draining soil. Here’s how I prepare my soil for planting:
1. Clear the Area: Remove any weeds, rocks, or debris from the planting area.
2. Loosen the Soil: Use a trowel or shovel to loosen the soil to a depth of at least 12 inches.
3. Amend the Soil: Mix in plenty of organic compost to improve soil fertility and drainage. I usually add about 1/3 compost to 2/3 soil.
4. Add Organic Fertilizer: Incorporate a slow-release organic fertilizer according to the package instructions. This will provide a steady supply of nutrients for your taro plants.
5. Water Thoroughly: Water the soil well to help settle it and activate the fertilizer.
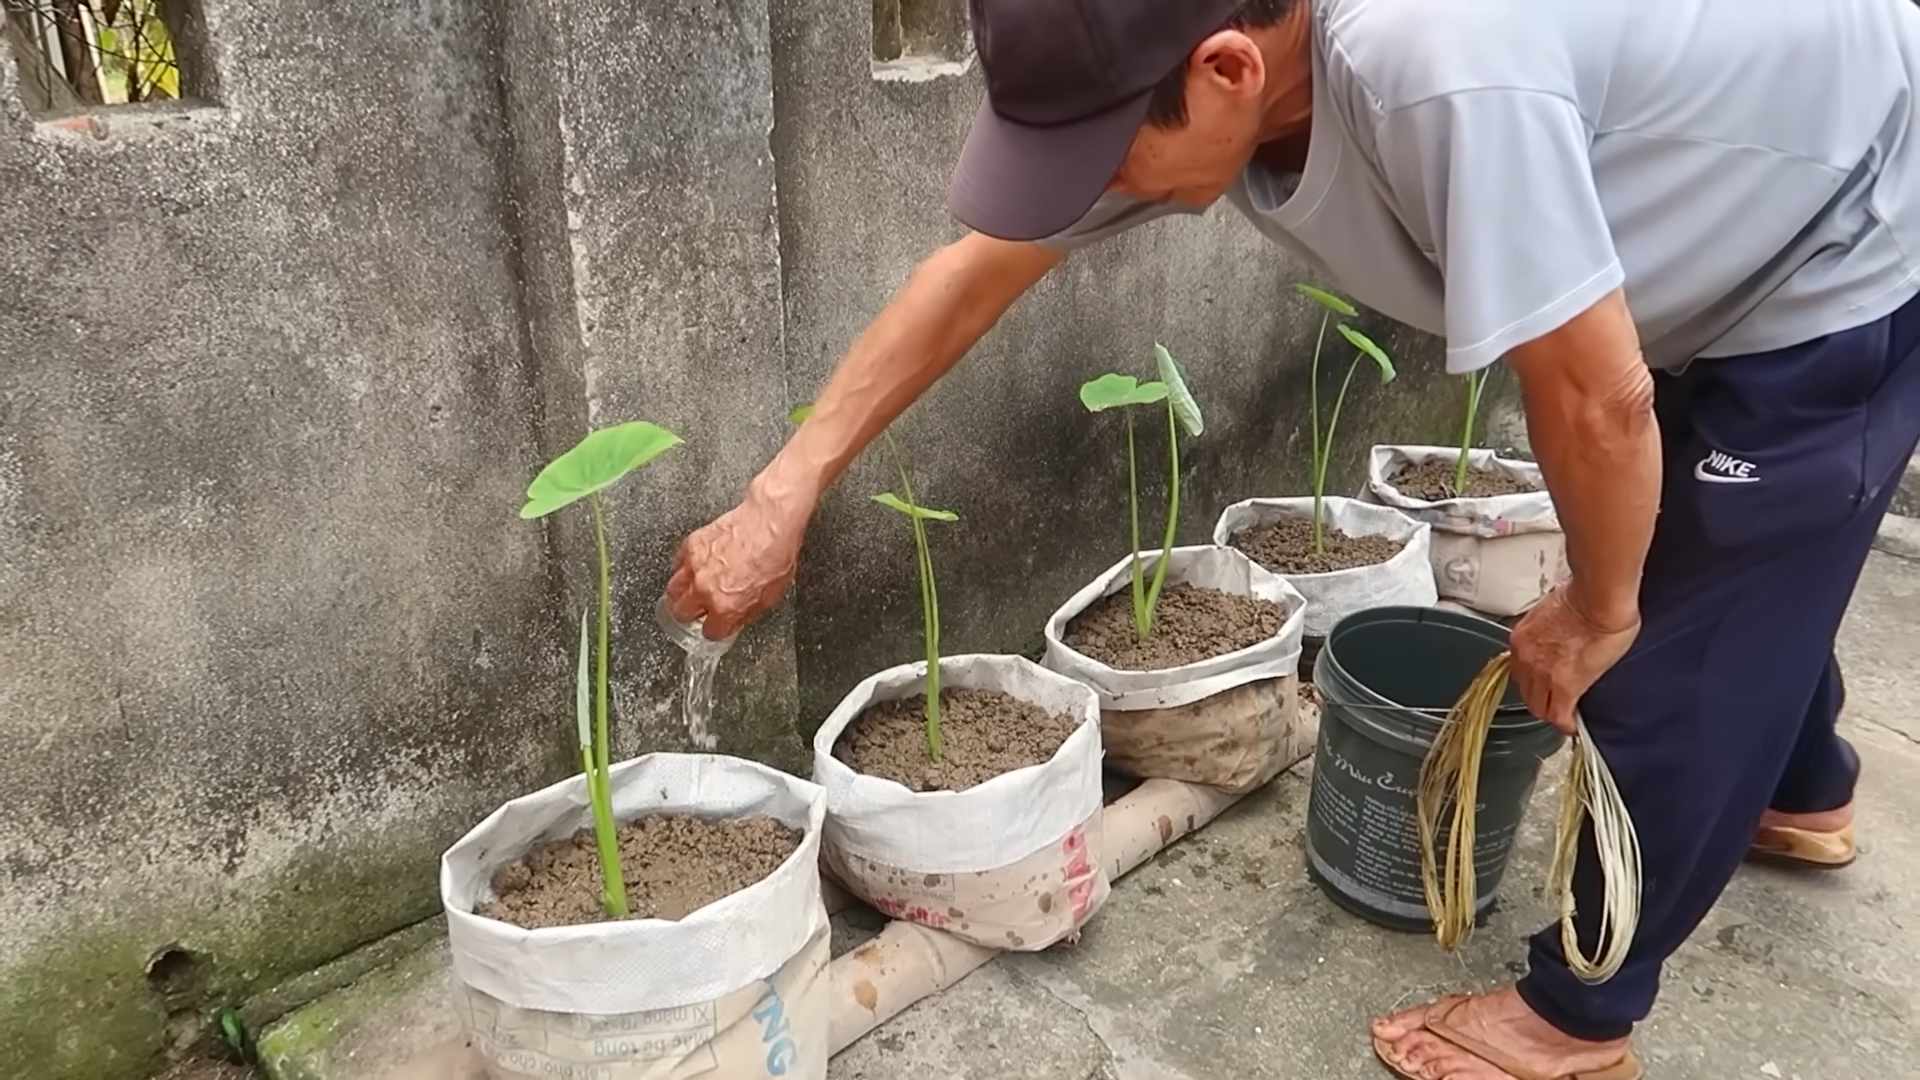
Planting Your Taro Corms
Now comes the fun part – planting your taro corms!
1. Dig a Hole: Dig a hole that’s about 4-6 inches deep and wide enough to accommodate the taro corm.
2. Place the Corm: Place the taro corm in the hole with the pointed end facing upwards.
3. Cover with Soil: Cover the corm with soil and gently pat it down.
4. Water Well: Water the newly planted corm thoroughly.
5. Mulch (Optional): Apply a layer of mulch around the base of the plant to help retain moisture and suppress weeds.
Caring for Your Taro Plants
Taro is relatively easy to care for, but it does have some specific needs.
1. Watering: Taro loves water, so keep the soil consistently moist. Water deeply whenever the top inch of soil feels dry. In hot weather, you may need to water daily.
2. Sunlight: Taro prefers partial shade, especially in hot climates. Too much direct sunlight can scorch the leaves. If you’re growing taro in a container, you can easily move it to a shadier location if needed.
3. Fertilizing: Feed your taro plants with organic fertilizer every 4-6 weeks during the growing season. I like to use a balanced fertilizer that’s specifically formulated for vegetables.
4. Weeding: Keep the area around your taro plants free of weeds. Weeds can compete with your taro for nutrients and water.
5. Pest Control: Taro is generally pest-resistant, but occasionally you may encounter aphids or spider mites. You can control these pests with organic insecticidal soap or neem oil.
6. Pruning: Remove any yellowing or damaged leaves to keep your taro plants healthy and productive.
Dealing with Common Taro Problems
Even with the best care, you may encounter some problems when growing taro. Here are some common issues and how to address them:
* Yellowing Leaves: This can be caused by overwatering, underwatering, nutrient deficiencies, or pests. Check the soil moisture, fertilize if needed, and inspect for pests.
* Root Rot: This is caused by overly wet soil and poor drainage. Make sure your soil is well-draining and avoid overwatering.
* Leaf Spot: This is a fungal disease that can cause brown spots on the leaves. Improve air circulation and avoid overhead watering. You can also treat with an organic fungicide.
Harvesting Your Taro
The time it takes for taro to mature depends on the variety and growing conditions. Generally, you can expect to harvest your taro corms in 6-12 months.
1. Check for Maturity: The leaves will start to turn yellow and die back when the corms are mature.
2. Dig Up the Corms: Use a trowel or shovel to carefully dig up the taro corms.
3. Clean the Corms: Wash the corms thoroughly to remove any dirt or debris.
4. Curing (Optional): You can cure the corms by allowing them to dry in a well-ventilated area for a few days. This will improve their storage life.
Enjoying Your Homegrown Taro
Now that you’ve harvested your taro, it’s time to enjoy the fruits (or rather, corms) of your labor! Taro can be cooked in many different ways.
Important Note: Always cook taro thoroughly before eating. Raw taro contains calcium oxalate crystals, which can cause irritation and discomfort. Cooking breaks down these crystals, making the taro safe to eat.
Propagating Taro
Want to expand your taro patch? Propagating taro is easy!
1. Division: When you harvest your taro corms, you’ll notice that they often have smaller corms attached to them. These can be separated and planted as new plants.
2. Offsets: Taro also produces offsets, which are small plantlets that grow from the base of the plant. These can be carefully removed and planted in their own containers.
Growing Taro in Containers
If you don’t have a garden, you can still grow taro in containers. Here are some tips for growing taro in pots:
* Choose a Large Container: As mentioned earlier, taro needs space to grow, so choose a container that’s at least 18 inches in diameter and depth.
* Use a Well-Draining Potting Mix: A good quality potting mix will provide the necessary nutrients and drainage.
* Water Regularly: Container-grown taro will dry out more quickly than taro grown in the ground, so water regularly.
* Fertilize Regularly: Container-grown taro will also need to be fertilized more frequently than taro grown in the ground.
* Provide Partial Shade: Protect your container-grown taro from direct sunlight, especially during the hottest part of the day.
Organic Pest Control for Taro
Keeping your taro plants healthy and pest-free is crucial for a successful harvest. Here are some organic pest control methods I use:
* Neem Oil: This is a natural insecticide that can be used to control a wide range of pests, including aphids, spider mites, and whiteflies.
* Insecticidal Soap: This is another effective organic insecticide that’s safe for use on edible plants.
* Companion Planting: Planting certain herbs and flowers near your taro can help repel pests. For example, marigolds are known to repel nematodes.
* Handpicking: If you only have a few pests, you can simply pick them off by hand.
* Attracting Beneficial Insects: Encourage beneficial insects like ladybugs and lacewings to visit your garden. These insects will prey on pests that can damage your taro plants.
Tips for Maximizing Your Taro Harvest
Want to get the most out of your taro plants? Here are some tips to help you maximize your harvest:
* Choose the Right Variety: Select a taro variety that’s well-suited to your climate and growing conditions.
* Prepare the Soil Properly: Make sure your soil is rich in organic matter and well-draining.
*
Conclusion
So, there you have it! Growing taro organically at home is not only achievable but also incredibly rewarding. From the satisfaction of nurturing a plant from corm to harvest, to the unparalleled flavor of freshly grown taro in your favorite dishes, this DIY project is a must-try for any gardening enthusiast or food lover.
We’ve walked you through the entire process, from selecting the right corms and preparing the soil to providing optimal growing conditions and harvesting your bounty. Remember, patience is key. Taro requires time and attention, but the results are well worth the effort. Imagine serving a creamy taro soup made with taro you grew yourself – the bragging rights alone are worth the initial investment!
But the journey doesn’t end here. Feel free to experiment with different varieties of taro to discover your personal favorite. Try growing taro in containers if you have limited space, or explore companion planting to enhance growth and deter pests naturally. Consider adding a layer of mulch to retain moisture and suppress weeds. You can even try different fertilizers, always opting for organic options like compost tea or well-rotted manure.
Don’t be afraid to get your hands dirty and adapt the process to suit your specific environment and preferences. The beauty of DIY gardening is the freedom to customize and create something truly unique.
We are confident that with a little dedication and the knowledge you’ve gained from this guide, you’ll be enjoying homegrown, organic taro in no time. We encourage you to embark on this exciting gardening adventure and share your experiences with us! Post pictures of your taro plants, share your favorite taro recipes, and let us know what challenges you faced and how you overcame them. Your insights can help other aspiring taro growers and contribute to a thriving community of organic gardeners.
Growing taro organically is a journey of discovery, a connection to nature, and a delicious way to enhance your culinary creations. So, grab your corms, prepare your soil, and get ready to experience the joy of growing your own taro! We can’t wait to hear about your success!
Frequently Asked Questions (FAQ)
What exactly is taro, and what are its benefits?
Taro (Colocasia esculenta) is a starchy root vegetable, similar to potatoes and yams, that is a staple food in many cultures around the world, particularly in tropical and subtropical regions. It’s known for its slightly sweet and nutty flavor. Taro is a good source of dietary fiber, vitamins (especially vitamin C and B vitamins), and minerals like potassium, manganese, and copper. It’s also relatively low in fat and sodium. The fiber content aids digestion and promotes gut health, while the vitamins and minerals contribute to overall well-being. Taro is also a good source of antioxidants.
Is it difficult to grow taro organically compared to other vegetables?
Growing taro organically requires a bit more attention than some other vegetables, primarily because it needs consistent moisture and protection from certain pests. However, it’s not overly difficult, especially if you follow the guidelines provided. The key is to understand taro’s specific needs and provide the right environment. Using organic methods, such as compost and natural pest control, ensures a healthy and sustainable crop. The biggest challenge is often maintaining consistent moisture levels, especially in drier climates.
What kind of soil is best for growing taro organically?
Taro thrives in rich, well-draining soil that is high in organic matter. A slightly acidic to neutral pH (around 6.0 to 7.0) is ideal. Amend your soil with plenty of compost, well-rotted manure, or other organic materials to improve drainage, fertility, and water retention. Avoid heavy clay soils, as they can become waterlogged and lead to root rot. If you have clay soil, consider growing taro in raised beds or containers with a suitable potting mix.
How much sunlight does taro need to grow well?
Taro prefers partial shade, especially in hot climates. While it needs sunlight for photosynthesis, too much direct sun can scorch the leaves. Aim for about 4-6 hours of sunlight per day, ideally in the morning or late afternoon. If you live in a very sunny area, provide some shade during the hottest part of the day.
How often should I water my taro plants?
Consistent moisture is crucial for taro growth. Keep the soil consistently moist, but not waterlogged. Water deeply whenever the top inch of soil feels dry to the touch. During hot and dry periods, you may need to water daily. Mulching around the plants can help retain moisture and reduce the frequency of watering. Taro can also be grown in flooded conditions, but this requires specific techniques and considerations.
What are some common pests and diseases that affect taro, and how can I control them organically?
Common pests that can affect taro include aphids, spider mites, and taro hornworms. Diseases include leaf blight and root rot. To control pests organically, you can use insecticidal soap, neem oil, or introduce beneficial insects like ladybugs. For diseases, ensure good drainage to prevent root rot and use copper-based fungicides for leaf blight. Regularly inspect your plants for signs of pests or diseases and take action promptly. Crop rotation and companion planting can also help prevent problems.
How long does it take for taro to mature and be ready for harvest?
Taro typically takes 7-12 months to mature, depending on the variety and growing conditions. You’ll know it’s ready to harvest when the leaves start to turn yellow and die back. The corm should be firm and well-developed.
How do I harvest taro?
To harvest taro, carefully dig around the plant and lift the corm from the soil. Be gentle to avoid damaging the corm. Remove any excess soil and trim the roots. The leaves and stems can also be harvested and used in cooking, but they should be cooked thoroughly to remove any calcium oxalate crystals, which can cause irritation.
Can I grow taro in containers?
Yes, you can grow taro in containers, especially if you have limited space. Choose a large container with drainage holes and use a well-draining potting mix. Ensure the container is deep enough to accommodate the corm’s growth. Water regularly and fertilize with an organic fertilizer. Container-grown taro may require more frequent watering than taro grown in the ground.
Is taro poisonous if not cooked properly?
Yes, raw taro contains calcium oxalate crystals, which can cause irritation and a burning sensation in the mouth and throat. It’s essential to cook taro thoroughly to break down these crystals. Boiling, steaming, baking, or frying are all effective cooking methods.
What are some delicious ways to use homegrown, organic taro in cooking?
Taro is incredibly versatile and can be used in a variety of dishes. It can be boiled, mashed, fried, or baked like potatoes. It’s also a key ingredient in many traditional dishes, such as poi (a Hawaiian staple), taro chips, taro soup, and taro curry. The leaves and stems can also be cooked and used in stews and stir-fries. Experiment with different recipes and flavors to discover your favorite ways to enjoy your homegrown taro.
How do I store taro after harvesting?
Store unwashed taro corms in a cool, dark, and dry place. Avoid storing them in the refrigerator, as this can cause them to spoil more quickly. Properly stored taro can last for several weeks. Once cut, taro should be stored in the refrigerator and used within a few days.
Can I save seeds from my taro plants?
While taro does produce seeds, it is more commonly propagated from corms or cormels (smaller corms that grow around the main corm). Saving seeds from taro can be challenging, and the resulting plants may not be true to type. For best results, propagate taro from corms.
What are some good companion plants for taro?
Good companion plants for taro include legumes (like beans and peas), which help fix nitrogen in the soil, and aromatic herbs (like basil and mint), which can deter pests. Avoid planting taro near plants that compete for water or nutrients.
Where can I find organic taro corms to start growing?
You can find organic taro corms at local nurseries, farmers’ markets, or online retailers specializing in organic gardening supplies. Be sure to choose healthy, disease-free corms from a reputable source.
Leave a Comment