
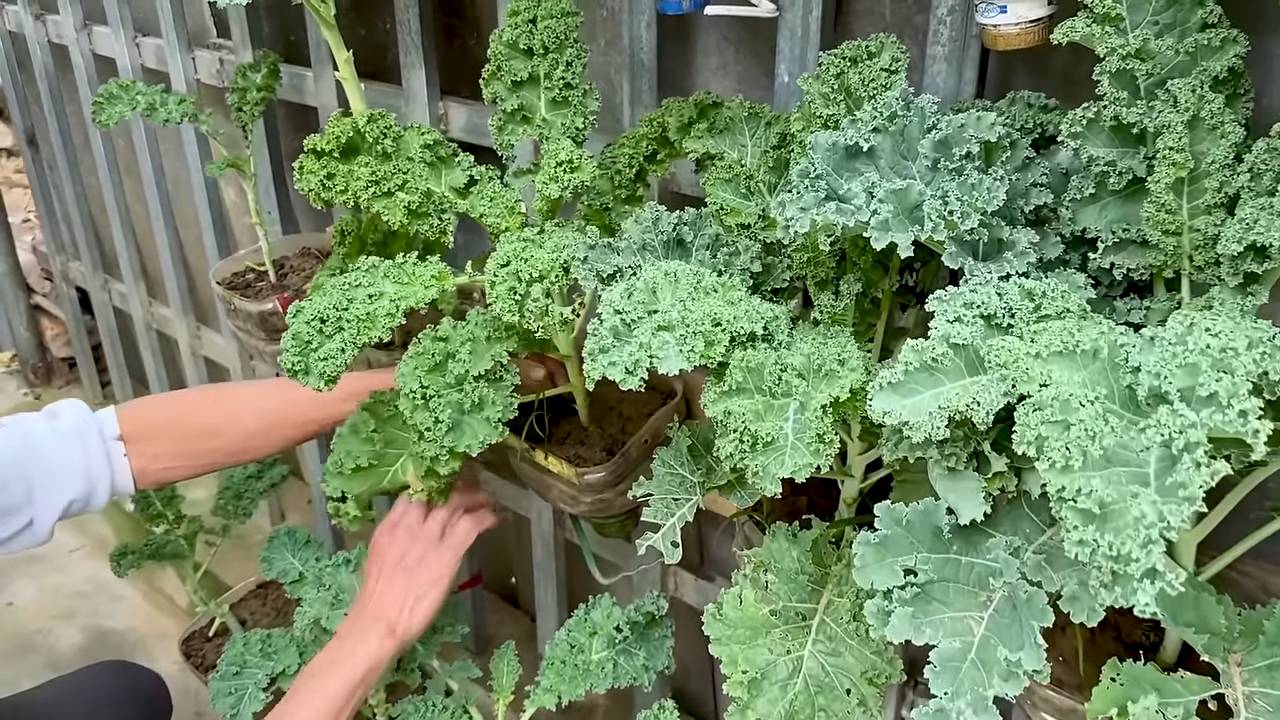
Indoor Kale Growing: Your Guide to a Year-Round Harvest
Have you ever dreamed of enjoying fresh, vibrant kale straight from your kitchen, regardless of the season or weather outside? Then you’ve come to the right place! This article is your complete guide to indoor kale growing, revealing simple yet effective tricks and DIY solutions to cultivate this nutritious leafy green right in your home. I’ll share my personal experiences and hard-earned knowledge, transforming your indoor space into a thriving kale garden.
While kale’s origins trace back thousands of years to the Mediterranean, its popularity has exploded recently due to its incredible nutritional value. From ancient civilizations who valued its resilience to modern health enthusiasts who appreciate its vitamin K and antioxidants, kale has always held a special place in our diets. But accessing fresh, high-quality kale can be challenging, especially during winter months or in areas with limited access to farmers’ markets. That’s where the magic of indoor kale growing comes in!
Why Grow Kale Indoors?
Growing your own kale offers numerous advantages. You’ll have a consistent supply of this superfood, free from pesticides and other potentially harmful chemicals. It’s incredibly rewarding to nurture a plant from seed to harvest, and the taste of homegrown kale is simply unparalleled. Plus, it’s a fantastic way to connect with nature, even if you live in a bustling city apartment. This article will equip you with the knowledge and confidence to successfully cultivate your own kale, no matter your experience level.
So, let’s dive into the fascinating world of indoor kale growing and unlock the secrets to a year-round harvest of this delicious and nutritious vegetable. Get ready to transform your home into a vibrant, healthy oasis!
My Sweet Potato Gardening Adventure: A Complete Guide
I’ve always loved sweet potatoes, and nothing beats the taste of one you’ve grown yourself. This guide will walk you through my process, from slips to harvest, ensuring a bountiful sweet potato crop in your own garden.
Phase 1: Starting from Slips
You can’t just plant a sweet potato and expect a harvest. You need “slips,” which are essentially cuttings from a sweet potato that sprout roots and shoots. Here’s how I do it:
- Choose the right sweet potato: Select a healthy, organically grown sweet potato, free from blemishes and disease. Avoid those that are already sprouting.
- Prepare the sweet potato: Wash the sweet potato thoroughly and gently pat it dry.
- The sprouting process: Find a shallow container, like a plastic tray or a wide bowl. Fill it with a moist, well-draining potting mix. I use a mix of peat moss, perlite, and vermiculite. Place the sweet potato horizontally on top of the mix, ensuring about half of it is buried. Keep the soil moist but not soggy. Place the container in a warm, sunny location (indirect sunlight is best initially).
- Patience is key: It takes about 2-4 weeks for slips to emerge. Keep the soil consistently moist during this time. You’ll start to see small sprouts emerging from the “eyes” of the sweet potato.
- Preparing the slips for planting: Once the slips have grown to about 4-6 inches tall and have developed a few leaves, they are ready for transplanting. Gently separate the slips from the mother sweet potato, being careful not to damage the roots. You can use a clean, sharp knife or your fingers to carefully separate them.
Phase 2: Preparing the Garden Bed
Sweet potatoes need well-drained soil and plenty of sunshine. Here’s how I prepare my garden bed:
- Site selection: Choose a sunny location that receives at least 6-8 hours of direct sunlight per day. Sweet potatoes thrive in warm weather.
- Soil preparation: Sweet potatoes prefer loose, well-drained soil. Amend heavy clay soil with plenty of compost or other organic matter to improve drainage and fertility. I usually add a generous amount of compost and aged manure to my garden bed.
- Soil testing: A soil test can help determine the pH level and nutrient content of your soil. Sweet potatoes prefer a slightly acidic to neutral pH (6.0-7.0). Adjust the pH accordingly if necessary using lime or sulfur.
- Weed control: Remove any weeds or grass from the garden bed before planting. A clean bed will help prevent competition for nutrients and water.
- Hill formation (optional but recommended): Sweet potatoes grow best in hills or ridges. This improves drainage and aeration. I create hills about 12-18 inches high and 2-3 feet apart. This allows for better air circulation and prevents rot.
Phase 3: Planting the Slips
Now comes the exciting part – planting your sweet potato slips!
- Planting depth: Plant the slips about 4-6 inches deep, burying the lower leaves slightly. Make sure the roots are spread out gently.
- Spacing: Space the slips about 12-18 inches apart within the hills or rows. This gives them enough room to grow without overcrowding.
- Watering: Water the newly planted slips thoroughly after planting. Keep the soil consistently moist but not waterlogged, especially during the initial weeks.
- Mulching: Apply a layer of mulch, such as straw or shredded leaves, around the plants. This helps retain moisture, suppress weeds, and regulate soil temperature.
Phase 4: Ongoing Care
Once your slips are planted, consistent care is crucial for a successful harvest.
- Watering: Water regularly, especially during dry periods. Aim for consistent moisture, avoiding both drought and waterlogging. The frequency of watering will depend on your climate and soil type.
- Fertilizing: Sweet potatoes are relatively low-maintenance, but a balanced fertilizer can boost yields. I apply a slow-release fertilizer at planting time and again mid-season. Always follow the instructions on the fertilizer packaging.
- Weed control: Regularly remove weeds to prevent competition for nutrients and water. Mulching helps significantly with weed control.
- Pest and disease monitoring: Regularly inspect your plants for signs of pests or diseases. Address any issues promptly using appropriate organic methods if possible.
- Hilling up (optional): As the plants grow, you can gradually hill up more soil around the base of the plants. This encourages more root development and larger sweet potatoes.
Phase 5: Harvesting Your Sweet Potatoes
The time to harvest depends on the variety you planted and your climate, but generally, it’s 3-4 months after planting.
- Signs of readiness: The leaves will start to yellow and die back as the sweet potatoes mature. This is a good indication that it’s time to harvest.
- Harvesting method: Carefully dig up the sweet potatoes using a garden fork or shovel. Be gentle to avoid damaging the tubers. I usually start by gently loosening the soil around the plants before carefully lifting them out.
- Curing: After harvesting, allow the sweet potatoes to cure for 7-10 days in a warm, dry, and well-ventilated area. This helps improve their storage life and flavor. I usually spread them out in a single layer on a screen or in a shallow box.
- Storage: Once cured, store the sweet potatoes in a cool, dark, and dry place. They can be stored for several months under the right conditions.
Important Note: Always wear gloves when handling sweet potato plants, as the sap can cause skin irritation in some individuals.
Conclusion
So there you have it – a comprehensive guide to achieving lush, vibrant kale right in your own home, regardless of your gardening experience. This indoor kale growing method is a must-try for several compelling reasons. First, it offers unparalleled freshness. Imagine snipping a tender kale leaf directly from your plant, ready to be incorporated into your dinner – a far cry from the sometimes-wilted supermarket alternative. Second, it’s incredibly rewarding. Watching your tiny kale seedlings sprout and flourish into healthy plants is a deeply satisfying experience, connecting you more directly with your food source. Third, and perhaps most importantly, it’s surprisingly easy! Even if you’ve never grown anything before, this simple technique, with its focus on proper lighting, watering, and soil conditions, will empower you to cultivate your own kale harvest. This DIY approach to indoor gardening is not just about growing kale; it’s about cultivating a deeper connection with nature and your food.
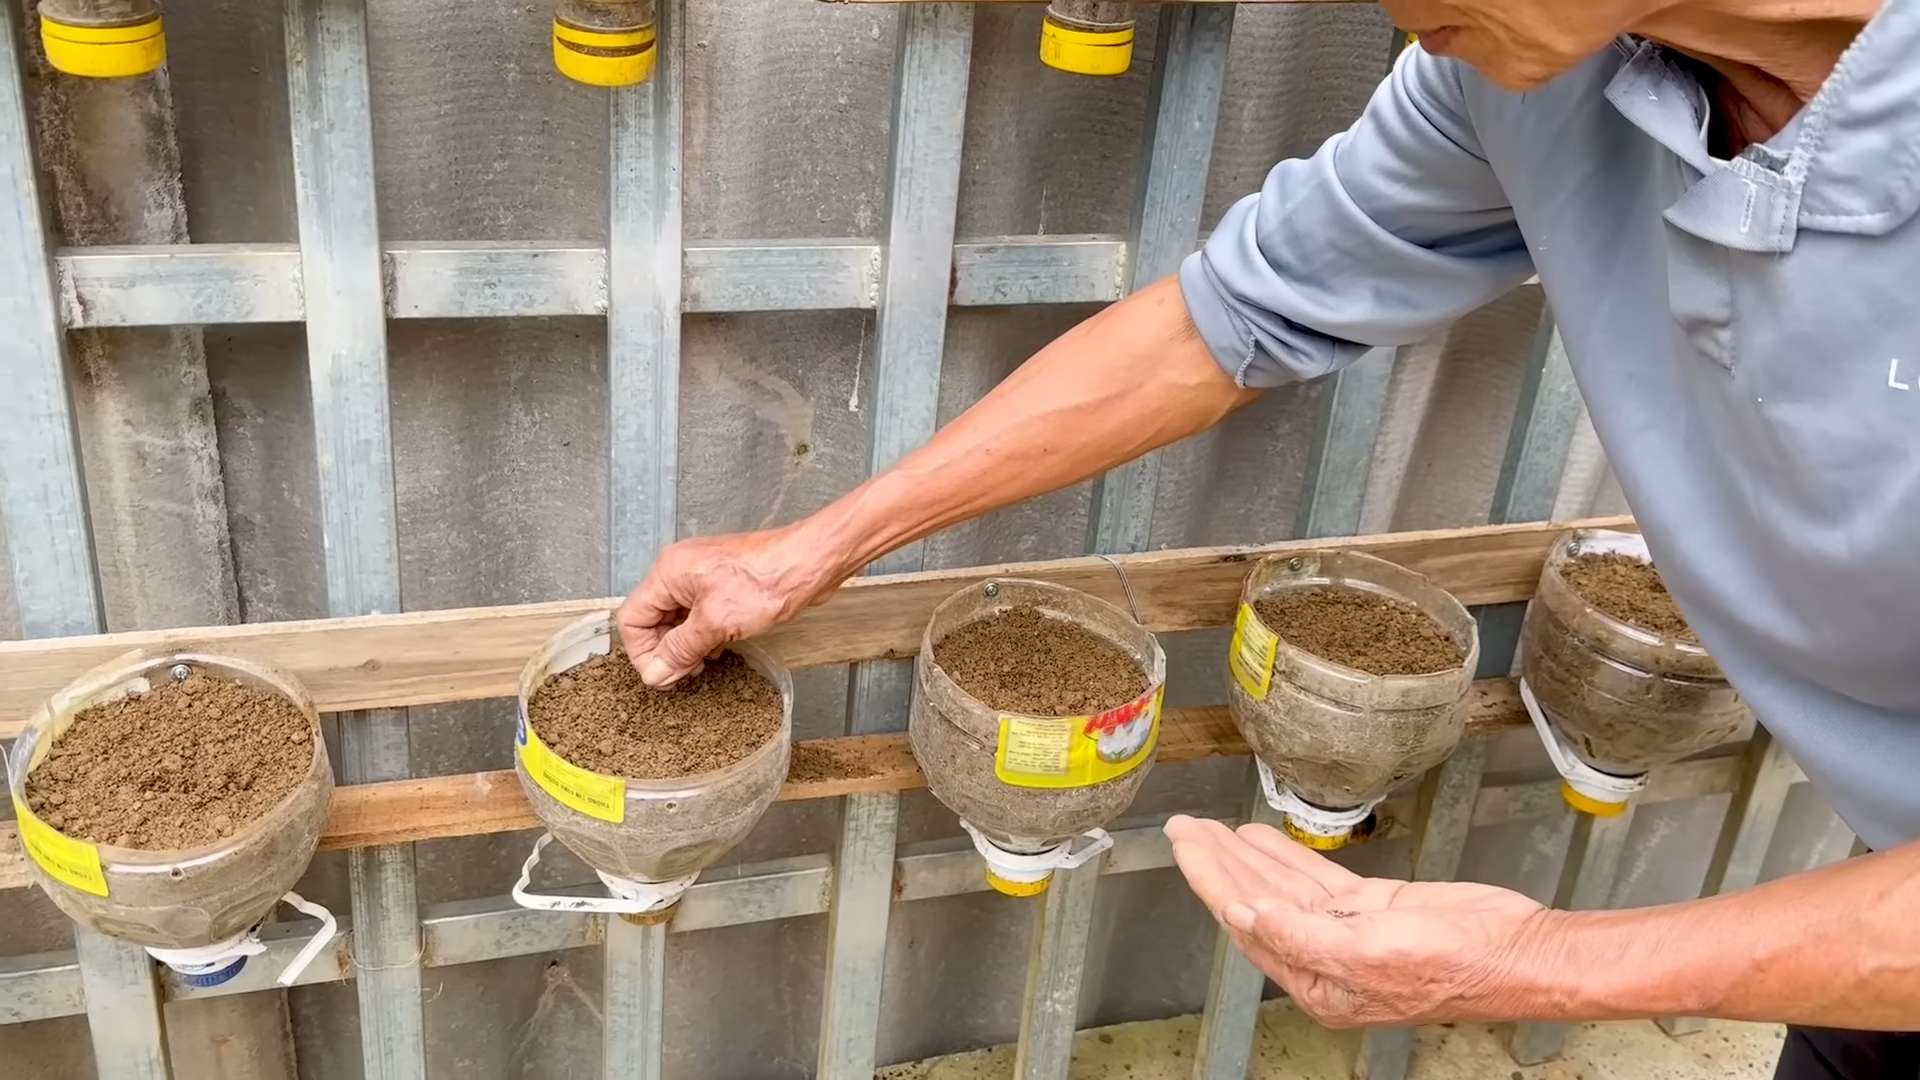
Beyond the basic method outlined, there are numerous exciting variations you can explore. Experiment with different kale varieties – from the curly-leafed dinosaur kale to the smoother Tuscan kale – to discover your personal favorite. Consider using different growing containers; repurposed jars, hanging baskets, or even self-watering planters can all work wonderfully. For those with limited space, vertical gardening techniques can maximize your yield. You can also explore companion planting, incorporating herbs like basil or mint near your kale to potentially enhance growth and deter pests. The possibilities are truly endless!
Don’t be intimidated by the prospect of indoor gardening. This indoor kale growing method is designed to be accessible to everyone, regardless of their experience level. Give it a try! You’ll be amazed at the quality and flavor of homegrown kale. Share your experiences, photos, and tips with us and other gardening enthusiasts online. Let’s build a community of indoor kale growers, supporting each other and celebrating the joy of harvesting fresh, healthy kale year-round. We’re eager to see your thriving kale plants and hear about your successes! Remember to tag us in your posts – let’s inspire each other to grow!
Frequently Asked Questions
What type of light is best for indoor kale growing?
Kale needs plenty of sunlight to thrive. Aim for at least 6-8 hours of bright, indirect sunlight per day. A south-facing window is ideal, but if you don’t have one, consider supplementing with grow lights. Full-spectrum LED grow lights are a popular and effective choice, mimicking the natural sunlight spectrum that kale needs for optimal growth.
How often should I water my indoor kale?
The watering frequency depends on several factors, including the size of your container, the type of soil, and the ambient temperature and humidity. As a general rule, water your kale when the top inch or two of soil feels dry to the touch. Avoid overwatering, as this can lead to root rot. Check the soil moisture regularly and adjust your watering schedule accordingly. Well-draining soil is crucial to prevent waterlogging.
What kind of soil is best for growing kale indoors?
Kale prefers a well-draining, nutrient-rich soil. A good quality potting mix is a great starting point. You can also amend your potting mix with compost or other organic matter to improve its drainage and nutrient content. Ensure the soil is loose and airy to allow for proper root development. Avoid using heavy clay soils, which can retain too much water and hinder growth.
Can I grow kale from seeds or cuttings?
Both methods work well for indoor kale growing. Starting from seeds is generally more common and cost-effective. Simply sow the seeds according to the package instructions, ensuring proper depth and spacing. Growing from cuttings is also possible, but requires a bit more experience. You’ll need to take healthy cuttings from an existing kale plant and root them in water or moist soil.
What are some common problems I might encounter when growing kale indoors?
Some common issues include pests (aphids, whiteflies), nutrient deficiencies (yellowing leaves), and diseases (fungal infections). Regularly inspect your plants for signs of pests or diseases. Use organic pest control methods if necessary, and ensure your kale receives adequate nutrients through fertilization. Good air circulation can also help prevent fungal diseases.
How long does it take to harvest kale grown indoors?
The time it takes to harvest depends on the variety of kale and growing conditions. Generally, you can expect to harvest your first kale leaves in 45-60 days from sowing seeds. You can then continue harvesting leaves throughout the growing season, allowing the plant to continue producing new leaves.
What can I do with my harvested kale?
The culinary possibilities are endless! Kale can be added to smoothies, salads, soups, stir-fries, and much more. Experiment with different recipes and discover your favorite ways to enjoy your homegrown kale. Remember to wash your kale thoroughly before consumption.
My kale plants are leggy. What should I do?
Leggy kale plants are often a sign of insufficient light. Move your plants closer to a light source or supplement with grow lights to provide them with the necessary light intensity. Ensure your plants are not overcrowded, as this can also contribute to legginess.
Leave a Comment