
Grow Asparagus in My Garden? Absolutely! Imagine stepping outside your back door and harvesting fresh, tender asparagus spears, ready to be steamed, grilled, or tossed into a vibrant spring salad. It’s a dream many gardeners share, and I’m here to tell you it’s totally achievable, even if you’re a beginner!
Asparagus has a rich history, enjoyed since Roman times for its delicate flavor and purported medicinal properties. For centuries, it’s been a symbol of spring and renewal, gracing tables with its elegant presence. But you don’t need to be a Roman emperor to enjoy this delicious vegetable.
Let’s face it, store-bought asparagus can be expensive and often lacks the freshness and flavor of homegrown. That’s where this DIY guide comes in. I’m going to share my tried-and-true tricks and hacks to help you successfully grow asparagus in my garden, no matter the size of your space. From choosing the right variety to preparing your soil and protecting your precious spears, I’ll walk you through every step. Get ready to enjoy the satisfaction of harvesting your own delicious asparagus for years to come!
Growing Artichokes at Home: A Gardener’s Guide
Okay, artichoke lovers, let’s get down to business! Growing your own artichokes might seem intimidating, but trust me, it’s totally doable, and the reward of plucking those gorgeous, spiky globes from your own garden is absolutely worth it. I’m going to walk you through everything you need to know, from choosing the right variety to harvesting your bounty.
Choosing Your Artichoke Variety
First things first, you need to pick the right artichoke variety for your climate. Artichokes are perennials in warmer zones (7-10), meaning they’ll come back year after year. If you live in a colder zone, don’t despair! You can still grow them as annuals. Here are a few popular varieties:
* Green Globe: This is the classic artichoke, known for its large, round, green buds. It’s a reliable producer and a great choice for beginners.
* Violetta: If you’re looking for something a little different, Violetta artichokes have beautiful purple buds. They’re also known for their tender hearts.
* Imperial Star: This variety is specifically bred for annual production, making it a great option for colder climates. It produces early and abundantly.
* Big Heart: As the name suggests, this variety boasts a large, meaty heart with fewer prickly chokes.
Starting from Seed vs. Transplants
You have two main options for starting your artichokes: from seed or from transplants.
* Seeds: Starting from seed requires a bit more patience, as artichokes can take a while to mature. However, it’s a more economical option, and you’ll have a wider selection of varieties to choose from.
* Transplants: Buying transplants is a faster way to get your artichoke plants established. You’ll find them at most garden centers in the spring. Just make sure to choose healthy-looking plants with plenty of green leaves.
Getting Started: Planting Your Artichokes
Now, let’s get our hands dirty! Here’s a step-by-step guide to planting your artichokes:
1. Preparing the Soil
Artichokes are heavy feeders, so they need rich, well-drained soil. Before planting, amend your soil with plenty of compost or well-rotted manure. This will provide the nutrients your artichokes need to thrive. I like to dig in about 4-6 inches of compost. Also, make sure the soil is slightly acidic to neutral (pH 6.0-7.0). A soil test can help you determine your soil’s pH and nutrient levels.
2. Starting Seeds Indoors (Optional)
If you’re starting from seed, you’ll need to start them indoors about 8-10 weeks before the last expected frost.
1. Sow the seeds: Fill seed trays or small pots with a seed-starting mix. Sow the seeds about 1/2 inch deep.
2. Keep them moist: Water gently and keep the soil consistently moist, but not soggy.
3. Provide warmth: Place the trays in a warm location, ideally around 70-75°F (21-24°C). A heat mat can be helpful.
4. Give them light: Once the seedlings emerge, provide them with plenty of light. A sunny windowsill or a grow light will work well.
5. Harden them off: Before transplanting your seedlings outdoors, you’ll need to harden them off. This means gradually exposing them to outdoor conditions over a period of about a week. Start by placing them in a sheltered spot for a few hours each day, gradually increasing the amount of time they spend outdoors.
3. Planting Transplants or Seedlings
Whether you’re planting transplants or seedlings, the process is the same.
1. Choose a sunny location: Artichokes need at least 6-8 hours of sunlight per day.
2. Dig a hole: Dig a hole that’s slightly larger than the root ball of your plant.
3. Plant the artichoke: Gently remove the plant from its container and place it in the hole. Make sure the top of the root ball is level with the surrounding soil.
4. Backfill the hole: Fill the hole with soil and gently firm it around the plant.
5. Water thoroughly: Water the plant well after planting.
4. Spacing Your Plants
Artichokes can get quite large, so you’ll need to give them plenty of space. Space plants about 3-4 feet apart. If you’re planting in rows, space the rows about 4-6 feet apart.
Caring for Your Artichokes
Once your artichokes are planted, it’s time to give them some TLC. Here’s what you need to do:
1. Watering
Artichokes need consistent moisture, especially during hot, dry weather. Water deeply and regularly, especially when the buds are forming. Aim for about 1-2 inches of water per week. I like to use a soaker hose to deliver water directly to the roots.
2. Fertilizing
As I mentioned earlier, artichokes are heavy feeders. Fertilize them regularly throughout the growing season with a balanced fertilizer. I like to use a slow-release fertilizer in the spring and then supplement with a liquid fertilizer every few weeks. Follow the instructions on the fertilizer label for application rates.
3. Mulching
Mulching around your artichoke plants helps to retain moisture, suppress weeds, and regulate soil temperature. Use organic mulch, such as straw, wood chips, or shredded leaves. Apply a layer of mulch about 2-3 inches thick.
4. Pest and Disease Control
Artichokes can be susceptible to a few pests and diseases. Keep an eye out for aphids, snails, and slugs. You can control these pests with insecticidal soap, diatomaceous earth, or by hand-picking them off the plants.
As for diseases, watch out for powdery mildew and botrytis blight. These fungal diseases can be prevented by providing good air circulation and avoiding overhead watering. If you do see signs of disease, treat the plants with a fungicide.
5. Pruning
Pruning is important for maintaining the health and productivity of your artichoke plants.
* Remove dead or damaged leaves: Regularly remove any dead or damaged leaves to prevent the spread of disease.
* Cut back spent flower stalks: After you harvest the artichokes, cut back the flower stalks to encourage new growth.
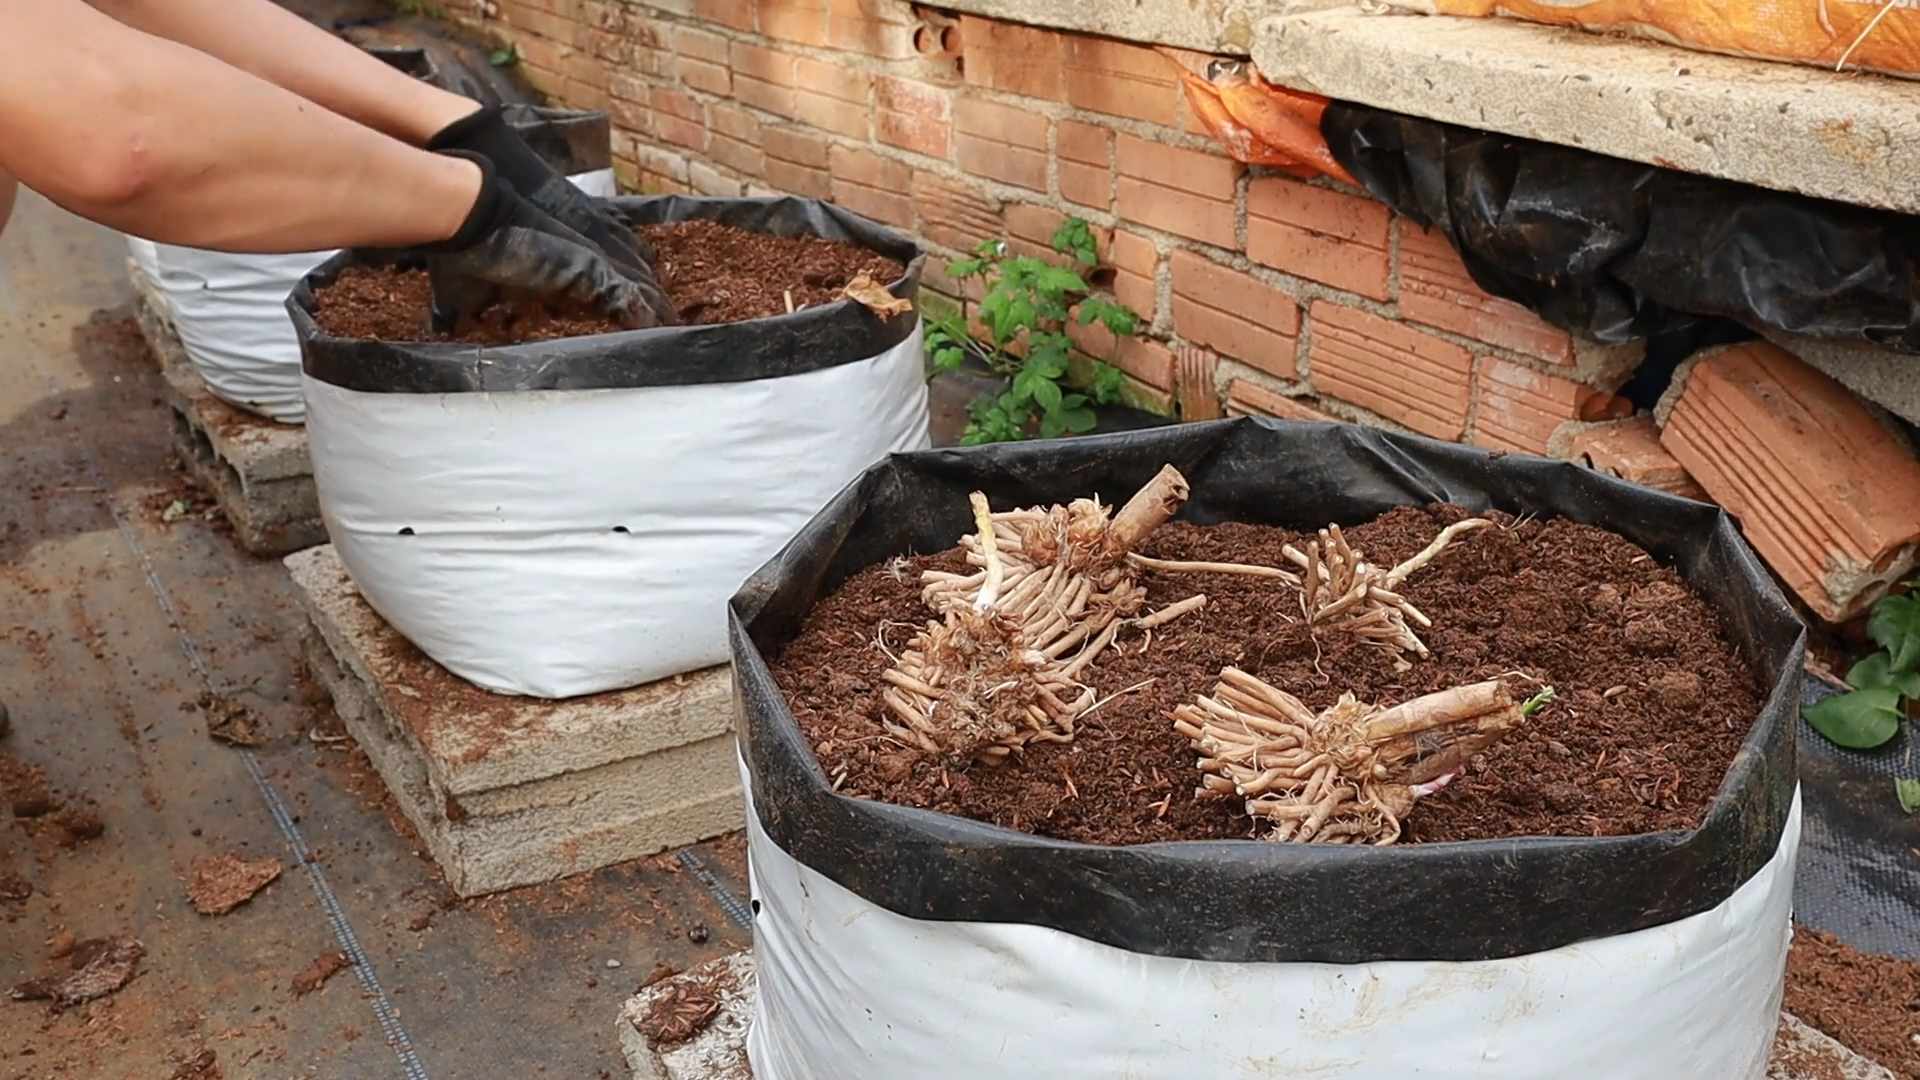
* Divide clumps (for perennial varieties): Every few years, you may need to divide your artichoke plants to prevent them from becoming overcrowded. This is best done in the spring or fall. Dig up the plant and carefully separate the roots into smaller clumps. Replant the clumps in separate locations.
Overwintering Artichokes (for Perennial Varieties)
If you live in a colder climate, you’ll need to protect your artichoke plants from frost and freezing temperatures. Here’s how:
1. Cut back the foliage: In the fall, after the first frost, cut back the foliage to about 6 inches above the ground.
2. Mulch heavily: Cover the plants with a thick layer of mulch, such as straw or leaves. This will help to insulate the roots and protect them from freezing.
3. Cover with a tarp or blanket (optional): For extra protection, you can cover the plants with a tarp or blanket during periods of extreme cold.
4. Remove the protection in the spring: In the spring, after the last frost, remove the mulch and any other protective coverings.
Harvesting Your Artichokes
The moment you’ve been waiting for! Harvesting your artichokes is the most rewarding part of the process.
1. When to harvest: Artichokes are ready to harvest when the buds are firm and plump, but before the bracts (the outer leaves) start to open. The size of the bud will vary depending on the variety.
2. How to harvest: Use a sharp knife to cut the artichoke stem about 2-3 inches below the bud.
3. Harvest the side shoots: After you harvest the main bud, you can also harvest the smaller side shoots that develop along the stem. These are often more tender than the main bud.
Enjoying Your Homegrown Artichokes
Now that you’ve harvested your artichokes, it’s time to enjoy them! There are countless ways to prepare and eat artichokes. You can steam them, grill them, bake them, or stuff them. My personal favorite is steamed artichokes with garlic aioli.
Here are a few tips for preparing artichokes:
* Rinse the artichokes: Rinse the artichokes thoroughly under cold water.
* Trim the sharp tips: Use kitchen shears to trim the sharp tips of the bracts.
*
Conclusion
So, there you have it! Growing asparagus in your own garden isn’t just a whimsical dream; it’s a tangible reality that can bring years of delicious harvests right to your table. We’ve walked through the process, demystified the challenges, and hopefully, instilled in you the confidence to embark on this rewarding gardening adventure.
Why is this DIY trick a must-try? Because fresh, homegrown asparagus is simply unparalleled. The flavor is sweeter, the texture is more tender, and the satisfaction of nurturing your own food from seedling to plate is immeasurable. Forget the limp, often bitter asparagus you find in the grocery store. Imagine snapping off vibrant green spears, still warm from the sun, and preparing them within minutes – that’s the magic of growing your own. Plus, asparagus is a perennial, meaning once established, your patch will produce for 15-20 years! That’s a long-term investment in deliciousness and self-sufficiency.
But the benefits extend beyond just the taste. Gardening, in general, is a fantastic stress reliever, a great way to connect with nature, and a source of immense pride. Growing asparagus, in particular, teaches patience and rewards dedication. It’s a project that connects you to the seasons and provides a tangible link to the earth.
Variations and Suggestions:
Don’t be afraid to experiment! While we’ve outlined a general approach, there’s room for personalization.
* Soil Amendments: Consider adding different types of compost or aged manure to tailor the soil to your specific needs. Some gardeners swear by bone meal for phosphorus, which promotes strong root growth.
* Companion Planting: Explore companion planting to deter pests and improve soil health. Tomatoes, basil, and marigolds are often cited as beneficial companions for asparagus.
* Variety Selection: Research different asparagus varieties to find the ones that best suit your climate and taste preferences. ‘Jersey Knight’ is a popular choice for its high yield and disease resistance, while ‘Purple Passion’ offers a unique color and sweeter flavor.
* Raised Beds: If your soil is particularly poor or drainage is an issue, consider growing your asparagus in raised beds. This allows you to create the ideal growing environment.
* Succession Planting: Plant new crowns each year for the first few years to ensure a continuous supply of asparagus as your older plants mature.
We wholeheartedly encourage you to give this DIY trick a try. It might seem daunting at first, but with a little planning and effort, you’ll be enjoying homegrown asparagus in no time. Remember to document your journey, take pictures, and most importantly, share your experiences! We’d love to hear about your successes, your challenges, and any tips you discover along the way. Share your stories and photos on social media using #HomegrownAsparagus and let’s build a community of asparagus enthusiasts! Growing asparagus is a rewarding experience, and we can’t wait to see what you create in your garden.
Frequently Asked Questions (FAQ)
How long does it take to grow asparagus from seed?
Growing asparagus from seed is a longer process than starting with crowns. It typically takes 2-3 years to harvest asparagus spears from plants grown from seed. The first year is dedicated to developing a strong root system. The second year, you’ll continue to nurture the plants. By the third year, you can usually begin a light harvest. While it requires more patience, growing from seed can be a more economical option.
What is the best time of year to plant asparagus?
The best time to plant asparagus crowns is in early spring, as soon as the ground can be worked. This allows the plants to establish themselves before the heat of summer. In warmer climates, fall planting may also be possible. If starting from seed, sow indoors 10-12 weeks before the last expected frost or direct sow after the danger of frost has passed.
How much sun does asparagus need?
Asparagus thrives in full sun, requiring at least 6-8 hours of direct sunlight per day. Adequate sunlight is crucial for photosynthesis, which fuels the plant’s growth and spear production. Insufficient sunlight can lead to weak, spindly plants and reduced yields.
What kind of soil is best for asparagus?
Asparagus prefers well-drained, sandy loam soil with a pH between 6.5 and 7.5. Good drainage is essential to prevent root rot. Amend heavy clay soils with organic matter, such as compost or aged manure, to improve drainage and aeration. Sandy soils may need amendments to improve water retention.
How often should I water asparagus?
Water asparagus regularly, especially during dry periods. Aim to keep the soil consistently moist but not waterlogged. Water deeply at the base of the plants, avoiding wetting the foliage, which can increase the risk of fungal diseases. During the first year, consistent watering is particularly important for establishing a strong root system.
How do I fertilize asparagus?
Fertilize asparagus in early spring before the spears emerge and again after the harvest season. Use a balanced fertilizer or a fertilizer specifically formulated for vegetables. Incorporate compost or aged manure into the soil to provide a slow-release source of nutrients. Avoid over-fertilizing, as this can lead to excessive foliage growth at the expense of spear production.
When can I start harvesting asparagus?
Do not harvest any spears during the first year after planting crowns. Allow the plants to establish a strong root system. In the second year, you can harvest lightly for a few weeks. In subsequent years, you can harvest for a longer period, typically 6-8 weeks. Stop harvesting when the spears become thin and spindly, allowing the plants to replenish their energy reserves for the following year.
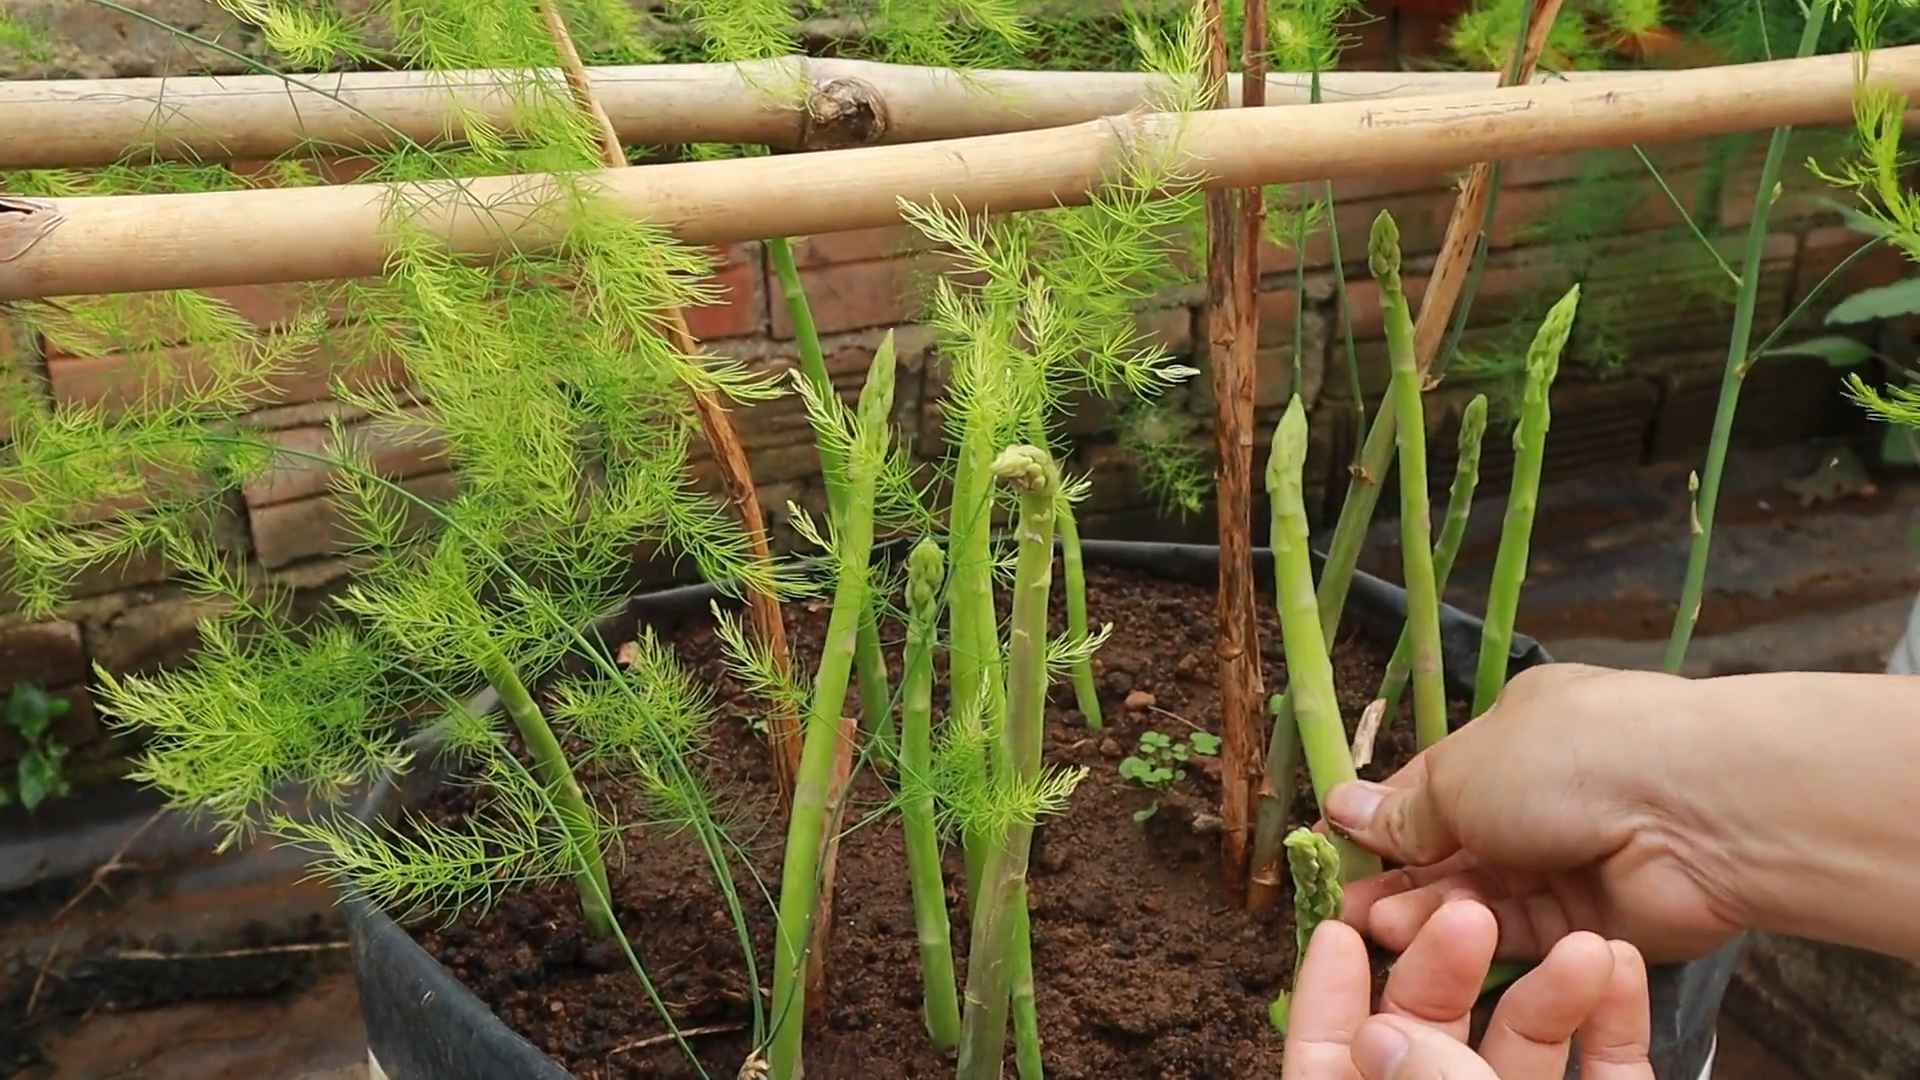
How do I harvest asparagus?
Harvest asparagus spears when they are 6-8 inches tall and about as thick as your finger. Use a sharp knife to cut the spears at or slightly below the soil surface. Avoid damaging the crown or surrounding spears. Harvest spears every day or two during the peak harvest season.
What are common asparagus pests and diseases?
Common asparagus pests include asparagus beetles, aphids, and cutworms. Diseases include asparagus rust, Fusarium crown and root rot, and purple spot. Monitor your plants regularly for signs of pests or diseases and take appropriate action. Organic pest control methods, such as insecticidal soap or neem oil, can be effective for controlling many pests. Ensure good air circulation and proper drainage to prevent fungal diseases.
How do I overwinter asparagus?
In colder climates, cut back the asparagus foliage to the ground in late fall after it has turned brown. Apply a layer of mulch, such as straw or shredded leaves, to protect the crowns from freezing temperatures. In milder climates, you may not need to mulch. Remove the mulch in early spring before the spears emerge.
Can I grow asparagus in containers?
Yes, you can grow asparagus in containers, but it requires a large container (at least 18 inches in diameter and 24 inches deep) to accommodate the plant’s extensive root system. Use a well-draining potting mix and provide regular watering and fertilization. Container-grown asparagus may not be as productive as plants grown in the ground, but it can be a good option for gardeners with limited space.
What are the benefits of growing asparagus?
Growing asparagus offers numerous benefits, including:
* Fresh, flavorful asparagus that is superior to store-bought varieties.
* A perennial crop that provides years of harvests.
* A rewarding gardening experience that connects you to nature.
* A healthy and nutritious vegetable that is low in calories and high in vitamins and minerals.
* The satisfaction of growing your own food.
Leave a Comment