
Growing Bottle Gourds might seem like a daunting task, conjuring images of sprawling vines and endless space. But what if I told you that you could cultivate these fascinating vegetables right in your own backyard, or even on a sunny balcony? This isn’t just about gardening; it’s about connecting with a tradition that stretches back millennia!
Bottle gourds, also known as calabash, have a rich history, serving as essential tools and containers in various cultures across the globe for thousands of years. From ancient Egypt to the Pacific Islands, these versatile gourds have been used for everything from water vessels to musical instruments. Isn’t it amazing to think you can grow something with such a deep connection to human history?
But beyond the historical significance, growing bottle gourds offers a fantastic opportunity to embrace sustainable living and enjoy fresh, homegrown produce. In this article, I’m going to share some simple yet effective DIY tricks and hacks that will empower you to successfully cultivate these unique vegetables, regardless of your gardening experience. Imagine the satisfaction of harvesting your own bottle gourds, knowing you nurtured them from seed to maturity! Whether you’re looking to add a touch of exotic flair to your garden or simply want to try your hand at something new, these tips will help you unlock the secrets to successful bottle gourd cultivation. Let’s get started!
Growing Bottle Gourds: A DIY Guide From Seed to Harvest
Hey there, fellow gardening enthusiasts! I’m so excited to share my experience with growing bottle gourds. These fascinating plants are not only fun to cultivate, but they also yield incredibly versatile fruits that can be used for everything from crafting to cooking. This guide will walk you through every step, from starting seeds to harvesting your own bottle gourds. Let’s get our hands dirty!
Choosing Your Bottle Gourd Variety
Before we dive into the nitty-gritty, let’s talk about choosing the right variety. Bottle gourds come in all shapes and sizes, from small, round ones perfect for birdhouses to long, slender ones ideal for dippers. Consider what you want to use your gourds for when making your selection. Here are a few popular varieties:
- Dipper Gourds: These have long handles and bulbous ends, perfect for making dippers or ladles.
- Birdhouse Gourds: These are larger and rounder, ideal for creating cozy homes for our feathered friends.
- Ornamental Gourds: These come in various shapes and sizes and are great for decorative purposes.
- Edible Gourds: Some varieties are specifically grown for their edible flesh when young. Make sure to research thoroughly before consuming any gourd.
Starting Your Bottle Gourd Seeds
Bottle gourds have a long growing season, so starting them indoors is often necessary, especially if you live in a cooler climate. I usually start mine about 6-8 weeks before the last expected frost.
Materials You’ll Need:
- Bottle gourd seeds
- Seed starting trays or small pots
- Seed starting mix
- Watering can or spray bottle
- Heat mat (optional, but helpful)
- Grow lights (optional, but recommended)
Step-by-Step Instructions:
- Soaking the Seeds: To improve germination rates, I like to soak my bottle gourd seeds in warm water for 24-48 hours before planting. This helps soften the hard outer shell.
- Preparing the Seed Starting Mix: Fill your seed starting trays or pots with a high-quality seed starting mix. This mix is usually lighter and better draining than regular potting soil.
- Planting the Seeds: Make a small hole (about 1/2 inch deep) in the center of each cell or pot. Place one seed in each hole and gently cover it with the seed starting mix.
- Watering: Gently water the soil until it’s evenly moist but not waterlogged. I prefer using a spray bottle to avoid disturbing the seeds.
- Providing Warmth: Bottle gourd seeds germinate best in warm temperatures (around 70-80°F). A heat mat can be really helpful for maintaining consistent warmth.
- Providing Light: Once the seedlings emerge (usually in 7-14 days), they’ll need plenty of light. If you don’t have a sunny windowsill, grow lights are a great option. Keep the lights on for about 14-16 hours per day.
- Thinning (If Necessary): If more than one seedling emerges in a cell or pot, thin them out by snipping off the weaker seedlings at the soil line. This will give the remaining seedling more room to grow.
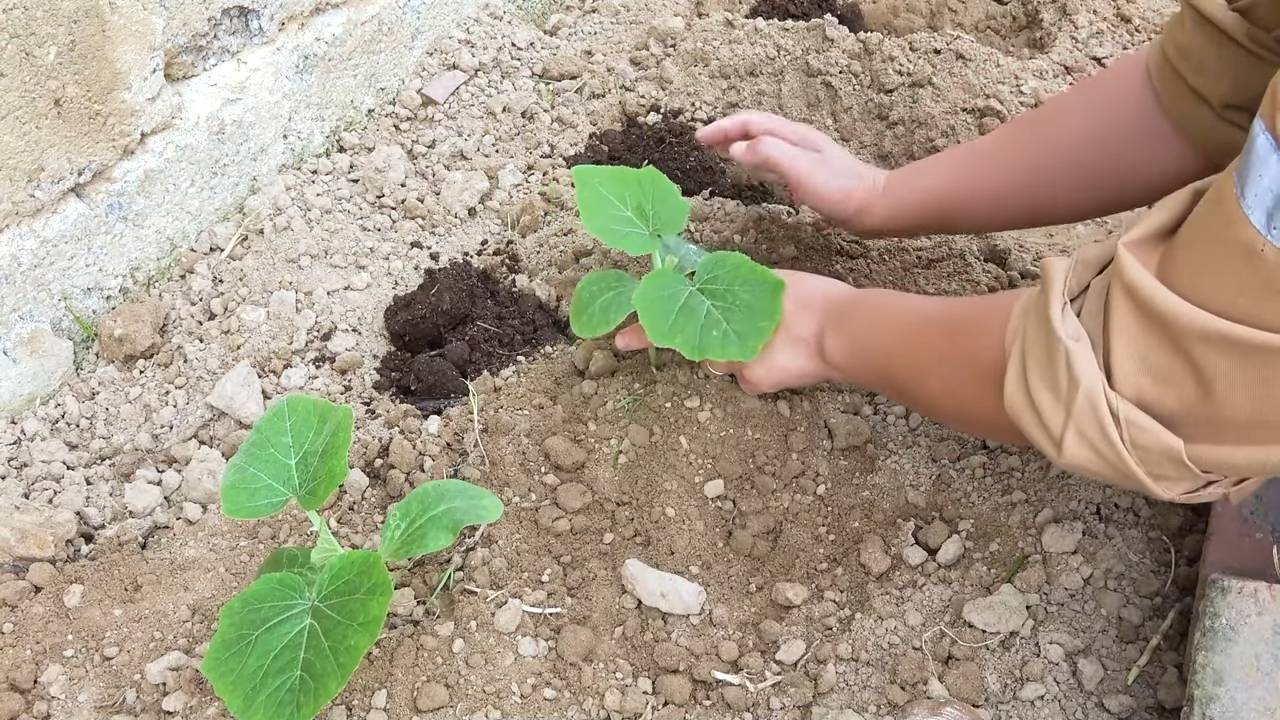
Transplanting Your Bottle Gourd Seedlings
Once the danger of frost has passed and your seedlings have developed a few sets of true leaves, it’s time to transplant them outdoors. Bottle gourds are vigorous growers and need plenty of space, so choose a sunny location with well-drained soil.
Preparing the Garden Bed:
- Choosing a Location: Select a spot that receives at least 6-8 hours of direct sunlight per day.
- Soil Preparation: Bottle gourds prefer well-drained soil that is rich in organic matter. Amend the soil with compost or well-rotted manure before planting.
- Building a Trellis or Support: Bottle gourds are vines and need a strong trellis or support system to climb on. You can use a fence, arbor, or build your own trellis using wood or metal. Make sure it’s sturdy enough to support the weight of the mature vines and gourds.
Transplanting Instructions:
- Hardening Off: Before transplanting, gradually acclimate your seedlings to outdoor conditions by hardening them off. This involves exposing them to increasing amounts of sunlight and fresh air over a period of 7-10 days. Start by placing them outdoors for a few hours each day and gradually increase the time until they can stay outside all day and night.
- Digging the Holes: Dig holes that are slightly larger than the root balls of your seedlings. Space the holes about 3-4 feet apart.
- Planting the Seedlings: Gently remove the seedlings from their pots and place them in the holes. Make sure the top of the root ball is level with the surrounding soil.
- Filling the Holes: Fill the holes with soil and gently firm it around the base of the plants.
- Watering: Water the seedlings thoroughly after planting.
- Mulching: Apply a layer of mulch around the base of the plants to help retain moisture and suppress weeds.
Caring for Your Bottle Gourd Plants
Bottle gourds are relatively easy to care for, but they do require regular watering, fertilizing, and pruning.
Watering:
Bottle gourds need consistent moisture, especially during hot, dry weather. Water deeply whenever the top inch of soil feels dry to the touch. Avoid overhead watering, as this can promote fungal diseases. Drip irrigation or soaker hoses are ideal.
Fertilizing:
Feed your bottle gourd plants with a balanced fertilizer every 2-3 weeks. You can use a liquid fertilizer or a slow-release granular fertilizer. Follow the instructions on the fertilizer package. I like to use a fertilizer that is high in phosphorus to encourage flowering and fruit production.
Pruning:
Pruning can help improve air circulation and encourage fruit production. Remove any dead or yellowing leaves. You can also prune back the vines to control their size and shape. I usually prune off the side shoots to encourage the main vine to grow upwards.
Pollination:
Bottle gourds produce separate male and female flowers. The female flowers have a small gourd-like structure at the base, while the male flowers do not. Pollination is necessary for the female flowers to develop into gourds. Bees and other insects usually take care of pollination, but if you’re not seeing many gourds developing, you may need to hand-pollinate.
Hand-Pollination Instructions:
- Identify Male and Female Flowers: Look for the male flowers (no small gourd behind the flower) and female flowers (small gourd behind the flower).
- Collect Pollen: Use a small paintbrush or cotton swab to collect pollen from the male flower. Gently brush the pollen onto the stigma (the sticky part) of the female flower.
- Timing: Hand-pollinate in the morning, when the flowers are most receptive.
Dealing with Pests and Diseases
Bottle gourds are generally resistant to pests and diseases, but they can be susceptible to certain problems, such as squash bugs, squash vine borers, and powdery mildew.
Common Pests and Diseases:
- Squash Bugs: These pests can suck the sap from the leaves and stems, causing the plants to wilt and die. Handpick the bugs and their eggs (which are usually laid on the undersides of the leaves) or use an insecticidal soap.
- Squash Vine Borers: These pests bore into the stems of the plants, causing them to wilt and die. Look for small holes in the stems and sawdust-like frass. You can try to remove the borers by slitting the stem open and extracting them, but prevention is key. Wrap the base of the stems with aluminum foil or netting to prevent the moths from laying their eggs.
- Powdery Mildew: This fungal disease causes a white, powdery coating on the leaves. Improve air circulation by pruning the plants and avoid overhead watering. You can also treat the plants with a fungicide.
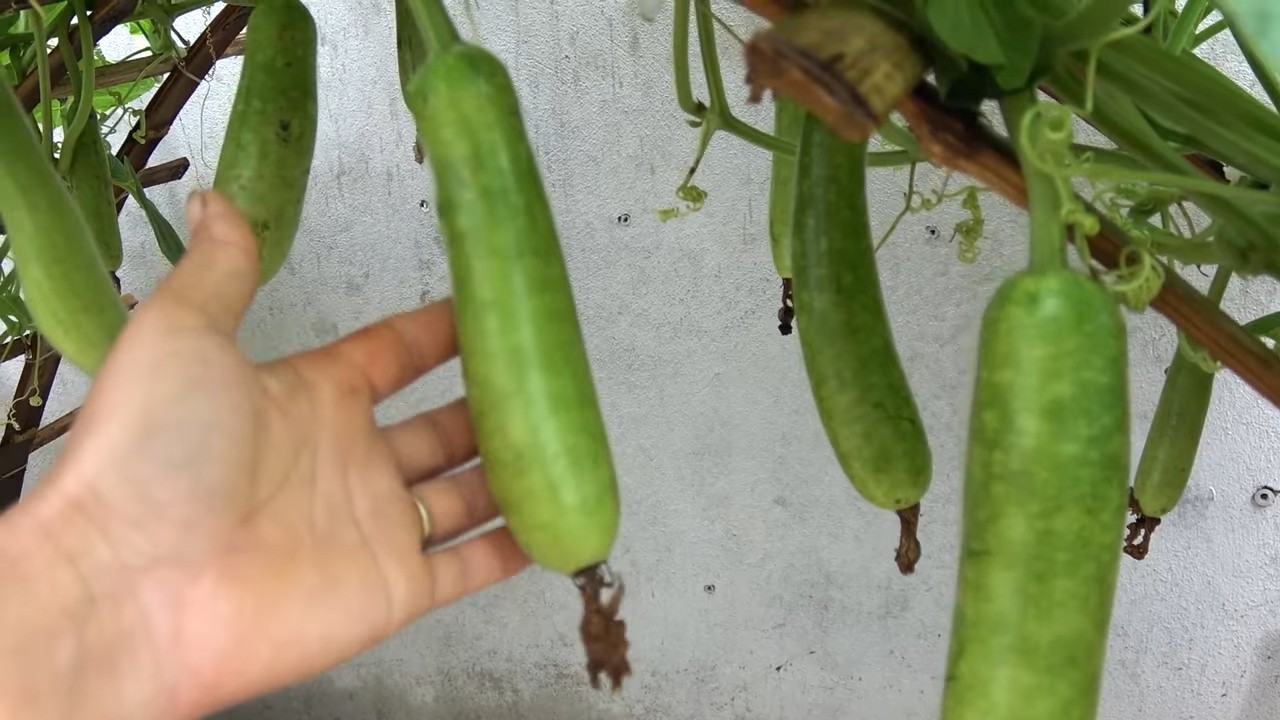
Harvesting Your Bottle Gourds
The time it takes for bottle gourds to mature depends on the variety and growing conditions. Generally, they are ready to harvest in about 100-120 days from planting.
Signs of Maturity:
- The gourd should be hard and dry to the touch.
- The stem should be brown and dry.
- The vine should be starting to die back.
Harvesting Instructions:
- Cut the Gourd: Use a sharp knife or pruning shears to cut the gourd
Conclusion
So, there you have it! Growing bottle gourds doesn’t have to be an intimidating endeavor. With a little patience, the right techniques, and a dash of creativity, you can cultivate these fascinating vegetables right in your own backyard. We’ve walked through the essential steps, from seed selection and soil preparation to trellising and pest control. But the real magic lies in the hands-on experience.
Why is this DIY approach a must-try? Because it connects you to the food you eat in a profound way. It’s about more than just saving money at the grocery store; it’s about understanding the life cycle of a plant, appreciating the effort that goes into producing food, and enjoying the satisfaction of harvesting something you nurtured from a tiny seed. Plus, homegrown bottle gourds simply taste better! They’re fresher, more flavorful, and free from the chemicals often used in commercial farming.
But the benefits extend beyond the culinary realm. Growing bottle gourds is a fantastic way to beautify your garden, create a natural privacy screen, or even provide shade during the hot summer months. Their unique shapes and sizes also make them a conversation starter and a source of endless fascination for children and adults alike.
Ready to take your bottle gourd growing to the next level? Consider experimenting with different varieties. Some are long and slender, perfect for crafting musical instruments, while others are round and bulbous, ideal for making bowls or birdhouses. You can also try different trellising methods to create unique and visually appealing structures in your garden.
Another variation to explore is companion planting. Certain plants, like marigolds and basil, can help deter pests and attract beneficial insects, creating a healthier and more productive environment for your bottle gourds. Don’t be afraid to experiment and see what works best in your specific climate and soil conditions.
We encourage you to embrace the challenge and embark on your own bottle gourd growing adventure. It’s a rewarding experience that will connect you with nature, enhance your gardening skills, and provide you with a bounty of delicious and versatile vegetables.
And most importantly, don’t forget to share your experiences with us! We’d love to hear about your successes, challenges, and creative uses for your homegrown bottle gourds. Post photos of your garden, share your favorite recipes, and let us know what you’ve learned along the way. Together, we can create a community of passionate bottle gourd growers and inspire others to discover the joys of homegrown food. So, get your hands dirty, plant those seeds, and watch the magic unfold! Happy growing!
Frequently Asked Questions (FAQ)
What is the best time of year to plant bottle gourd seeds?
Bottle gourds are warm-season crops, so the best time to plant them is in the spring or early summer, after the last frost has passed and the soil has warmed up to at least 65°F (18°C). In warmer climates, you can even plant them in late spring for a fall harvest. The key is to ensure that the plants have enough time to mature before the first frost of the fall. Check your local weather forecast and planting guides for specific recommendations based on your region.
How much space do bottle gourd plants need?
Bottle gourd vines can grow quite large, so they need plenty of space to spread out. Ideally, you should provide at least 6-8 feet of space between plants. If you’re growing them on a trellis, make sure the trellis is sturdy enough to support the weight of the mature vines and gourds. Consider the mature size of the specific variety you’re growing when determining spacing. Crowded plants can be more susceptible to diseases and pests, and they may not produce as many gourds.
What kind of soil is best for growing bottle gourds?
Bottle gourds thrive in well-drained, fertile soil that is rich in organic matter. Before planting, amend your soil with compost, aged manure, or other organic materials to improve its drainage, fertility, and water-holding capacity. A slightly acidic to neutral soil pH (around 6.0 to 7.0) is ideal. If your soil is heavy clay or sandy, consider growing your bottle gourds in raised beds or containers filled with a suitable potting mix. Regular soil testing can help you determine if your soil needs any amendments.
How often should I water bottle gourd plants?
Bottle gourd plants need consistent moisture, especially during hot, dry weather. Water deeply and regularly, aiming to keep the soil consistently moist but not waterlogged. Avoid overhead watering, as this can increase the risk of fungal diseases. Drip irrigation or soaker hoses are excellent options for delivering water directly to the roots. Mulching around the plants can also help retain moisture and suppress weeds. Check the soil moisture regularly and adjust your watering schedule accordingly.
What are some common pests and diseases that affect bottle gourds, and how can I control them?
Common pests that can affect bottle gourds include squash bugs, squash vine borers, aphids, and cucumber beetles. Diseases include powdery mildew, downy mildew, and fungal leaf spots. To control pests, you can use insecticidal soap, neem oil, or handpick them off the plants. Row covers can also help prevent pests from reaching the plants. For diseases, ensure good air circulation, avoid overhead watering, and apply fungicides if necessary. Crop rotation and choosing disease-resistant varieties can also help prevent disease problems.
How long does it take for bottle gourds to mature?
The time it takes for bottle gourds to mature depends on the variety and growing conditions, but generally, it takes about 90-120 days from planting to harvest. The gourds are ready to harvest when the skin is hard and the stem has dried out. You can test the maturity by tapping the gourd; a mature gourd will sound hollow. Be careful not to damage the gourd when harvesting, as this can lead to rot.
Can I eat bottle gourds?
Yes, young bottle gourds can be eaten as a vegetable. They have a mild, slightly sweet flavor and can be used in soups, stews, curries, and stir-fries. However, it’s important to harvest them when they are young and tender, as mature gourds can become bitter and fibrous. Always cook bottle gourds thoroughly before eating.
How do I cure bottle gourds for crafting?
To cure bottle gourds for crafting, harvest them when they are fully mature and the stems have dried out. Wash the gourds with soapy water and dry them thoroughly. Place them in a well-ventilated area, such as a garage or shed, and allow them to dry for several months. Turn them regularly to prevent rot. The gourds are fully cured when they are lightweight and the seeds rattle inside.
Can I save seeds from my bottle gourds?
Yes, you can save seeds from your bottle gourds. Allow the gourds to fully mature on the vine, then harvest them and cut them open. Scoop out the seeds and wash them thoroughly. Spread the seeds out on a paper towel to dry completely. Once dry, store them in an airtight container in a cool, dark place.
What are some creative uses for bottle gourds?
Bottle gourds can be used for a variety of creative purposes, including making birdhouses, bowls, musical instruments, lamps, and decorative items. Their unique shapes and sizes make them ideal for crafting one-of-a-kind pieces. You can paint, carve, or decorate them to create personalized gifts or home decor. The possibilities are endless!
Leave a Comment