
Growing habaneros successfully can feel like a fiery challenge, but trust me, the reward of those intensely flavorful peppers is absolutely worth it! Have you ever dreamt of adding a serious kick to your homemade salsa or creating your own signature hot sauce? This guide is your secret weapon to unlocking the secrets of habanero cultivation, right in your own backyard (or even on your balcony!).
The habanero pepper, with its vibrant colors and scorching heat, has a rich history rooted in the Yucatan Peninsula of Mexico. For centuries, it’s been a staple ingredient in Mayan cuisine, adding depth and complexity to traditional dishes. Today, its popularity has exploded worldwide, with chefs and home cooks alike seeking its unique flavor profile.
But why bother with the DIY route? Well, store-bought habaneros can be expensive and sometimes lack the freshness and potency you crave. Plus, there’s something incredibly satisfying about nurturing a plant from seed to harvest, knowing you’ve created something amazing with your own two hands. This article will provide you with simple, effective DIY tricks and hacks to ensure you’re growing habaneros successfully, even if you’re a complete beginner. I’m here to guide you through every step, from choosing the right seeds to protecting your plants from pests, so you can enjoy a bountiful harvest of these fiery gems!
Growing Habaneros: From Seed to Fiery Harvest!
Hey fellow chiliheads! So, you’re thinking about growing your own habaneros? Awesome! Get ready for some serious heat and a whole lot of satisfaction. I’ve been growing these little firecrackers for years, and I’m here to share everything I’ve learned to help you succeed. Trust me, with a little patience and the right know-how, you’ll be swimming in habaneros before you know it.
What You’ll Need: The Habanero Arsenal
Before we dive in, let’s gather our supplies. Here’s a checklist of everything you’ll need to get started:
* Habanero Seeds: Obviously! Choose a reputable seed supplier for the best germination rates. I’ve had good luck with online retailers specializing in chili peppers.
* Seed Starting Trays or Small Pots: These will be your habanero nurseries.
* Seed Starting Mix: This is crucial! Don’t use regular potting soil; it’s too heavy for delicate seedlings.
* Heat Mat (Optional but Recommended): Habaneros love warmth, especially during germination.
* Grow Light (Optional but Recommended): If you’re starting seeds indoors, a grow light will ensure strong, healthy seedlings.
* Potting Soil: Once your seedlings are ready to transplant, you’ll need a good quality potting soil.
* Larger Pots or Garden Space: Habaneros need room to grow!
* Fertilizer: A balanced fertilizer will help your plants thrive.
* Watering Can or Hose: For keeping your plants hydrated.
* Gardening Gloves: To protect your hands.
* Plant Labels: To keep track of your plants.
* Patience: Habaneros can be a bit slow to germinate and grow, so don’t get discouraged!
Phase 1: Starting Your Habanero Seeds Indoors
Habaneros have a long growing season, so starting them indoors is essential, especially if you live in a cooler climate. I usually start my seeds about 8-10 weeks before the last expected frost.
1. Prepare Your Seed Starting Trays: Fill your seed starting trays or small pots with seed starting mix. Gently tap the trays to settle the mix.
2. Sow the Seeds: Make a small indentation (about 1/4 inch deep) in the center of each cell or pot. Place 2-3 seeds in each indentation. This increases your chances of at least one seed germinating.
3. Cover the Seeds: Gently cover the seeds with seed starting mix.
4. Water Thoroughly: Water the trays gently using a watering can or spray bottle. You want the mix to be moist but not soggy.
5. Provide Warmth: Place the trays on a heat mat. Habaneros germinate best at temperatures between 80-90°F (27-32°C).
6. Provide Light: If you’re using a grow light, position it a few inches above the trays. If you’re using natural light, place the trays in a sunny window.
7. Maintain Moisture: Keep the seed starting mix consistently moist. You can cover the trays with a clear plastic dome or plastic wrap to help retain moisture. Just be sure to remove the cover once the seeds start to germinate.
8. Be Patient: Habanero seeds can take anywhere from 7 to 21 days (or even longer) to germinate. Don’t give up!
Phase 2: Nurturing Your Seedlings
Once your seedlings have emerged, it’s time to give them some extra TLC.
1. Remove the Heat Mat: Once the seeds have germinated, remove the heat mat.
2. Provide Adequate Light: Continue to provide plenty of light, either from a grow light or a sunny window. If using a grow light, adjust the height as the seedlings grow.
3. Water Carefully: Water the seedlings when the top inch of soil feels dry. Avoid overwatering, as this can lead to root rot.
4. Thin the Seedlings: Once the seedlings have developed their first true leaves (the leaves that appear after the initial seed leaves), thin them out by snipping off the weaker seedlings at the soil line. Leave only the strongest seedling in each cell or pot.
5. Fertilize Gently: Start fertilizing the seedlings with a diluted liquid fertilizer (half strength) every 1-2 weeks.
6. Harden Off the Seedlings: Before transplanting your seedlings outdoors, you need to “harden them off.” This process gradually acclimates them to the outdoor environment. Start by placing the seedlings outdoors in a sheltered location for a few hours each day, gradually increasing the amount of time they spend outdoors over the course of a week or two.
Phase 3: Transplanting Your Habaneros
Now for the exciting part – getting your habaneros into their permanent homes!
1. Choose the Right Location: Habaneros need at least 6-8 hours of sunlight per day. Choose a location that gets plenty of sun and has well-draining soil.
2. Prepare the Soil: Amend the soil with compost or other organic matter to improve drainage and fertility.
3. Dig the Holes: Dig holes that are slightly larger than the root balls of your seedlings.
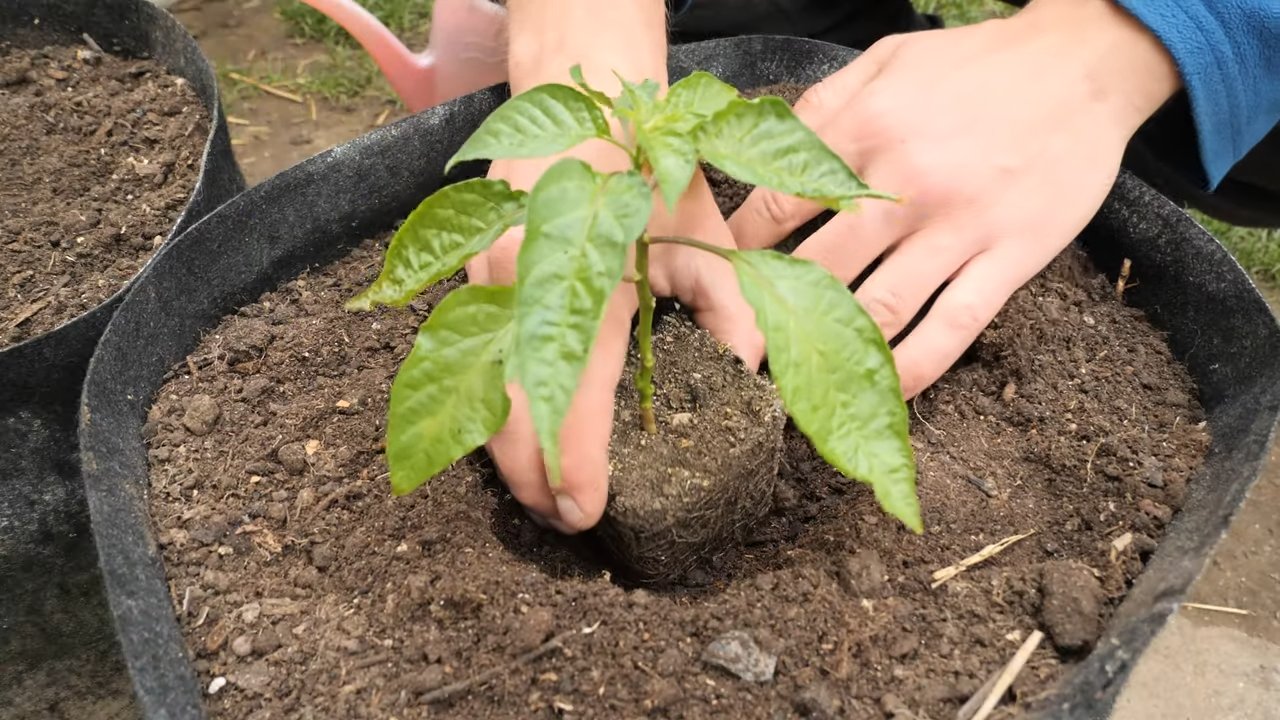
4. Transplant Carefully: Gently remove the seedlings from their pots or trays. Loosen the roots slightly and place the seedlings in the holes.
5. Backfill the Holes: Backfill the holes with soil, gently firming it around the base of the plants.
6. Water Thoroughly: Water the plants thoroughly after transplanting.
7. Mulch: Apply a layer of mulch around the base of the plants to help retain moisture and suppress weeds.
Phase 4: Caring for Your Habanero Plants
Consistent care is key to a bountiful habanero harvest.
1. Water Regularly: Water your habanero plants regularly, especially during hot, dry weather. Aim to keep the soil consistently moist but not soggy.
2. Fertilize Regularly: Fertilize your plants every 2-3 weeks with a balanced fertilizer. You can also use a fertilizer specifically formulated for peppers.
3. Prune (Optional): Pruning can help to improve air circulation and encourage bushier growth. You can prune off any suckers (small shoots that grow from the base of the plant) or any dead or diseased leaves.
4. Provide Support (Optional): As your plants grow, they may need support to prevent them from falling over. You can use stakes, cages, or trellises to support the plants.
5. Watch Out for Pests and Diseases: Keep an eye out for common pepper pests and diseases, such as aphids, spider mites, and blossom end rot. Take action promptly if you notice any problems. I like to use organic pest control methods whenever possible.
6. Be Patient: Habaneros can take several months to mature and produce fruit. Don’t get discouraged if you don’t see peppers right away.
Phase 5: Harvesting Your Fiery Bounty
The moment you’ve been waiting for!
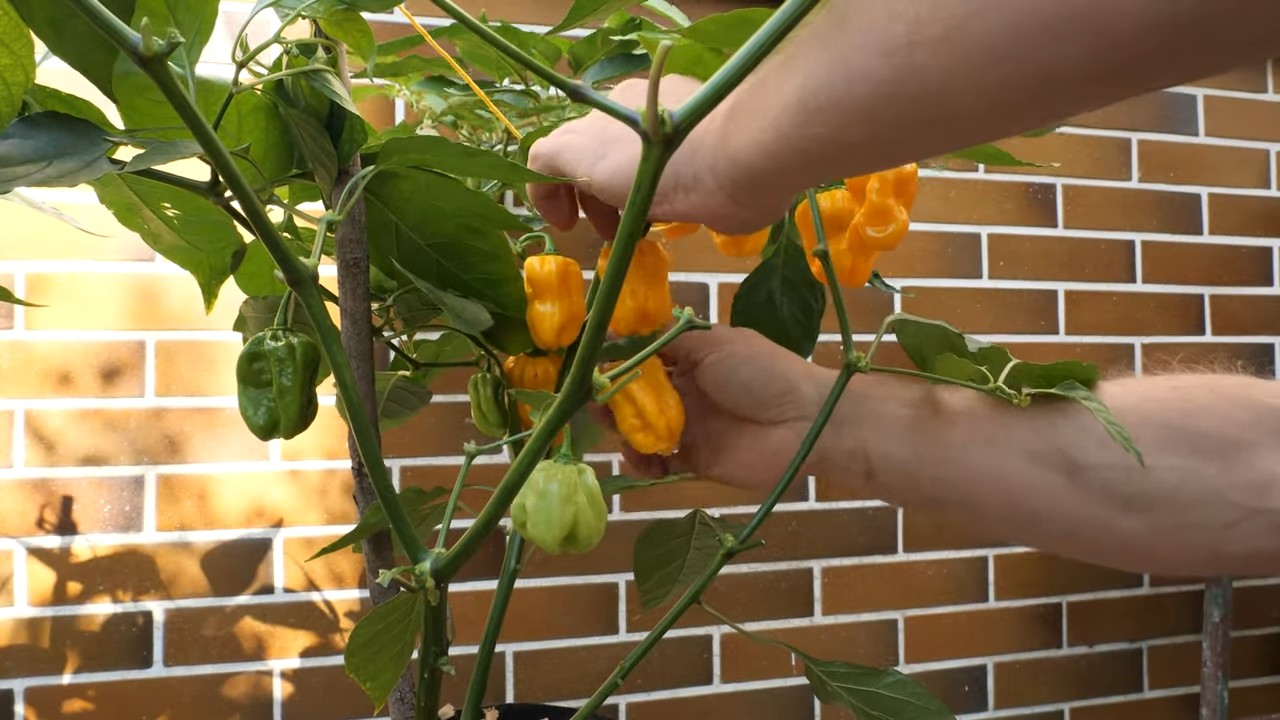
1. Harvest When Ripe: Habaneros are typically ready to harvest when they turn from green to orange, red, or yellow, depending on the variety. They should also be firm to the touch.
2. Use Gloves: Wear gloves when harvesting habaneros to protect your hands from the capsaicin (the compound that makes them hot).
3. Cut the Peppers: Use scissors or pruning shears to cut the peppers from the plant, leaving a small stem attached.
4. Enjoy Your Harvest: Use your habaneros to make hot sauce, salsa, or other spicy dishes. You can also dry or freeze them for later use.
Troubleshooting Tips
* No Germination: Make sure your seeds are fresh and that you’re providing adequate warmth and moisture.
* Yellowing Leaves: This could be a sign of overwatering, nutrient deficiency, or pest infestation.
* Blossom End Rot: This is caused by a calcium deficiency. Make sure your soil is well-drained and that you’re providing adequate calcium.
* Pests: Use insecticidal soap or neem oil to control pests.
Growing habaneros can be a rewarding experience. With a little care and attention, you can enjoy a bountiful harvest of these fiery peppers. Good luck, and happy growing!
Conclusion
So, there you have it! Mastering the art of growing habaneros successfully doesn’t require a green thumb blessed by the gardening gods. It’s about understanding their needs, providing the right environment, and a little bit of patience. From seed to fiery fruit, the journey is incredibly rewarding.
Why is this DIY approach a must-try? Because it puts you in control. You dictate the soil composition, the watering schedule, and the pest control methods. You’re not relying on commercially grown peppers that may have been treated with chemicals or harvested before they reached their peak flavor and heat. You’re cultivating your own little inferno, tailored to your exact specifications. Plus, let’s be honest, there’s a certain satisfaction that comes from nurturing a plant from a tiny seed to a bountiful harvest.
But don’t stop there! Experiment with different variations. Try different soil mixes to see what works best in your climate. Consider using companion planting techniques to deter pests and improve growth. Explore different methods of providing support for your plants as they mature. You could even try growing different varieties of habaneros, from the classic orange to the chocolate or red varieties, each with its unique flavor profile and level of heat.
Growing habaneros successfully is an adventure, not a rigid formula. Embrace the challenges, learn from your mistakes, and most importantly, have fun! The reward is a bounty of fiery peppers that will add a kick to your culinary creations.
We wholeheartedly encourage you to give this DIY guide a try. Start small, perhaps with just a few plants, and gradually expand your operation as you gain experience. And most importantly, share your journey with us! We’d love to hear about your successes, your challenges, and any tips or tricks you discover along the way. Post pictures of your plants, share your favorite habanero recipes, and let’s build a community of passionate pepper growers.
Don’t be intimidated by the reputation of habaneros. With a little knowledge and effort, you can absolutely grow these fiery fruits in your own backyard. So, grab your seeds, prepare your soil, and get ready to embark on a spicy adventure! The world of homegrown habaneros awaits!
Frequently Asked Questions (FAQ)
What is the best time of year to start growing habaneros?
The ideal time to start growing habaneros depends on your climate. Because habaneros require a long growing season (around 100 days), it’s best to start seeds indoors 6-8 weeks before the last expected frost. This allows the seedlings to develop a strong root system before being transplanted outdoors. If you live in a warmer climate with a longer growing season, you can start seeds directly outdoors after the last frost, but be sure to choose a location with plenty of sunlight and well-draining soil.
What kind of soil is best for growing habaneros?
Habaneros thrive in well-draining, nutrient-rich soil with a slightly acidic to neutral pH (around 6.0-7.0). A good soil mix should include a combination of compost, peat moss, perlite, and vermiculite. Compost provides essential nutrients, peat moss helps retain moisture, and perlite and vermiculite improve drainage and aeration. Avoid heavy clay soils, as they can become waterlogged and suffocate the roots. You can also amend your existing soil with organic matter to improve its drainage and fertility.
How much sunlight do habaneros need?
Habaneros are sun-loving plants and require at least 6-8 hours of direct sunlight per day to thrive. Choose a location in your garden that receives full sun throughout the day. If you’re growing habaneros indoors, place them near a sunny window or use grow lights to supplement natural sunlight. Insufficient sunlight can lead to leggy growth, reduced flowering, and smaller, less flavorful peppers.
How often should I water my habanero plants?
Water habanero plants deeply and regularly, especially during hot, dry weather. The soil should be kept consistently moist but not waterlogged. Water when the top inch of soil feels dry to the touch. Avoid overwatering, as this can lead to root rot. During cooler weather, you may need to water less frequently. Mulching around the base of the plants can help retain moisture and suppress weeds.
What are some common pests and diseases that affect habaneros?
Habaneros can be susceptible to various pests and diseases, including aphids, spider mites, whiteflies, pepper weevils, blossom-end rot, and fungal diseases. Regularly inspect your plants for signs of infestation or disease. Use organic pest control methods, such as insecticidal soap or neem oil, to control pests. Ensure good air circulation around the plants to prevent fungal diseases. Blossom-end rot is caused by calcium deficiency and can be prevented by adding calcium to the soil or using a calcium-rich fertilizer.
How do I fertilize my habanero plants?
Fertilize habanero plants regularly throughout the growing season. Use a balanced fertilizer with equal amounts of nitrogen, phosphorus, and potassium (e.g., 10-10-10) during the early stages of growth. Once the plants start to flower and produce fruit, switch to a fertilizer with a higher phosphorus content (e.g., 5-10-5) to promote fruit development. Avoid over-fertilizing, as this can lead to excessive vegetative growth and reduced fruit production. You can also use organic fertilizers, such as compost tea or fish emulsion.
How do I harvest habaneros?
Habaneros are typically ready to harvest when they reach their mature color, which can be orange, red, chocolate, or yellow, depending on the variety. The peppers should be firm and slightly glossy. Use pruning shears or scissors to cut the peppers from the plant, leaving a small stem attached. Wear gloves when handling habaneros, as the capsaicin oil can irritate the skin.
How do I store habaneros?
Freshly harvested habaneros can be stored in the refrigerator for up to a week. For longer storage, you can dry, freeze, or pickle the peppers. To dry habaneros, string them together and hang them in a well-ventilated area or use a dehydrator. To freeze habaneros, wash and dry them thoroughly, then place them in a freezer bag or container. To pickle habaneros, follow a canning recipe to ensure proper preservation.
Can I grow habaneros indoors?
Yes, you can grow habaneros indoors, but you’ll need to provide them with adequate light, warmth, and humidity. Use grow lights to supplement natural sunlight, and maintain a consistent temperature of around 70-80°F. Increase humidity by misting the plants regularly or using a humidifier. Choose a large pot with well-draining soil, and fertilize regularly.
Are habaneros really that hot?
Yes, habaneros are considered to be very hot peppers, with a Scoville heat unit (SHU) rating of 100,000-350,000. This means they are significantly hotter than jalapeños, which have a SHU rating of 2,500-8,000. Handle habaneros with care and wear gloves when preparing them. Start with small amounts when adding them to your dishes, and adjust to your taste.
Leave a Comment