
Growing Lettuce Coconut Shells: Who knew such a simple, sustainable, and frankly adorable method existed for cultivating fresh greens right at home? I’m so excited to share this unique DIY project with you! For centuries, resourceful gardeners around the world have sought innovative ways to maximize their yields, often turning to readily available materials. Think about it – ancient civilizations utilizing clay pots, repurposed containers, and ingenious irrigation systems. This coconut shell lettuce garden is a modern take on that resourceful spirit, blending eco-consciousness with the joy of homegrown goodness.
Why should you try this? Well, for starters, it’s incredibly space-saving, perfect for apartment dwellers or anyone with limited garden space. Plus, it’s a fantastic way to upcycle those coconut shells you might otherwise toss away after enjoying a refreshing tropical drink. But beyond the practical benefits, there’s something deeply satisfying about nurturing life in such a natural and unexpected vessel. Imagine the vibrant green lettuce leaves cascading from the rustic brown shell – a miniature oasis on your windowsill! This DIY trick is not only visually appealing but also offers a fantastic opportunity to teach children about sustainability and the wonders of plant life. So, let’s dive in and discover how easy it is to start growing lettuce coconut shells and bring a touch of tropical charm to your home garden!
DIY: Growing Lettuce in Coconut Shells – A Fun and Sustainable Project!
Hey there, fellow gardening enthusiasts! I’m super excited to share a fun and eco-friendly project with you: growing lettuce in coconut shells! It’s a fantastic way to repurpose those leftover coconut shells, add a touch of tropical charm to your garden, and enjoy fresh, homegrown lettuce. Plus, it’s a great project for beginners and kids alike. Let’s get started!
What You’ll Need
Before we dive in, let’s gather all the necessary materials. This will make the process smoother and more enjoyable.
* **Coconut Shells:** The stars of the show! You’ll need cleaned and prepared coconut shells. I recommend using mature coconut shells for their durability.
* **Potting Mix:** A good quality potting mix is crucial for healthy lettuce growth. Look for a mix that’s well-draining and rich in nutrients.
* **Lettuce Seeds:** Choose your favorite lettuce variety! I personally love Romaine, Butterhead, and loose-leaf varieties for their ease of growth.
* **Drill (Optional):** If your coconut shells don’t have drainage holes, you’ll need a drill to create them.
* **Gloves:** To keep your hands clean and protected.
* **Watering Can or Spray Bottle:** For gentle watering.
* **Small Trowel or Spoon:** For handling the potting mix.
* **Sandpaper (Optional):** To smooth out any rough edges on the coconut shells.
* **Coconut Coir (Optional):** To line the bottom of the shells for added drainage and moisture retention.
* **Small Pebbles or Gravel (Optional):** Another option for improving drainage.
Preparing the Coconut Shells
This is a crucial step to ensure your lettuce has a healthy growing environment.
1. **Cleaning the Shells:** If you’re using fresh coconut shells, scoop out all the coconut meat and thoroughly clean the inside and outside of the shells. Remove any remaining fibers or debris. You can use warm soapy water and a scrub brush. Rinse them well and let them dry completely.
2. **Sanding (Optional):** If the edges of the coconut shells are rough, use sandpaper to smooth them out. This will prevent any accidental cuts or scrapes.
3. **Creating Drainage Holes:** This is super important! Lettuce needs well-draining soil to prevent root rot. If your coconut shells don’t already have drainage holes, use a drill to create a few holes in the bottom. I usually drill about 3-4 holes, each about ¼ inch in diameter. Be careful when drilling to avoid cracking the shell. If you don’t have a drill, you can try using a nail and hammer, but be extra cautious.
4. **Lining the Shells (Optional):** To further improve drainage and moisture retention, you can line the bottom of the coconut shells with a layer of coconut coir or small pebbles/gravel. This will prevent the potting mix from clogging the drainage holes and help retain moisture. I personally prefer coconut coir as it’s a sustainable and effective option.
Planting the Lettuce Seeds
Now for the fun part – planting the lettuce seeds!
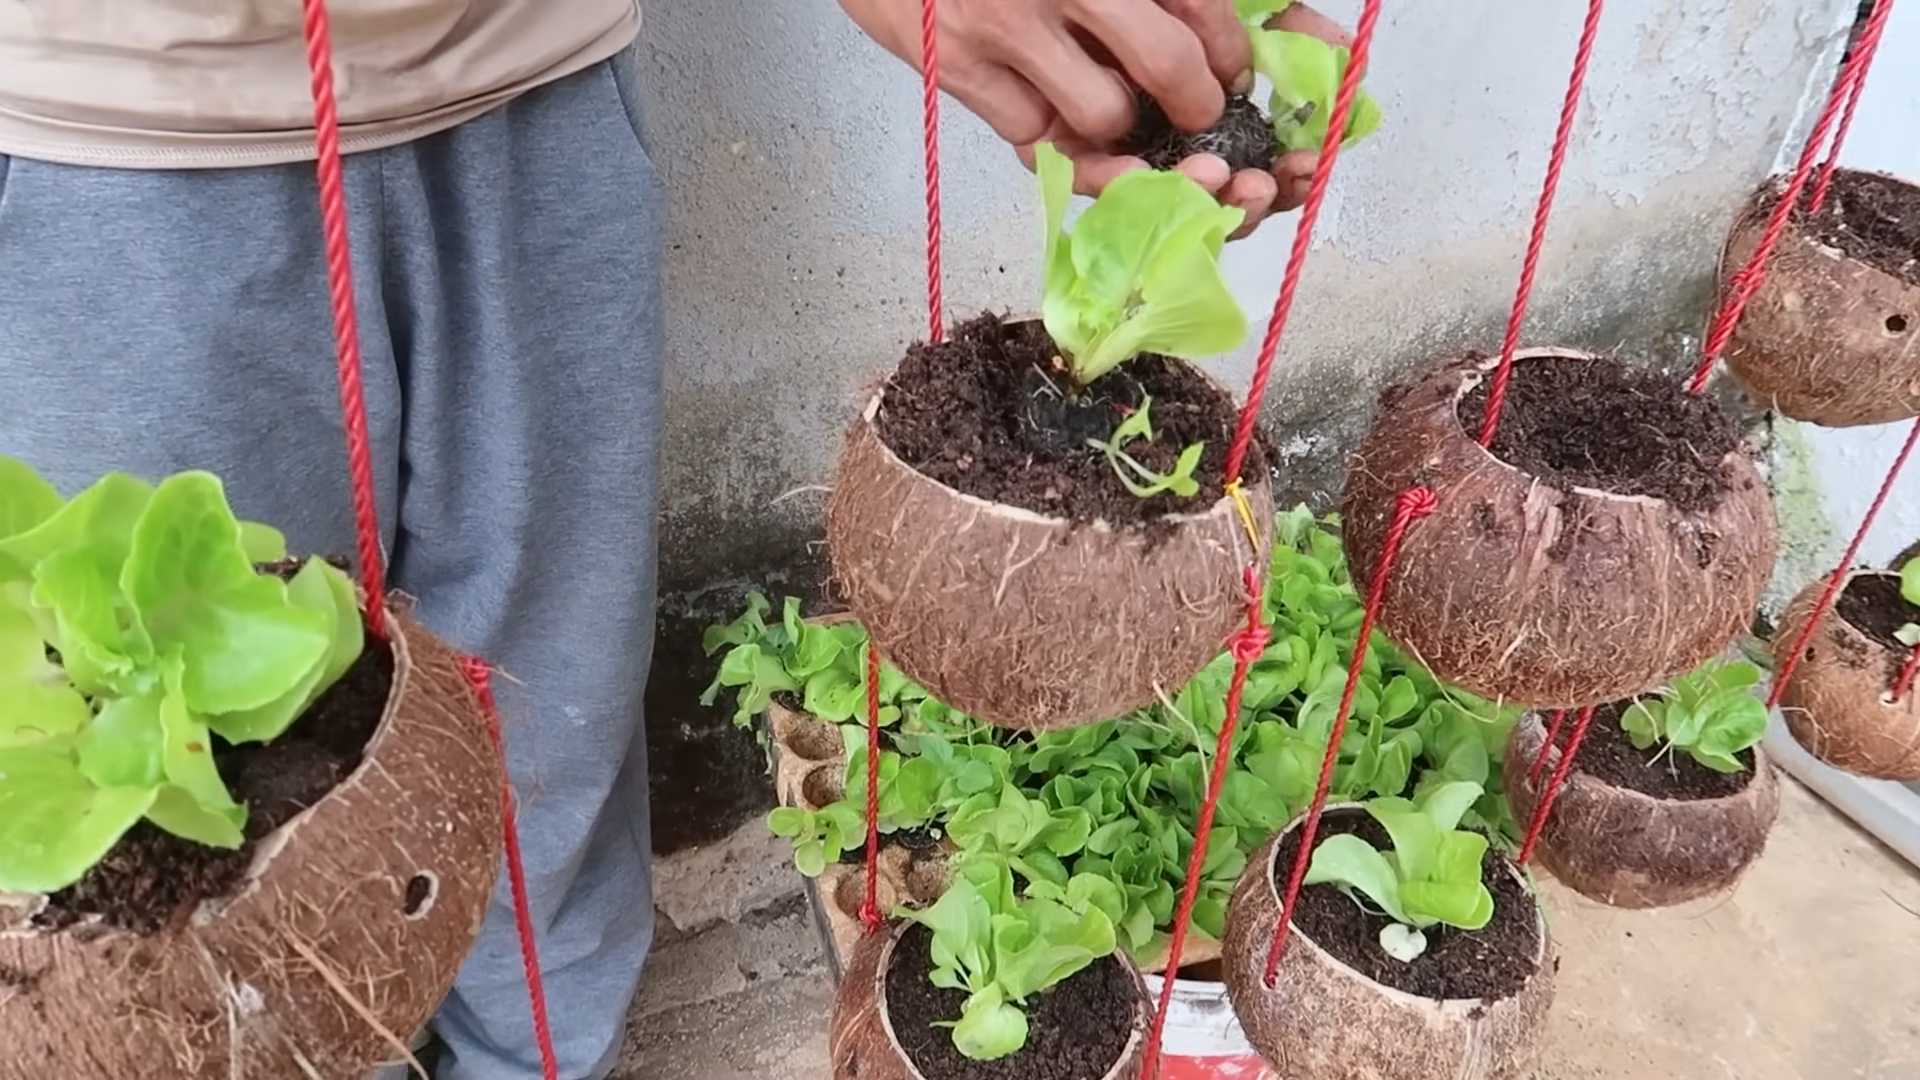
1. **Filling the Coconut Shells:** Fill each coconut shell with potting mix, leaving about an inch of space at the top. Gently pat down the soil to remove any air pockets.
2. **Sowing the Seeds:** Sprinkle the lettuce seeds evenly over the surface of the potting mix. Don’t overcrowd the seeds, as this can lead to competition for resources. A good rule of thumb is to space the seeds about ½ inch apart.
3. **Covering the Seeds:** Lightly cover the seeds with a thin layer of potting mix (about ¼ inch). Lettuce seeds need light to germinate, so don’t bury them too deep.
4. **Watering:** Gently water the potting mix using a watering can or spray bottle. Be careful not to dislodge the seeds. The soil should be moist but not soggy.
5. **Placement:** Place the coconut shells in a location that receives at least 6 hours of sunlight per day. Lettuce thrives in sunny locations. If you’re starting the seeds indoors, you can use a grow light to supplement natural sunlight.
Caring for Your Lettuce Plants
Consistent care is key to growing healthy and delicious lettuce.
1. **Watering:** Keep the potting mix consistently moist, but not waterlogged. Water when the top inch of soil feels dry to the touch. Avoid overwatering, as this can lead to root rot. I usually water every 1-2 days, depending on the weather conditions.
2. **Thinning (If Necessary):** Once the seedlings emerge and have a few true leaves, you may need to thin them out if they’re too crowded. This will give the remaining plants enough space to grow. Gently remove the weaker seedlings, leaving the strongest ones.
3. **Fertilizing (Optional):** Lettuce is a relatively light feeder, but you can give it a boost by fertilizing it with a diluted liquid fertilizer every 2-3 weeks. Look for a fertilizer that’s specifically formulated for leafy greens. Follow the instructions on the fertilizer label. I personally use a seaweed-based fertilizer for its natural and gentle properties.
4. **Pest Control:** Keep an eye out for common lettuce pests, such as aphids, slugs, and snails. If you spot any pests, you can try removing them by hand or using an organic pest control spray. I’ve found that a mixture of water and neem oil is effective against aphids.
5. **Sunlight:** Ensure your lettuce plants receive adequate sunlight. If you’re growing them indoors, rotate the coconut shells regularly to ensure even growth.
Harvesting Your Lettuce
The best part – enjoying the fruits (or rather, leaves!) of your labor!
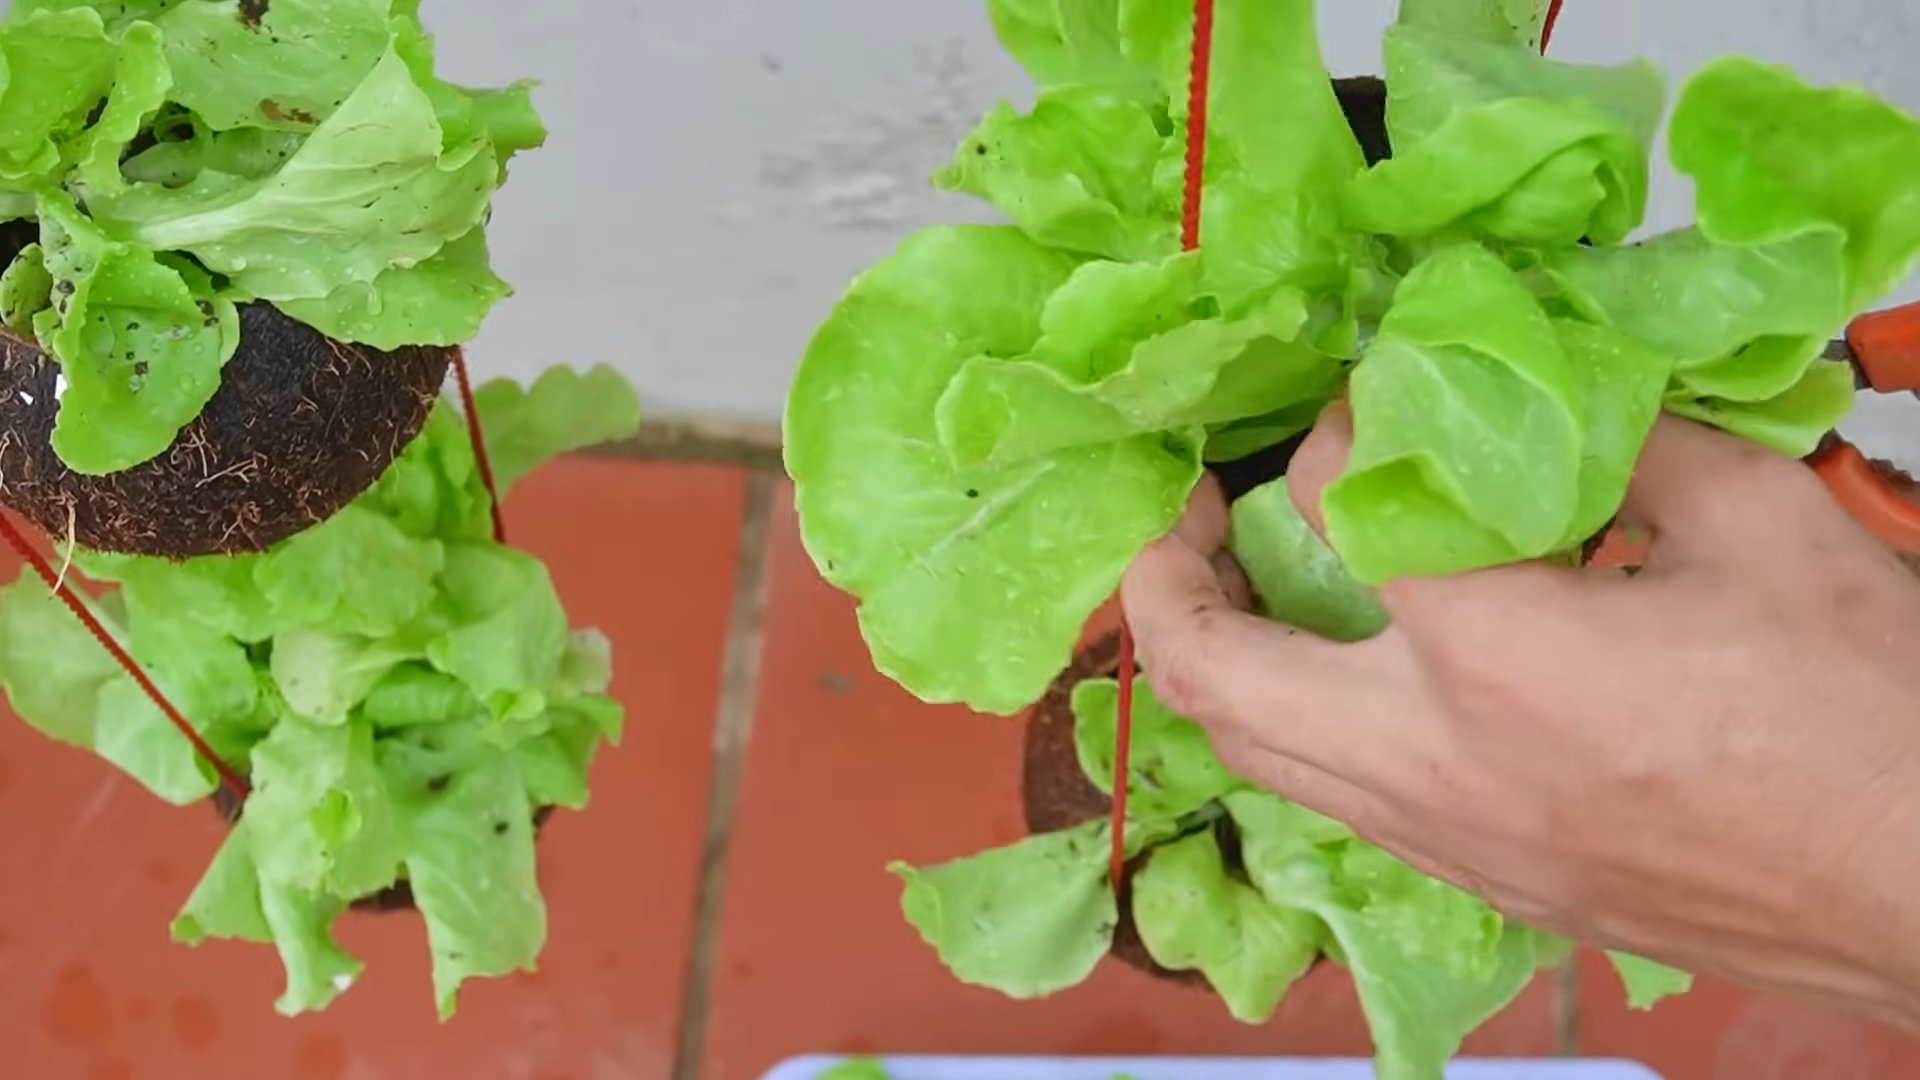
1. **Harvest Time:** Lettuce is typically ready to harvest in about 4-6 weeks, depending on the variety. You can start harvesting the outer leaves when they’re about 4-6 inches long.
2. **Harvesting Method:** Use a sharp knife or scissors to cut the leaves off at the base of the plant. Avoid pulling the leaves, as this can damage the plant.
3. **Cut-and-Come-Again:** Lettuce is a “cut-and-come-again” crop, meaning you can harvest the leaves multiple times over several weeks. Simply harvest the outer leaves as needed, and the plant will continue to produce new leaves.
4. **Storage:** Store your harvested lettuce leaves in the refrigerator in a plastic bag or container. They should stay fresh for several days.
Tips and Tricks for Success
Here are a few extra tips to help you succeed with your coconut shell lettuce garden:
* Choose the Right Lettuce Variety: Some lettuce varieties are better suited for container gardening than others. Loose-leaf varieties, such as Butterhead and Romaine, are generally easier to grow in containers.
* Use High-Quality Potting Mix: A good quality potting mix is essential for healthy lettuce growth. Avoid using garden soil, as it can be too heavy and compacted.
* Don’t Overwater: Overwatering is a common mistake that can lead to root rot. Make sure the potting mix is well-draining and avoid watering too frequently.
* Provide Adequate Sunlight: Lettuce needs at least 6 hours of sunlight per day. If you’re growing it indoors, use a grow light to supplement natural sunlight.
* Protect from Extreme Temperatures: Lettuce prefers cool temperatures. Protect your plants from extreme heat or cold.
* Repurpose and Recycle: This project is all about sustainability! Use recycled materials whenever possible.
* Get Creative with Decoration: Feel free to decorate your coconut shells with paint, markers, or other embellishments. This is a great way to personalize your garden and add a touch of whimsy.
I hope you enjoyed this DIY project! Growing lettuce in coconut shells is a fun, sustainable, and rewarding experience. Happy gardening!
Conclusion
So, there you have it! Growing lettuce in coconut shells isn’t just a quirky gardening trend; it’s a genuinely effective, sustainable, and visually appealing way to cultivate fresh, delicious greens right at your fingertips. We’ve explored the numerous benefits, from the natural drainage and aeration provided by the coconut coir to the reduced need for plastic containers and the inherent aesthetic charm these little planters bring to your space.
But why is this DIY trick a must-try? Beyond the environmental advantages and the visual appeal, it’s about accessibility. Whether you have a sprawling garden or a tiny balcony, growing lettuce in coconut shells makes fresh, homegrown produce a reality. It’s a fantastic project for families, a rewarding activity for seasoned gardeners, and a simple way for beginners to dip their toes into the world of urban farming.
Think of the possibilities! You can create a vertical garden using a series of coconut shells, hanging them from a sunny wall or balcony railing. Imagine a vibrant cascade of different lettuce varieties, each thriving in its own little coconut home. Or, consider using different types of coconut shells – some polished and varnished for a more refined look, others left in their natural state for a rustic charm.
The variations are endless. Experiment with different lettuce varieties – from crisp romaine and buttery butterhead to peppery arugula and vibrant red leaf. You can even add companion plants like basil or chives to your coconut shell planters, creating miniature herb gardens alongside your lettuce. Consider painting the coconut shells with vibrant colors or adding decorative elements like twine or beads to personalize your creations.
Don’t limit yourself to just lettuce! While this guide focuses on lettuce, the same principles can be applied to other small, shallow-rooted plants like spinach, radishes, or even herbs like parsley and cilantro. The key is to ensure adequate drainage and provide the plants with the nutrients they need to thrive.
The beauty of this DIY project lies in its simplicity and adaptability. It’s a chance to get creative, connect with nature, and enjoy the satisfaction of growing your own food. It’s also a fantastic conversation starter! Imagine the delight of serving a salad made with lettuce you grew yourself, presented in its charming coconut shell planter.
We wholeheartedly encourage you to try growing lettuce in coconut shells. It’s a rewarding experience that combines sustainability, creativity, and the simple pleasure of fresh, homegrown produce. And most importantly, we want to hear about your experiences! Share your photos, tips, and variations with us in the comments below. Let’s build a community of coconut shell gardeners and inspire others to embrace this eco-friendly and delightful way to grow their own food. Let us know what worked for you, what challenges you faced, and any creative twists you added to the process. Your feedback will help us refine this guide and inspire others to embark on their own coconut shell gardening adventures. So, grab some coconut shells, some lettuce seeds, and get ready to experience the joy of growing your own fresh, delicious greens!
Frequently Asked Questions (FAQ)
What kind of coconut shells are best for growing lettuce?
Any coconut shell can technically be used, but mature coconut shells are generally preferred. These shells are thicker and more durable, providing a longer-lasting planter. Ensure the shell is thoroughly cleaned and free of any remaining coconut flesh before using it. You can purchase pre-cleaned coconut shells specifically for gardening, or you can clean them yourself after enjoying the coconut water and flesh. If you are cleaning them yourself, be sure to remove all the flesh and fibers, then scrub the inside and outside of the shell with warm, soapy water. Rinse thoroughly and allow to dry completely before planting.
How do I prepare the coconut shell for planting?
First, ensure the coconut shell has drainage holes. If it doesn’t, carefully drill a few holes in the bottom using a drill bit suitable for hard materials. This is crucial to prevent waterlogging, which can lead to root rot. Next, line the bottom of the shell with a layer of coconut coir or small pebbles to further improve drainage. Fill the shell with a well-draining potting mix suitable for lettuce. Avoid using garden soil, as it can be too dense and may not provide adequate drainage.
What type of lettuce grows best in coconut shells?
Most lettuce varieties will thrive in coconut shells, but smaller, compact varieties are particularly well-suited. Consider loose-leaf varieties like butterhead, romaine, or red leaf lettuce. These varieties are relatively easy to grow and can be harvested continuously as needed. Avoid larger head lettuce varieties, as they may outgrow the limited space of the coconut shell.
How often should I water my lettuce growing in coconut shells?
Watering frequency will depend on the climate, the type of potting mix used, and the size of the coconut shell. Generally, you should water when the top inch of soil feels dry to the touch. Avoid overwatering, as this can lead to root rot. Ensure the coconut shell has adequate drainage to prevent water from pooling at the bottom. In hot, dry weather, you may need to water daily, while in cooler, wetter weather, you may only need to water every few days.
What kind of sunlight does lettuce need when grown in coconut shells?
Lettuce prefers partial shade, especially during the hottest part of the day. Aim for at least 4-6 hours of sunlight per day. If you live in a particularly hot climate, consider placing your coconut shell planters in a location that receives morning sun and afternoon shade. Too much direct sunlight can cause the lettuce leaves to wilt and burn.
Do I need to fertilize my lettuce growing in coconut shells?
Yes, lettuce grown in coconut shells will benefit from regular fertilization. Use a balanced liquid fertilizer diluted to half strength every 2-3 weeks. Alternatively, you can incorporate slow-release fertilizer granules into the potting mix at planting time. Avoid over-fertilizing, as this can lead to leggy growth and bitter-tasting leaves.
How do I harvest lettuce from coconut shells?
Harvest lettuce leaves as needed, starting with the outer leaves. This allows the inner leaves to continue growing, providing a continuous harvest. You can harvest individual leaves or cut the entire head of lettuce at the base. Regular harvesting encourages new growth and prevents the lettuce from bolting (going to seed).
How long will lettuce last in a coconut shell?
The lifespan of lettuce in a coconut shell depends on several factors, including the variety of lettuce, the growing conditions, and how frequently you harvest. Generally, you can expect to harvest lettuce from a coconut shell for several weeks to a few months. Once the lettuce begins to bolt or becomes overcrowded, it’s time to start a new planting.
Can I reuse the coconut shell after harvesting the lettuce?
Yes, you can reuse the coconut shell multiple times. After harvesting the lettuce, remove the old potting mix and clean the shell thoroughly. You may want to sterilize the shell with a diluted bleach solution to prevent the spread of diseases. Allow the shell to dry completely before replanting.
Are there any pests or diseases that affect lettuce grown in coconut shells?
Lettuce grown in coconut shells can be susceptible to common garden pests like aphids, slugs, and snails. Regularly inspect your plants for signs of infestation and take appropriate action. You can use organic pest control methods like insecticidal soap or diatomaceous earth to control pests. Diseases like powdery mildew and downy mildew can also affect lettuce. Ensure good air circulation and avoid overwatering to prevent these diseases. If you notice signs of disease, remove affected leaves and treat the plants with a fungicide.

Leave a Comment