
Growing red cabbage for beginners might seem daunting, but trust me, it’s a rewarding experience that anyone can achieve! Have you ever dreamt of harvesting vibrant, jewel-toned cabbages straight from your own backyard? Imagine the satisfaction of adding a splash of color and nutrition to your meals, knowing you nurtured it from a tiny seedling.
Cabbage, in general, has a rich history, dating back to ancient times where it was valued for its medicinal properties and resilience. Different varieties of cabbage have been cultivated across various cultures, each with its unique culinary traditions. Red cabbage, with its striking color, adds a touch of elegance to any dish.
But why should you bother with growing red cabbage for beginners? Well, store-bought red cabbage can sometimes lack the freshness and flavor of homegrown produce. Plus, growing your own allows you to control the pesticides and fertilizers used, ensuring a healthier and more sustainable harvest. In this article, I’ll share easy-to-follow tips and tricks to help you successfully cultivate these beautiful and nutritious vegetables, even if you’re a complete novice. Let’s get started and transform your garden into a vibrant red cabbage haven!
Growing Red Cabbage: A Beginner’s Guide to a Vibrant Harvest
Okay, so you want to grow red cabbage? Awesome! It’s a fantastic addition to any garden, not only for its beautiful color but also for its delicious flavor and nutritional benefits. Don’t be intimidated; even if you’re a complete newbie, I’m here to guide you through the process. I’ll break it down into easy-to-follow steps, so you can enjoy your own homegrown red cabbage in no time.
Choosing the Right Variety
First things first, let’s talk about varieties. Red cabbage comes in different shapes and sizes, and some are better suited for certain climates than others. Here are a few popular choices:
* ‘Red Acre’: This is a classic, medium-sized variety that’s known for its good storage capabilities. It’s a reliable choice for beginners.
* ‘Ruby Perfection’: As the name suggests, this variety produces beautiful, deep red heads. It’s relatively early maturing, which is great if you’re impatient like me!
* ‘Red Express’: If you’re looking for a fast-growing option, ‘Red Express’ is your best bet. It matures quickly and produces smaller heads.
* ‘Langedijker Dauer’: This is a late-season variety that’s known for its excellent storage qualities. If you want to enjoy your red cabbage throughout the winter, this is a good choice.
Consider your local climate and growing season when making your decision. Check with your local nursery or garden center for recommendations on varieties that thrive in your area.
Starting Your Red Cabbage
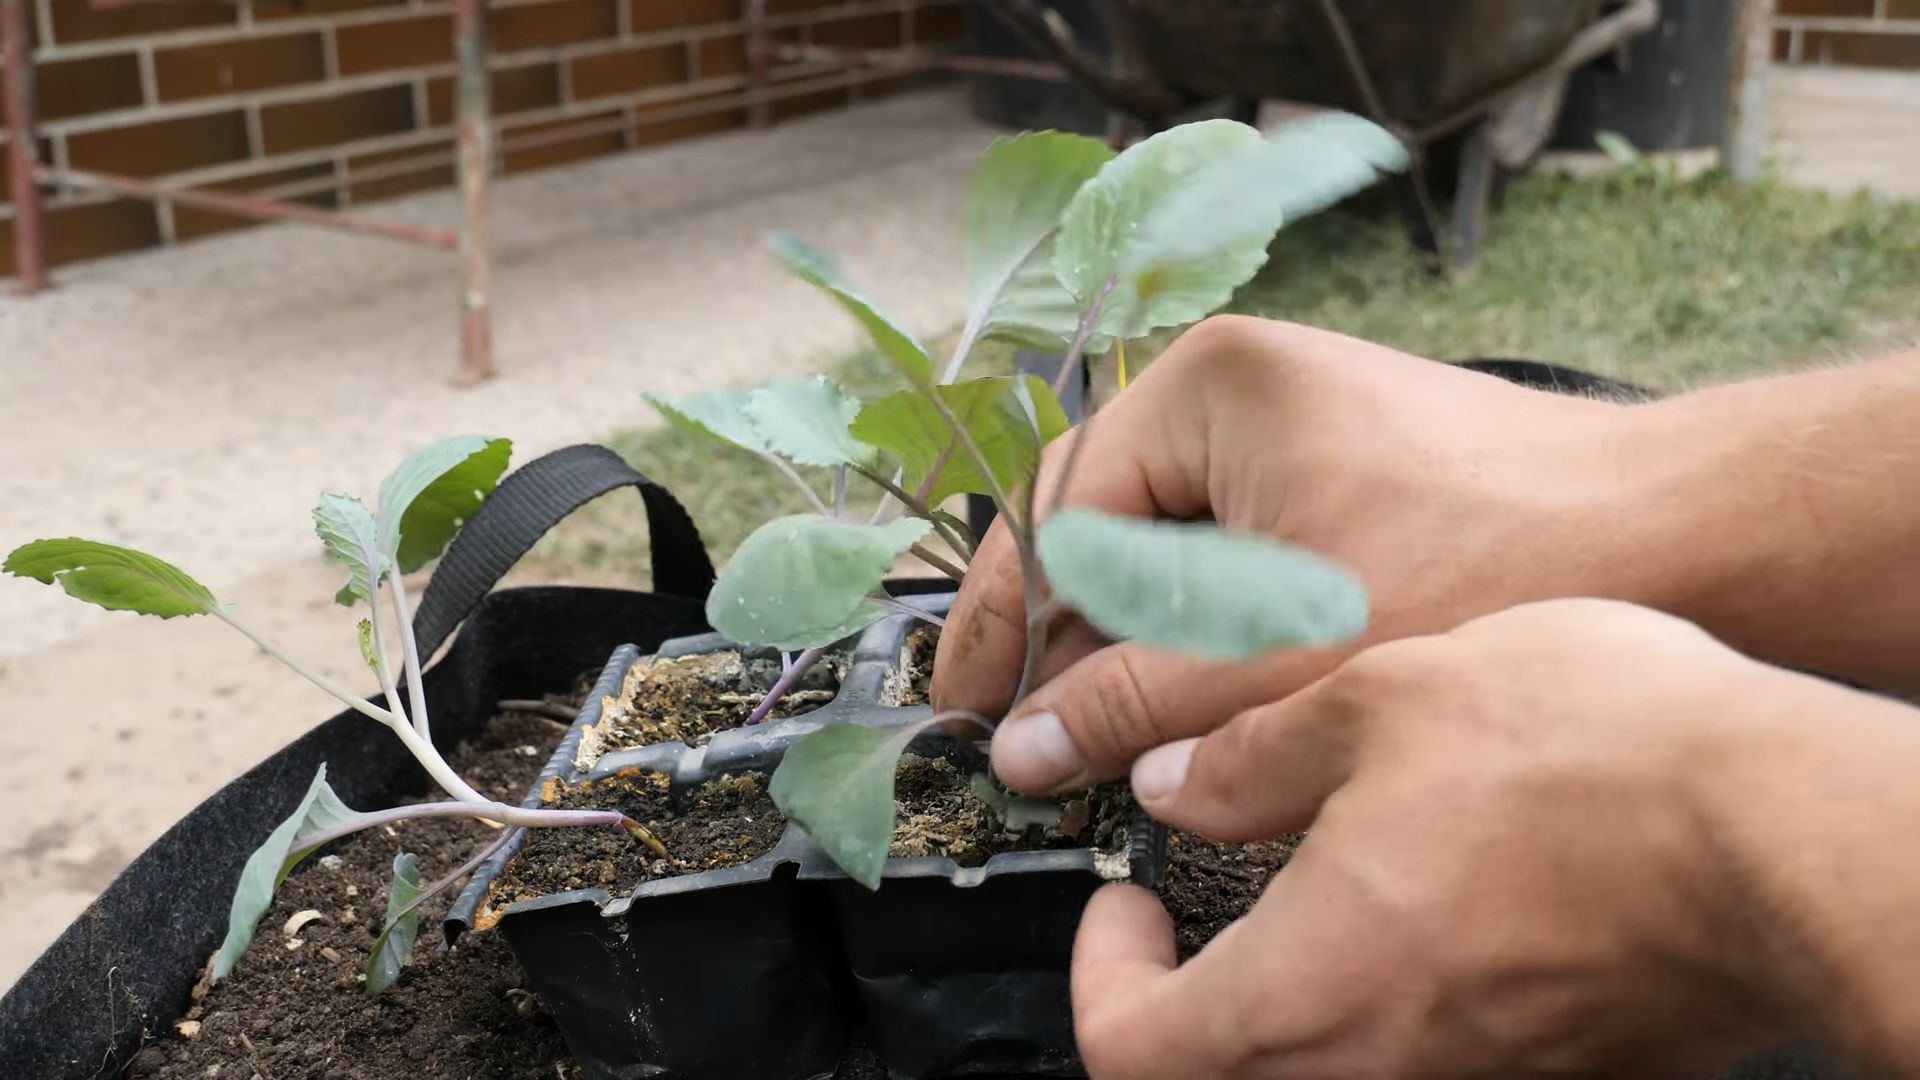
You have two main options for starting your red cabbage: starting from seed indoors or buying transplants. I personally prefer starting from seed indoors because it gives me more control over the process, but transplants are a great option if you’re short on time or space.
Starting from Seed Indoors:
* Timing is Key: Start your seeds about 6-8 weeks before the last expected frost in your area. This will give them a head start before transplanting them outdoors.
* Seed Starting Mix: Use a high-quality seed starting mix. This is important because it’s specifically formulated to provide the right nutrients and drainage for young seedlings.
* Planting the Seeds: Sow the seeds about ¼ inch deep in small pots or seed trays. I like to use individual cells to minimize root disturbance when transplanting.
* Watering: Keep the soil consistently moist, but not soggy. Overwatering can lead to damping-off, a fungal disease that can kill your seedlings.
* Light: Provide plenty of light. If you don’t have a sunny windowsill, use grow lights. Seedlings need about 14-16 hours of light per day.
* Temperature: Maintain a temperature of around 65-70°F (18-21°C). A heat mat can help speed up germination.
* Hardening Off: Before transplanting your seedlings outdoors, you need to harden them off. This means gradually exposing them to outdoor conditions over a period of about a week. Start by placing them in a sheltered spot for a few hours each day, gradually increasing the amount of time they spend outdoors.
Buying Transplants:
* Choose Healthy Plants: Look for transplants that are healthy and vigorous, with no signs of disease or pests. Avoid plants that are root-bound or have yellowing leaves.
* Timing: Plant your transplants after the last expected frost, when the soil has warmed up to at least 50°F (10°C).
Preparing the Garden Bed
Red cabbage needs a sunny spot with well-drained soil. Here’s how to prepare your garden bed:
* Sunlight: Choose a location that receives at least 6 hours of sunlight per day.
* Soil: Red cabbage prefers slightly acidic soil with a pH of 6.0-7.0. Amend the soil with compost or other organic matter to improve drainage and fertility.
* Fertilizer: Incorporate a balanced fertilizer into the soil before planting. Follow the instructions on the fertilizer package.
* Weed Control: Remove any weeds from the planting area. Weeds can compete with your red cabbage for nutrients and water.
Planting Your Red Cabbage
Now for the fun part – planting!
1. Spacing: Space your red cabbage plants about 18-24 inches apart in rows that are 24-36 inches apart. This will give them enough room to grow and mature.
2. Planting Depth: Dig a hole that’s deep enough to accommodate the root ball of your transplant. Gently remove the transplant from its container and place it in the hole. Make sure the top of the root ball is level with the soil surface.
3. Watering: Water the plants thoroughly after planting. This will help them settle in and establish their roots.
4. Mulching: Apply a layer of mulch around the plants to help retain moisture, suppress weeds, and regulate soil temperature. I like to use straw or wood chips.
Caring for Your Red Cabbage
Once your red cabbage is planted, it’s important to provide proper care to ensure a healthy and bountiful harvest.
* Watering: Water your red cabbage regularly, especially during dry periods. Aim for about 1 inch of water per week.
* Fertilizing: Fertilize your red cabbage every 2-3 weeks with a balanced fertilizer. Follow the instructions on the fertilizer package.
* Weed Control: Keep the area around your red cabbage free of weeds. Hand-pulling is the best option, as herbicides can damage your plants.
* Pest Control: Red cabbage can be susceptible to pests such as cabbage worms, aphids, and flea beetles. Inspect your plants regularly and take action if you see any signs of infestation.
* Cabbage Worms: These green caterpillars can quickly devour your cabbage leaves. Hand-picking them off the plants is an effective method of control. You can also use Bacillus thuringiensis (Bt), a biological insecticide that’s safe for humans and pets.
* Aphids: These tiny insects suck the sap from plants, causing them to weaken and become distorted. Spraying your plants with a strong stream of water can dislodge aphids. You can also use insecticidal soap or neem oil.
* Flea Beetles: These small, jumping beetles can create tiny holes in cabbage leaves. Covering your plants with row covers can prevent flea beetles from reaching them. You can also use insecticidal soap or neem oil.
* Disease Control: Red cabbage can also be susceptible to diseases such as black rot and clubroot.
* Black Rot: This bacterial disease can cause yellowing and wilting of leaves, as well as black lesions on the stems. To prevent black rot, plant disease-resistant varieties and practice crop rotation.
* Clubroot: This fungal disease causes swollen and distorted roots, which can stunt the growth of your plants. To prevent clubroot, amend the soil with lime to raise the pH to 7.0-7.2 and practice crop rotation.
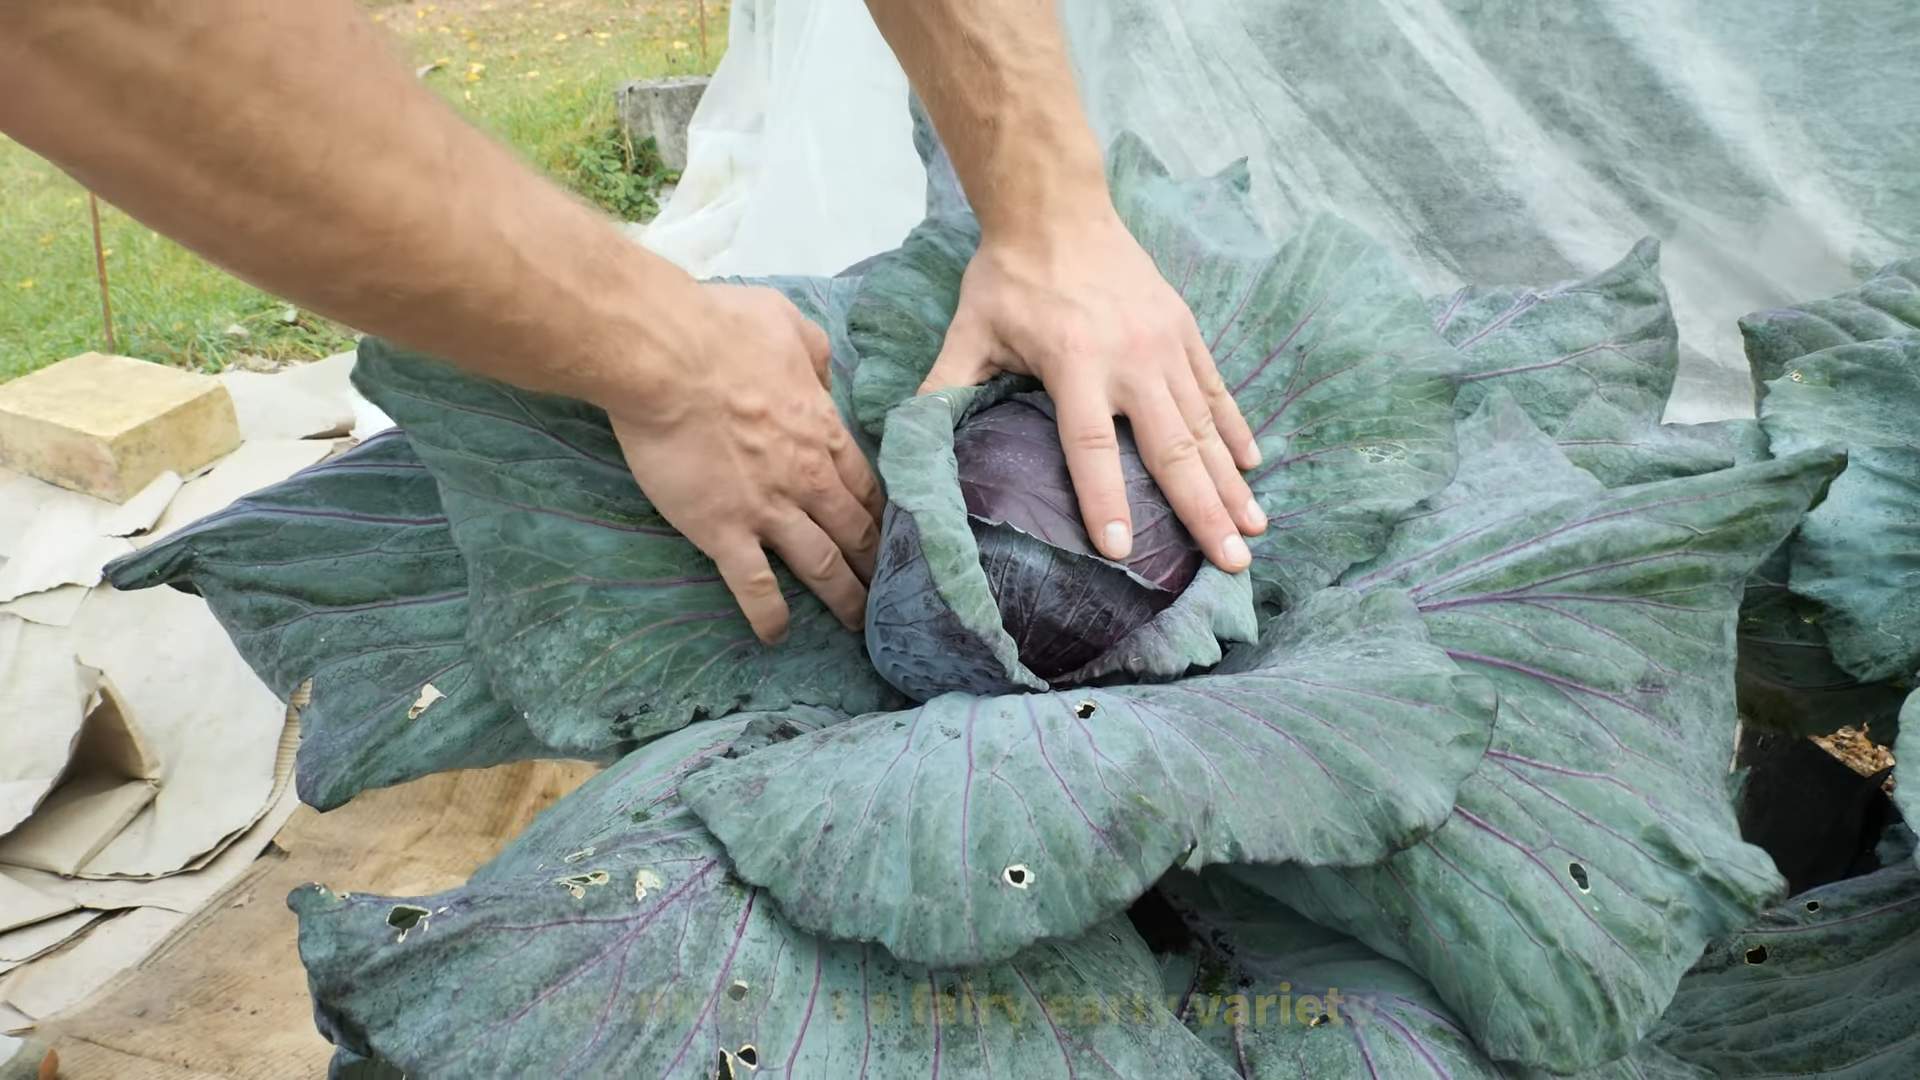
Harvesting Your Red Cabbage
The moment you’ve been waiting for! Red cabbage is typically ready to harvest about 70-100 days after planting, depending on the variety.
1. Check for Firmness: The head should be firm and solid to the touch.
2. Size: The size of the head will vary depending on the variety, but it should be close to the mature size listed on the seed packet or plant tag.
3. Cutting: Use a sharp knife to cut the head from the stem. Leave a few outer leaves attached to protect the head during storage.
4. Storage: Red cabbage can be stored in a cool, dry place for several weeks. Wrap the head in plastic wrap or store it in a plastic bag to prevent it from drying out.
Troubleshooting
Even with the best care, you might encounter some challenges along the way. Here are a few common problems and how to address them:
* Heads Not Forming: This can be caused by a lack of sunlight, poor soil fertility, or insufficient watering. Make sure your plants are getting enough sunlight, fertilize them regularly, and water them deeply during dry periods.
* Splitting Heads: This can be caused by uneven watering, especially after a dry spell. Water your plants consistently and mulch around them to help retain moisture.
* Pest Infestations: As mentioned earlier, red cabbage can be susceptible to various pests. Inspect your plants regularly and take action if you see any signs of infestation.
* Disease Problems: Red cabbage can also be susceptible to diseases such as black rot and clubroot. Plant disease-resistant varieties and practice crop rotation to prevent these problems.
Enjoying Your Harvest
Now that you’ve harvested your red cabbage, it’s time to enjoy it! Red cabbage can be eaten raw in
Conclusion
So, there you have it! Growing red cabbage, even for beginners, is not only achievable but incredibly rewarding. We’ve walked through the entire process, from selecting the right seeds and preparing your soil to nurturing your seedlings and protecting your precious crop from pests. The vibrant color and delicious flavor of homegrown red cabbage are simply unmatched by anything you can find in the store. Plus, knowing you cultivated it yourself adds a special touch of satisfaction to every meal.
But why is this DIY approach a must-try? Beyond the superior taste and freshness, growing your own red cabbage allows you to control exactly what goes into your food. You can avoid harmful pesticides and herbicides, ensuring a healthier and more sustainable harvest for you and your family. It’s also a fantastic way to connect with nature, learn about the growing process, and appreciate the effort that goes into producing the food we eat.
Don’t be afraid to experiment with different varieties of red cabbage! Some are better suited for specific climates or have unique flavor profiles. For instance, ‘Red Acre’ is a popular choice for its compact size and early maturity, while ‘Ruby Perfection’ offers excellent disease resistance. You can also try succession planting, sowing seeds every few weeks to ensure a continuous harvest throughout the growing season. Consider companion planting too! Herbs like rosemary and thyme can help deter pests, while marigolds add a splash of color and attract beneficial insects.
And if you’re feeling adventurous, why not try pickling your red cabbage? It’s a fantastic way to preserve your harvest and enjoy its tangy flavor all year round. You can also shred it into salads, braise it with apples and onions, or use it as a colorful addition to stir-fries. The possibilities are endless!
We wholeheartedly encourage you to give this DIY project a try. Growing red cabbage is a fun, educational, and ultimately delicious experience. Don’t be intimidated by the initial learning curve; with a little patience and care, you’ll be harvesting your own beautiful red cabbages in no time.
Ready to embark on your red cabbage growing adventure? We’re confident you’ll be thrilled with the results. And most importantly, we want to hear about your experience! Share your tips, tricks, and triumphs in the comments below. Let’s create a community of red cabbage enthusiasts and learn from each other. Happy growing!
Frequently Asked Questions (FAQs)
What is the best time of year to start growing red cabbage?
The ideal time to start growing red cabbage depends on your climate. In general, red cabbage prefers cooler temperatures and thrives in spring or fall. For spring planting, start seeds indoors 6-8 weeks before the last expected frost. For fall planting, sow seeds directly into the garden in mid-summer, about 10-12 weeks before the first expected frost. Check your local frost dates to determine the best timing for your region. If you live in a warmer climate, you can often grow red cabbage throughout the winter.
How much sunlight does red cabbage need?
Red cabbage needs at least 6 hours of direct sunlight per day to thrive. Choose a sunny location in your garden where your plants will receive ample sunlight. If you live in a particularly hot climate, some afternoon shade can be beneficial to prevent the leaves from scorching.
What kind of soil is best for growing red cabbage?
Red cabbage prefers well-drained, fertile soil that is rich in organic matter. The ideal soil pH is between 6.0 and 7.0. Before planting, amend your soil with compost or well-rotted manure to improve its fertility and drainage. You can also add a slow-release fertilizer to provide your plants with the nutrients they need.
How often should I water my red cabbage plants?
Red cabbage needs consistent moisture to grow properly. Water your plants deeply and regularly, especially during dry periods. Aim to keep the soil consistently moist but not waterlogged. Mulching around your plants can help to retain moisture and suppress weeds.
What are some common pests and diseases that affect red cabbage?
Red cabbage can be susceptible to several pests and diseases, including cabbage worms, aphids, flea beetles, clubroot, and black rot. To prevent pest problems, consider using row covers to protect your plants. You can also handpick pests off your plants or use insecticidal soap or neem oil. To prevent diseases, choose disease-resistant varieties, practice crop rotation, and ensure good air circulation around your plants.
How do I know when my red cabbage is ready to harvest?
Red cabbage is typically ready to harvest when the head is firm and solid. The size of the head will vary depending on the variety, but generally, you can harvest when the head is about 6-8 inches in diameter. To harvest, use a sharp knife to cut the head from the stem, leaving a few outer leaves intact.
Can I grow red cabbage in containers?
Yes, you can grow red cabbage in containers, but you’ll need to choose a large container that is at least 12 inches in diameter and depth. Use a well-draining potting mix and provide your plants with plenty of sunlight and water. Container-grown red cabbage may require more frequent fertilization than plants grown in the ground.
How do I store red cabbage after harvesting?
Red cabbage can be stored in the refrigerator for several weeks. Wrap the head tightly in plastic wrap or store it in a plastic bag to prevent it from drying out. You can also store red cabbage in a cool, dark, and humid place, such as a root cellar.
Why is my red cabbage not turning red?
The red color in red cabbage is due to pigments called anthocyanins, which are influenced by soil pH. If your soil is too alkaline (high pH), the cabbage may not develop its characteristic red color. To encourage red color development, you can amend your soil with sulfur or add acidic organic matter, such as pine needles or coffee grounds.
Can I eat the outer leaves of red cabbage?
Yes, you can eat the outer leaves of red cabbage, as long as they are not damaged or discolored. The outer leaves may be slightly tougher than the inner leaves, but they are still nutritious and flavorful. Just be sure to wash them thoroughly before eating.

Leave a Comment