
Growing Rosemary Without Soil might sound like something out of a science fiction movie, but trust me, it’s a totally achievable and surprisingly simple DIY project! Have you ever dreamed of having fresh rosemary on hand for your culinary creations, but struggled with traditional gardening methods? Maybe you live in an apartment with limited space, or perhaps you just want to try something a little different. Well, you’re in the right place!
Rosemary, with its fragrant needles and rich history, has been cherished for centuries. From ancient Greece, where it was believed to enhance memory, to its use in traditional medicine and culinary arts across the Mediterranean, rosemary has always held a special place in our lives. But did you know you don’t even need soil to enjoy this amazing herb?
That’s right! This DIY article will guide you through the fascinating world of hydroponics, specifically focusing on how to successfully cultivate rosemary without soil. This method is perfect for anyone looking for a low-maintenance, space-saving, and frankly, pretty cool way to grow their own herbs. Imagine the satisfaction of snipping fresh rosemary sprigs, knowing you nurtured them from start to finish, all without getting your hands dirty! Plus, growing rosemary without soil can often lead to faster growth and healthier plants. So, let’s dive in and unlock the secrets to this amazing gardening trick!
Growing Rosemary Without Soil: A DIY Hydroponic Adventure!
Hey there, fellow plant enthusiasts! Ever dreamt of having fresh rosemary at your fingertips, without the mess of soil? Well, you’re in the right place! I’m going to walk you through a super cool DIY project: growing rosemary hydroponically. It’s easier than you think, and the results are incredibly rewarding. Get ready to ditch the dirt and embrace the future of gardening!
What is Hydroponics, Anyway?
Before we dive in, let’s quickly cover the basics. Hydroponics is simply growing plants without soil, using nutrient-rich water solutions. The roots get everything they need directly from the water, making for faster growth and healthier plants. Plus, it’s a fantastic way to recycle and reduce waste!
Why Rosemary?
Rosemary is a fantastic herb to grow hydroponically. It’s relatively low-maintenance, smells amazing, and adds a delicious touch to countless dishes. Plus, it’s a perennial, meaning it can live for several years, giving you a continuous supply of fresh herbs.
Gathering Your Supplies
Okay, let’s get down to business! Here’s what you’ll need for this project:
* Rosemary Cuttings: You can either take cuttings from an existing rosemary plant or purchase them from a nursery. Look for healthy, vibrant green stems.
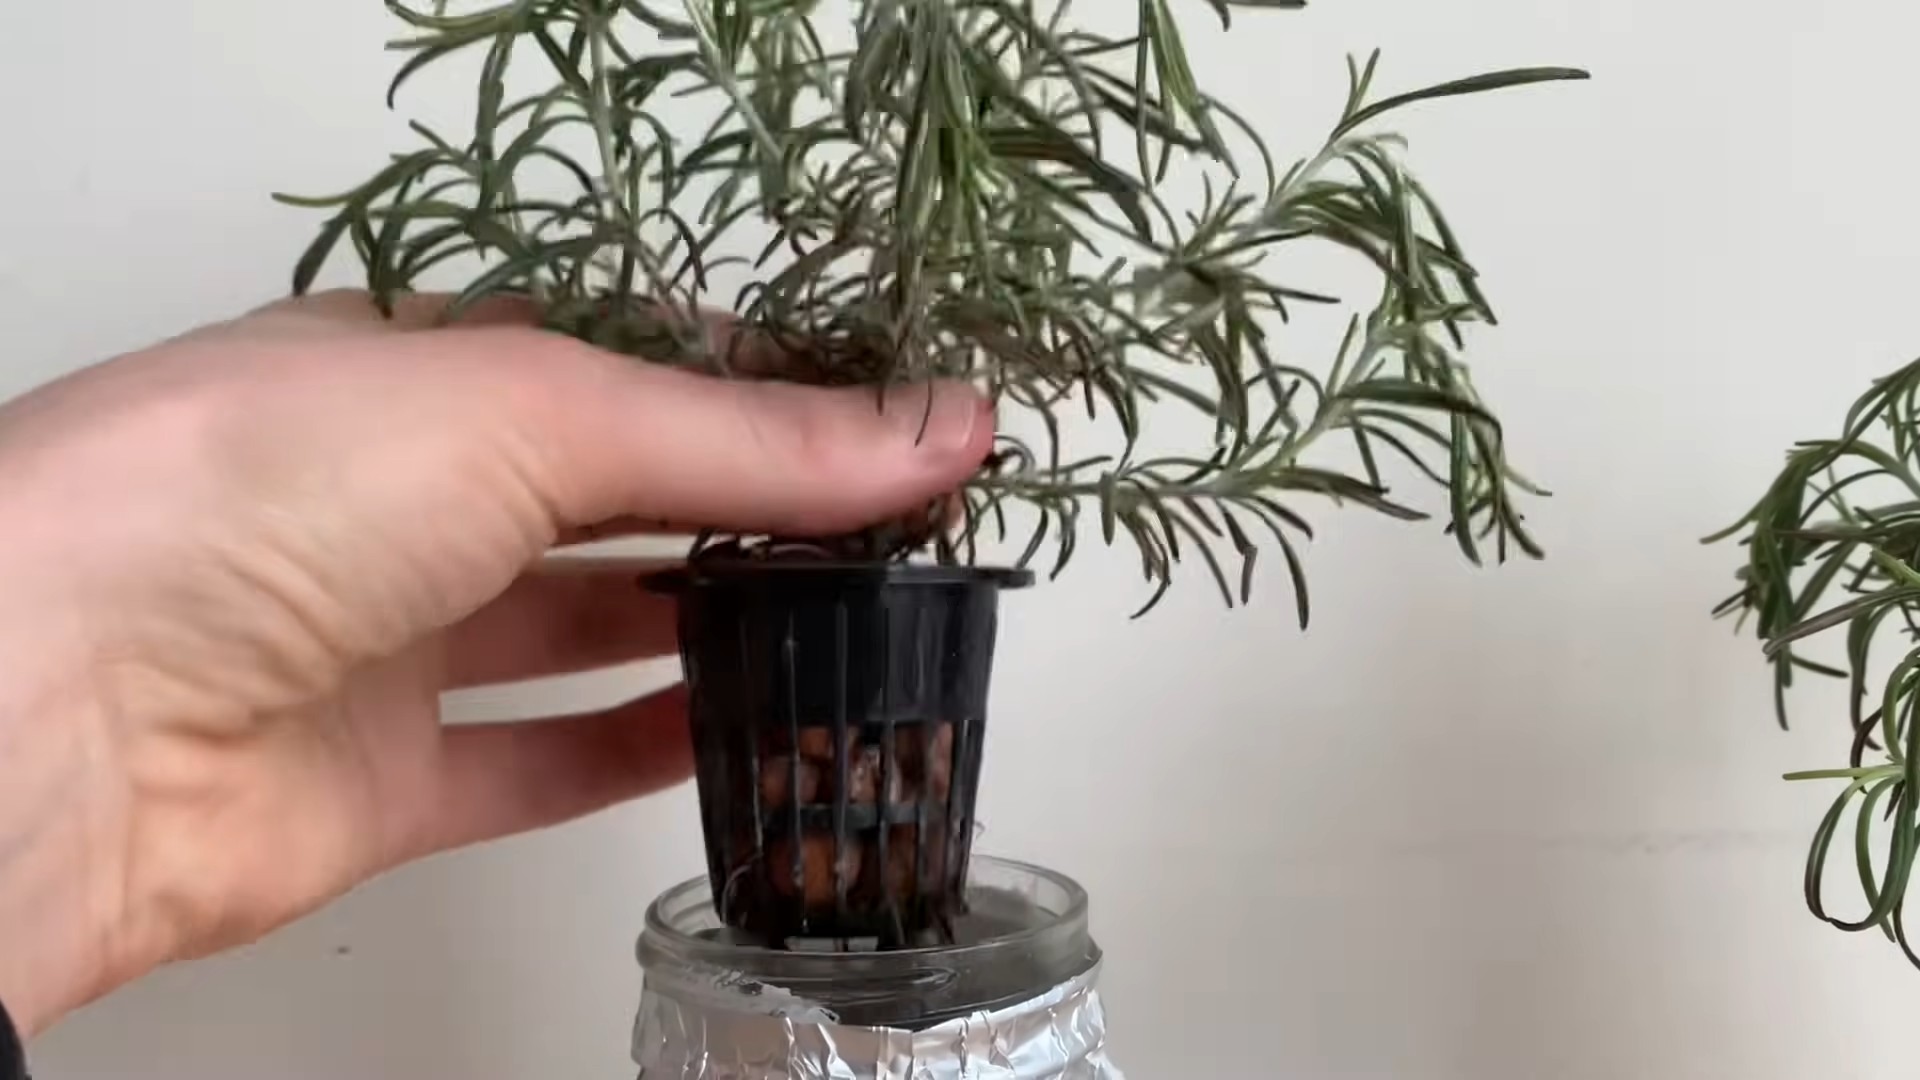
* Net Pots: These are small, mesh pots that will hold your rosemary cuttings and allow the roots to access the nutrient solution.
* Hydroponic Grow Medium: I recommend using rockwool cubes or coco coir. These materials provide support for the cuttings and retain moisture.
* Hydroponic Nutrient Solution: You’ll need a balanced nutrient solution specifically formulated for hydroponics. You can find these at most garden centers or online.
* A Container: Choose a container that’s large enough to hold your net pots and nutrient solution. A plastic storage bin or a repurposed container works great.
* Air Pump and Air Stone: These will oxygenate the nutrient solution, which is crucial for healthy root growth.
* pH Meter: This will help you monitor the pH level of your nutrient solution. Rosemary prefers a slightly acidic pH of around 6.0-6.5.
* Grow Lights (Optional): If you don’t have a sunny spot, you’ll need grow lights to provide your rosemary with the light it needs.
* Clay Pebbles (Optional): These can be used as a top layer in the net pots to help retain moisture and prevent algae growth.
* Rooting Hormone (Optional): This can help speed up the rooting process, but it’s not essential.
* Measuring Cups and Spoons: For accurately measuring your nutrient solution.
* Water: Distilled or filtered water is best.
Taking Rosemary Cuttings (If Needed)
If you’re taking cuttings from an existing rosemary plant, here’s how to do it:
1. Choose Healthy Stems: Select stems that are about 4-6 inches long and have healthy, green leaves.
2. Make the Cut: Use clean, sharp scissors or pruning shears to make a clean cut just below a leaf node (the point where a leaf grows from the stem).
3. Remove Lower Leaves: Strip off the leaves from the bottom inch or two of the stem. This will encourage root growth.
4. Dip in Rooting Hormone (Optional): Dip the cut end of the stem in rooting hormone powder or gel.
5. Prepare for Rooting: You can either root the cuttings directly in the rockwool cubes or in a glass of water first. I prefer rooting in water as it allows me to see the root development.
Rooting Rosemary Cuttings in Water (My Preferred Method)
1. Fill a Glass with Water: Use distilled or filtered water.
2. Place Cuttings in Water: Make sure the bottom inch or two of the stem is submerged in water.
3. Find a Sunny Spot: Place the glass in a warm, sunny location.
4. Change the Water Regularly: Change the water every 2-3 days to prevent algae growth.
5. Wait for Roots to Develop: It usually takes about 2-4 weeks for roots to develop. Once the roots are about an inch long, you can transplant the cuttings into the net pots.
Preparing the Net Pots and Grow Medium
1. Soak the Grow Medium: If you’re using rockwool cubes or coco coir, soak them in water for at least 30 minutes to saturate them.
2. Place Grow Medium in Net Pots: Gently squeeze out any excess water from the grow medium and place it in the net pots.
3. Make a Hole: Create a small hole in the center of the grow medium to accommodate the rosemary cutting.
Transplanting the Rosemary Cuttings
1. Gently Remove Cuttings from Water: Carefully remove the rooted rosemary cuttings from the water.
2. Place Cuttings in Net Pots: Gently insert the roots of the rosemary cuttings into the hole in the grow medium.
3. Secure the Cuttings: Gently pack the grow medium around the base of the cuttings to secure them in place.
4. Add Clay Pebbles (Optional): If you’re using clay pebbles, add a layer on top of the grow medium to help retain moisture and prevent algae growth.
Setting Up the Hydroponic System
1. Prepare the Container: Clean your container thoroughly.
2. Add Nutrient Solution: Fill the container with the hydroponic nutrient solution, following the instructions on the nutrient solution packaging.
3. Place Net Pots in Container: Arrange the net pots in the container so that the bottom of the net pots is submerged in the nutrient solution.
4. Position the Air Stone: Place the air stone in the bottom of the container.
5. Connect Air Pump: Connect the air stone to the air pump with the tubing.
6. Turn on Air Pump: Turn on the air pump to oxygenate the nutrient solution.
Maintaining Your Hydroponic Rosemary
1. Monitor pH Level: Use your pH meter to check the pH level of the nutrient solution regularly. Adjust the pH as needed to maintain a level of around 6.0-6.5. You can use pH up or pH down solutions to adjust the pH.
2. Change Nutrient Solution: Change the nutrient solution every 2-3 weeks to prevent nutrient buildup and maintain optimal nutrient levels.
3. Provide Adequate Light: Rosemary needs at least 6 hours of sunlight per day. If you don’t have a sunny spot, use grow lights to provide supplemental light.
4. Prune Regularly: Prune your rosemary regularly to encourage bushier growth and prevent it from becoming leggy.
5. Monitor for Pests and Diseases: Keep an eye out for pests and diseases. If you notice any problems, address them promptly.
Troubleshooting
* Yellowing Leaves: This could be a sign of nutrient deficiency. Make sure you’re using a balanced nutrient solution and that the pH level is correct.
* Slow Growth: This could be due to insufficient light, low nutrient levels, or incorrect pH.
* Root Rot: This is caused by overwatering or poor aeration. Make sure your air pump is working properly and that the roots are not constantly submerged in water.
Harvesting Your Rosemary
Once your rosemary plants have grown to a decent size, you can start harvesting the leaves. Simply snip off the stems with scissors or pruning shears. You can use the fresh rosemary leaves immediately, or you can dry them for later use.
Enjoy Your Soil-Free Rosemary!
And there you have it! You’ve successfully grown rosemary hydroponically. Now you can enjoy fresh, flavorful rosemary whenever you want, without the hassle of soil. This is a fun and rewarding project that’s perfect for anyone who loves gardening and wants to try something new. Happy growing!

Conclusion
So, there you have it! Growing rosemary without soil, using the water propagation method, is not just a quirky experiment; it’s a game-changer for herb enthusiasts, space-conscious gardeners, and anyone looking for a sustainable and visually appealing way to cultivate this fragrant herb. We’ve walked you through the simple steps, highlighted the benefits, and addressed potential challenges. Now, it’s time to ditch the dirt and dive into the world of hydroponic rosemary!
Why is this a must-try? Because it’s incredibly easy, cost-effective, and yields impressive results. You bypass the common pitfalls of soil-based rosemary cultivation, such as overwatering and root rot, which are often the demise of many rosemary plants. Plus, the visual appeal of watching the roots develop in water is undeniably captivating. It transforms your herb propagation into a living art piece.
But don’t stop there! Experimentation is key to unlocking the full potential of this method. Consider these variations:
* **Nutrient Solutions:** While rosemary can thrive in plain water, adding a diluted hydroponic nutrient solution every few weeks can boost growth and vigor. Look for solutions specifically formulated for herbs or leafy greens.
* **Lighting:** While rosemary loves sunlight, supplementing with a grow light, especially during the winter months or in dimly lit spaces, can significantly improve growth rates.
* **Container Choices:** Get creative with your containers! Use repurposed glass jars, elegant vases, or even specialized hydroponic systems. The possibilities are endless.
* **Rosemary Varieties:** Try propagating different rosemary varieties, such as ‘Prostratus’ (creeping rosemary) or ‘Tuscan Blue,’ to see how they respond to water propagation. Each variety may exhibit slightly different growth patterns and characteristics.
* **From Water to Soil:** Once your rosemary cuttings have developed a robust root system in water, you can carefully transplant them into soil if you prefer. This gives them a head start and increases their chances of survival.
This DIY trick is a fantastic way to propagate rosemary and expand your herb garden without the mess and hassle of traditional soil methods. It’s a sustainable, visually appealing, and surprisingly effective approach that anyone can master.
We wholeheartedly encourage you to give this method a try. It’s a rewarding experience that will not only provide you with a constant supply of fresh rosemary but also deepen your connection with the natural world.
And most importantly, share your experiences! We want to hear about your successes, your challenges, and your unique variations. Post photos of your water-propagated rosemary on social media using #WaterRosemary and tag us [Your Social Media Handle]. Let’s build a community of hydroponic rosemary enthusiasts and learn from each other. Your insights could inspire others to embark on this exciting journey. So, grab your rosemary cuttings, prepare your water, and get ready to witness the magic of root development. Happy growing!
Frequently Asked Questions (FAQ)
What kind of rosemary cuttings should I use?
The best rosemary cuttings for water propagation are semi-hardwood cuttings, meaning they are neither too young and flexible nor too old and woody. Look for stems that are about 4-6 inches long, with healthy leaves. Avoid cuttings with flowers or buds, as these will divert energy away from root development. Ideally, take cuttings from a healthy, established rosemary plant. Using sharp, clean pruning shears or scissors is crucial to prevent disease and ensure a clean cut.
How often should I change the water?
It’s essential to change the water regularly to prevent the buildup of bacteria and algae, which can hinder root growth. Change the water every 2-3 days initially. Once roots start to develop, you can extend the intervals to once a week. Always use fresh, clean water. If you notice any cloudiness or discoloration in the water, change it immediately.
How long does it take for rosemary cuttings to root in water?
Rooting time can vary depending on several factors, including the rosemary variety, the temperature, and the amount of light. Generally, you can expect to see roots developing within 2-4 weeks. Be patient and continue to change the water regularly. If you don’t see any root growth after a month, consider taking fresh cuttings from a different part of the plant or trying a different propagation method.
What if my rosemary cuttings start to turn brown or rot?
Browning or rotting of the cuttings is usually a sign of bacterial or fungal infection. This can be caused by using dirty tools, contaminated water, or overcrowding the cuttings in the container. Remove any affected cuttings immediately to prevent the spread of infection. Ensure that the remaining cuttings have adequate space and are not touching each other. Disinfect the container with a mild bleach solution before adding fresh water.
Can I use tap water for water propagation?
While tap water can be used, it’s best to let it sit out for 24 hours to allow chlorine and other chemicals to dissipate. Alternatively, you can use filtered or distilled water. Avoid using softened water, as it contains high levels of sodium, which can be harmful to plants.
What kind of light do rosemary cuttings need?
Rosemary cuttings need bright, indirect light to thrive. Avoid placing them in direct sunlight, as this can scorch the leaves. A location near a window that receives morning sun or filtered afternoon sun is ideal. If you don’t have access to natural light, you can supplement with a grow light.
Can I add rooting hormone to the water?
While not strictly necessary, adding a rooting hormone to the water can help to speed up the rooting process and increase the success rate. Use a rooting hormone specifically formulated for cuttings, and follow the instructions on the label. Be careful not to overdose, as too much rooting hormone can be harmful.
How do I transplant my water-propagated rosemary into soil?
Once your rosemary cuttings have developed a robust root system (at least 2-3 inches long), you can transplant them into soil. Choose a well-draining potting mix specifically formulated for herbs. Gently remove the cuttings from the water and plant them in individual pots. Water thoroughly and keep the soil moist but not waterlogged. Gradually acclimate the plants to outdoor conditions before transplanting them into the garden.
Can I keep my rosemary growing in water indefinitely?
While rosemary can survive in water for an extended period, it will eventually need nutrients to thrive. You can add a diluted hydroponic nutrient solution to the water every few weeks to provide the necessary nutrients. However, for optimal growth and long-term health, it’s best to transplant the rosemary into soil.
Is water propagation suitable for all rosemary varieties?
Water propagation generally works well for most rosemary varieties. However, some varieties may root more easily than others. Experiment with different varieties to see which ones respond best to this method. Keep in mind that environmental factors, such as temperature and light, can also influence the success rate.


Leave a Comment