
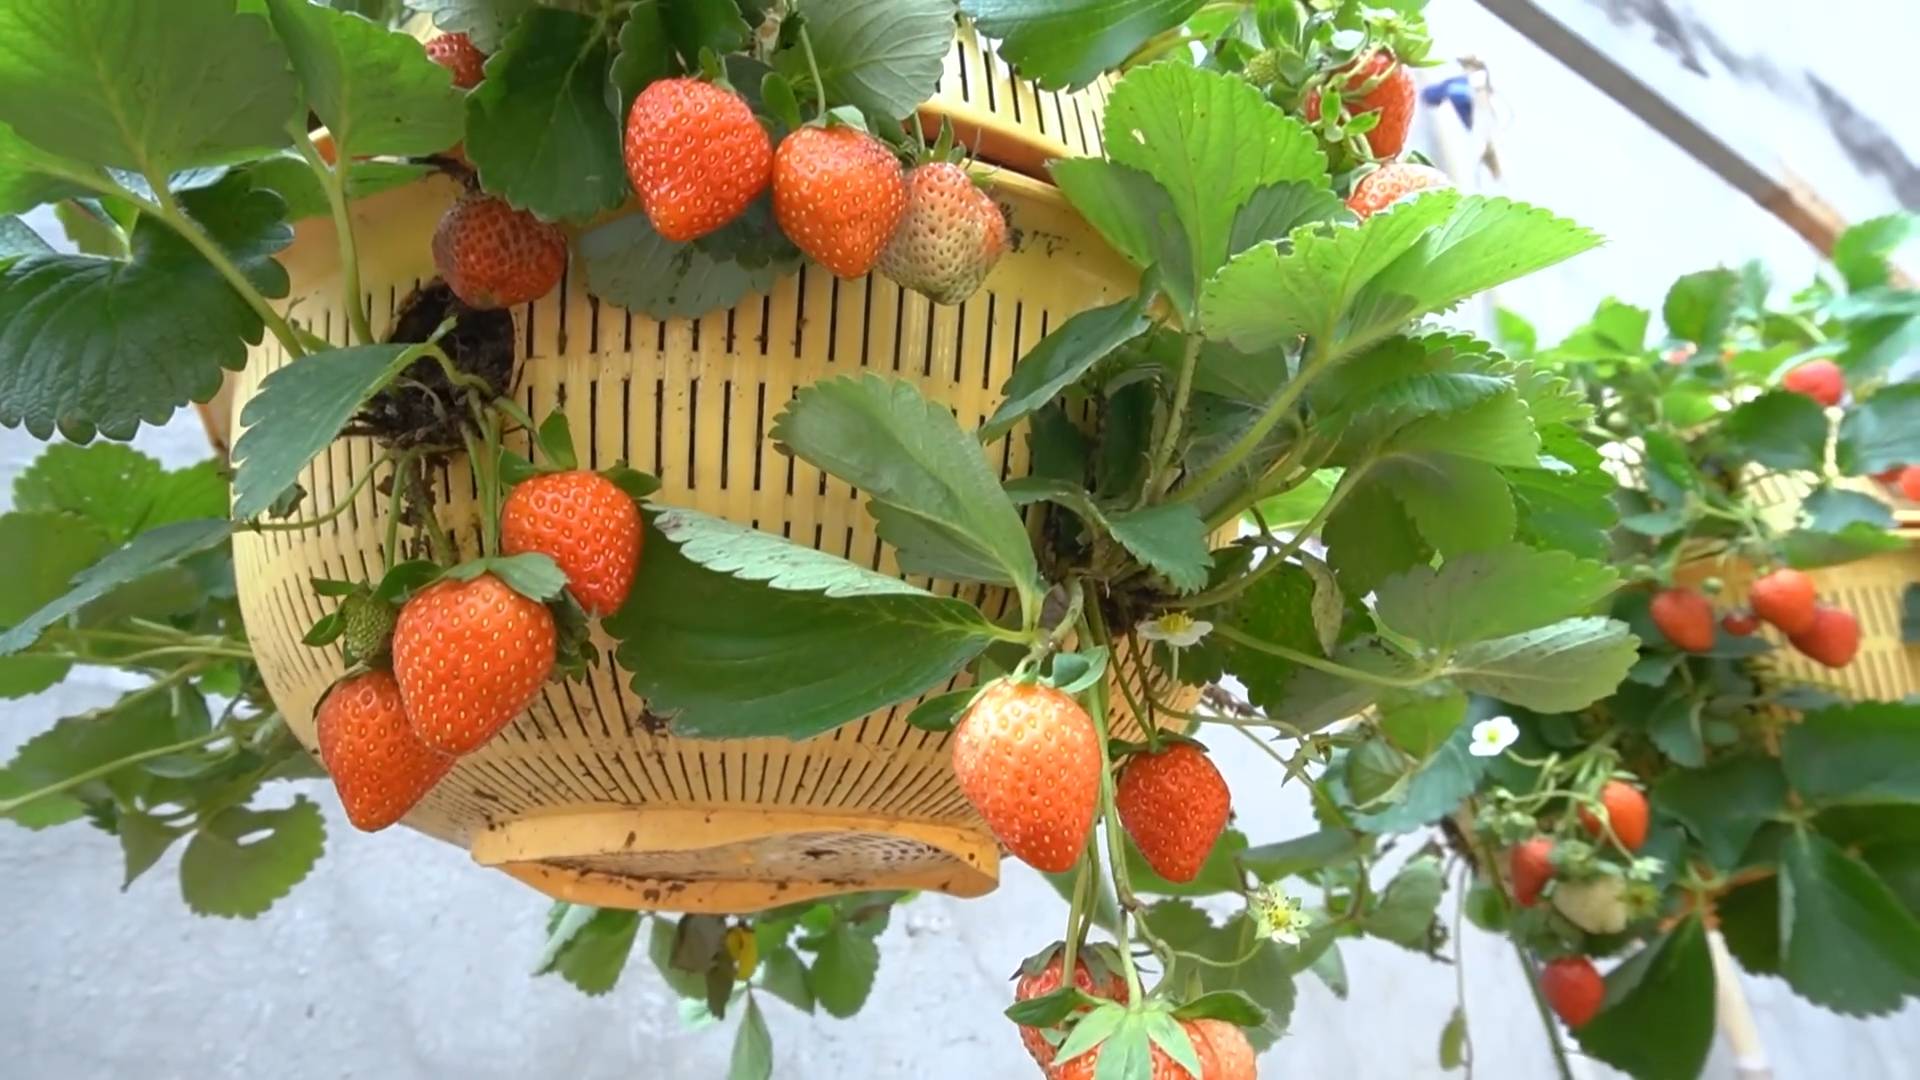
Hanging Strawberry Planter DIY: Imagine plucking juicy, sun-ripened strawberries right from your own balcony or patio! No sprawling garden needed. I’m so excited to share a simple and rewarding project that will bring a touch of sweetness and vibrant green to even the smallest spaces: a DIY hanging strawberry planter.
The concept of growing food vertically has been around for centuries, with roots in ancient civilizations optimizing limited land. Think of the Hanging Gardens of Babylon, a testament to human ingenuity in creating lush landscapes in unexpected places. While we might not be building wonders of the world, we *can* bring that same spirit of innovation to our homes.
In today’s world, where space is often a premium and access to fresh, healthy produce isn’t always guaranteed, a hanging strawberry planter DIY offers a fantastic solution. It’s not just about growing strawberries; it’s about connecting with nature, enjoying the satisfaction of nurturing your own food, and adding a beautiful, edible element to your living space. Plus, who can resist the allure of fresh, homegrown strawberries in their morning smoothie or as a delightful snack? This project is perfect for beginners and seasoned gardeners alike, offering a fun and accessible way to cultivate your own little slice of paradise. Let’s get started!
DIY Hanging Strawberry Planter: A Sweet Project for Any Space
Hey there, fellow gardening enthusiasts! I’m so excited to share this project with you – a DIY hanging strawberry planter that’s not only functional but also adds a touch of charm to any balcony, patio, or even a sunny indoor space. Get ready to enjoy fresh, homegrown strawberries right at your fingertips!
Materials You’ll Need
Before we dive in, let’s gather all the necessary supplies. Trust me, having everything organized beforehand will make the whole process smoother and more enjoyable.
* A sturdy plastic bucket (around 5-gallon size is ideal)
* Potting soil (specifically formulated for fruits and vegetables is best)
* Strawberry plants (choose everbearing varieties for a continuous harvest)
* Drill with a hole saw attachment (2-inch diameter)
* Utility knife or sharp scissors
* Landscape fabric or burlap
* Staple gun (optional, but helpful for securing the fabric)
* Measuring tape or ruler
* Pencil or marker
* Hanging chain or rope (strong enough to support the weight of the planter)
* S-hooks (for attaching the chain to the bucket)
* Gloves (to protect your hands)
* Watering can or hose
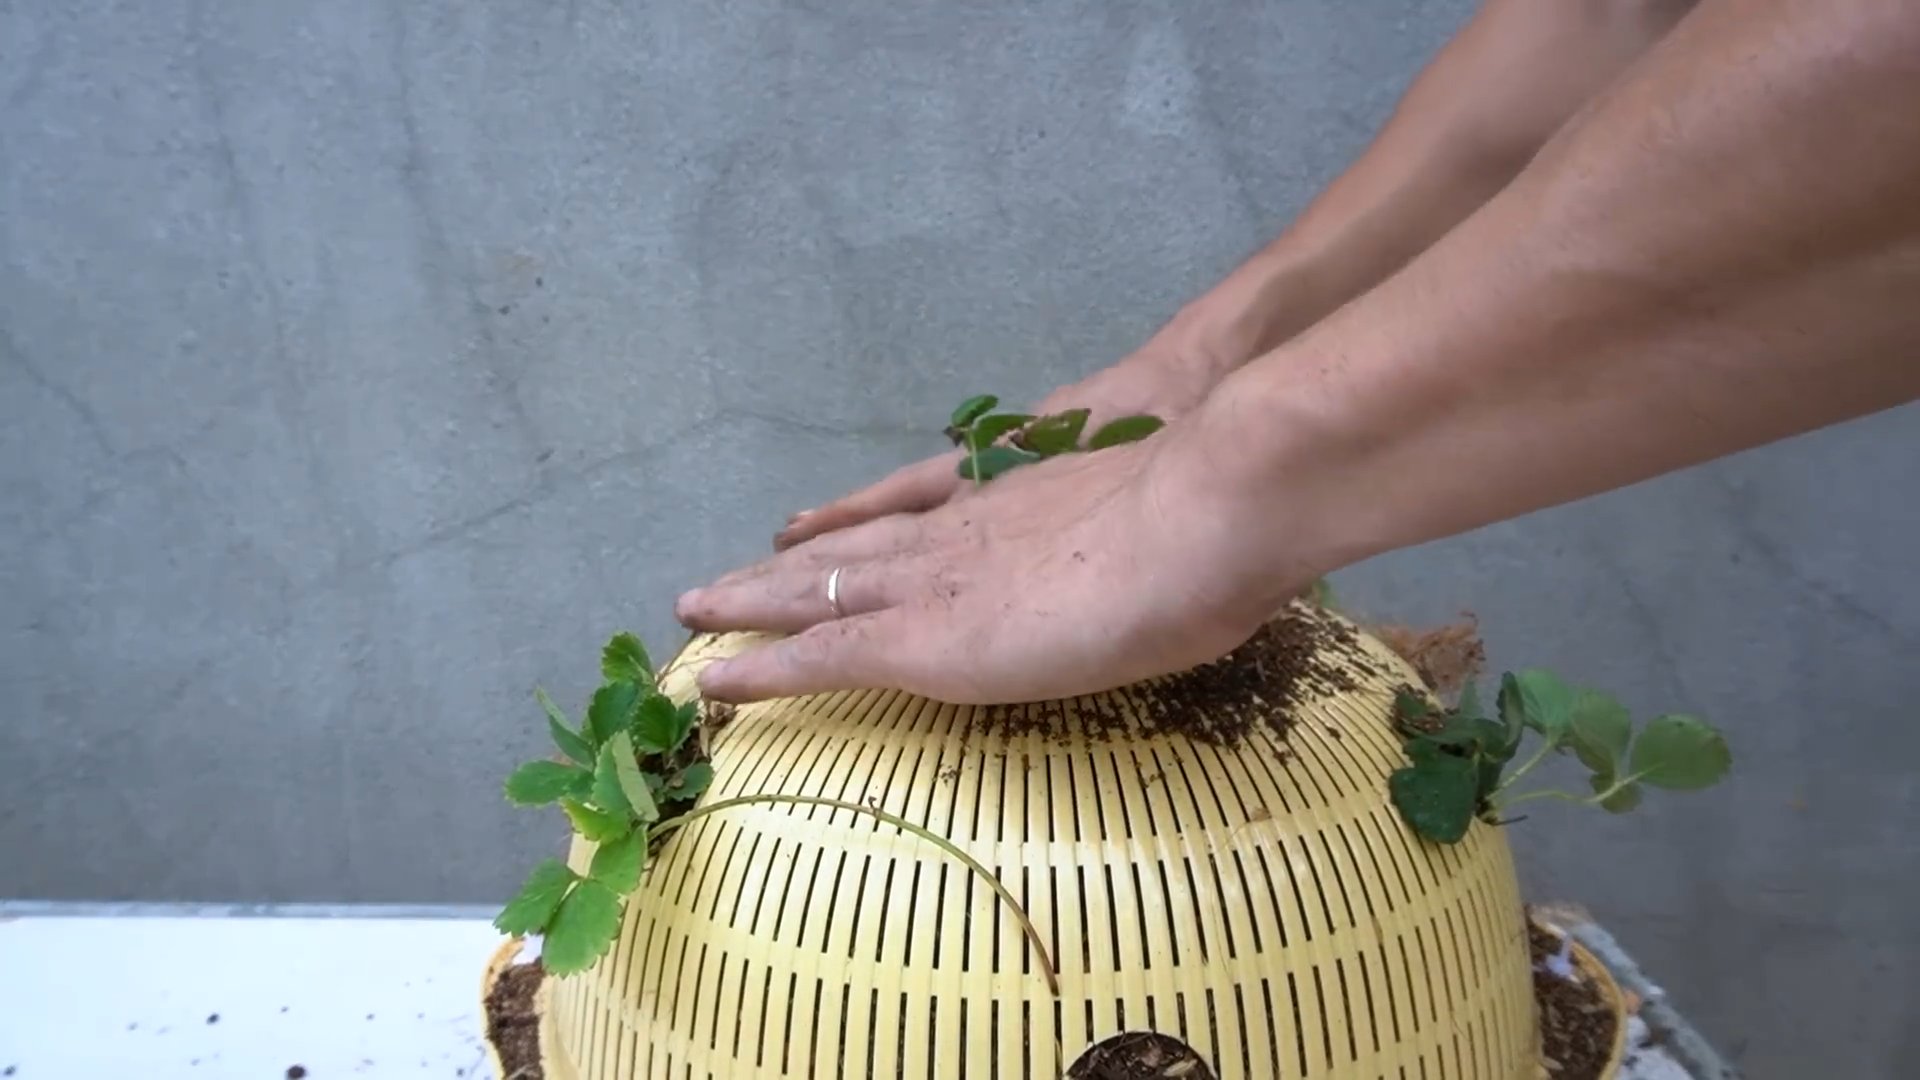
Preparing the Bucket
Okay, let’s get our hands dirty! The first step is to prepare the bucket for planting. This involves drilling holes for the strawberry plants and lining the inside to prevent soil erosion.
1. Mark the Planting Holes: Using your measuring tape and pencil, mark the locations for the planting holes around the sides of the bucket. Space them evenly, about 6-8 inches apart, and stagger them in rows. I usually do about three rows, but you can adjust based on the size of your bucket. Remember to leave a few inches of space at the bottom of the bucket.
2. Drill the Holes: Now, carefully use the drill with the hole saw attachment to drill out the marked holes. Go slowly and steadily to avoid cracking the plastic. Safety first – wear eye protection!
3. Cut Drainage Holes: Flip the bucket over and drill several smaller drainage holes in the bottom. This is crucial to prevent waterlogging and root rot. I usually make about 5-6 holes, each about ¼ inch in diameter.
4. Line the Bucket (Optional but Recommended): This step is optional, but I highly recommend lining the inside of the bucket with landscape fabric or burlap. This will help prevent soil from washing out through the planting holes when you water. Cut a piece of fabric large enough to line the entire inside of the bucket, with some overlap at the top.
5. Secure the Lining: Place the fabric inside the bucket and smooth it out. Use a staple gun to secure the fabric to the inside of the bucket, especially around the top edge. If you don’t have a staple gun, you can use strong tape or even fabric glue. Just make sure it’s securely attached.
6. Cut the Fabric at the Planting Holes: Using your utility knife or scissors, carefully cut an “X” shape in the fabric at each of the planting holes. This will allow you to insert the strawberry plants.
Planting the Strawberries
This is the fun part! Now we get to bring our strawberry plants into the picture.
1. Add Soil to the Bottom: Start by adding a layer of potting soil to the bottom of the bucket, about 4-6 inches deep. This will provide a good base for the plants.
2. Plant the First Row: Gently remove a strawberry plant from its container and loosen the roots. Carefully insert the plant through one of the planting holes, making sure the crown of the plant (where the stems meet the roots) is facing outwards. Add more soil around the roots to secure the plant in place.
3. Repeat for Each Hole in the Row: Repeat the process for each planting hole in the first row, spacing the plants evenly.
4. Add More Soil and Plant the Next Row: Add another layer of potting soil, about 4-6 inches deep, and repeat the planting process for the second row of holes.
5. Continue Until All Holes are Filled: Continue adding soil and planting strawberries until all the holes are filled.
6. Plant the Top: Finally, plant a few strawberry plants on the top surface of the soil in the bucket. Space them evenly around the center.
7. Water Thoroughly: Once all the plants are in place, water the planter thoroughly until water drains out of the bottom drainage holes. This will help settle the soil and encourage the plants to establish their roots.
Hanging the Planter
Almost there! Now we need to hang our beautiful strawberry planter.
1. Attach the Hanging Chain or Rope: Drill four holes evenly spaced around the top rim of the bucket. Attach the S-hooks to the holes. Then, attach the hanging chain or rope to the S-hooks. Make sure the chain or rope is strong enough to support the weight of the planter when it’s full of soil and plants.
2. Test the Strength: Before hanging the planter in its final location, test the strength of the chain or rope by lifting the planter slightly off the ground. Make sure everything feels secure and stable.
3. Choose a Sunny Location: Strawberries need at least 6-8 hours of sunlight per day, so choose a location that receives plenty of sun. A south-facing balcony or patio is ideal.
4. Hang the Planter: Carefully hang the planter in your chosen location. Make sure the hanging point is strong and secure.
5. Admire Your Work! Step back and admire your beautiful new hanging strawberry planter! You’ve done it!
Caring for Your Hanging Strawberry Planter
Now that your planter is hanging, it’s important to provide proper care to ensure a bountiful harvest.
* Watering: Water your strawberry plants regularly, especially during hot, dry weather. Check the soil moisture by sticking your finger into the soil. If the top inch feels dry, it’s time to water. Avoid overwatering, as this can lead to root rot.
* Fertilizing: Feed your strawberry plants with a balanced fertilizer every 2-3 weeks. Follow the instructions on the fertilizer package. You can also use a liquid fertilizer diluted in water.
* Sunlight: Make sure your strawberry plants receive at least 6-8 hours of sunlight per day. If they’re not getting enough sun, you may need to move the planter to a sunnier location.
* Pruning: Remove any dead or yellowing leaves to keep your plants healthy. You can also pinch off runners (the long stems that grow out from the plant) to encourage the plant to produce more fruit.
* Pest Control: Keep an eye out for pests such as aphids, slugs, and snails. If you notice any pests, treat them with an appropriate insecticide or organic pest control method.
* Winter Care: In colder climates, you may need to protect your strawberry plants from frost. You can cover the planter with burlap or move it to a sheltered location.
Troubleshooting
Sometimes, things don’t go exactly as planned. Here are a few common problems you might encounter and how to fix them:
* Yellowing Leaves: This could be a sign of overwatering, underwatering, or nutrient deficiency. Check the soil moisture and adjust your watering schedule accordingly. Fertilize the plants with a balanced fertilizer.
* No Fruit: This could be due to lack of sunlight, poor pollination, or nutrient deficiency. Make sure your plants are getting enough sun and fertilize them regularly. You can also try hand-pollinating the flowers by gently brushing them with a small paintbrush.
* Root Rot: This is caused by overwatering and poor drainage. Make sure your planter has adequate drainage holes and avoid overwatering. If you suspect root rot, you may need to repot the plants in fresh soil.
* Pests: Inspect your plants regularly for pests and treat them with an appropriate insecticide or organic pest control method.
Hey there, fellow gardening enthusiasts! I’m so excited to share this project with you – a DIY hanging strawberry planter that’s not only functional but also adds a touch of charm to any balcony, patio, or even a sunny indoor space. Get ready to enjoy fresh, homegrown strawberries right at your fingertips!
Materials You’ll Need
Before we dive in, let’s gather all the necessary supplies. Trust me, having everything organized beforehand will make the whole process smoother and more enjoyable.
* A sturdy plastic bucket (around 5-gallon size is ideal)
* Potting soil (specifically formulated for fruits and vegetables is best)
* Strawberry plants (choose everbearing varieties for a continuous harvest)
* Drill with a hole saw attachment (2-inch diameter)
* Utility knife or sharp scissors
* Landscape fabric or burlap
* Staple gun (optional, but helpful for securing the fabric)
* Measuring tape or ruler
* Pencil or marker
* Hanging chain or rope (strong enough to support the weight of the planter)
* S-hooks (for attaching the chain to the bucket)
* Gloves (to protect your hands)
* Watering can or hose
Preparing the Bucket
Okay, let’s get our hands dirty! The first step is to prepare the bucket for planting. This involves drilling holes for the strawberry plants and lining the inside to prevent soil erosion.
1. Mark the Planting Holes: Using your measuring tape and pencil, mark the locations for the planting holes around the sides of the bucket. Space them evenly, about 6-8 inches apart, and stagger them in rows. I usually do about three rows, but you can adjust based on the size of your bucket. Remember to leave a few inches of space at the bottom of the bucket.
2. Drill the Holes: Now, carefully use the drill with the hole saw attachment to drill out the marked holes. Go slowly and steadily to avoid cracking the plastic. Safety first – wear eye protection!
3. Cut Drainage Holes: Flip the bucket over and drill several smaller drainage holes in the bottom. This is crucial to prevent waterlogging and root rot. I usually make about 5-6 holes, each about ¼ inch in diameter.
4. Line the Bucket (Optional but Recommended): This step is optional, but I highly recommend lining the inside of the bucket with landscape fabric or burlap. This will help prevent soil from washing out through the planting holes when you water. Cut a piece of fabric large enough to line the entire inside of the bucket, with some overlap at the top.
5. Secure the Lining: Place the fabric inside the bucket and smooth it out. Use a staple gun to secure the fabric to the inside of the bucket, especially around the top edge. If you don’t have a staple gun, you can use strong tape or even fabric glue. Just make sure it’s securely attached.
6. Cut the Fabric at the Planting Holes: Using your utility knife or scissors, carefully cut an “X” shape in the fabric at each of the planting holes. This will allow you to insert the strawberry plants.
Planting the Strawberries
This is the fun part! Now we get to bring our strawberry plants into the picture.
1. Add Soil to the Bottom: Start by adding a layer of potting soil to the bottom of the bucket, about 4-6 inches deep. This will provide a good base for the plants.
2. Plant the First Row: Gently remove a strawberry plant from its container and loosen the roots. Carefully insert the plant through one of the planting holes, making sure the crown of the plant (where the stems meet the roots) is facing outwards. Add more soil around the roots to secure the plant in place.
3. Repeat for Each Hole in the Row: Repeat the process for each planting hole in the first row, spacing the plants evenly.
4. Add More Soil and Plant the Next Row: Add another layer of potting soil, about 4-6 inches deep, and repeat the planting process for the second row of holes.
5. Continue Until All Holes are Filled: Continue adding soil and planting strawberries until all the holes are filled.
6. Plant the Top: Finally, plant a few strawberry plants on the top surface of the soil in the bucket. Space them evenly around the center.
7. Water Thoroughly: Once all the plants are in place, water the planter thoroughly until water drains out of the bottom drainage holes. This will help settle the soil and encourage the plants to establish their roots.
Hanging the Planter
Almost there! Now we need to hang our beautiful strawberry planter.
1. Attach the Hanging Chain or Rope: Drill four holes evenly spaced around the top rim of the bucket. Attach the S-hooks to the holes. Then, attach the hanging chain or rope to the S-hooks. Make sure the chain or rope is strong enough to support the weight of the planter when it’s full of soil and plants.
2. Test the Strength: Before hanging the planter in its final location, test the strength of the chain or rope by lifting the planter slightly off the ground. Make sure everything feels secure and stable.
3. Choose a Sunny Location: Strawberries need at least 6-8 hours of sunlight per day, so choose a location that receives plenty of sun. A south-facing balcony or patio is ideal.
4. Hang the Planter: Carefully hang the planter in your chosen location. Make sure the hanging point is strong and secure.
5. Admire Your Work! Step back and admire your beautiful new hanging strawberry planter! You’ve done it!
Caring for Your Hanging Strawberry Planter
Now that your planter is hanging, it’s important to provide proper care to ensure a bountiful harvest.
* Watering: Water your strawberry plants regularly, especially during hot, dry weather. Check the soil moisture by sticking your finger into the soil. If the top inch feels dry, it’s time to water. Avoid overwatering, as this can lead to root rot.
* Fertilizing: Feed your strawberry plants with a balanced fertilizer every 2-3 weeks. Follow the instructions on the fertilizer package. You can also use a liquid fertilizer diluted in water.
* Sunlight: Make sure your strawberry plants receive at least 6-8 hours of sunlight per day. If they’re not getting enough sun, you may need to move the planter to a sunnier location.
* Pruning: Remove any dead or yellowing leaves to keep your plants healthy. You can also pinch off runners (the long stems that grow out from the plant) to encourage the plant to produce more fruit.
* Pest Control: Keep an eye out for pests such as aphids, slugs, and snails. If you notice any pests, treat them with an appropriate insecticide or organic pest control method.
* Winter Care: In colder climates, you may need to protect your strawberry plants from frost. You can cover the planter with burlap or move it to a sheltered location.
Troubleshooting
Sometimes, things don’t go exactly as planned. Here are a few common problems you might encounter and how to fix them:
* Yellowing Leaves: This could be a sign of overwatering, underwatering, or nutrient deficiency. Check the soil moisture and adjust your watering schedule accordingly. Fertilize the plants with a balanced fertilizer.
* No Fruit: This could be due to lack of sunlight, poor pollination, or nutrient deficiency. Make sure your plants are getting enough sun and fertilize them regularly. You can also try hand-pollinating the flowers by gently brushing them with a small paintbrush.
* Root Rot: This is caused by overwatering and poor drainage. Make sure your planter has adequate drainage holes and avoid overwatering. If you suspect root rot, you may need to repot the plants in fresh soil.
* Pests: Inspect your plants regularly for pests and treat them with an appropriate insecticide or organic pest control method.
Enjoying Your Harvest
The best part of this project is, of course, enjoying the delicious, homegrown strawberries!
* Harvesting: Strawberries are ready to harvest when they are fully red and slightly soft to the touch. Gently twist the berry off the plant, leaving the green cap attached.
* Eating: Enjoy your strawberries fresh, in smoothies, on desserts, or however you like!
* Storing: Store your strawberries in the refrigerator for up to a week. Wash them just before eating.
I hope you enjoyed this DIY project! With a little bit of effort, you can have a beautiful and productive hanging strawberry planter that will provide you with fresh, delicious strawberries all season long. Happy gardening!
Conclusion
So, there you have it! Creating your own hanging strawberry planter is not just a fun weekend project; it’s a gateway to fresh, delicious strawberries right outside your door. We’ve walked you through the steps, highlighting the simplicity and cost-effectiveness of this DIY approach. Forget expensive store-bought planters that might not even suit your space or aesthetic. With a few readily available materials and a little bit of elbow grease, you can craft a personalized strawberry haven that’s both functional and visually appealing.
Why is this hanging strawberry planter DIY a must-try? Because it offers a multitude of benefits beyond just growing strawberries. It’s a space-saver, perfect for balconies, patios, or even small gardens. It elevates your strawberries, protecting them from ground pests and diseases. And, let’s be honest, it looks absolutely charming! Imagine the vibrant green foliage and the bright red berries cascading down, adding a touch of rustic elegance to your outdoor space.
But the beauty of this project lies in its adaptability. Feel free to experiment with different materials. Instead of a plastic container, consider using a repurposed burlap sack for a more rustic look. Or, if you’re feeling ambitious, try building a tiered planter using wooden pallets. The possibilities are endless!
Consider these variations to personalize your hanging strawberry planter:
* Herb Garden Hybrid: Interplant your strawberries with herbs like basil or thyme. These companion plants can deter pests and enhance the flavor of your strawberries.
* Vertical Succulent Garden: Adapt the same technique to create a stunning vertical succulent garden. Use a well-draining potting mix and choose a variety of succulents with different textures and colors.
* Floral Cascade: Plant trailing flowers like petunias or calibrachoa alongside your strawberries for a burst of color.
Don’t be afraid to get creative with the design. Paint your planter a vibrant color, add decorative stones, or even incorporate fairy lights for a magical touch. The goal is to create a planter that reflects your personal style and enhances your outdoor space.
We are confident that you will find this project rewarding. The satisfaction of harvesting your own homegrown strawberries is unparalleled. Plus, you’ll be reducing your carbon footprint by growing your own food and repurposing materials.
So, what are you waiting for? Gather your supplies, follow our simple instructions, and embark on this exciting DIY adventure. We encourage you to try this hanging strawberry planter DIY and share your experiences with us. Post photos of your creations on social media using #HangingStrawberryPlanterDIY and tag us so we can see your amazing work! We can’t wait to see what you come up with. Happy planting!
Frequently Asked Questions (FAQ)
What kind of strawberries are best for hanging planters?
The best strawberry varieties for hanging planters are everbearing and day-neutral types. Everbearing strawberries produce fruit throughout the growing season, while day-neutral varieties are less sensitive to day length and will also produce fruit continuously. Some popular choices include ‘Tristan’, ‘Temptation’, ‘Seascape’, and ‘Albion’. These varieties tend to produce smaller, more manageable plants that are well-suited for containers. Avoid June-bearing strawberries, as they produce a large crop all at once, which may not be ideal for a hanging planter.
What type of soil should I use for my hanging strawberry planter?
Use a high-quality potting mix specifically formulated for containers. Avoid using garden soil, as it can become compacted and doesn’t drain well in containers. A good potting mix should be lightweight, well-draining, and contain ingredients like peat moss, perlite, and vermiculite. You can also add some compost to the mix to provide extra nutrients for your strawberries. Ensure the potting mix has a slightly acidic pH, ideally between 5.5 and 6.5, for optimal strawberry growth.
How often should I water my hanging strawberry planter?
Hanging strawberry planters tend to dry out quickly, especially during hot weather. Check the soil moisture daily by sticking your finger about an inch into the soil. If the soil feels dry to the touch, it’s time to water. Water thoroughly until water drains out of the bottom of the planter. Avoid overwatering, as this can lead to root rot. During cooler weather, you may need to water less frequently. A good rule of thumb is to water deeply but infrequently, allowing the soil to dry out slightly between waterings.
How much sunlight do strawberries need in a hanging planter?
Strawberries need at least 6-8 hours of direct sunlight per day to produce a good crop of fruit. Choose a location for your hanging planter that receives plenty of sunlight. If you live in a hot climate, provide some afternoon shade to protect the plants from scorching. Insufficient sunlight can result in fewer flowers and smaller, less flavorful berries.
How do I fertilize my hanging strawberry planter?
Strawberries are heavy feeders and require regular fertilization to thrive. Use a balanced fertilizer specifically formulated for strawberries or fruits and vegetables. Follow the instructions on the fertilizer package for application rates and frequency. You can also use a slow-release fertilizer at planting time to provide a steady supply of nutrients throughout the growing season. Avoid over-fertilizing, as this can lead to excessive foliage growth and fewer fruits.
How do I protect my strawberries from pests and diseases in a hanging planter?
Hanging planters can help to reduce the risk of pests and diseases, but it’s still important to take precautions. Regularly inspect your plants for signs of pests like aphids, spider mites, and slugs. Remove any infested leaves or berries. You can also use insecticidal soap or neem oil to control pests. To prevent fungal diseases, ensure good air circulation around the plants and avoid overwatering. Remove any dead or diseased leaves promptly.
Can I overwinter my hanging strawberry planter?
In colder climates, you’ll need to protect your hanging strawberry planter during the winter months. Move the planter to a sheltered location, such as a garage or shed, or wrap it in burlap or bubble wrap to insulate the roots. Water sparingly during the winter, only enough to keep the soil from completely drying out. In milder climates, you may be able to leave the planter outdoors, but be sure to protect it from frost.
How long will my strawberry plants last in a hanging planter?
Strawberry plants typically produce well for 2-3 years. After that, their fruit production may decline. You can propagate new plants from runners (the stems that grow out from the main plant) to replace older plants. Simply root the runners in small pots of potting mix and then transplant them into your hanging planter.
Can I grow other plants with my strawberries in the hanging planter?
Yes, you can grow companion plants with your strawberries in the hanging planter. Some good choices include basil, thyme, marigolds, and nasturtiums. These plants can help to deter pests and attract beneficial insects. Avoid planting aggressive growers that will compete with your strawberries for nutrients and space.
How do I harvest my strawberries from a hanging planter?
Harvest your strawberries when they are fully ripe and red. Gently twist or cut the berries from the plant, leaving a small piece of stem attached. Handle the berries carefully to avoid bruising them. Harvest regularly to encourage the plant to produce more fruit. Enjoy your fresh, homegrown strawberries!

Leave a Comment