
Indoor Rosemary Growing: A Fragrant Guide to Kitchen Herb Success
Indoor rosemary growing might seem daunting, but I’m here to tell you it’s easier than you think! Forget those sad, wilting supermarket sprigs; imagine instead, having a thriving rosemary plant right in your kitchen, constantly providing you with fresh, fragrant herbs for your culinary creations. This article is your passport to that fragrant reality, packed with simple, effective indoor rosemary growing techniques and DIY solutions.
The history of rosemary is rich and fascinating, steeped in symbolism and tradition. From ancient Greece, where it was associated with remembrance and fidelity, to its use in medieval Europe as a culinary and medicinal herb, rosemary has held a special place in human culture for centuries. Now, you can bring a piece of that history into your own home with your very own indoor rosemary plant.
Why bother with indoor rosemary growing? Well, aside from the obvious joy of having fresh herbs readily available, there’s a significant advantage to growing your own. Supermarket rosemary often lacks the intense flavor and aroma of a freshly harvested plant. Plus, knowing exactly where your herbs come from, and how they’re grown, offers peace of mind. This DIY guide will empower you to cultivate a healthy, vibrant rosemary plant, regardless of your gardening experience. We’ll cover everything from choosing the right pot and soil to mastering watering techniques and dealing with common problems. Get ready to transform your kitchen into a fragrant oasis!
Ready to get your hands dirty? Let’s dive into the world of indoor rosemary growing!
Growing Bok Choy: A DIY Guide to a Delicious Harvest
Bok choy, with its tender leaves and mild flavor, is a surprisingly easy vegetable to grow, even for beginner gardeners. This guide will walk you through the process, from seed to harvest, ensuring you enjoy a bountiful crop of this delicious green.
Phase 1: Planning and Preparation
- Choose your location: Bok choy thrives in full sun to partial shade. At least six hours of sunlight per day is ideal, but in hotter climates, some afternoon shade can be beneficial to prevent bolting (premature flowering).
- Prepare your soil: Bok choy prefers loose, well-drained soil rich in organic matter. Amend heavy clay soils with compost or other organic materials to improve drainage and aeration. A soil pH between 6.0 and 6.8 is optimal.
- Select your seeds or seedlings: You can start bok choy from seed or purchase seedlings from a garden center. Starting from seed gives you more variety and control, but seedlings offer a faster route to harvest. Choose varieties suited to your climate and growing season.
- Gather your supplies: You’ll need seeds or seedlings, potting mix (if starting seeds indoors), garden gloves, a trowel or hand cultivator, a watering can, and possibly some row covers or netting to protect against pests.
Phase 2: Starting from Seed (Optional)
- Start seeds indoors (6-8 weeks before the last expected frost): Fill small seed starting trays or pots with a seed-starting mix. Sow seeds about ¼ inch deep and ½ inch apart. Gently water and cover the tray with plastic wrap to maintain humidity.
- Maintain consistent moisture: Keep the soil consistently moist but not soggy. Check daily and water as needed. Avoid overwatering, which can lead to damping off (a fungal disease).
- Provide adequate light: Place the trays in a sunny location or under grow lights. Bok choy seedlings need at least 12-14 hours of light per day.
- Thin seedlings: Once the seedlings have developed their first true leaves (the leaves that appear after the cotyledons), thin them to about 2 inches apart. This gives each plant enough space to grow.
- Harden off seedlings: Before transplanting outdoors, gradually acclimate the seedlings to outdoor conditions. Over a period of 7-10 days, gradually increase their exposure to sunlight and wind. Start with a few hours of outdoor time and gradually increase it until they can tolerate full sun.
Phase 3: Transplanting and Growing
- Prepare the planting site: Loosen the soil to a depth of about 6-8 inches. If you’re planting directly into the garden, incorporate compost or other organic matter to improve soil fertility.
- Transplant seedlings (or sow seeds directly): If using seedlings, dig holes slightly larger than the root ball and gently place the seedlings in the holes. If sowing seeds directly, sow them about ¼ inch deep and 1-2 inches apart. Space rows about 12-18 inches apart.
- Water thoroughly: After transplanting or sowing, water deeply to settle the soil around the plants.
- Mulch (optional): Applying a layer of mulch, such as straw or shredded leaves, helps retain moisture, suppress weeds, and regulate soil temperature.
- Water regularly: Bok choy needs consistent moisture, especially during dry periods. Water deeply and regularly, aiming to keep the soil consistently moist but not waterlogged.
- Fertilize (optional): While not strictly necessary, a light application of balanced fertilizer can promote vigorous growth. Follow the instructions on the fertilizer package.
- Weed regularly: Keep the area around your bok choy plants free of weeds to prevent competition for water and nutrients.
- Monitor for pests and diseases: Regularly inspect your plants for signs of pests or diseases. Common pests include aphids and slugs. If you notice any problems, take appropriate action, such as handpicking pests or using an organic insecticide.
Phase 4: Harvesting
- Harvest when mature: Bok choy is ready for harvest when the leaves are fully developed and firm. This typically takes 4-6 weeks from transplanting, depending on the variety and growing conditions. For baby bok choy, you can harvest the entire plant when it’s about 4-6 inches tall.
- Harvesting methods: For larger plants, you can harvest the outer leaves individually, leaving the inner leaves to continue growing. Alternatively, you can harvest the entire plant by cutting it off at the base.
- Post-harvest care: Store harvested bok choy in a plastic bag in the refrigerator for up to a week.
Troubleshooting
Bolting:
If your bok choy bolts (goes to seed) prematurely, it’s usually due to hot weather or long days. Choose varieties that are more heat-tolerant, provide some afternoon shade, or plant in early spring or fall for cooler temperatures.
Pests and Diseases:
Aphids and slugs are common pests. Handpick them or use an organic insecticide. Fungal diseases can occur if the soil is too wet. Ensure good drainage and avoid overhead watering.
Yellowing Leaves:
Yellowing leaves can indicate nutrient deficiencies, overwatering, or underwatering. Adjust your watering practices and consider adding fertilizer if needed.
Tips for Success
- Succession planting: Plant bok choy in succession every few weeks to ensure a continuous harvest.Bok choy, with its tender leaves and mild flavor, is a surprisingly easy vegetable to grow, even for beginner gardeners. This guide will walk you through the process, from seed to harvest, ensuring you enjoy a bountiful crop of this delicious green.
Phase 1: Planning and Preparation
- Choose your location: Bok choy thrives in full sun to partial shade. At least six hours of sunlight per day is ideal, but in hotter climates, some afternoon shade can be beneficial to prevent bolting (premature flowering).
- Prepare your soil: Bok choy prefers loose, well-drained soil rich in organic matter. Amend heavy clay soils with compost or other organic materials to improve drainage and aeration. A soil pH between 6.0 and 6.8 is optimal.
- Select your seeds or seedlings: You can start bok choy from seed or purchase seedlings from a garden center. Starting from seed gives you more variety and control, but seedlings offer a faster route to harvest. Choose varieties suited to your climate and growing season.
- Gather your supplies: You’ll need seeds or seedlings, potting mix (if starting seeds indoors), garden gloves, a trowel or hand cultivator, a watering can, and possibly some row covers or netting to protect against pests.
Phase 2: Starting from Seed (Optional)
- Start seeds indoors (6-8 weeks before the last expected frost): Fill small seed starting trays or pots with a seed-starting mix. Sow seeds about ¼ inch deep and ½ inch apart. Gently water and cover the tray with plastic wrap to maintain humidity.
- Maintain consistent moisture: Keep the soil consistently moist but not soggy. Check daily and water as needed. Avoid overwatering, which can lead to damping off (a fungal disease).
- Provide adequate light: Place the trays in a sunny location or under grow lights. Bok choy seedlings need at least 12-14 hours of light per day.
- Thin seedlings: Once the seedlings have developed their first true leaves (the leaves that appear after the cotyledons), thin them to about 2 inches apart. This gives each plant enough space to grow.
- Harden off seedlings: Before transplanting outdoors, gradually acclimate the seedlings to outdoor conditions. Over a period of 7-10 days, gradually increase their exposure to sunlight and wind. Start with a few hours of outdoor time and gradually increase it until they can tolerate full sun.
Phase 3: Transplanting and Growing
- Prepare the planting site: Loosen the soil to a depth of about 6-8 inches. If you’re planting directly into the garden, incorporate compost or other organic matter to improve soil fertility.
- Transplant seedlings (or sow seeds directly): If using seedlings, dig holes slightly larger than the root ball and gently place the seedlings in the holes. If sowing seeds directly, sow them about ¼ inch deep and 1-2 inches apart. Space rows about 12-18 inches apart.
- Water thoroughly: After transplanting or sowing, water deeply to settle the soil around the plants.
- Mulch (optional): Applying a layer of mulch, such as straw or shredded leaves, helps retain moisture, suppress weeds, and regulate soil temperature.
- Water regularly: Bok choy needs consistent moisture, especially during dry periods. Water deeply and regularly, aiming to keep the soil consistently moist but not waterlogged.
- Fertilize (optional): While not strictly necessary, a light application of balanced fertilizer can promote vigorous growth. Follow the instructions on the fertilizer package.
- Weed regularly: Keep the area around your bok choy plants free of weeds to prevent competition for water and nutrients.
- Monitor for pests and diseases: Regularly inspect your plants for signs of pests or diseases. Common pests include aphids and slugs. If you notice any problems, take appropriate action, such as handpicking pests or using an organic insecticide.
Phase 4: Harvesting
- Harvest when mature: Bok choy is ready for harvest when the leaves are fully developed and firm. This typically takes 4-6 weeks from transplanting, depending on the variety and growing conditions. For baby bok choy, you can harvest the entire plant when it’s about 4-6 inches tall.
- Harvesting methods: For larger plants, you can harvest the outer leaves individually, leaving the inner leaves to continue growing. Alternatively, you can harvest the entire plant by cutting it off at the base.
- Post-harvest care: Store harvested bok choy in a plastic bag in the refrigerator for up to a week.
Troubleshooting
Bolting:
If your bok choy bolts (goes to seed) prematurely, it’s usually due to hot weather or long days. Choose varieties that are more heat-tolerant, provide some afternoon shade, or plant in early spring or fall for cooler temperatures.
Pests and Diseases:
Aphids and slugs are common pests. Handpick them or use an organic insecticide. Fungal diseases can occur if the soil is too wet. Ensure good drainage and avoid overhead watering.
Yellowing Leaves:
Yellowing leaves can indicate nutrient deficiencies, overwatering, or underwatering. Adjust your watering practices and consider adding fertilizer if needed.
Tips for Success
- Succession planting: Plant bok choy in succession every few weeks to ensure a continuous harvest.
- Choose the right variety: Select varieties suited to your climate and growing season. Some varieties are more heat-tolerant than others.
- Protect from frost: If frost is expected, cover your bok choy plants with row covers or other frost protection.
Conclusion
So there you have it – a comprehensive guide to the rewarding experience of indoor rosemary growing. This DIY trick isn’t just about having fresh rosemary readily available for your culinary creations; it’s about connecting with nature, even within the confines of your home. The satisfying process of nurturing a rosemary plant from cutting to thriving herb, witnessing its growth and enjoying the fragrant bounty, is an unparalleled experience. This simple yet effective method transforms a seemingly daunting task into an achievable and enjoyable hobby, perfect for both seasoned gardeners and complete beginners alike. The ability to harvest fresh, flavorful rosemary year-round, regardless of the season or climate, makes this indoor growing technique a true game-changer. You’ll be amazed at the difference between the vibrant, intensely aromatic flavor of homegrown rosemary and the often-lackluster quality of store-bought herbs.
Beyond the culinary benefits, indoor rosemary growing offers a therapeutic element. The act of caring for a plant is inherently calming and rewarding, offering a welcome respite from the stresses of daily life. The beautiful, evergreen foliage adds a touch of natural elegance to your home, brightening any space. And let’s not forget the delightful aroma that permeates your kitchen, instantly transporting you to sun-drenched Mediterranean landscapes.
There are countless ways to personalize your indoor rosemary growing experience. Experiment with different pot sizes and types, from terracotta to ceramic. Consider adding decorative elements to your plant’s surroundings, such as pebbles or small figurines. You can even incorporate your rosemary plant into a larger indoor herb garden, creating a vibrant and fragrant oasis within your home. For those with limited space, consider growing your rosemary in a hanging planter or a small, compact pot. Don’t be afraid to get creative and tailor your approach to suit your individual needs and preferences. Remember, the key is to provide your rosemary plant with the right conditions – sufficient sunlight, well-draining soil, and consistent watering – and it will reward you with abundant growth and delicious herbs.
We strongly encourage you to embark on this rewarding journey of indoor rosemary growing. It’s a project that offers a multitude of benefits, from fresh, flavorful herbs to a sense of accomplishment and connection with nature. Share your experiences with us! We’d love to hear about your successes, challenges, and any creative variations you develop. Post pictures of your thriving rosemary plants on social media and tag us – let’s build a community of indoor rosemary enthusiasts together! Let the fragrant journey begin!
Frequently Asked Questions
What type of soil is best for indoor rosemary growing?
Rosemary thrives in well-draining soil. A good potting mix specifically designed for herbs or succulents is ideal. Avoid heavy clay soils that retain too much moisture, as this can lead to root rot. Adding perlite or vermiculite to your potting mix can improve drainage and aeration.
How much sunlight does my indoor rosemary plant need?
Rosemary needs at least 6-8 hours of sunlight per day. A south-facing window is ideal, but if you don’t have one, consider using a grow light to supplement natural sunlight. Ensure the light source is positioned appropriately to avoid scorching the leaves.
How often should I water my indoor rosemary plant?
Water your rosemary plant thoroughly when the top inch of soil feels dry to the touch. Avoid overwatering, which can lead to root rot. Allow the soil to dry out slightly between waterings. The frequency of watering will depend on factors such as the size of the pot, the type of soil, and the ambient temperature and humidity.
Can I propagate rosemary from cuttings?
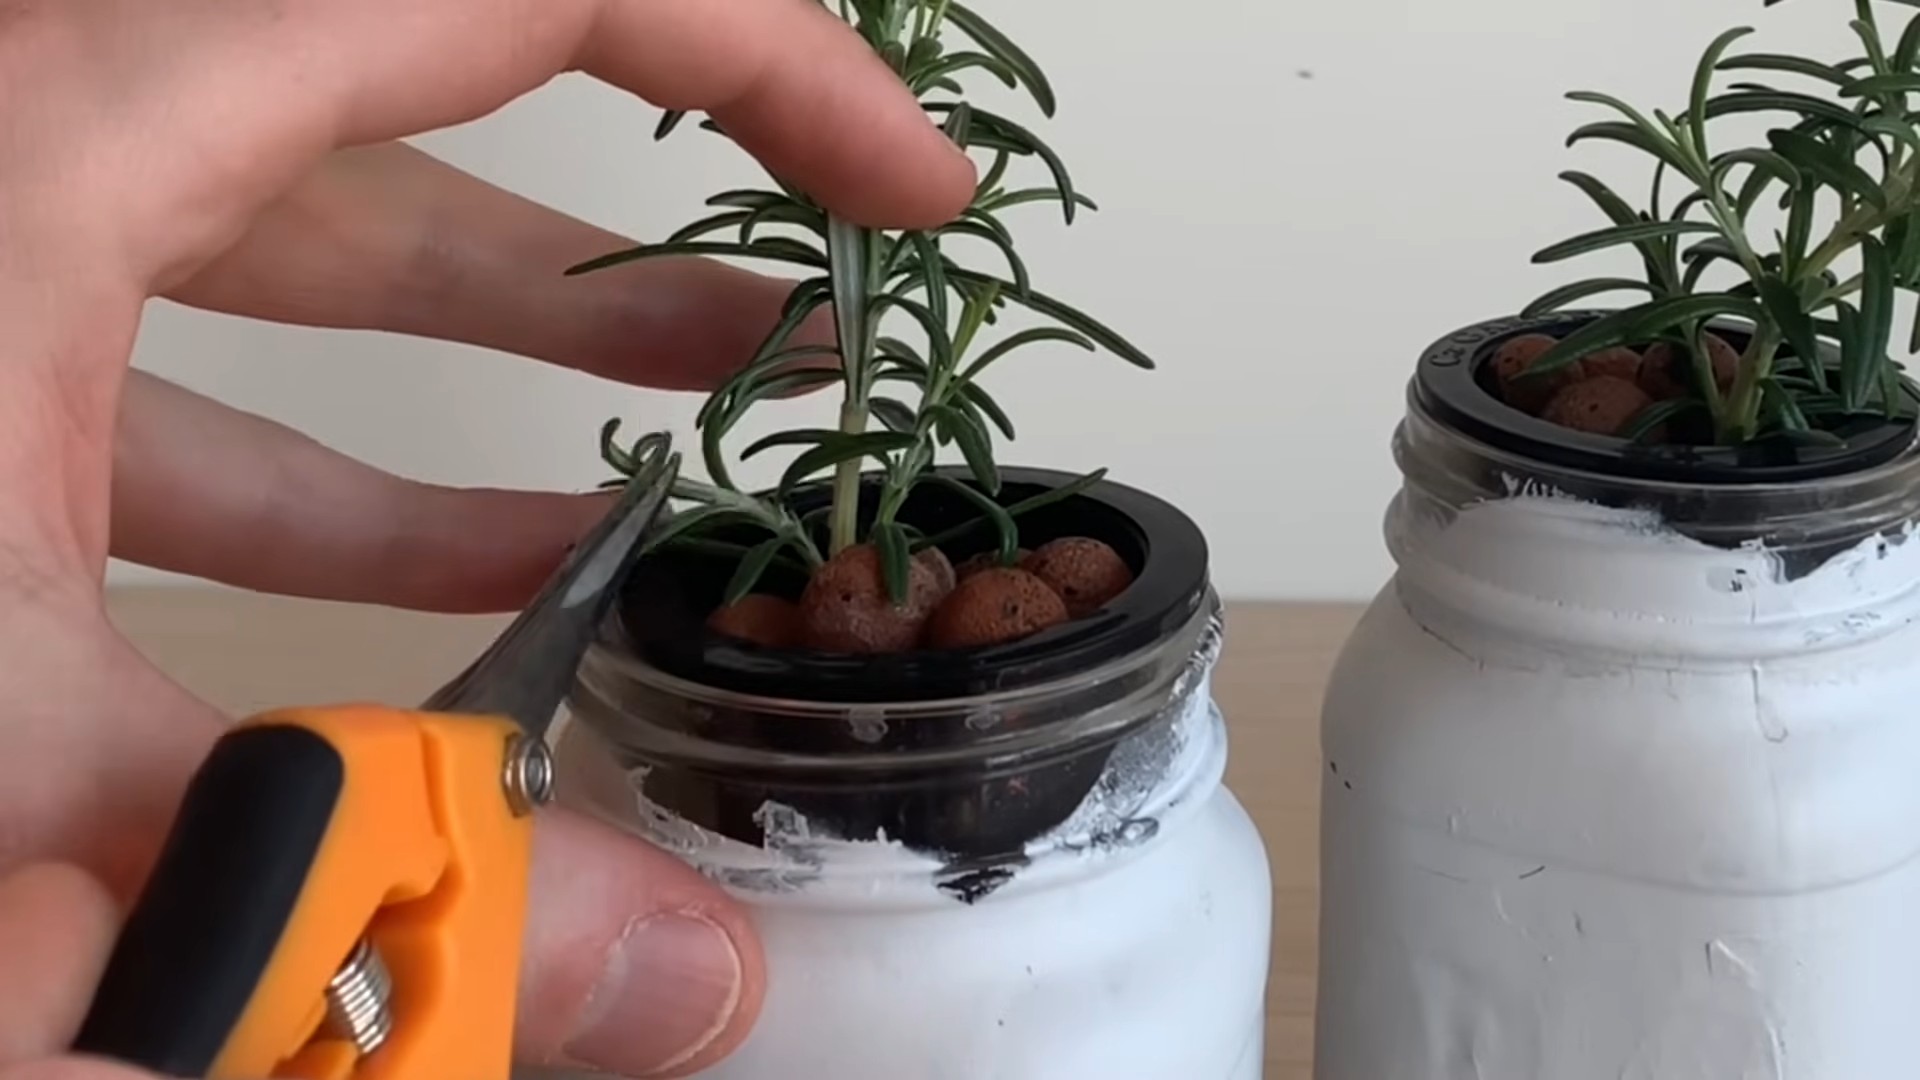
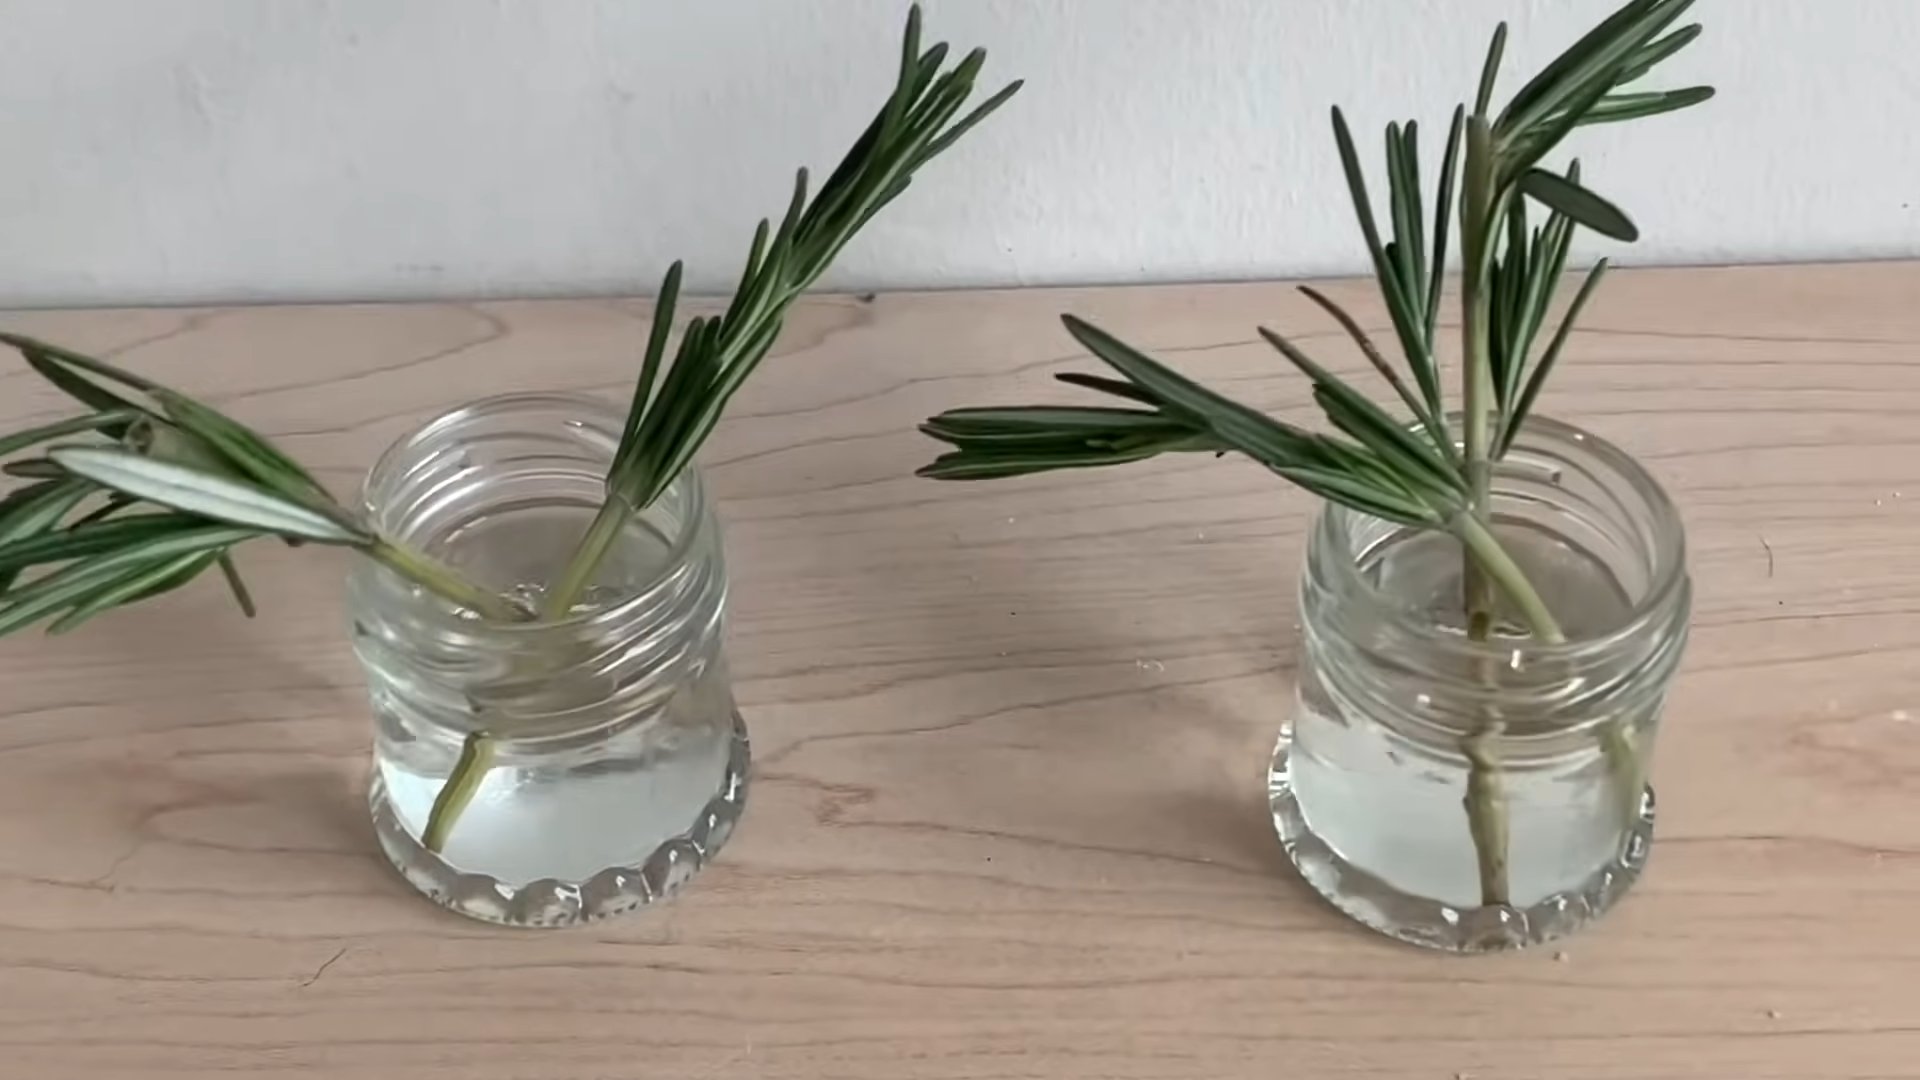
Yes, propagating rosemary from cuttings is a simple and effective method. Take 4-6 inch cuttings from healthy stems, remove the lower leaves, and dip the cut ends in rooting hormone before planting them in a well-draining potting mix. Keep the soil consistently moist but not soggy, and provide bright, indirect light. Roots should develop within a few weeks.
What are the common problems encountered when growing rosemary indoors?
Common problems include overwatering (leading to root rot), insufficient sunlight (resulting in leggy growth), and pest infestations (such as spider mites or aphids). Regularly inspect your plant for signs of pests or diseases, and address any issues promptly. Proper watering and adequate sunlight are crucial for preventing most problems.
How do I harvest rosemary from my indoor plant?
You can harvest rosemary by pinching off small sprigs or cutting larger stems. Harvesting regularly encourages bushier growth. Use sharp, clean scissors or pruning shears to avoid damaging the plant. Harvesting can be done year-round, as long as the plant is healthy and actively growing.
What are some common uses for homegrown rosemary?
Homegrown rosemary is incredibly versatile! Use it to flavor roasted meats, soups, stews, and vegetables. Add it to bread, pasta dishes, or even create your own rosemary-infused olive oil or vinegar. The possibilities are endless!
My rosemary plant is dropping leaves. What should I do?
Leaf drop can be caused by several factors, including overwatering, underwatering, insufficient sunlight, or temperature fluctuations. Assess your plant’s environment and adjust accordingly. Ensure proper watering, adequate sunlight, and a consistent temperature range. If the problem persists, consider repotting your rosemary plant into fresh soil.
Can I grow rosemary in a hydroponic system?
Yes, rosemary can be successfully grown in a hydroponic system. Hydroponics provides excellent control over nutrient delivery and watering, which can lead to vigorous growth. However, it requires a bit more technical knowledge and setup than traditional soil-based methods.
How do I prevent pests and diseases on my indoor rosemary?
Regularly inspect your plant for any signs of pests or diseases. Maintain good air circulation around the plant to prevent fungal diseases. Use insecticidal soap or neem oil to control pests if necessary. Ensure proper watering and avoid overwatering to prevent root rot.
Leave a Comment