
Indoor Kale Garden: Imagine fresh, vibrant kale gracing your kitchen counter, ready to be tossed into your morning smoothie or added to a delicious salad. No more trips to the grocery store for limp, overpriced greens! This isn’t just a dream; it’s a reality you can create with a simple DIY indoor kale garden.
For centuries, cultivating kale has been a cornerstone of healthy diets, particularly in European cultures where it’s been enjoyed since Roman times. Its resilience and nutritional power have made it a staple crop. Now, we’re bringing that tradition indoors, adapting it for modern living.
Why do you need this DIY trick? Well, beyond the convenience of having fresh produce at your fingertips, growing your own indoor kale garden is incredibly rewarding. It’s a fantastic way to connect with nature, even in a small apartment. Plus, you’ll know exactly what’s going into your food – no pesticides or hidden chemicals. I’m going to show you how to create a thriving indoor kale garden, even if you don’t have a green thumb. Get ready to enjoy the freshest, most delicious kale you’ve ever tasted!
Creating Your Own Thriving Indoor Kale Garden
Hey there, fellow plant enthusiasts! I’m so excited to share my experience with creating an indoor kale garden. Fresh, homegrown kale is just the best, and you don’t need a huge outdoor space to enjoy it. This guide will walk you through everything you need to know to grow your own delicious kale indoors, even if you’re a complete beginner. Let’s get started!
What You’ll Need: The Essentials
Before we dive into the nitty-gritty, let’s gather our supplies. Having everything ready beforehand will make the process smooth and enjoyable.
* Kale Seeds: Choose your favorite varieties! I personally love ‘Lacinato’ (dinosaur kale) and ‘Red Russian’ for their flavor and texture.
* Seed Starting Tray and Dome: This will help create a humid environment for germination.
* Seed Starting Mix: A light, well-draining mix is crucial for healthy seedlings.
* Grow Lights: Kale needs plenty of light, especially indoors. LED grow lights are energy-efficient and effective.
* Pots: Choose pots that are at least 6 inches in diameter for mature kale plants.
* Potting Soil: A good quality potting mix with added nutrients is essential.
* Watering Can or Spray Bottle: For gentle watering.
* Fertilizer: A balanced liquid fertilizer to feed your kale plants.
* pH Meter (Optional): To monitor the soil pH. Kale prefers a slightly acidic to neutral pH (6.0-7.5).
* Small Shovel or Trowel: For transplanting seedlings.
* Spray Bottle with Water: For misting the leaves.
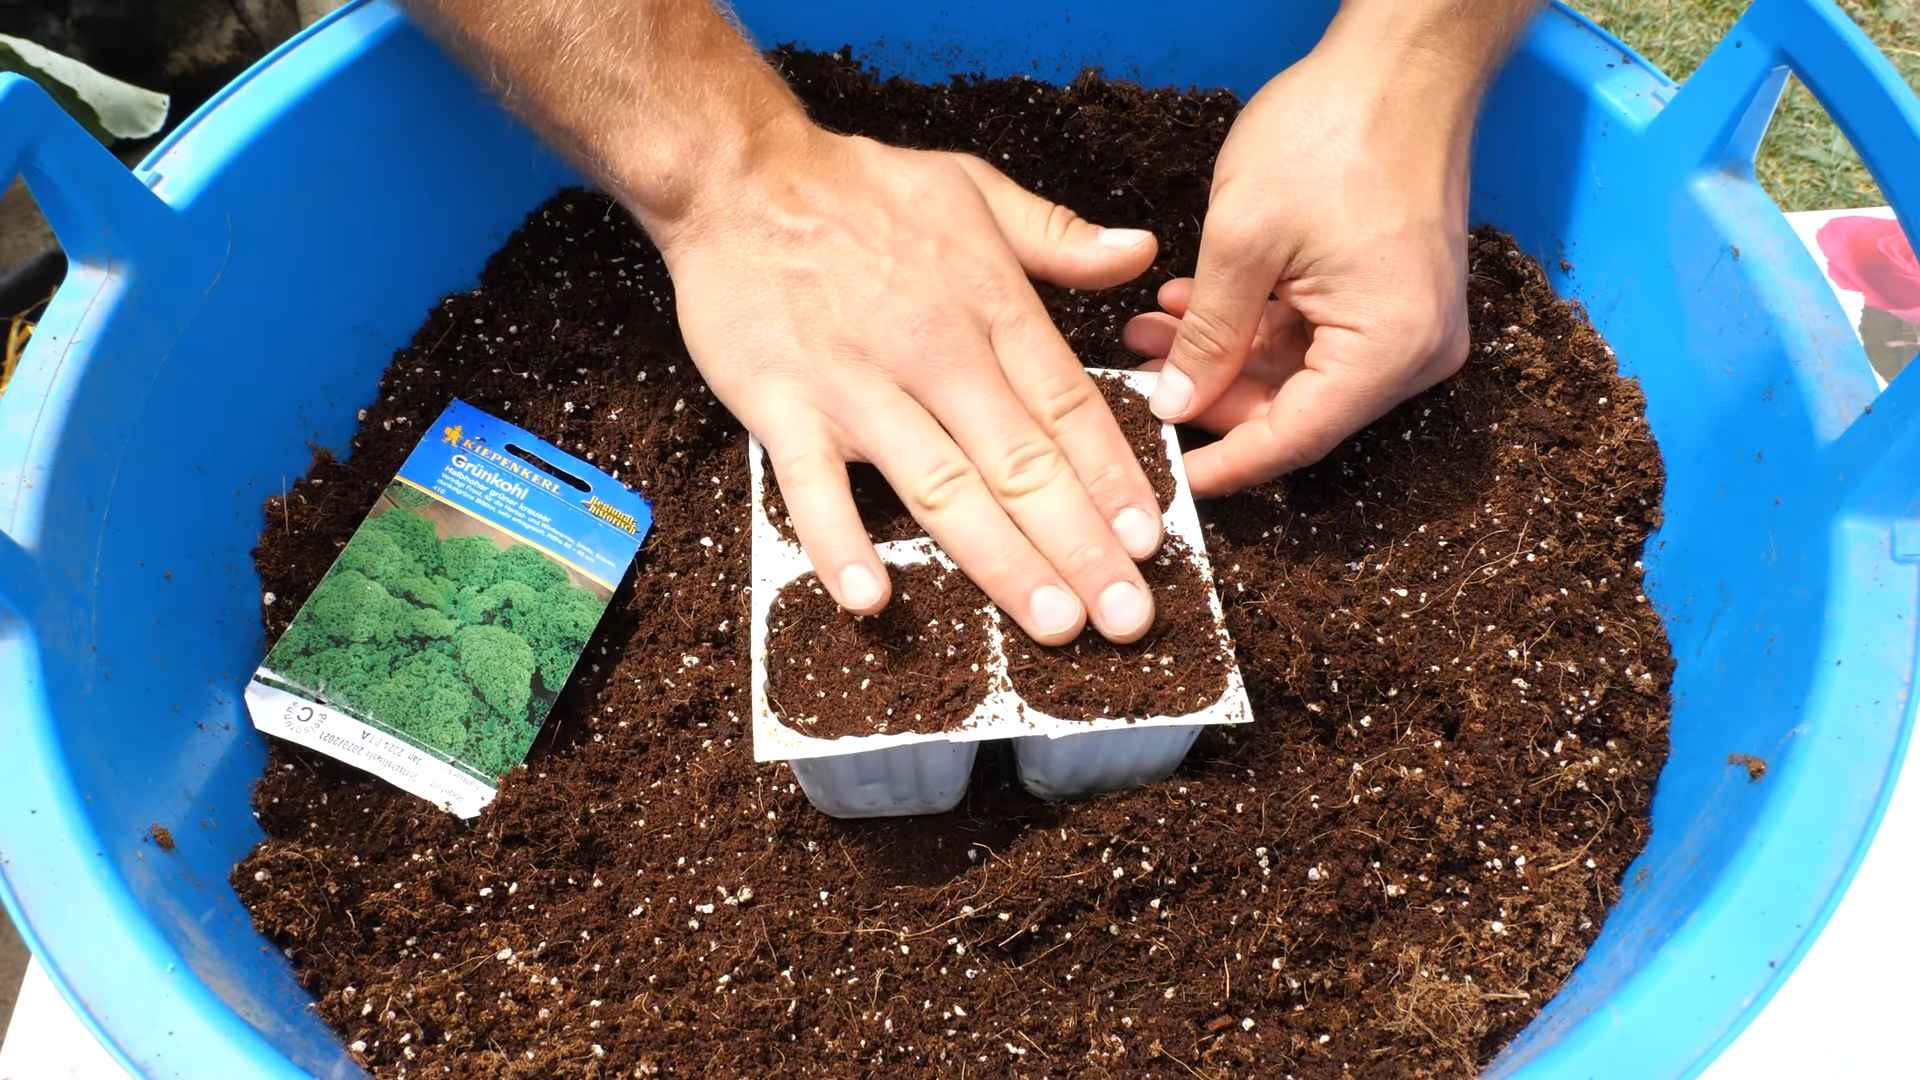
Phase 1: Starting Your Kale Seeds
This is where the magic begins! Starting your seeds indoors gives you a head start and ensures healthy seedlings.
1. Prepare the Seed Starting Tray: Fill each cell of your seed starting tray with seed starting mix. Gently press down to eliminate air pockets.
2. Sow the Seeds: Place 2-3 kale seeds in each cell, about ¼ inch deep.
3. Cover and Water: Lightly cover the seeds with more seed starting mix and gently water the tray using a spray bottle. You want the soil to be moist, not soggy.
4. Cover with Dome: Place the dome over the tray to create a humid environment.
5. Provide Light and Warmth: Place the tray under your grow lights. Keep the lights on for 14-16 hours a day. The ideal temperature for germination is between 65-75°F (18-24°C).
6. Monitor Moisture: Check the moisture level daily. If the soil feels dry, mist it with a spray bottle.
7. Wait for Germination: Kale seeds typically germinate within 5-10 days. Once the seedlings emerge, remove the dome to allow for better air circulation.
Phase 2: Nurturing Your Seedlings
Once your seedlings have sprouted, it’s time to give them the care they need to grow strong and healthy.
1. Thin the Seedlings: Once the seedlings have their first true leaves (the second set of leaves after the initial seed leaves), thin them to one seedling per cell. Choose the strongest, healthiest-looking seedling and gently snip off the others at the soil level.
2. Maintain Light and Water: Continue to provide 14-16 hours of light per day. Water the seedlings when the top inch of soil feels dry. Avoid overwatering, as this can lead to root rot.
3. Fertilize Gently: Once the seedlings have their second set of true leaves, start fertilizing them with a diluted liquid fertilizer. Follow the instructions on the fertilizer label. I usually use half the recommended strength for seedlings.
4. Harden Off (Optional): If you plan to eventually move your kale plants outdoors, you’ll need to harden them off. This involves gradually exposing them to outdoor conditions over a period of 1-2 weeks. Start by placing them outdoors for a few hours each day in a sheltered location, gradually increasing the amount of time they spend outdoors.
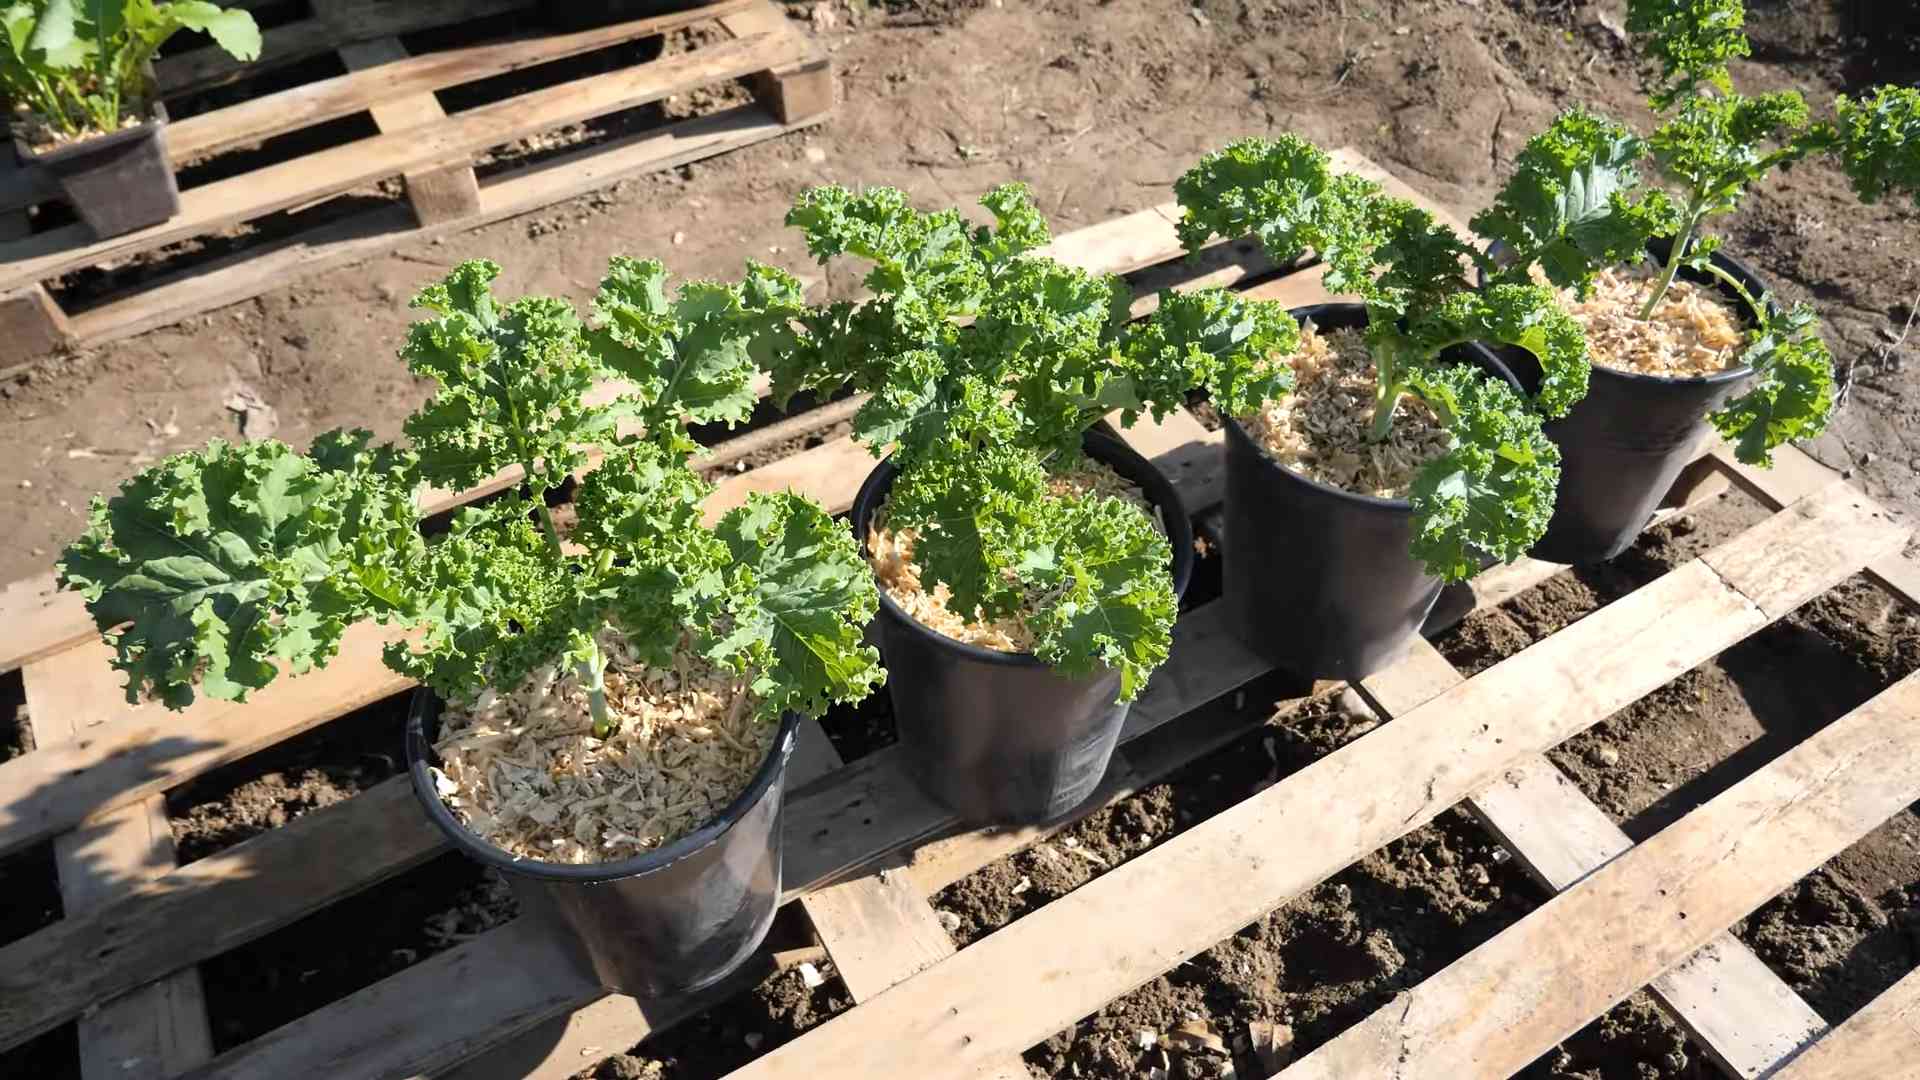
Phase 3: Transplanting to Larger Pots
When your seedlings are about 4-6 inches tall and have a well-developed root system, it’s time to transplant them to larger pots.
1. Prepare the Pots: Fill your pots with a good quality potting mix. Make a hole in the center of each pot that is large enough to accommodate the root ball of the seedling.
2. Carefully Remove Seedlings: Gently remove the seedlings from the seed starting tray. Be careful not to damage the roots. You can use a small trowel or spoon to help loosen the soil around the roots.
3. Transplant the Seedlings: Place the seedlings in the holes you prepared in the pots. Make sure the top of the root ball is level with the soil surface.
4. Fill and Water: Fill in the remaining space around the seedlings with potting mix. Gently press down to eliminate air pockets. Water the plants thoroughly.
5. Provide Support (Optional): If your kale plants are getting tall and leggy, you may need to provide them with some support. You can use bamboo stakes or tomato cages to help keep them upright.
Phase 4: Caring for Your Indoor Kale Plants
Now that your kale plants are in their permanent homes, it’s time to provide them with the ongoing care they need to thrive.
1. Light: Kale needs at least 6 hours of direct sunlight per day, or 14-16 hours of artificial light from grow lights. Place your plants in a sunny window or under grow lights.
2. Watering: Water your kale plants when the top inch of soil feels dry. Avoid overwatering, as this can lead to root rot. Make sure the pots have drainage holes to allow excess water to escape.
3. Fertilizing: Fertilize your kale plants every 2-3 weeks with a balanced liquid fertilizer. Follow the instructions on the fertilizer label.
4. Temperature: Kale prefers cool temperatures, between 60-70°F (15-21°C). Avoid placing your plants near heat sources, such as radiators or vents.
5. Humidity: Kale prefers moderate humidity. If the air in your home is dry, you can increase the humidity around your plants by misting them with a spray bottle or placing them on a tray filled with pebbles and water.
6. Air Circulation: Good air circulation is important for preventing fungal diseases. Make sure your plants have plenty of space around them and that the air is circulating freely. A small fan can help improve air circulation.
7. Pest Control: Keep an eye out for pests, such as aphids, spider mites, and whiteflies. If you notice any pests, treat them with an insecticidal soap or neem oil.
8. Pruning: Prune your kale plants regularly to encourage bushier growth. Remove any yellowing or damaged leaves. You can also pinch off the growing tips to encourage side shoots.
Phase 5: Harvesting Your Kale
The best part! Harvesting your own homegrown kale is incredibly rewarding.
1. When to Harvest: You can start harvesting kale leaves when they are about 4-6 inches long.
2. How to Harvest: Harvest the outer leaves first, leaving the inner leaves to continue growing. You can use scissors or a knife to cut the leaves off at the base of the stem.
3. Harvest Regularly: Harvesting regularly will encourage your kale plants to produce more leaves.
4. Enjoy Your Harvest: Wash your kale leaves thoroughly before eating. You can use them in salads, smoothies, soups, stews, and many other dishes.
Troubleshooting Common Problems
Even with the best care, you might encounter some challenges along the way. Here are some common problems and how to address them:
* Yellowing Leaves: This could be a sign of overwatering, underwatering, nutrient deficiency, or pest infestation. Check the soil moisture, fertilize your plants, and inspect them for pests.
* Leggy Growth: This is usually caused by insufficient light. Make sure your plants are getting enough light, either from a sunny window or grow lights.
* Pest Infestation: Treat pests with insecticidal soap or neem oil. You can also try hand-picking the pests off the plants.
* Fungal Diseases: Prevent fungal diseases by providing good air circulation and avoiding overwatering. If you notice any signs of fungal disease, such as powdery mildew, treat your plants with a fungicide.
Choosing the Right Kale Variety for Indoors
While most kale varieties can be grown indoors, some are better suited than others. Here are a few of my favorites:
* Lacinato (Dinosaur Kale): This variety has long, dark green leaves with a slightly wrinkled texture. It’s
Conclusion
So, there you have it! Creating your own indoor kale garden isn’t just a fun project; it’s a gateway to fresh, nutritious greens right at your fingertips, regardless of the season. We’ve walked through the simple steps, highlighting the ease and accessibility of this rewarding endeavor. Forget those wilted, overpriced bunches at the grocery store. Imagine stepping into your kitchen and harvesting vibrant, crisp kale leaves whenever you need them.
This DIY trick is a must-try for several compelling reasons. First and foremost, it empowers you to control the quality of your food. You know exactly what goes into your kale – no pesticides, no hidden chemicals, just pure, homegrown goodness. Secondly, it’s incredibly cost-effective. The initial investment in seeds, soil, and containers is minimal compared to the ongoing expense of buying kale regularly. Over time, your indoor garden will pay for itself many times over. Thirdly, it’s a sustainable practice. You’re reducing your carbon footprint by eliminating the transportation and packaging associated with store-bought produce.
But the benefits extend beyond the practical. Nurturing an indoor kale garden is a therapeutic and fulfilling experience. Watching your seeds sprout and grow into lush, leafy plants is incredibly rewarding. It connects you to the natural world, even within the confines of your home. Plus, it’s a fantastic way to introduce children to the wonders of gardening and healthy eating.
Don’t be afraid to experiment with variations! Try different varieties of kale, such as curly kale, lacinato kale (dinosaur kale), or red Russian kale. Each variety offers a unique flavor and texture. You can also explore different growing mediums, such as hydroponics, for a soilless approach. Consider adding companion plants, like herbs or flowers, to your indoor garden to attract pollinators and enhance the overall aesthetic. You can even use grow lights with different spectrums to see which yields the best results for your specific environment.
Ready to embark on your indoor kale adventure? We wholeheartedly encourage you to give this DIY trick a try. It’s easier than you think, and the rewards are immeasurable. Start small, learn as you go, and don’t be discouraged by initial setbacks. Gardening is a journey, and every mistake is a learning opportunity.
Once you’ve harvested your first batch of homegrown kale, we’d love to hear about your experience! Share your photos, tips, and challenges in the comments below. Let’s create a community of indoor kale enthusiasts and inspire others to embrace the joys of homegrown goodness. Your success story could be the motivation someone else needs to start their own indoor kale garden today! Let us know what worked for you, what didn’t, and any creative solutions you discovered along the way. Together, we can unlock the full potential of this amazing DIY trick and enjoy a constant supply of fresh, healthy kale all year round.
Frequently Asked Questions (FAQ)
1. What is the best type of kale to grow indoors?
The best type of kale to grow indoors depends on your personal preference and growing conditions. However, some varieties tend to thrive better in indoor environments. Dwarf Siberian kale is a popular choice due to its compact size and relatively fast growth rate. Lacinato kale (also known as dinosaur kale or Tuscan kale) is another excellent option, offering a rich flavor and attractive appearance. Curly kale is also a good choice, being relatively easy to grow and providing a good yield. Red Russian kale can add a splash of color to your indoor garden, but it may require slightly more light than other varieties. Ultimately, experimenting with different types of kale is the best way to determine which ones perform best in your specific indoor environment. Consider factors like available space, lighting conditions, and your personal taste preferences when making your selection.
2. How much light does my indoor kale garden need?
Kale requires a significant amount of light to thrive. Ideally, aim for at least 6-8 hours of direct sunlight per day. If you don’t have access to a sunny windowsill, you’ll need to supplement with artificial lighting. Fluorescent grow lights or LED grow lights are excellent options. Position the lights about 6-12 inches above the plants and keep them on for 12-16 hours per day. Observe your plants closely for signs of insufficient light, such as leggy growth (long, spindly stems) or pale leaves. If you notice these symptoms, increase the amount of light your kale receives. Remember that different varieties of kale may have slightly different light requirements, so it’s always a good idea to research the specific needs of the kale you’re growing.
3. What kind of soil should I use for my indoor kale garden?
The ideal soil for your indoor kale garden is a well-draining potting mix that is rich in organic matter. Avoid using garden soil, as it can be too heavy and may contain pests or diseases. A good quality potting mix will provide the necessary nutrients and drainage for healthy kale growth. You can also amend the potting mix with compost or other organic materials to further improve its fertility. Consider using a potting mix specifically formulated for vegetables, as these mixes are often enriched with essential nutrients. Ensure that your containers have drainage holes to prevent waterlogging, which can lead to root rot.
4. How often should I water my indoor kale plants?
Water your indoor kale plants when the top inch of soil feels dry to the touch. Avoid overwatering, as this can lead to root rot. The frequency of watering will depend on factors such as the size of your containers, the type of soil you’re using, and the ambient temperature and humidity. In general, you’ll likely need to water your kale plants every few days. When watering, water thoroughly until water drains out of the drainage holes. This ensures that the entire root system is adequately hydrated. Check the soil moisture regularly and adjust your watering schedule accordingly.
5. How do I fertilize my indoor kale garden?
Kale is a heavy feeder and benefits from regular fertilization. Start fertilizing your kale plants about two weeks after they sprout. Use a balanced liquid fertilizer, such as a 10-10-10 or 20-20-20 formula, diluted to half strength. Fertilize every two to three weeks, following the instructions on the fertilizer label. You can also use organic fertilizers, such as compost tea or fish emulsion. Avoid over-fertilizing, as this can lead to excessive foliage growth and reduced flavor. Monitor your plants for signs of nutrient deficiencies, such as yellowing leaves or stunted growth, and adjust your fertilization schedule accordingly.
6. How do I harvest my indoor kale?
You can start harvesting kale leaves when they are about 4-6 inches long. Harvest the outer leaves first, leaving the inner leaves to continue growing. This cut-and-come-again method allows you to harvest kale continuously over a long period. Use a sharp knife or scissors to cut the leaves close to the stem. Avoid tearing the leaves, as this can damage the plant. Harvest in the morning, when the leaves are at their peak freshness. Wash the harvested leaves thoroughly before using them.
7. What pests and diseases are common in indoor kale gardens, and how do I prevent them?
Common pests in indoor kale gardens include aphids, spider mites, and whiteflies. To prevent these pests, inspect your plants regularly and remove any infested leaves. You can also use insecticidal soap or neem oil to control infestations. Ensure good air circulation around your plants to prevent fungal diseases. Avoid overwatering, as this can create a favorable environment for fungal growth. If you notice signs of disease, such as powdery mildew or leaf spot, remove the affected leaves and treat the plants with a fungicide. Maintaining a clean and healthy growing environment is crucial for preventing pests and diseases in your indoor kale garden.
8. Can I grow kale indoors year-round?
Yes, you can absolutely grow kale indoors year-round! With proper lighting, watering, and fertilization, you can enjoy a continuous supply of fresh kale regardless of the season. Indoor gardening allows you to control the growing environment, protecting your plants from harsh weather conditions and pests. By providing adequate light and maintaining a consistent temperature, you can create an ideal environment for kale to thrive throughout the year.
9. How do I deal with leggy kale plants?
Leggy kale plants are usually a sign of insufficient light. The plants are stretching towards the light source, resulting in long, spindly stems and sparse foliage. To address this issue, increase the amount of light your kale plants receive. Move them to a sunnier location or supplement with artificial lighting. You can also prune the leggy stems to encourage bushier growth. Pinch off the top growth to promote side branching. In severe cases, you may need to start over with new seeds or seedlings, ensuring that they receive adequate light from the beginning.
10. Can I transplant kale seedlings from outdoors to indoors?
Yes, you can transplant kale seedlings from outdoors to indoors, but it’s important to do it carefully. Gradually acclimate the seedlings to indoor conditions before transplanting them. Start by bringing them indoors for a few hours each day, gradually increasing the amount of time they spend indoors over a week or two. This will help them adjust to the lower light levels and different humidity levels. When transplanting, choose a cloudy day to minimize stress on the plants. Dig up the seedlings carefully, taking care to avoid damaging the roots. Plant them in well-draining potting mix and water them thoroughly. Monitor the plants closely for
Leave a Comment