
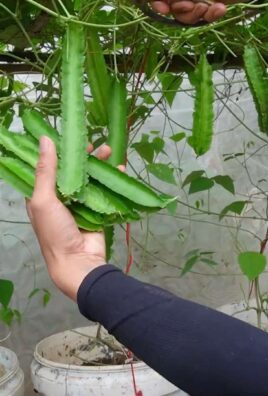
Mung Bean Sprouts DIY: Unlock the secrets to growing your own fresh, crunchy sprouts right in your kitchen! Forget those limp, flavorless sprouts from the grocery store. I’m going to show you how incredibly easy and rewarding it is to cultivate your own batch of vibrant, nutrient-packed mung bean sprouts at home.
Sprouting beans has a rich history, dating back thousands of years in Asian cultures, where they were prized for their nutritional value and ease of cultivation, especially during times of scarcity. Think of it as a tiny, edible time capsule, connecting you to ancient traditions of resourcefulness and healthy eating!
Why should you embark on this Mung Bean Sprouts DIY adventure? Well, for starters, it’s incredibly cost-effective. A small bag of mung beans can yield a surprisingly large quantity of sprouts. More importantly, you control the growing environment, ensuring your sprouts are free from harmful chemicals and contaminants. Plus, the taste is simply unmatched – fresh, crisp, and bursting with life. Imagine adding them to your salads, stir-fries, or sandwiches for a delightful crunch and a boost of vitamins and minerals.
This DIY trick is perfect for anyone looking to add a healthy and sustainable element to their diet. So, are you ready to ditch the store-bought sprouts and embrace the joy of growing your own? Let’s get started!
DIY Mung Bean Sprouts: A Beginner’s Guide to Growing Your Own Crunchy Goodness
Hey there, fellow food enthusiasts! Ever wanted to grow your own fresh, crunchy mung bean sprouts right in your kitchen? It’s surprisingly easy, incredibly rewarding, and way cheaper than buying them at the store. Plus, you know exactly what’s going into them – no weird preservatives or questionable growing practices. I’m going to walk you through the whole process, step-by-step, so you can enjoy delicious, homegrown sprouts in just a few days. Let’s get sprouting!
What You’ll Need
Before we dive in, let’s gather our supplies. This is a pretty low-tech operation, so you probably already have most of this stuff lying around:
* Mung Beans: Obviously! Look for whole, green mung beans specifically intended for sprouting. You can find these at most health food stores, Asian markets, or online. Avoid beans that look damaged or discolored.
* A Wide-Mouth Jar or Container: A quart-sized mason jar works perfectly, but any clean container with a wide mouth will do. Just make sure it’s food-grade.
* Sprouting Lid or Cheesecloth and Rubber Band: A sprouting lid is ideal because it allows for easy rinsing and drainage. If you don’t have one, a piece of cheesecloth secured with a rubber band works just as well.
* Water: Filtered water is best, but tap water is usually fine too, as long as it’s safe to drink.
* A Dark Place: Mung bean sprouts grow best in the dark. A cupboard, drawer, or even a covered pot will do the trick.
* A Bowl or Tray: To angle the jar for drainage.
Step-by-Step Sprouting Instructions
Okay, let’s get down to business! Here’s how to grow your own mung bean sprouts:
1. Rinse the Beans: Start by rinsing your mung beans thoroughly under cool water. This removes any dirt, debris, or broken beans. I usually use about 1/4 to 1/2 cup of dry beans, which will yield a good amount of sprouts.
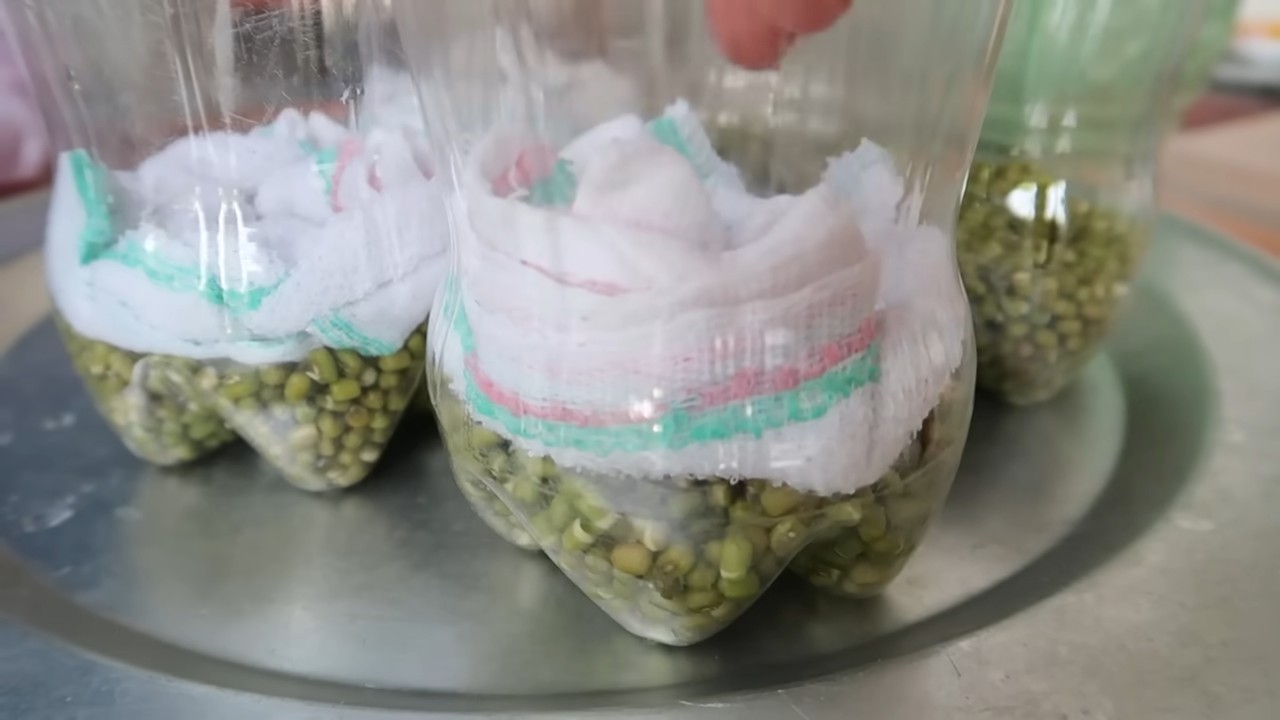
2. Soak the Beans: Place the rinsed beans in your jar or container and cover them with plenty of cool water. The beans will expand significantly as they soak, so make sure they have enough room. I usually use about 3 times the volume of water as beans. Let them soak for 8-12 hours, or overnight. This is crucial for activating the germination process.
3. Drain and Rinse Again: After soaking, drain the water completely. Rinse the beans thoroughly with fresh, cool water. This is important to prevent mold growth.
4. Secure the Lid: Attach your sprouting lid or secure the cheesecloth with a rubber band. Make sure the cheesecloth is taut enough to prevent beans from falling out.
5. Angle for Drainage: Place the jar upside down at an angle in a bowl or tray. This allows excess water to drain out and prevents the beans from sitting in water, which can lead to spoilage.
6. Darkness is Key: Place the jar in a dark, well-ventilated place. A cupboard or drawer works perfectly. You can also cover the jar with a towel or place it inside a pot with a lid.
7. Rinse and Drain Regularly: This is the most important step! Rinse and drain the beans at least twice a day, morning and evening. Use cool, fresh water each time. This keeps them hydrated and prevents mold growth. Make sure to drain the water completely after each rinse.
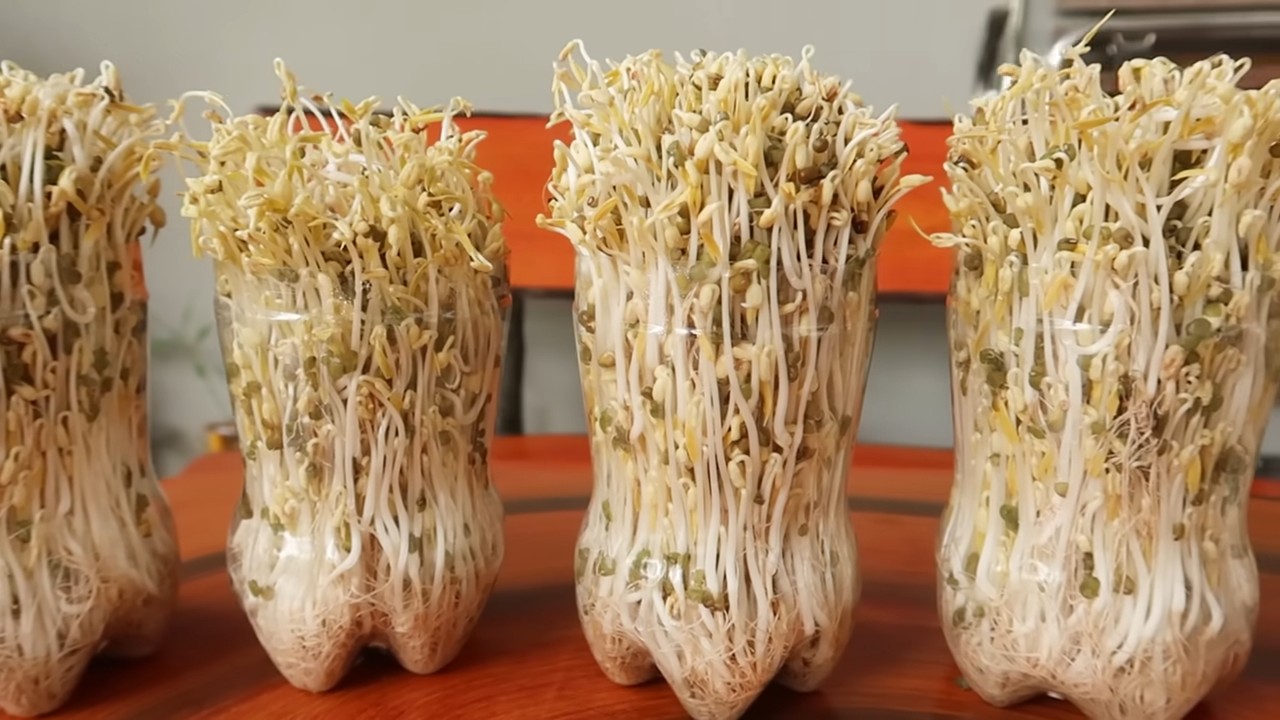
8. Observe and Enjoy the Magic: Over the next 3-5 days, you’ll see tiny sprouts emerging from the beans. Continue rinsing and draining twice a day. The sprouts will grow longer and thicker each day.
9. Harvest Time!: Your sprouts are ready to harvest when they are about 1-2 inches long. I usually harvest mine when they have a nice, crunchy texture.
10. Final Rinse and Storage: Give your sprouts a final rinse in cool water. Remove any remaining bean hulls (the green skins) if you like. They’re perfectly safe to eat, but some people prefer to remove them for aesthetic reasons. Store the sprouts in an airtight container in the refrigerator. They should last for up to a week.
Troubleshooting and Tips
Even with the best instructions, sometimes things can go a little sideways. Here are a few common issues and how to fix them:
* Mold Growth: Mold is the enemy of sprouting! If you see any fuzzy, white, or colored growth on your sprouts, discard the entire batch. Mold usually indicates that the sprouts weren’t rinsed and drained properly. Make sure you’re rinsing thoroughly at least twice a day.
* Slow Sprouting: If your sprouts are taking longer than 5 days to grow, it could be due to a few factors. The temperature might be too cold (sprouts prefer a slightly warmer environment), or the beans might be old or damaged. Try moving the jar to a slightly warmer location and make sure you’re using fresh, high-quality beans.
* Rotting Smell: A rotting smell is a sign of bacterial growth. This usually happens when the sprouts are sitting in water for too long. Make sure you’re draining the water completely after each rinse.
* Bitter Taste: Sometimes, sprouts can develop a slightly bitter taste. This is usually due to the presence of certain compounds in the beans. Rinsing them more frequently can help reduce the bitterness.
* Bean Hulls: Removing the bean hulls can be a bit tedious, but it’s not essential. You can try gently agitating the sprouts in a bowl of water to loosen the hulls, then skimming them off the surface.
Creative Uses for Your Homegrown Sprouts
Now that you have a bounty of fresh mung bean sprouts, what are you going to do with them? The possibilities are endless! Here are a few of my favorite ways to use them:
* Salads: Add a handful of sprouts to your favorite salad for a boost of crunch and nutrients. They pair well with Asian-inspired dressings.
* Stir-Fries: Mung bean sprouts are a classic ingredient in stir-fries. Add them towards the end of cooking to maintain their crispness.
* Sandwiches and Wraps: Add sprouts to sandwiches and wraps for extra texture and flavor.
* Soups: Sprinkle sprouts on top of soups for a fresh, crunchy garnish.
* Spring Rolls: Mung bean sprouts are a key ingredient in many spring roll recipes.
* Juicing: Add a small handful of sprouts to your juice for an extra nutritional boost.
* On Their Own: I sometimes just eat a handful of sprouts straight from the jar as a healthy snack!
Why Grow Your Own?
Growing your own mung bean sprouts is not only easy and affordable, but it’s also incredibly rewarding. Here are just a few of the benefits:
* Freshness: Homegrown sprouts are as fresh as it gets! You can harvest them at their peak of flavor and nutrition.
* Cost Savings: Buying sprouts at the store can be expensive. Growing your own is a fraction of the cost.
* Control: You have complete control over the growing process, ensuring that your sprouts are free from pesticides and other harmful chemicals.
* Nutritional Value: Mung bean sprouts are packed with vitamins, minerals, and enzymes. They’re a great source of protein, fiber, and antioxidants.
* Sustainability: Growing your own sprouts reduces your carbon footprint by eliminating the need for transportation and packaging.
* It’s Fun!: Seriously, it’s kind of magical to watch those little sprouts grow day by day.
Experiment and Enjoy!
Don’t be afraid to experiment with different techniques and recipes. Once you get the hang of it, you’ll be sprouting like a pro in no time! Happy sprouting!
Conclusion
So, there you have it! Cultivating your own mung bean sprouts at home is not just a fun project; it’s a gateway to fresher, more nutritious, and significantly more affordable sprouts than you’ll ever find at the grocery store. Forget those limp, sad-looking sprouts in plastic containers. With this simple DIY method, you’re in control of the entire process, ensuring peak freshness and flavor.
Why is this DIY trick a must-try? Because it empowers you to bypass the often-questionable quality and inflated prices of store-bought sprouts. You know exactly where your food is coming from and how it’s been grown. Plus, it’s incredibly satisfying to watch those tiny beans transform into crunchy, delicious sprouts right before your eyes. It’s a mini-science experiment that ends with a healthy and delicious reward!
But the benefits don’t stop there. Growing your own mung bean sprouts allows for endless customization. Want a slightly different flavor profile? Experiment with different sprouting times. Shorter sprouting times will yield smaller, sweeter sprouts, while longer times will result in larger, more robust sprouts. You can even try adding a touch of lemon juice to the rinsing water for a brighter, tangier flavor.
Consider these variations to elevate your sprouting game:
* Spicy Sprouts: Add a pinch of red pepper flakes to the rinsing water for a subtle kick.
* Garlic Infused Sprouts: Mince a clove of garlic and add it to the sprouting jar during the last day or two of sprouting.
* Herbaceous Sprouts: Introduce fresh herbs like cilantro or parsley during the final rinse for a burst of fresh flavor.
Beyond flavor variations, think about the ways you can incorporate your freshly grown mung bean sprouts into your diet. They’re fantastic in stir-fries, salads, sandwiches, spring rolls, and even as a crunchy topping for soups. The possibilities are truly endless!
We wholeheartedly encourage you to give this DIY mung bean sprouts method a try. It’s a simple, rewarding, and cost-effective way to add a healthy and delicious element to your meals. Once you experience the satisfaction of growing your own sprouts, you’ll never go back to store-bought again.
Don’t be intimidated by the process. It’s far easier than you might think. Just follow the steps outlined in this guide, and you’ll be enjoying your own homegrown sprouts in no time.
And most importantly, we want to hear about your experience! Share your photos, tips, and variations in the comments below. Let’s build a community of sprout enthusiasts and inspire others to embrace the joy of DIY food cultivation. What worked for you? What challenges did you face? What creative ways did you find to use your sprouts? Your feedback is invaluable and will help others succeed in their own sprouting adventures. So, go ahead, get sprouting, and share your story! Let’s make the world a little bit greener, one mung bean sprout at a time.
Frequently Asked Questions (FAQ)
1. What kind of mung beans should I use for sprouting?
The best mung beans for sprouting are whole, dried mung beans specifically intended for sprouting. Avoid using split mung beans or those that have been processed in any way, as they will not germinate properly. Look for beans that are uniform in size and color, and free from any signs of damage or mold. Organic mung beans are a great choice, as they are free from pesticides and other chemicals. You can typically find sprouting mung beans at health food stores, Asian markets, or online retailers.
2. How long does it take to grow mung bean sprouts?
Typically, mung bean sprouts take between 3 to 5 days to grow to a desirable length. The exact time will depend on factors such as the temperature, humidity, and the quality of the mung beans. Warmer temperatures generally speed up the sprouting process, while cooler temperatures may slow it down. It’s important to monitor your sprouts daily and adjust the rinsing frequency as needed to prevent them from drying out or becoming moldy.
3. What if my mung beans don’t sprout?
There are several reasons why your mung beans might not be sprouting. First, ensure that you are using fresh, high-quality mung beans specifically intended for sprouting. Old or damaged beans may have a lower germination rate. Second, make sure that the beans are being soaked and rinsed properly. They need to be kept consistently moist but not waterlogged. Third, check the temperature. If it’s too cold, the beans may not sprout. Aim for a temperature between 70-75°F (21-24°C). Finally, ensure that the beans are not exposed to direct sunlight, as this can inhibit germination. If you’ve addressed all of these factors and your beans still aren’t sprouting, try starting with a fresh batch of beans.
4. How do I prevent mold from growing on my mung bean sprouts?
Preventing mold growth is crucial for successful sprouting. The key is to maintain good hygiene and proper ventilation. Always use clean equipment, including the sprouting jar or container, and rinse the beans thoroughly with fresh, clean water at least twice a day. Ensure that the container is well-drained to prevent water from pooling at the bottom. Avoid overcrowding the container with too many beans, as this can restrict airflow. If you notice any signs of mold, such as a fuzzy or slimy texture, discard the entire batch immediately.
5. How long do mung bean sprouts last in the refrigerator?
Freshly grown mung bean sprouts can last for up to a week in the refrigerator if stored properly. To maximize their shelf life, rinse the sprouts thoroughly and drain them well. Place them in a clean, airtight container lined with a paper towel to absorb excess moisture. Store the container in the crisper drawer of your refrigerator. Check the sprouts daily for any signs of spoilage, such as a slimy texture or unpleasant odor.
6. Can I eat the roots of mung bean sprouts?
Yes, the roots of mung bean sprouts are perfectly edible and are often considered a desirable part of the sprout. They are tender and have a slightly sweet flavor. However, some people prefer to remove the roots for aesthetic reasons or if they find the texture to be undesirable. The choice is entirely up to you.
7. Are there any health benefits to eating mung bean sprouts?
Absolutely! Mung bean sprouts are packed with nutrients and offer a variety of health benefits. They are a good source of protein, fiber, vitamins (especially vitamin C and vitamin K), and minerals (such as iron and potassium). They are also low in calories and fat. Eating mung bean sprouts can help boost your immune system, improve digestion, lower cholesterol levels, and promote healthy skin.
8. Can I sprout other types of beans using this method?
Yes, this method can be adapted for sprouting other types of beans and seeds, such as lentils, alfalfa, and radish seeds. However, the sprouting time and specific requirements may vary depending on the type of bean or seed. It’s always a good idea to research the specific sprouting instructions for each type of bean or seed before you begin.
9. What if my sprouts smell bad?
A foul odor is a sign that your sprouts have gone bad and should not be consumed. This is usually caused by bacterial contamination or mold growth. Discard the entire batch immediately and thoroughly clean your sprouting equipment before attempting to sprout another batch.
10. Can I use tap water for sprouting?
While tap water is generally safe to use for sprouting, it’s best to use filtered or purified water if possible. Tap water can sometimes contain chlorine or other chemicals that may inhibit germination or affect the flavor of the sprouts. If you do use tap water, let it sit for a few hours to allow the chlorine to dissipate before using it for soaking and rinsing.
Leave a Comment