
Mushroom Growing Indoors DIY: Ever dreamt of harvesting fresh, gourmet mushrooms right from your kitchen? Imagine the satisfaction of snipping off plump oyster mushrooms for your stir-fry or adding earthy shiitakes to your homemade ramen, all grown with your own two hands! For centuries, mushroom cultivation has been shrouded in mystery, often associated with ancient practices and specialized knowledge. From the traditional log cultivation methods in East Asia to the modern, controlled environments of commercial farms, the allure of growing these fascinating fungi has captivated people across cultures.
But what if I told you that you don’t need a sprawling farm or a degree in mycology to enjoy the fruits (or rather, fungi!) of your labor? That’s right! This article is your ultimate guide to mushroom growing indoors DIY, demystifying the process and providing you with simple, step-by-step instructions to cultivate your own delicious mushrooms at home. In today’s world, where access to fresh, locally sourced produce is increasingly valued, learning to grow your own mushrooms is not just a fun hobby, it’s a way to connect with nature, reduce your carbon footprint, and enjoy a sustainable source of nutritious food. Plus, it’s incredibly rewarding to witness the magic of mushrooms sprouting from a simple substrate. So, grab your gardening gloves (or not, it’s pretty clean!), and let’s embark on this exciting journey together!
DIY Indoor Mushroom Growing: A Beginner’s Guide
Hey there, fellow fungi enthusiasts! Ever dreamt of harvesting your own delicious mushrooms right in your kitchen? Well, dream no more! I’m going to walk you through a simple and rewarding DIY project: growing mushrooms indoors. It’s easier than you think, and the satisfaction of eating your homegrown mushrooms is unbeatable.
Choosing Your Mushroom Variety
Before we dive in, let’s talk about mushroom types. Not all mushrooms are created equal, and some are much easier to grow indoors than others. For beginners, I highly recommend starting with:
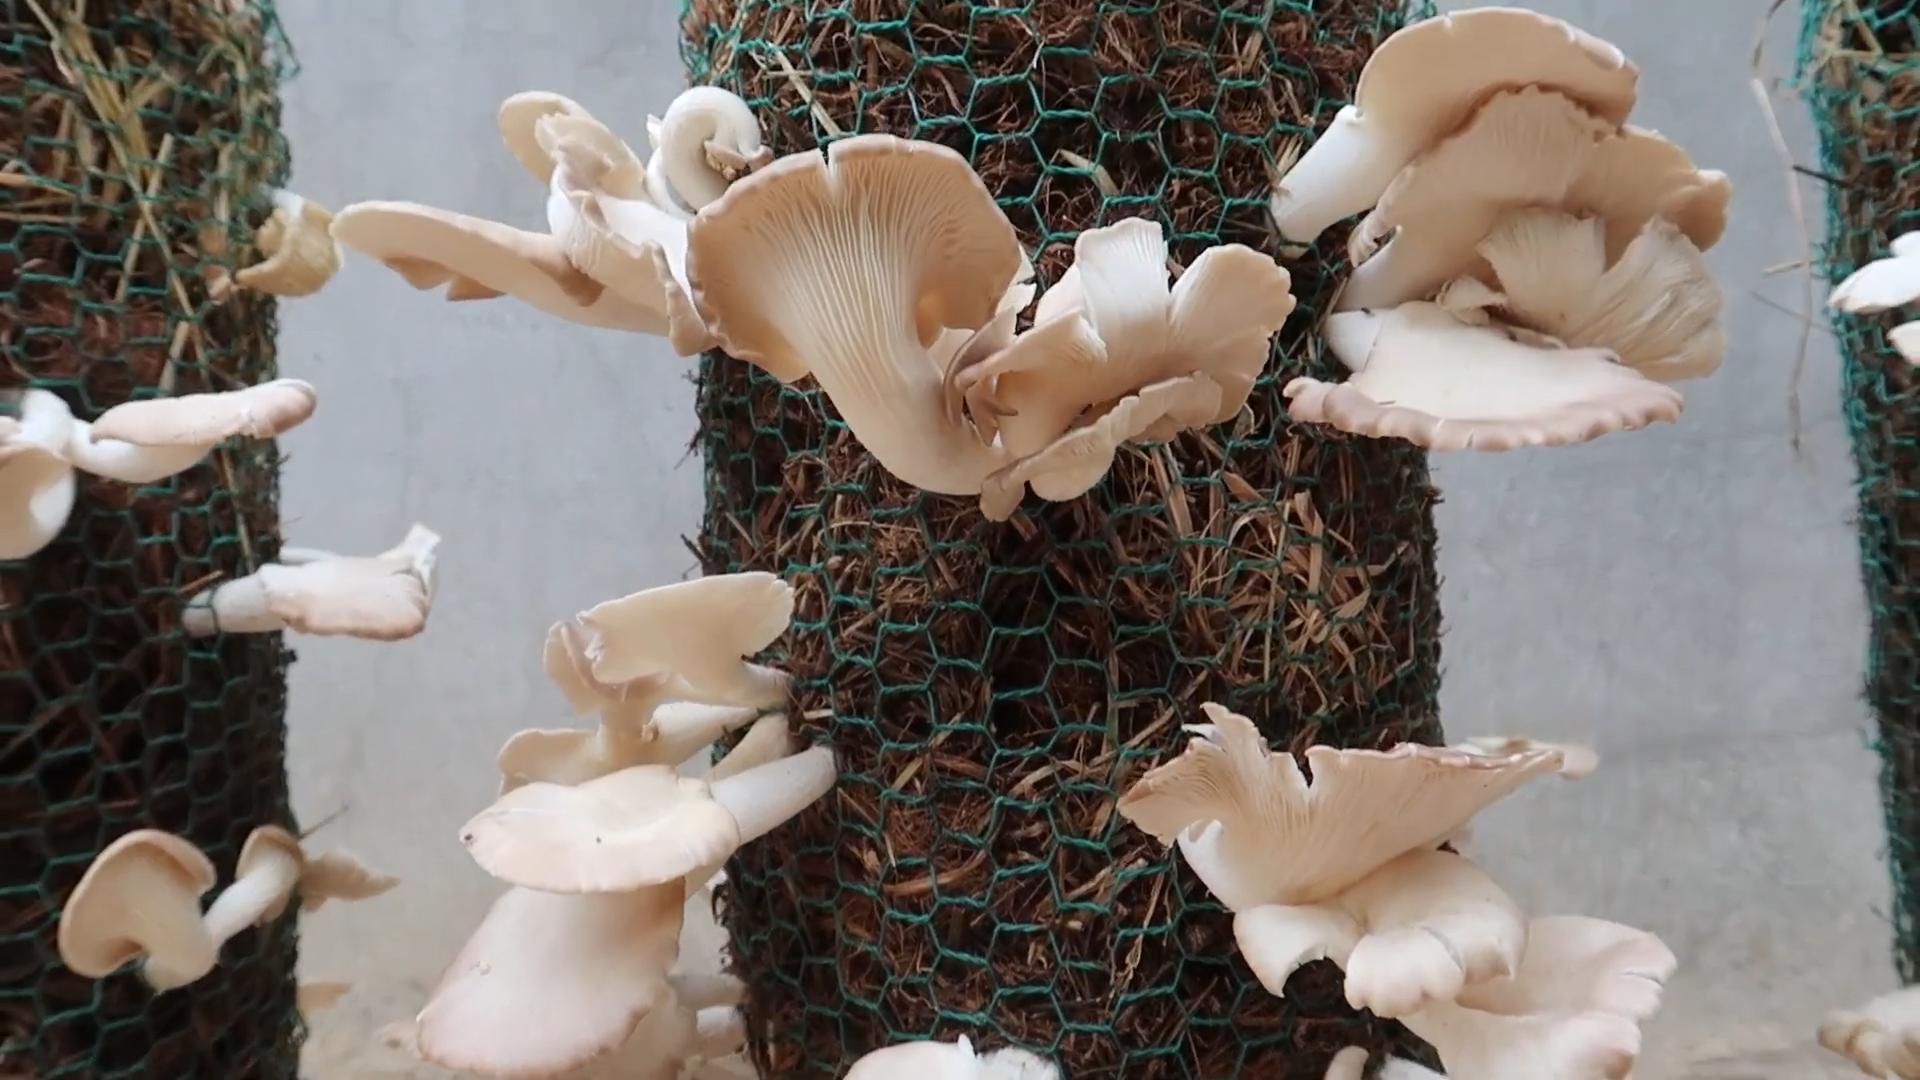
* Oyster Mushrooms (Pleurotus spp.): These are super forgiving, fast-growing, and come in a variety of colors (white, pink, blue, yellow). They thrive on a wide range of substrates.
* Shiitake Mushrooms (Lentinula edodes): A bit more demanding than oysters, but still manageable. They have a rich, savory flavor and are a popular choice.
* Wine Cap Mushrooms (Stropharia rugosoannulata): These are typically grown outdoors in wood chips, but can be adapted for indoor containers. They have a unique, slightly wine-like flavor.
For this guide, I’ll focus primarily on growing oyster mushrooms, as they are the most beginner-friendly.
Gathering Your Supplies
Okay, let’s get our hands dirty! Here’s what you’ll need to get started:
* Mushroom Spawn: This is essentially mushroom “seeds.” You can buy it online or from a local mushroom supplier. Make sure to get the spawn that matches the type of mushroom you want to grow. Grain spawn is a common and easy-to-use option.
* Substrate: This is the material the mushrooms will grow on. For oyster mushrooms, you can use:
* Straw: Readily available and inexpensive. You’ll need to pasteurize it first.
* Coffee Grounds: A great way to recycle! Make sure they are used and cooled.
* Hardwood Sawdust: Works well, but make sure it’s from untreated wood.
* Growing Container: A plastic bucket, tub, or even a large bag will work. Make sure it’s clean and has drainage holes.
* Spray Bottle: For misting the mushrooms to keep them humid.
* Bleach or Hydrogen Peroxide: For sanitizing your equipment.
* Gloves: To keep your hands clean and prevent contamination.
* Optional:
* Humidity Tent: A clear plastic bag or container to create a humid environment.
* Thermometer: To monitor the temperature.
Preparing the Substrate
The substrate needs to be properly prepared to kill off any competing organisms and create a favorable environment for the mushroom spawn.
Pasteurizing Straw (If Using Straw)
1. Chop the Straw: Cut the straw into smaller pieces, about 2-3 inches long. This will make it easier to pack into the container.
2. Heat the Water: Fill a large pot or container with water and heat it to around 160-180°F (71-82°C). You can use a thermometer to monitor the temperature.
3. Soak the Straw: Submerge the straw in the hot water for about 1-2 hours. This will kill off most of the unwanted bacteria and fungi.
4. Drain and Cool: Carefully drain the hot water and let the straw cool down to room temperature. It should be moist but not dripping wet. Squeeze out any excess water.
Using Coffee Grounds
Used coffee grounds are already partially pasteurized by the brewing process. However, I still recommend taking a few precautions:
1. Collect Coffee Grounds: Gather used coffee grounds from your home or a local coffee shop.
2. Cool and Drain: Make sure the coffee grounds are cool and drain off any excess water.
3. Optional: You can microwave the coffee grounds for a few minutes to further sterilize them.
Using Hardwood Sawdust
1. Source Sawdust: Obtain hardwood sawdust from a reliable source, ensuring it’s untreated and free from chemicals.
2. Hydrate Sawdust: Add water to the sawdust until it reaches field capacity. This means it should be moist enough that when you squeeze a handful, only a few drops of water come out.
3. Sterilize Sawdust: Place the hydrated sawdust in autoclavable bags or jars. Sterilize in a pressure cooker at 15 PSI for 90 minutes. Allow to cool completely before using.
Inoculating the Substrate
This is where the magic happens! We’re going to introduce the mushroom spawn to the prepared substrate.
1. Sanitize Your Work Area: Clean your work surface with bleach or hydrogen peroxide to minimize contamination.
2. Mix the Spawn and Substrate: In a clean container, mix the mushroom spawn with the prepared substrate. A good ratio is about 1 part spawn to 10 parts substrate (by weight). Break up the spawn into smaller pieces and distribute it evenly throughout the substrate.
3. Pack the Container: Pack the inoculated substrate into your growing container. Make sure it’s not too tightly packed, as the mushrooms need air to breathe.
4. Create Airflow: If you’re using a bag, poke some small holes in it for ventilation. If you’re using a bucket or tub, make sure there are drainage holes at the bottom.
Incubation
Now, we need to give the mushroom spawn time to colonize the substrate.
1. Find a Suitable Location: Place the container in a dark, humid, and well-ventilated location. The ideal temperature for oyster mushrooms is around 65-75°F (18-24°C).
2. Maintain Humidity: Mist the substrate regularly with a spray bottle to keep it moist. You can also use a humidity tent to help maintain a high humidity level.
3. Monitor Colonization: Over the next few weeks, you should see the white mycelium (the vegetative part of the mushroom) spreading throughout the substrate. This is a good sign!
4. Be Patient: Colonization can take anywhere from 2-4 weeks, depending on the temperature and humidity.
Fruiting
Once the substrate is fully colonized, it’s time to trigger fruiting (the formation of mushrooms).
1. Introduce Light: Move the container to a location with indirect light. Mushrooms don’t need a lot of light, but some light is necessary for fruiting.
2. Increase Ventilation: Increase the airflow around the container. This will help to prevent mold and encourage fruiting.
3. Maintain Humidity: Continue to mist the substrate regularly to keep it moist.
4. Lower Temperature (Optional): Lowering the temperature slightly can also help to trigger fruiting.
5. Watch for Pins: After a few days, you should start to see small mushroom “pins” forming on the surface of the substrate. These are the baby mushrooms!
Harvesting
The moment we’ve been waiting for!
1. Harvest When Mature: Harvest the mushrooms when the caps are fully developed but before they start to drop spores. For oyster mushrooms, this is usually when the edges of the caps start to flatten out.
2. Twist and Pull: Gently twist and pull the mushrooms from the substrate.
3. Enjoy Your Harvest: Cook and enjoy your homegrown mushrooms! They’re delicious in soups, stir-fries, and omelets.
Subsequent Flushes
After harvesting, you can often get multiple “flushes” of mushrooms from the same substrate.
1. Soak the Substrate: After harvesting, soak the substrate in water for a few hours to rehydrate it.
2. Repeat the Fruiting Process: Repeat the fruiting process as described above.
3. Expect Diminishing Returns: Each subsequent flush will likely produce fewer mushrooms than the previous one.
Troubleshooting
Sometimes, things don’t go exactly as planned. Here are some common problems and how to fix them:
* Mold: If you see mold growing on the substrate, it’s usually a sign of contamination. Remove the affected area and try to improve ventilation.
* Slow Colonization: If the mycelium is not spreading, it could be due to low temperature, low humidity, or contamination. Check your conditions and make sure everything is clean.
* No Fruiting: If the substrate is fully colonized but no mushrooms are forming, try increasing ventilation, lowering the temperature, and making sure there is enough light.
* Small Mushrooms: If the mushrooms are small and stunted, it could be due to lack of humidity or nutrients. Mist the substrate more frequently and consider adding some nutrients to the water.
Important Considerations
* Clean

Conclusion
So, there you have it! Growing your own mushrooms indoors is not only achievable but also incredibly rewarding. This DIY mushroom growing method offers a fantastic way to bring fresh, flavorful fungi right into your kitchen, bypassing the grocery store and embracing a more sustainable lifestyle. Forget those pre-packaged, often bland mushrooms – imagine the taste of freshly harvested oyster mushrooms, shiitakes, or even lion’s mane, bursting with flavor and nutrients, all thanks to your own efforts.
This isn’t just about saving money; it’s about connecting with the natural world, learning a new skill, and enjoying the unparalleled satisfaction of nurturing something from start to finish. The process itself is surprisingly simple, requiring minimal space and equipment. You don’t need a sprawling garden or a green thumb of steel. With a little patience and attention to detail, you can transform a dark corner of your home into a thriving mushroom farm.
Why is this DIY mushroom growing trick a must-try? Because it empowers you to control the quality and freshness of your food. You know exactly what goes into your mushrooms – no pesticides, no preservatives, just pure, unadulterated goodness. Plus, it’s a fantastic conversation starter! Imagine serving a dish featuring mushrooms you grew yourself – your friends and family will be amazed.
But the benefits don’t stop there. Growing mushrooms indoors is also an environmentally friendly practice. It reduces your carbon footprint by eliminating the need for transportation and packaging associated with store-bought mushrooms. You’re essentially recycling waste products like coffee grounds and cardboard, turning them into a delicious and nutritious food source.
Ready to experiment? Consider trying different types of mushrooms. Oyster mushrooms are a great starting point due to their ease of cultivation and rapid growth. Shiitakes offer a more complex flavor profile and are slightly more challenging but well worth the effort. For the adventurous, lion’s mane mushrooms are a unique and visually stunning option, known for their potential cognitive benefits. You can also experiment with different substrates. While coffee grounds and cardboard are popular choices, straw, wood chips, and even sawdust can be used, depending on the type of mushroom you’re growing.
Don’t be afraid to tweak the process to suit your specific environment and preferences. Monitor the humidity and temperature closely, and adjust your watering schedule as needed. Remember, every grow is a learning experience.
We wholeheartedly encourage you to give this DIY mushroom growing method a try. It’s a fun, educational, and ultimately delicious adventure. Once you’ve harvested your first batch of homegrown mushrooms, we’d love to hear about your experience! Share your photos, tips, and challenges in the comments below. Let’s build a community of indoor mushroom growers and inspire others to embrace the magic of fungi! Let us know what kind of mushroom growing indoors success you have!
Frequently Asked Questions (FAQ)
What are the best types of mushrooms to grow indoors for beginners?
Oyster mushrooms are generally considered the easiest and most forgiving mushrooms for beginners. They are fast-growing, tolerate a wider range of conditions, and produce abundant yields. Shiitake mushrooms are another good option, although they require a bit more patience and attention to detail. Avoid more demanding varieties like morels or truffles when you’re just starting out.
What kind of substrate should I use for growing mushrooms indoors?
The ideal substrate depends on the type of mushroom you’re growing. Oyster mushrooms thrive on coffee grounds, straw, and cardboard. Shiitakes prefer hardwood sawdust or logs. Lion’s mane can be grown on a variety of substrates, including sawdust, straw, and supplemented hardwood. Make sure your substrate is properly pasteurized or sterilized to eliminate competing molds and bacteria.
How do I pasteurize or sterilize my mushroom substrate?
Pasteurization involves heating the substrate to a temperature that kills most harmful microorganisms without completely eliminating beneficial ones. A common method is to soak the substrate in hot water (around 160-180°F) for 1-2 hours. Sterilization, on the other hand, aims to kill all microorganisms and is typically done using an autoclave or pressure cooker. This is more common for advanced mushroom growers. For beginners using coffee grounds or cardboard for oyster mushrooms, pasteurization is usually sufficient.
How much light do mushrooms need to grow indoors?
Mushrooms don’t need a lot of light. In fact, direct sunlight can be harmful. They primarily need light to trigger pinning (the formation of baby mushrooms). Indirect or ambient light is usually sufficient. A location near a window or a room with artificial lighting is generally adequate.
How do I maintain the proper humidity for growing mushrooms indoors?
Maintaining high humidity is crucial for successful mushroom cultivation. You can achieve this by using a humidity tent, a plastic bag with holes, or a humidifier. Misting the substrate regularly with water is also important. Aim for a humidity level of 80-90%. A hygrometer can help you monitor the humidity levels.
How long does it take to grow mushrooms indoors?
The time it takes to grow mushrooms varies depending on the species and growing conditions. Oyster mushrooms can typically be harvested within 1-2 weeks after pinning. Shiitakes take longer, usually several weeks to months. Be patient and monitor your mushrooms closely.
What are some common problems I might encounter when growing mushrooms indoors?
Common problems include contamination by mold or bacteria, insufficient humidity, and improper temperature. Contamination can be prevented by using sterile techniques and pasteurizing your substrate properly. Humidity can be increased by using a humidity tent or misting regularly. Temperature should be maintained within the optimal range for the specific mushroom species you’re growing.
How do I know when my mushrooms are ready to harvest?
The signs of maturity vary depending on the type of mushroom. Oyster mushrooms are typically ready to harvest when the caps are fully formed and the edges start to curl upwards. Shiitakes are ready when the caps have flattened out and the veils have broken. Harvest your mushrooms before they start to drop spores.
Can I reuse my mushroom substrate after harvesting?
Yes, you can often get multiple flushes (harvests) from the same substrate. After harvesting, soak the substrate in water for a few hours to rehydrate it. Then, place it back in its growing environment and wait for another flush. The subsequent flushes may be smaller than the first. After several flushes, the substrate will become depleted and should be composted.
Is growing mushrooms indoors safe?
Yes, growing edible mushrooms indoors is generally safe, as long as you properly identify the species you are growing and follow safe handling practices. Always wash your hands thoroughly after handling mushrooms and avoid consuming any mushrooms that you are unsure about. Ensure proper ventilation in your growing area to prevent the buildup of spores.
Leave a Comment