
Peanut Planting Guide: Your Path to a Bountiful Harvest!
Have you ever dreamed of strolling through your garden, casually plucking fresh, homegrown peanuts straight from the earth? It’s more achievable than you think! For generations, peanuts have been a staple crop, holding significant cultural importance in cuisines worldwide, particularly in regions of South America and Africa where they originated. From creamy peanut butter to crunchy snacks, this humble legume offers a wealth of culinary possibilities.
But beyond their deliciousness, growing your own peanuts is incredibly rewarding. In this DIY article, I’m going to share my best-kept secrets and easy-to-follow steps in this Peanut Planting Guide, transforming your backyard into a peanut paradise. Many people shy away from growing peanuts, thinking it’s too complicated or requires specialized knowledge. But trust me, with the right guidance, even a beginner gardener can enjoy a successful harvest.
Why should you embark on this peanut-growing adventure? Not only will you have access to fresh, organic peanuts, but you’ll also experience the joy of nurturing a plant from seed to harvest. Plus, peanuts are nitrogen-fixing plants, meaning they naturally enrich your soil, benefiting other plants in your garden. So, grab your gardening gloves, and let’s dive into this comprehensive Peanut Planting Guide and unlock the secrets to growing your own delicious peanuts!
Grow Your Own Peanuts: A Beginner’s Guide to Backyard Peanut Farming!
Hey there, fellow gardening enthusiasts! Ever thought about growing your own peanuts? It’s surprisingly easy and incredibly rewarding. Forget buying those pre-packaged peanuts – imagine the satisfaction of harvesting your own homegrown crop! This guide will walk you through every step, from choosing the right variety to enjoying your freshly roasted harvest. Let’s get our hands dirty!
Choosing the Right Peanut Variety
Before we dive into the planting process, let’s talk about peanut varieties. Not all peanuts are created equal, and some are better suited for certain climates and growing conditions than others. Here’s a quick rundown of some popular choices:
* Virginia Peanuts: These are the large, elongated peanuts you often see roasted in the shell. They require a longer growing season (120-150 days) and are best suited for warmer climates.
* Spanish Peanuts: These are smaller, rounder peanuts with a reddish-brown skin. They have a shorter growing season (100-130 days) and are more tolerant of cooler temperatures. They are also known for their high oil content.
* Runner Peanuts: These are the most commonly grown type of peanut in the United States. They have a uniform size and shape, making them ideal for processing into peanut butter. They have a growing season of around 120-140 days.
* Valencia Peanuts: These peanuts typically have three or more kernels per shell and are known for their sweet flavor. They have a growing season of around 90-110 days, making them a good choice for shorter growing seasons.
Choosing the right variety depends on your climate and what you plan to do with your peanuts. If you live in a warmer region and want large, roasted peanuts, go for Virginia. If you have a shorter growing season or want peanuts for peanut butter, Spanish or Runner varieties might be better choices. I personally love Valencia for their sweetness!
Preparing Your Peanut Patch
Peanuts need a sunny spot with well-drained soil. They thrive in loose, sandy loam, but can tolerate other soil types as long as the drainage is good. Here’s how to get your garden ready:
* Sunlight: Peanuts need at least 6-8 hours of direct sunlight per day. Choose a location that gets plenty of sun throughout the growing season.
* Soil Testing: It’s always a good idea to test your soil before planting anything. A soil test will tell you the pH level and nutrient content of your soil. Peanuts prefer a slightly acidic soil pH of around 6.0 to 6.5.
* Soil Amendment: If your soil is heavy clay or compacted, amend it with organic matter like compost, aged manure, or peat moss. This will improve drainage and aeration. I like to add a generous amount of compost to my peanut patch each year.
* Weed Control: Peanuts don’t compete well with weeds, so it’s important to clear the area of weeds before planting. You can do this by hand-pulling, hoeing, or using a pre-emergent herbicide.
* Fertilizing: Peanuts are legumes, which means they can fix nitrogen from the air. However, they still benefit from a balanced fertilizer. I recommend using a fertilizer with a ratio of 5-10-10 (nitrogen-phosphorus-potassium) at planting time.
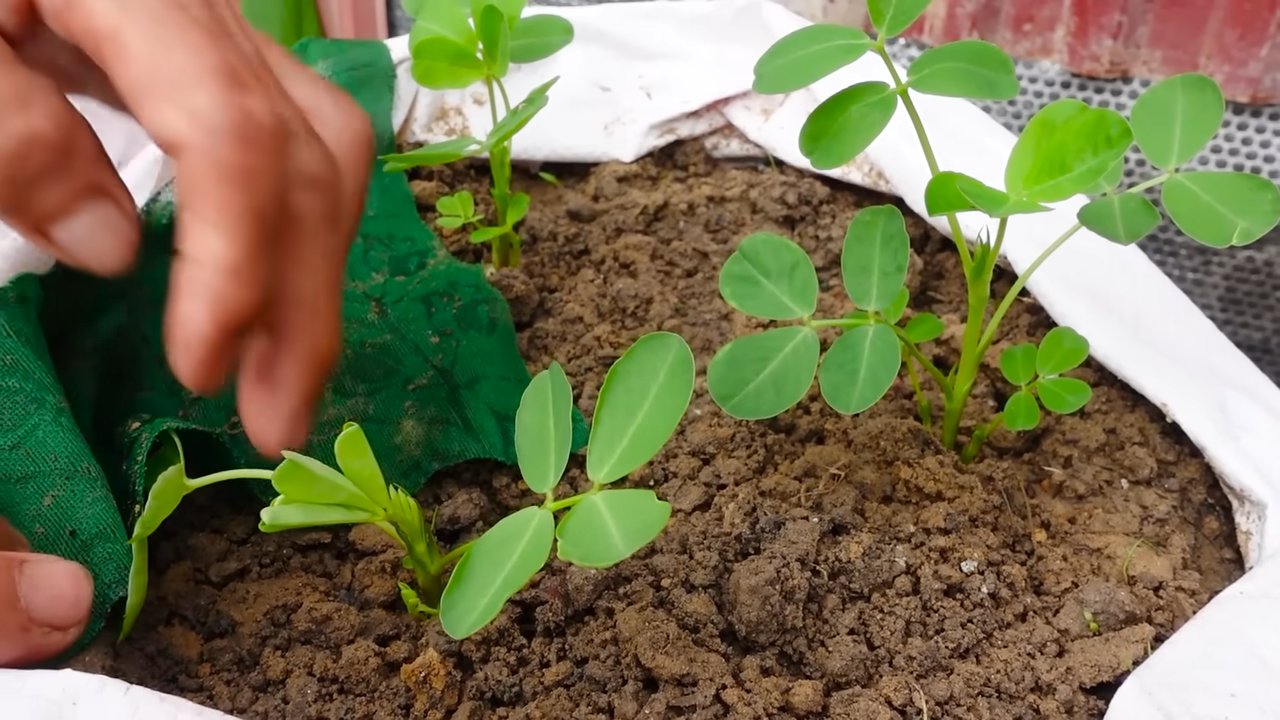
Planting Your Peanut Seeds
Now for the fun part – planting! Here’s a step-by-step guide to getting your peanut seeds in the ground:
1. Timing is Key: Peanuts are warm-weather crops and should be planted after the last frost when the soil temperature has warmed to at least 65°F (18°C). In my area, that’s usually around late May or early June.
2. Prepare the Seeds: You can plant peanuts in the shell or shelled. If you’re planting in the shell, crack the shell gently to help the seed germinate. Soaking the seeds in water for a few hours before planting can also speed up germination.
3. Planting Depth and Spacing: Plant the seeds 1-2 inches deep and 6-8 inches apart in rows that are 2-3 feet apart. This gives the plants enough room to spread out and develop their peanuts.
4. Watering: Water the seeds thoroughly after planting. Keep the soil consistently moist until the seedlings emerge.
5. Mark Your Rows: Use stakes or row markers to identify your peanut rows. This will help you avoid accidentally stepping on or weeding out your peanut plants.
Caring for Your Peanut Plants
Once your peanut plants are established, they’re relatively low-maintenance. Here’s what you need to do to keep them healthy and productive:
* Watering: Water your peanut plants regularly, especially during dry periods. Peanuts need about 1 inch of water per week. Avoid overwatering, as this can lead to fungal diseases.
* Weeding: Keep the area around your peanut plants free of weeds. Weeds compete with peanuts for nutrients and water. Hand-pulling is the best way to remove weeds, as herbicides can damage peanut plants.
* Hilling: As your peanut plants grow, hill the soil around the base of the plants. This encourages the pegs (the stems that produce the peanuts) to enter the soil.
* Fertilizing: Side-dress your peanut plants with a balanced fertilizer about 4-6 weeks after planting. This will provide them with the nutrients they need to produce a good crop of peanuts.
* Pest and Disease Control: Peanuts are susceptible to a few pests and diseases, such as aphids, spider mites, and leaf spot. Monitor your plants regularly and take action if you see any signs of problems. Insecticidal soap or neem oil can be used to control aphids and spider mites. Fungicides can be used to control leaf spot.
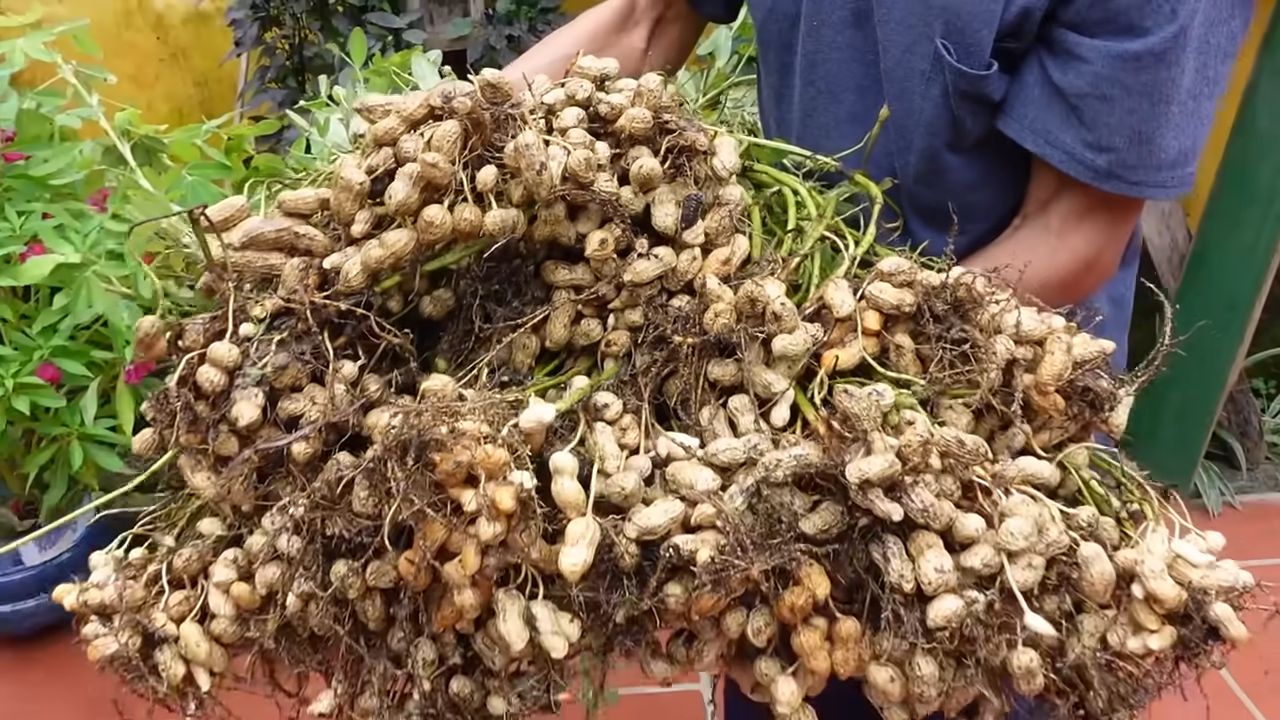
Harvesting Your Peanuts
Harvesting is the most exciting part of growing peanuts! Here’s how to know when it’s time to harvest and how to do it:
1. Timing: Peanuts are typically ready to harvest in the fall, about 120-150 days after planting, depending on the variety. A good indicator is when the leaves start to turn yellow and the plants begin to die back.
2. Test Dig: Before you harvest your entire crop, dig up a few plants to check the peanuts. The peanuts should be mature and the shells should be hard and well-filled.
3. Digging: Use a garden fork or shovel to carefully dig up the peanut plants. Be careful not to damage the peanuts.
4. Shaking: Shake off as much soil as possible from the peanut plants.
5. Drying: Hang the peanut plants upside down in a well-ventilated area to dry for 2-4 weeks. This allows the peanuts to cure and develop their flavor. I usually hang mine in my garage.
6. Picking: Once the peanuts are dry, pick them off the plants.
Curing and Storing Your Peanuts
Proper curing and storage are essential for preserving the quality and flavor of your peanuts.
* Curing: As mentioned earlier, curing involves drying the peanuts on the plants for 2-4 weeks. This reduces the moisture content of the peanuts and prevents them from spoiling.
* Storing: Store your cured peanuts in a cool, dry place in airtight containers. You can store them in the shell or shelled. Shelled peanuts will last longer if stored in the refrigerator or freezer.
Roasting Your Homegrown Peanuts
Now for the best part – enjoying your homegrown peanuts! Here’s how to roast them:
1. Preheat Oven: Preheat your oven to 350°F (175°C).
2. Prepare Peanuts: Spread the peanuts in a single layer on a baking sheet. If you’re roasting peanuts in the shell, you can soak them in salted water for a few hours before roasting for extra flavor.
3. Roasting Time: Roast the peanuts for 20-25 minutes, or until they are golden brown and fragrant. Stir them occasionally to ensure even roasting.
4. Cooling: Let the peanuts cool completely before eating. They will continue to crisp up as they cool.
Enjoy your delicious, homegrown roasted peanuts! You can eat them as a snack, use them in recipes, or give them as gifts.
Troubleshooting Common Peanut Problems
Even with the best care, you might encounter some problems while growing peanuts. Here are a few common issues and how to address them:
* Poor Germination: If your peanut seeds aren’t germinating, it could be due to cold soil, poor-quality seeds, or overwatering. Make sure the soil temperature is warm enough before planting, use fresh seeds, and avoid overwatering.
* Yellowing Leaves: Yellowing leaves can be a sign of nutrient
Conclusion
So, there you have it! This simple yet effective DIY peanut planting guide unlocks the potential for a bountiful harvest right in your own backyard. Forget expensive store-bought peanuts – imagine the satisfaction of snacking on peanuts you nurtured from seed to shell. This isn’t just about saving money; it’s about connecting with nature, understanding the growing process, and enjoying the unparalleled flavor of freshly harvested, homegrown peanuts.
The beauty of this method lies in its adaptability. Feel free to experiment with different peanut varieties to discover your personal favorite. Virginia peanuts, known for their large size, are a classic choice, while Spanish peanuts offer a sweeter, nuttier flavor. Runner peanuts are ideal for peanut butter, and Valencia peanuts are perfect for boiling. Consider your local climate and soil conditions when selecting your variety for optimal results.
Beyond variety, you can also tweak the planting process to suit your specific needs. If you’re short on space, try growing peanuts in large containers. Just ensure the containers have adequate drainage and are filled with a well-draining potting mix. For those with limited sunlight, consider using grow lights to supplement natural light exposure, especially during the early stages of growth.
This DIY peanut planting guide is more than just a set of instructions; it’s an invitation to embark on a rewarding gardening adventure. The process is surprisingly straightforward, even for beginner gardeners, and the results are incredibly gratifying. From the initial planting to the final harvest, you’ll witness the miracle of nature unfold before your eyes.
Don’t be intimidated by the prospect of growing your own peanuts. With a little patience, attention, and the guidance provided here, you’ll be well on your way to enjoying a delicious and sustainable supply of homegrown peanuts. We encourage you to embrace this DIY project and experience the joy of harvesting your own peanuts.
We’re confident that you’ll find this DIY peanut planting guide to be a valuable resource. But the real test is putting it into practice. So, grab your seeds, prepare your soil, and get ready to grow! And most importantly, we want to hear about your experiences. Share your successes, your challenges, and any tips or tricks you discover along the way. Let’s build a community of peanut-growing enthusiasts and learn from each other. Share your photos and stories on social media using #HomegrownPeanuts and inspire others to join the fun. Happy planting!
Frequently Asked Questions (FAQ)
What is the best time to plant peanuts?
The ideal time to plant peanuts is after the last frost in spring, when the soil temperature consistently reaches 65°F (18°C) or higher. Peanuts require warm soil to germinate and thrive. In most regions, this typically falls between April and June. Planting too early in cold soil can lead to poor germination and stunted growth. Check your local weather forecasts and historical data to determine the average last frost date for your area. If you’re unsure, it’s always better to err on the side of caution and wait a week or two after the predicted last frost.
How much space do peanuts need to grow?
Peanuts require adequate spacing to allow for proper growth and development. Generally, you should space peanut plants 6-8 inches apart in rows that are 2-3 feet apart. This spacing allows for sufficient sunlight penetration, air circulation, and room for the peanut plants to spread as they grow. If you’re planting in containers, choose pots that are at least 12 inches in diameter and depth to accommodate the root system. Overcrowding can lead to reduced yields and increased susceptibility to diseases.
What type of soil is best for growing peanuts?
Peanuts thrive in well-drained, sandy loam soil with a slightly acidic to neutral pH (6.0-7.0). Sandy loam soil provides good drainage, which is essential for preventing root rot and other soilborne diseases. The soil should also be loose and friable to allow the peanut pegs (the structures that develop into peanuts) to easily penetrate the soil. Avoid heavy clay soils, as they can become waterlogged and compacted, hindering peanut development. If you have clay soil, amend it with organic matter, such as compost or well-rotted manure, to improve drainage and aeration.
How often should I water my peanut plants?
Peanut plants require consistent moisture, especially during germination and early growth. Water deeply and regularly, ensuring the soil remains consistently moist but not waterlogged. Avoid overhead watering, as it can promote fungal diseases. Instead, water at the base of the plants. As the peanuts mature, you can gradually reduce watering frequency, but be sure to monitor the soil moisture levels and water when the top inch of soil feels dry. During periods of drought, more frequent watering may be necessary.
How long does it take for peanuts to mature?
Peanuts typically take 120-150 days to mature, depending on the variety and growing conditions. The exact time frame can vary depending on factors such as temperature, sunlight, and soil fertility. You’ll know your peanuts are ready to harvest when the foliage begins to yellow and the inner shells of the peanuts turn brown. You can also dig up a few plants to check the maturity of the peanuts. If the peanuts are plump and the shells are well-formed, it’s time to harvest.
What are some common pests and diseases that affect peanut plants?
Peanut plants can be susceptible to various pests and diseases, including aphids, spider mites, leafhoppers, white mold, and leaf spot. Regularly inspect your plants for signs of infestation or disease. If you detect any problems, take action promptly to prevent them from spreading. Organic pest control methods, such as insecticidal soap or neem oil, can be effective for controlling aphids and spider mites. To prevent fungal diseases, ensure good air circulation around the plants and avoid overhead watering. Crop rotation and the use of disease-resistant varieties can also help minimize disease problems.
How do I harvest peanuts?
Harvesting peanuts involves digging up the entire plant, including the peanuts attached to the roots. Use a garden fork or shovel to carefully lift the plants from the soil, being careful not to damage the peanuts. Gently shake off any excess soil and allow the plants to dry in the sun for several days. This process, known as curing, helps to reduce moisture content and improve the flavor of the peanuts. Once the peanuts are dry, you can remove them from the plants and store them in a cool, dry place.
Can I grow peanuts in containers?
Yes, peanuts can be successfully grown in containers, making them a great option for gardeners with limited space. Choose containers that are at least 12 inches in diameter and depth to provide adequate room for the root system. Use a well-draining potting mix and ensure the containers have drainage holes to prevent waterlogging. Water regularly and fertilize as needed. Container-grown peanuts may require more frequent watering and fertilization than those grown in the ground.
How do I store harvested peanuts?
Proper storage is essential for preserving the quality and flavor of harvested peanuts. After curing, remove the peanuts from the plants and store them in a cool, dry, and well-ventilated place. You can store peanuts in their shells or shelled. Shelled peanuts should be stored in airtight containers to prevent them from becoming rancid. Properly stored peanuts can last for several months. You can also freeze peanuts for longer-term storage.
Leave a Comment