
Radish harvest small garden success is within your reach, even if you think you don’t have the space! Have you ever dreamed of plucking vibrant, peppery radishes straight from your own backyard, but felt limited by a tiny garden or even just a balcony? I’m here to tell you that dream can absolutely become a reality. This isn’t just another gardening article; it’s your personalized guide to maximizing your radish yield in even the most compact spaces.
Radishes have a surprisingly rich history, dating back to ancient Egypt, where they were a staple food. They were even used as currency! Today, while we might not be trading them for goods, their value as a quick-growing, nutritious, and delicious crop remains undeniable. But let’s face it, sometimes getting a decent radish harvest small garden can feel like a challenge. You might end up with tiny, underdeveloped roots, or worse, nothing at all!
That’s where these DIY tricks and hacks come in. I’m going to share my secrets to ensure you get a bountiful harvest, no matter how limited your space. We’ll cover everything from choosing the right radish varieties for containers to optimizing your soil and watering techniques. Get ready to transform your small garden into a radish-producing powerhouse!
Harvesting Radishes Like a Pro (Even in a Tiny Garden!)
Okay, so you’ve poured your heart and soul (and maybe a little sweat) into growing radishes in your small garden. Now comes the fun part: harvesting! But before you just start yanking things out of the ground, let’s talk about how to do it right. Harvesting radishes at the perfect time ensures you get that crisp, peppery flavor we all crave, and prevents them from becoming woody or overly spicy. Trust me, I’ve been there – nobody wants a radish that tastes like it’s been sitting in the sun for a week!
Here’s my guide to harvesting radishes, even if you’re working with a postage-stamp-sized garden.
Knowing When to Harvest: The Radish Whisperer
The key to a perfect radish harvest is timing. Radishes are fast growers, which is awesome, but it also means they can quickly go from delicious to disappointing if you’re not paying attention.
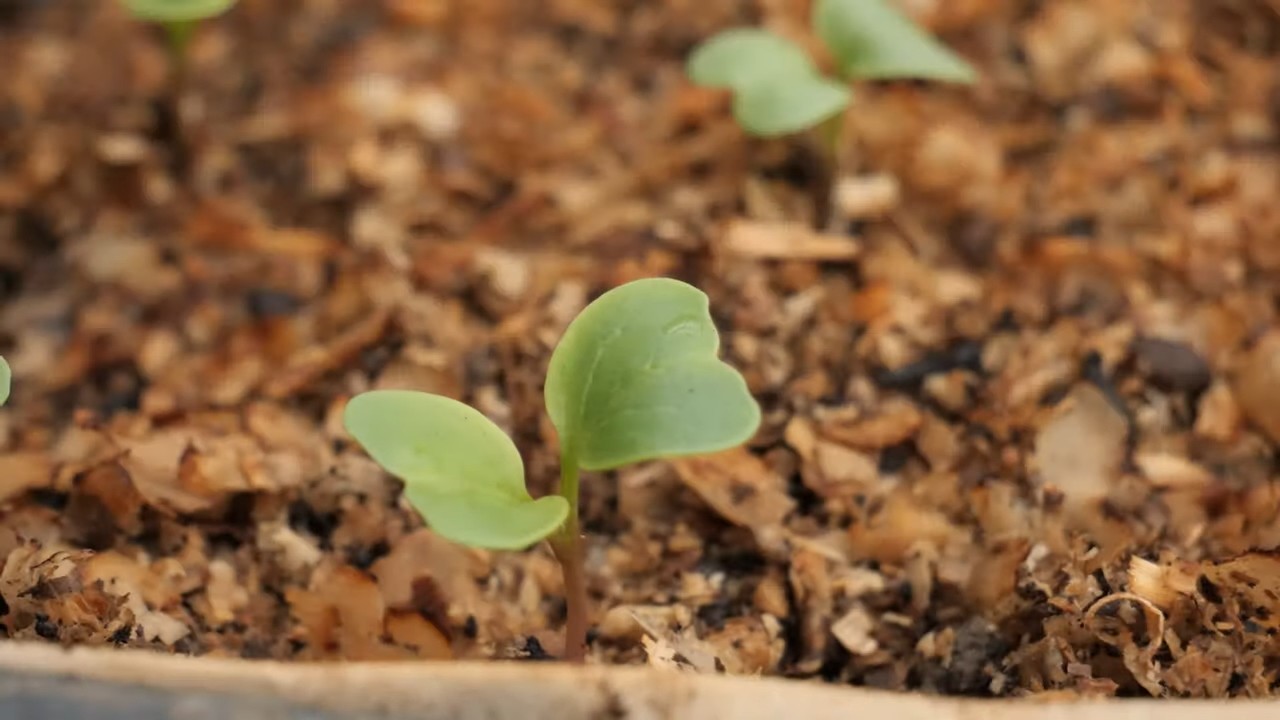
* Check Your Seed Packet: This is your first clue! Most radish varieties mature in 20-30 days. Jot down the planting date and count forward.
* Look at the Shoulders: The “shoulder” is the part of the radish that’s peeking out of the soil. If you see a good-sized, round shoulder (about 1 inch in diameter for most common varieties), it’s likely ready.
* Feel the Soil: Gently brush away a little soil around the base of a radish. If it looks plump and round, you’re in business.
* Don’t Wait Too Long: This is crucial! Overripe radishes get tough, woody, and overly spicy. It’s better to harvest a little early than too late.
* Succession Planting is Your Friend: Plant radishes every week or two for a continuous harvest. This way, you’ll always have fresh radishes ready to go.
Tools You’ll Need (Keep it Simple!)
You don’t need a fancy arsenal of gardening tools for this. Here’s what I usually grab:
* Gardening Gloves: Protect your hands from dirt and any potential irritants.
* Small Trowel or Fork (Optional): Helpful if your soil is compacted or if you’re having trouble pulling the radishes.
* Bucket or Basket: For collecting your bounty!
* Water Hose or Bucket of Water: For washing the radishes.
The Harvesting Process: Step-by-Step
Alright, let’s get those radishes out of the ground!
1. Loosen the Soil (If Needed): If your soil is hard or compacted, use a small trowel or fork to gently loosen the soil around the radish. Be careful not to damage the radish itself. I usually skip this step unless the soil is really tough.
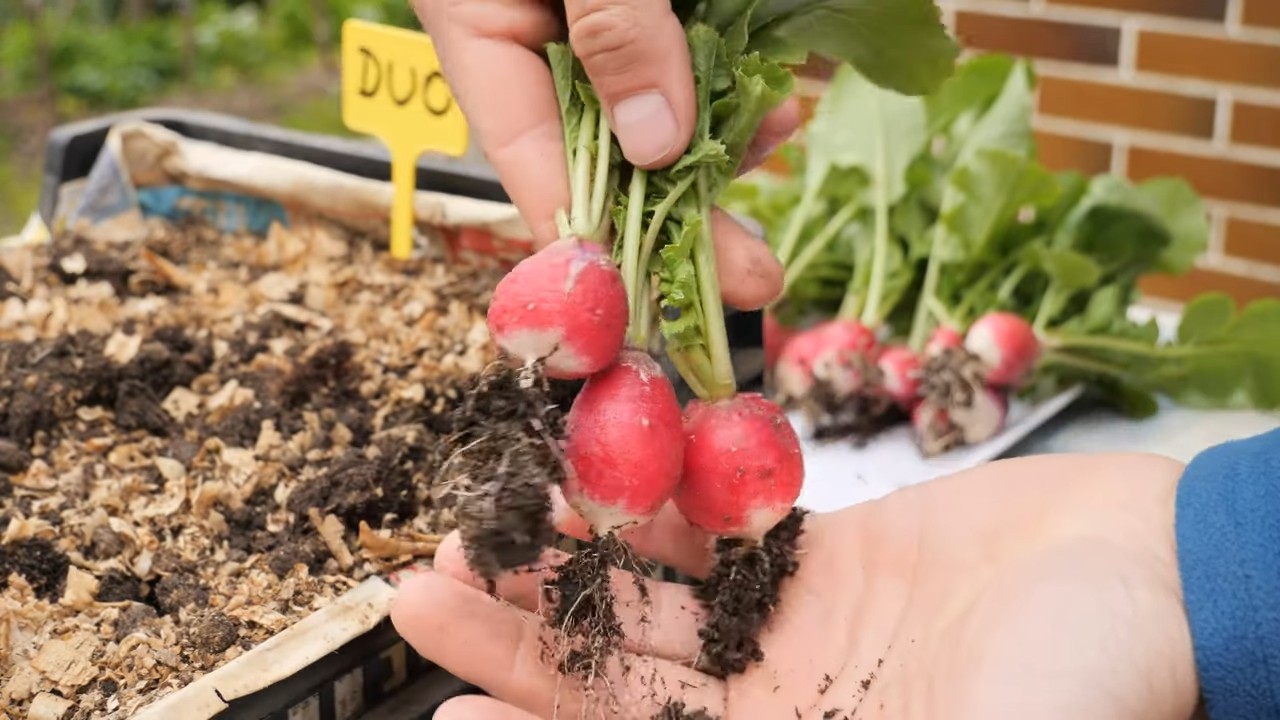
2. Grasp the Greens: Grab the radish greens (the leafy tops) close to the base of the radish.
3. Pull Gently but Firmly: Pull straight up with a steady, even motion. Don’t yank! You want to avoid breaking the radish or leaving part of it in the ground.
4. If It Resists, Wiggle It: If the radish is being stubborn, gently wiggle it back and forth while pulling. This helps to loosen the roots.
5. Use the Trowel (If Still Stuck): If you’re still having trouble, use your trowel to carefully dig around the radish and loosen the soil. Then, try pulling again.
6. Inspect Your Harvest: Check each radish for any signs of damage, like cracks or insect holes. Discard any damaged radishes.
7. Repeat! Continue harvesting the radishes that are ready, leaving the smaller ones to grow a bit longer.
8. Wash Your Radishes: Rinse the radishes thoroughly with water to remove any dirt. I like to use a hose with a gentle spray nozzle.
9. Trim the Greens (Optional): You can trim the greens to about an inch above the radish. Radish greens are edible and can be used in salads or stir-fries! I usually keep them on for a few days if I’m planning to eat them soon, but trim them off for longer storage.
10. Store Properly: Store your radishes in the refrigerator in a plastic bag or container. They’ll stay fresh for about a week. If you’ve left the greens on, they’ll wilt faster, so it’s best to use them within a few days.
Dealing with Common Radish Problems During Harvest
Sometimes, things don’t go exactly as planned. Here are a few common radish problems you might encounter during harvest and how to deal with them:
* Radishes are Cracked: This is usually caused by inconsistent watering. Try to keep the soil consistently moist, especially during hot weather.
* Radishes are Woody: This means you waited too long to harvest. Harvest radishes when they’re the right size, and don’t let them sit in the ground for too long.
* Radishes are Too Spicy: This can be caused by hot weather or dry soil. Make sure to water your radishes regularly, especially during hot spells. Some varieties are also naturally spicier than others.
* Radishes are Small: This could be due to overcrowding, poor soil, or not enough sunlight. Thin your radishes to give them enough space to grow, and make sure they’re getting at least 6 hours of sunlight per day. Amend your soil with compost or other organic matter to improve its fertility.
* Pests and Diseases: Keep an eye out for pests like flea beetles or diseases like white rust. Treat any problems promptly to prevent them from affecting your harvest.
What to Do With All Those Radishes!
Okay, you’ve got a basket full of beautiful radishes. Now what? Here are a few of my favorite ways to enjoy them:
* Eat Them Raw: This is the simplest and most classic way to enjoy radishes. Slice them thinly and add them to salads, sandwiches, or crudité platters.
* Roast Them: Roasting radishes mellows out their flavor and makes them surprisingly sweet. Toss them with olive oil, salt, and pepper, and roast them in a 400°F oven for about 20 minutes.
* Pickle Them: Pickled radishes are a tangy and delicious addition to tacos, sandwiches, or salads.
* Make Radish Top Pesto: Don’t throw away those radish greens! They can be used to make a delicious and peppery pesto.
* Add Them to Stir-Fries: Radishes add a nice crunch and peppery flavor to stir-fries.
* Radish and Butter Sandwiches: A classic French snack! Spread butter on a baguette, top with thinly sliced radishes and a sprinkle of sea salt. Simple and delicious.
Extending Your Radish Season
Want to enjoy fresh radishes for as long as possible? Here are a few tips for extending your radish season:
* Succession Planting: As mentioned earlier, plant radishes every week or two for a continuous harvest.
* Choose Different Varieties: Some radish varieties are better suited for cool weather, while others can tolerate warmer temperatures. Experiment with different varieties to find the ones that work best in your climate.
* Use Row Covers: Row covers can protect your radishes from frost in the spring and from excessive heat in the summer.
* Plant in the Fall: Radishes can also be planted in the fall for a late-season harvest.
Final Thoughts
Harvesting radishes is a quick and rewarding experience, especially when you get it right. By paying attention to the signs and following these simple steps, you’ll be enjoying fresh, delicious radishes from your small garden in no time. Happy gardening!
Conclusion
So, there you have it! Transforming your radish harvest from a potential glut into a delightful array of culinary treasures is not only achievable but surprisingly simple. This DIY trick, focusing on maximizing the use of your small garden’s bounty, is a game-changer for any home gardener, especially those working with limited space. No longer will you be faced with the dilemma of radishes going to waste or struggling to find ways to incorporate them into every meal.
This method, centered around pickling, roasting, and utilizing radish greens, offers a multifaceted approach to radish preservation and enjoyment. The pickling process extends the shelf life of your radishes significantly, allowing you to savor their peppery bite long after the harvest season has ended. Roasted radishes, on the other hand, offer a surprisingly sweet and mellow flavor profile, a stark contrast to their raw sharpness. And let’s not forget the radish greens! These often-overlooked leaves are packed with nutrients and can be used in salads, stir-fries, or even pesto, adding a vibrant green boost to your diet.
Why is this DIY trick a must-try? Because it empowers you to make the most of your hard work in the garden. It minimizes waste, maximizes flavor, and provides you with a versatile ingredient that can be used in countless dishes. It’s a sustainable and satisfying way to connect with your food and appreciate the fruits (or rather, roots and leaves!) of your labor.
Variations and Suggestions:
* Spice it up! When pickling, experiment with different spices like mustard seeds, coriander seeds, or even a pinch of red pepper flakes for an extra kick.
* Herb Infusion: Add fresh herbs like dill, thyme, or rosemary to your pickling brine for a more complex flavor profile.
* Roasting Remix: Toss your radishes with different herbs and spices before roasting. Garlic powder, onion powder, paprika, or even a touch of maple syrup can create delicious variations.
* Green Goodness: Don’t be afraid to experiment with radish greens in different recipes. Try adding them to your favorite soup, omelet, or even blending them into a smoothie for a nutrient boost.
* Radish Top Pesto: Blend radish greens with garlic, parmesan cheese, pine nuts (or walnuts), and olive oil for a unique and flavorful pesto.
* Fermented Radishes: Explore the world of fermentation by making fermented radishes. This process not only preserves the radishes but also adds beneficial probiotics to your diet.
We wholeheartedly encourage you to try this DIY trick with your next radish harvest. It’s a simple, effective, and rewarding way to make the most of your garden’s bounty. We’re confident that you’ll be amazed at the versatility and deliciousness of radishes when you explore these different preparation methods.
Don’t just take our word for it! Get your hands dirty, experiment with different flavors, and discover your own favorite ways to enjoy your radish harvest. And most importantly, share your experiences with us! We’d love to hear about your successes, your variations, and any tips or tricks you discover along the way. Let’s build a community of radish enthusiasts and celebrate the joys of homegrown goodness. Share your photos and recipes on social media using #RadishHarvestDIY and let’s inspire others to make the most of their small garden harvests. Happy gardening and happy eating!
FAQ
Q: How long will pickled radishes last?
A: Properly pickled radishes, stored in a sterilized jar in the refrigerator, can last for several months, typically up to 2-3 months. The key is to ensure the radishes are fully submerged in the brine and that the jar is properly sealed. Always check for any signs of spoilage, such as mold or an off odor, before consuming. If you notice anything unusual, discard the radishes.
Q: Can I use any type of vinegar for pickling?
A: While you can technically use different types of vinegar, white vinegar or apple cider vinegar are generally recommended for pickling radishes. White vinegar provides a clean, neutral flavor that allows the radish’s natural taste to shine through. Apple cider vinegar adds a slightly sweeter and more complex flavor. Avoid using vinegars with strong flavors, such as balsamic vinegar, as they can overpower the delicate taste of the radishes.
Q: What’s the best way to store roasted radishes?
A: Roasted radishes are best enjoyed immediately, as they tend to lose their crispness over time. However, if you have leftovers, you can store them in an airtight container in the refrigerator for up to 3-4 days. Reheat them in a skillet or oven to restore some of their warmth and flavor. Keep in mind that they will be softer than when they were freshly roasted.
Q: Are radish greens safe to eat?
A: Yes, radish greens are perfectly safe to eat and are actually quite nutritious! They have a peppery flavor similar to the radishes themselves. Make sure to wash them thoroughly before using them in salads, stir-fries, or other dishes. If you find the flavor too strong, you can blanch them briefly in boiling water to mellow it out.
Q: My radish greens are a bit bitter. Is there anything I can do?
A: Bitterness in radish greens can be influenced by factors like the age of the greens and growing conditions. To reduce bitterness, try these tips:
* Harvest young greens: Younger greens tend to be less bitter than older ones.
* Blanch the greens: Briefly blanching the greens in boiling water for 1-2 minutes can help to reduce bitterness.
* Pair with acidic ingredients: Adding acidic ingredients like lemon juice or vinegar to your dish can help to balance out the bitterness.
* Cook the greens: Cooking the greens can also help to mellow out the flavor.
Q: Can I freeze radishes?
A: Freezing radishes is not generally recommended, as they tend to become mushy and lose their texture when thawed. However, if you’re planning to use them in cooked dishes like soups or stews, you can freeze them after blanching them for a few minutes. Keep in mind that the texture will still be affected. Pickled radishes can be stored for longer periods of time.
Q: What are some other ways to use my radish harvest?
A: Beyond pickling, roasting, and using the greens, here are a few more ideas:
* Radish and Butter Sandwiches: A classic French snack – thinly sliced radishes with butter and sea salt on crusty bread.
* Radish Salsa: Dice radishes and combine them with tomatoes, onions, cilantro, lime juice, and jalapeno for a refreshing salsa.
* Radish Slaw: Shred radishes and mix them with shredded cabbage, carrots, and a creamy dressing for a crunchy slaw.
* Radish Soup: Use radishes as a base for a creamy and flavorful soup.
* Radish Juice: Juice radishes along with other vegetables and fruits for a healthy and refreshing drink.
Q: How do I know when my radishes are ready to harvest?
A: Radishes are typically ready to harvest about 3-4 weeks after planting. The exact timing will depend on the variety and growing conditions. Look for radishes that are about 1 inch in diameter. You can gently brush away the soil around the base of the plant to check the size of the radish. If they’re ready, they should easily pull out of the ground.
Q: What if my radishes are cracking?
A: Radish cracking is often caused by inconsistent watering. Radishes need consistent moisture to grow properly. If the soil dries out and then is suddenly saturated with water, the radishes can swell too quickly and crack. To prevent cracking, water your radishes regularly and consistently, especially during hot and dry weather.
Q: How can I prevent pests from attacking my radish plants?
A: Several pests can attack radish plants, including flea beetles, root maggots, and aphids. Here are some tips for preventing pest problems:
* Use row covers: Row covers can protect your radish plants from pests.
* Companion planting: Plant radishes near plants that repel pests, such as marigolds or nasturtiums.
* Rotate crops: Avoid planting radishes in the same spot year after year, as this can attract pests.
* Handpick pests: If you see any pests on your radish plants, handpick them off and dispose of them.
* Use organic pest control methods: If necessary, use organic pest control methods, such as insecticidal soap or neem oil.
Leave a Comment