
Radish Planting Beginners Guide: Ready to add a burst of peppery flavor to your plate, straight from your backyard? I’m so excited to share this simple yet rewarding journey into the world of radish cultivation! For centuries, radishes have been a staple in gardens across the globe, from ancient Egypt to modern-day kitchen gardens. Their quick growth and vibrant colors have made them a favorite among gardeners of all skill levels.
But let’s be honest, sometimes getting started can feel a little daunting. Maybe you’ve tried growing radishes before and ended up with tiny, bitter roots, or perhaps you’re a complete newbie, unsure where to even begin. That’s where this DIY guide comes in! I’m here to demystify the process and provide you with easy-to-follow tips and tricks that will guarantee a bountiful harvest.
Why do you need this guide? Because fresh, homegrown radishes are simply unbeatable! They offer a crisp, spicy kick that store-bought varieties often lack. Plus, growing your own food is incredibly satisfying and empowering. With this radish planting beginners guide, you’ll learn everything you need to know to successfully grow these delightful root vegetables, even if you have limited space or experience. Get ready to enjoy the taste of success – and delicious radishes – in just a few short weeks!
Planting Radishes: A Beginner’s Guide to Crunchy Success
Hey there, fellow gardening enthusiasts! I’m so excited you’re diving into the world of radish growing. Radishes are fantastic because they’re super quick to mature, making them incredibly rewarding for beginner gardeners. Plus, they add a peppery zing to salads and are delicious pickled or even roasted! This guide will walk you through everything you need to know to grow your own bumper crop of radishes.
Choosing Your Radish Varieties
First things first, let’s talk about radish varieties. There’s more to radishes than just the classic red globe!
* **Cherry Belle:** This is your classic, round, bright red radish. It’s reliable and matures quickly.
* **French Breakfast:** These are elongated, red radishes with a white tip. They have a milder flavor than some other varieties.
* **Easter Egg:** A mix of radishes in different colors – red, pink, purple, and white. A fun choice for kids (and adults!).
* **Black Spanish:** A larger, black-skinned radish with a strong, pungent flavor. These take a bit longer to mature.
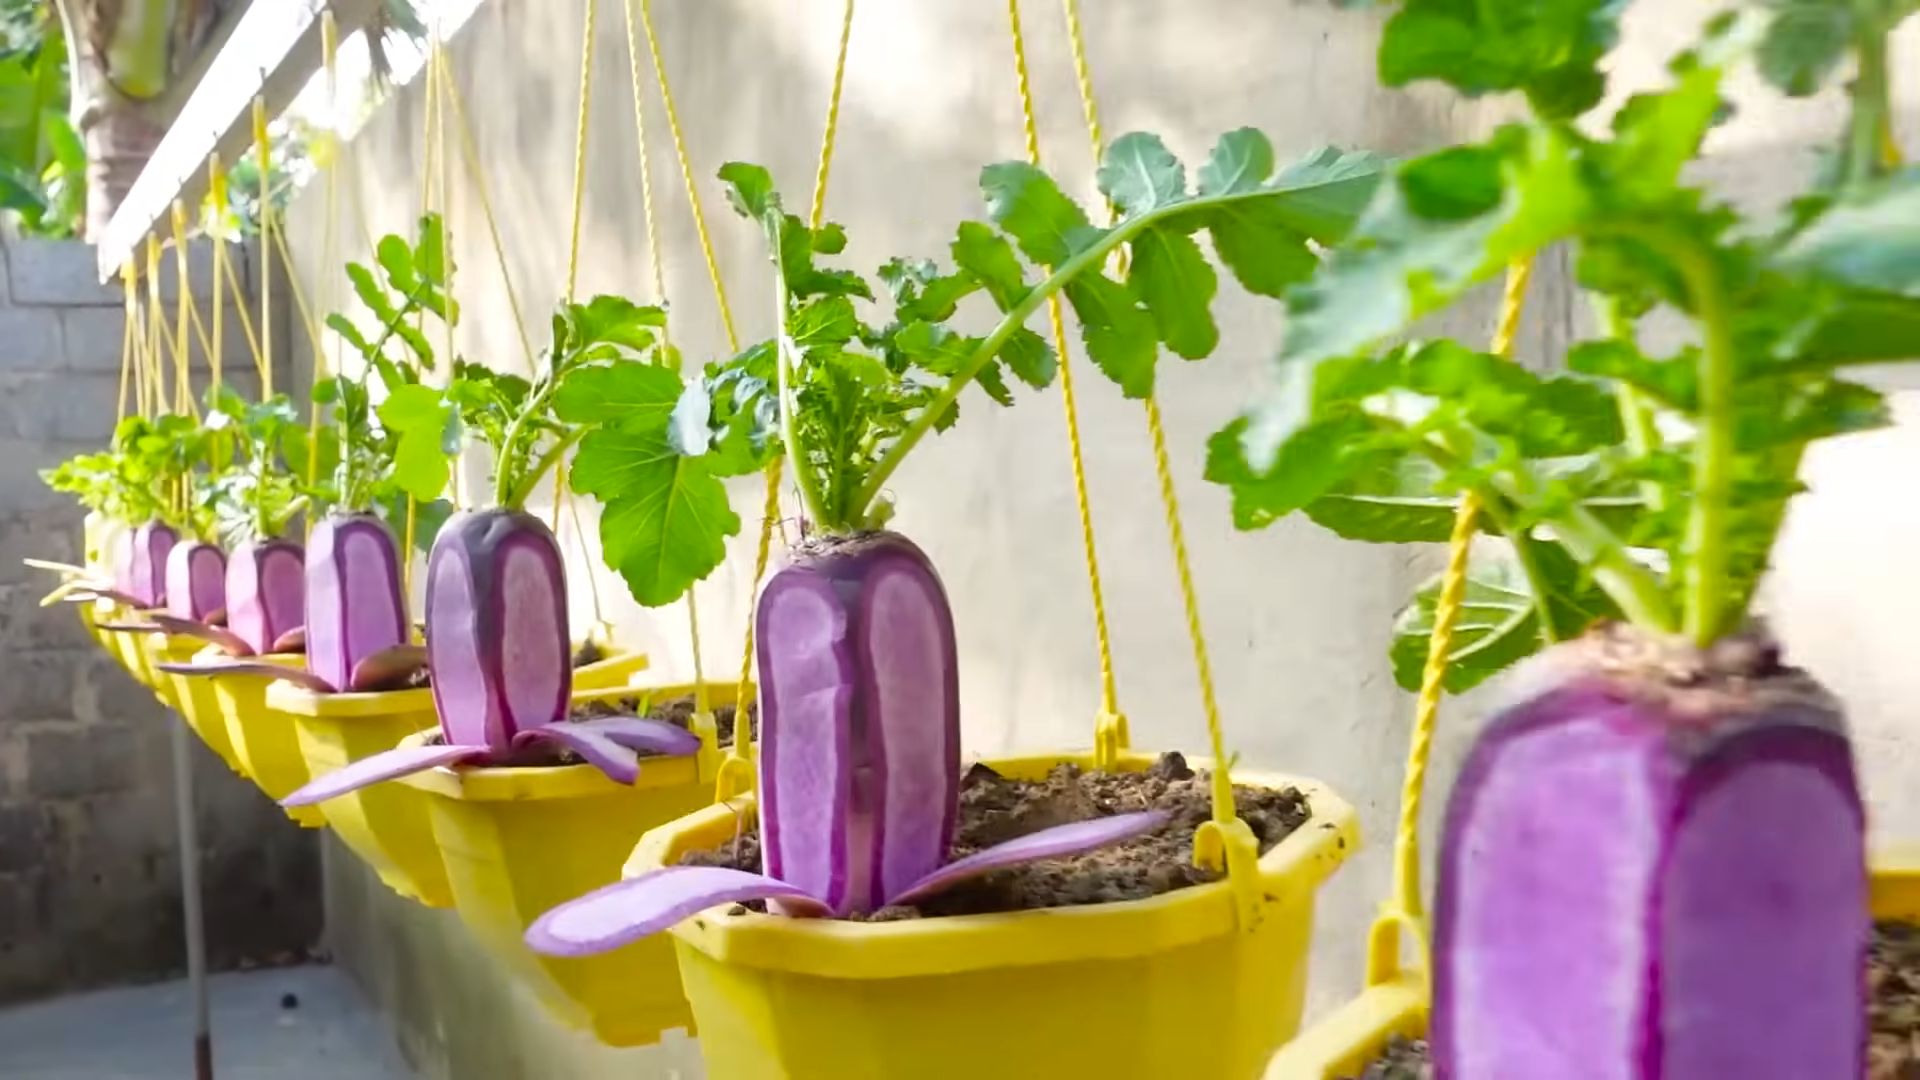
* **Watermelon Radish:** Don’t let the name fool you; it doesn’t taste like watermelon! It has a green exterior and a beautiful pink interior, with a mild, slightly sweet flavor.
I recommend starting with Cherry Belle or French Breakfast if you’re a beginner. They’re easy to grow and have a pleasant flavor.
Preparing the Soil
Radishes need loose, well-drained soil to thrive. If your soil is compacted or heavy clay, they’ll struggle to form nice, round roots.
* **Soil Testing:** Ideally, you should test your soil to determine its pH and nutrient levels. Radishes prefer a slightly acidic to neutral pH (around 6.0 to 7.0). You can get a soil testing kit at most garden centers or online.
* **Amending the Soil:** Based on your soil test results (or even without one, as a general precaution), amend your soil with compost or well-rotted manure. This will improve drainage, add nutrients, and create a looser soil structure. I usually add a couple of inches of compost to my radish beds.
* **Removing Rocks and Debris:** Radishes need to grow straight down, so remove any rocks, sticks, or other debris from the planting area. This will prevent them from becoming misshapen.
* **Tilling or Digging:** Loosen the soil to a depth of at least 6 inches. You can use a tiller for larger areas or a garden fork for smaller beds. Break up any large clumps of soil.
* **Raking:** Rake the soil smooth to create a level planting surface.
Planting Your Radish Seeds
Radishes are cool-season crops, meaning they grow best in cooler temperatures.
* **Timing:** Plant radish seeds in early spring or late summer/early fall. In the spring, plant as soon as the soil can be worked. For a fall harvest, plant about 4-6 weeks before the first expected frost. I usually aim for planting in March/April for a spring harvest and August/September for a fall harvest.
* **Succession Planting:** To enjoy a continuous harvest of radishes, plant a new batch of seeds every 1-2 weeks. This is called succession planting.
* **Spacing:** Radish seeds should be planted about ½ inch deep and 1 inch apart. If you’re planting in rows, space the rows about 6 inches apart.
* **Sowing the Seeds:** Create shallow furrows in the soil. Sprinkle the seeds evenly into the furrows. Cover the seeds with soil and gently pat down.
* **Watering:** Water the planting area thoroughly after sowing the seeds. Keep the soil consistently moist until the seeds germinate.
**Step-by-Step Planting Instructions:**
1. **Gather your supplies:** You’ll need radish seeds, a garden trowel or hoe, a watering can or hose, and compost (optional).
2. **Prepare the soil:** Follow the steps outlined in the “Preparing the Soil” section above.
3. **Create furrows:** Use your trowel or hoe to create shallow furrows in the soil, about ½ inch deep.
4. **Sow the seeds:** Sprinkle the radish seeds evenly into the furrows, spacing them about 1 inch apart.
5. **Cover the seeds:** Gently cover the seeds with soil.
6. **Pat down the soil:** Lightly pat down the soil to ensure good contact between the seeds and the soil.
7. **Water thoroughly:** Water the planting area thoroughly with a watering can or hose.
Caring for Your Radishes
Radishes are relatively low-maintenance, but here are a few things you can do to help them thrive:
* **Watering:** Keep the soil consistently moist, especially during hot, dry weather. Radishes need plenty of water to develop properly. Aim for about 1 inch of water per week.
* **Thinning:** Once the seedlings emerge, thin them to about 2 inches apart. This will give them enough space to grow. Use small scissors to snip off the unwanted seedlings at the soil line. Don’t pull them out, as this can disturb the roots of the remaining plants.
* **Weeding:** Keep the planting area free of weeds. Weeds compete with radishes for water and nutrients. Hand-pull weeds carefully to avoid disturbing the radish roots.
* **Fertilizing:** Radishes don’t need a lot of fertilizer. If your soil is poor, you can side-dress them with a balanced fertilizer a few weeks after they emerge. Follow the instructions on the fertilizer package. I usually just rely on the compost I added to the soil.
* **Pest Control:** Radishes are generally pest-resistant, but they can sometimes be bothered by flea beetles or root maggots.
* **Flea Beetles:** These tiny beetles chew small holes in the leaves. You can control them with insecticidal soap or by covering the plants with row covers.
* **Root Maggots:** These are the larvae of flies that feed on the roots of radishes. You can prevent them by covering the plants with row covers or by using a soil drench containing beneficial nematodes.
Harvesting Your Radishes
This is the best part! Radishes are ready to harvest in as little as 3-4 weeks after planting, depending on the variety.
* **Timing:** Harvest radishes when they reach the desired size. Check the seed packet for the expected size of your chosen variety. Don’t let them get too big, as they can become woody and bitter.
* **Harvesting Technique:** Gently pull the radishes from the soil. If the soil is dry, you may need to loosen it with a garden fork first.
* **Storage:** Remove the greens from the radishes and store them in a plastic bag in the refrigerator. They should keep for about a week. The greens can also be eaten! They’re delicious in salads or sautéed.
**Step-by-Step Harvesting Instructions:**
1. **Check for readiness:** Gently brush away some soil around the base of a radish to check its size. Compare it to the expected size for your variety.
2. **Loosen the soil (if needed):** If the soil is dry or compacted, use a garden fork to gently loosen the soil around the radishes.
3. **Grasp the radish:** Grasp the radish firmly by the base of the leaves.
4. **Pull gently:** Gently pull the radish straight up from the soil.
5. **Remove the greens:** Twist or cut off the greens, leaving about ½ inch of stem attached to the radish.
6. **Wash and store:** Wash the radishes thoroughly and store them in a plastic bag in the refrigerator.
Troubleshooting Common Problems
Even with the best care, you might encounter a few problems when growing radishes. Here are some common issues and how to address them:
* **Radishes are small and skinny:** This is usually caused by overcrowding. Make sure you thin your seedlings to the recommended spacing.
* **Radishes are woody and bitter:** This can be caused by letting them grow too large or by hot weather. Harvest them when they’re the right size and provide shade during hot spells.
* **Radishes are cracked:** This is usually caused by inconsistent watering. Keep the soil consistently moist.
* **Radishes have holes in the leaves:** This is likely caused by flea beetles. Control them with insecticidal soap or row covers.
* **Radishes are stunted and have swollen roots:** This could be caused by root maggots. Prevent them with row covers or a soil drench containing beneficial nematodes.
Enjoying Your Radish Harvest
Now that you’ve harvested your radishes, it’s time to enjoy them! Here are a few ideas:
* **Eat them raw:** Radishes are delicious sliced and added to salads, sandwiches, or crudités platters.
* **Pickle them:** Pickled radishes are a tangy and crunchy treat.
* **Roast them:** Ro
Conclusion
So, there you have it! Your comprehensive guide to successfully planting radishes, even if you’re a complete beginner. We’ve covered everything from selecting the right radish variety and preparing your soil to planting techniques, ongoing care, and even troubleshooting common problems. But why is this DIY approach to radish planting a must-try?
Simply put, growing your own radishes is incredibly rewarding. It’s a fast, easy, and inexpensive way to enjoy fresh, crisp, and peppery vegetables straight from your garden. Imagine the satisfaction of pulling up your own vibrant red (or pink, purple, or white!) radishes, knowing exactly where they came from and what went into growing them. Store-bought radishes simply can’t compare to the flavor and freshness of homegrown ones. Plus, it’s a fantastic way to introduce children to the joys of gardening and healthy eating.
Beyond the immediate gratification of delicious radishes, this DIY project offers a valuable learning experience. You’ll gain a deeper understanding of plant life cycles, soil health, and the importance of sustainable gardening practices. You’ll also develop a sense of connection to nature and a greater appreciation for the food you eat.
But the benefits don’t stop there! Growing your own radishes allows you to experiment with different varieties and techniques. For example, you could try succession planting, sowing a new batch of seeds every week or two, to ensure a continuous harvest throughout the growing season. Or, you could explore companion planting, pairing your radishes with other vegetables like carrots or lettuce to improve growth and deter pests.
Consider these variations to elevate your radish-growing game:
* Container Gardening: If you’re short on space, radishes thrive in containers. Choose a pot that’s at least 6 inches deep and filled with well-draining potting mix. This is perfect for balconies, patios, or even indoor gardening.
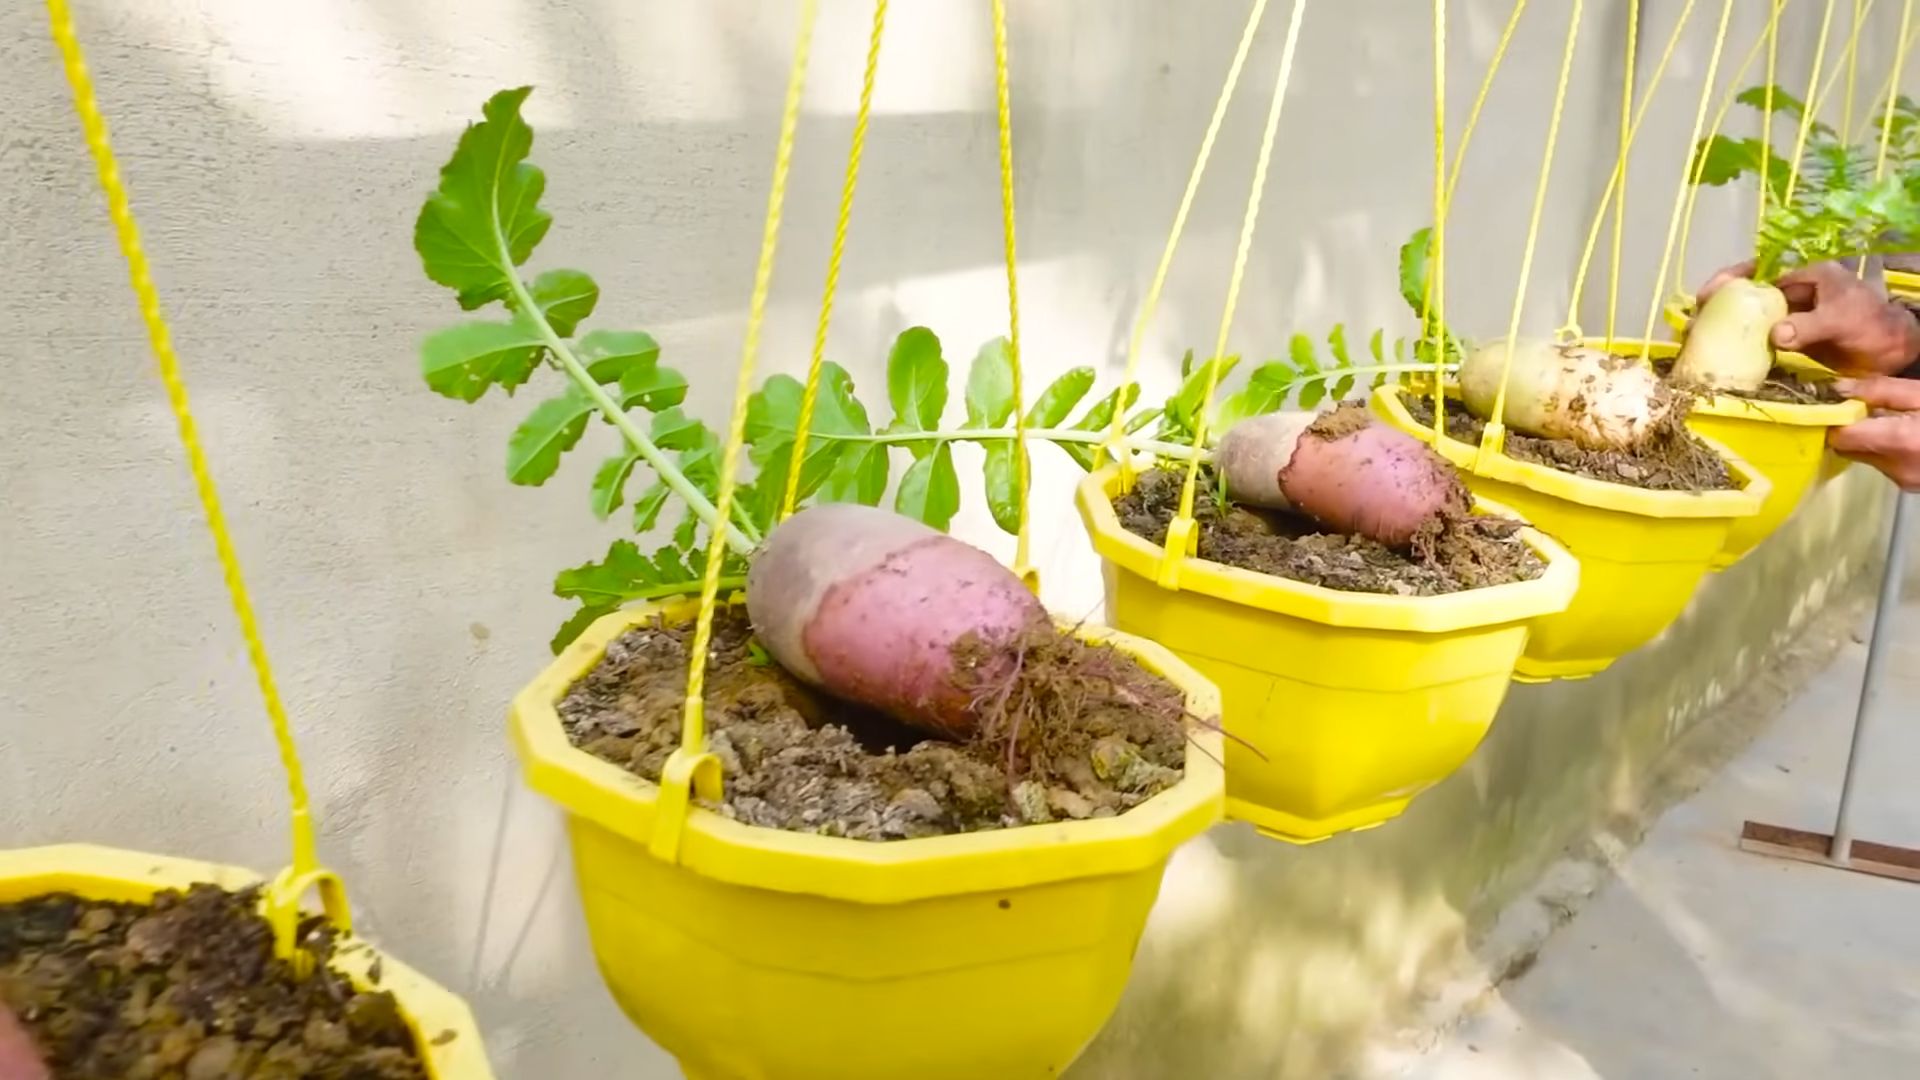
* Vertical Gardening: Get creative and try growing radishes in vertical planters or hanging baskets. This is a great way to maximize space and add a unique touch to your garden.
* Sprouting Radish Seeds: For an even faster harvest, sprout radish seeds indoors. You can enjoy the spicy sprouts in salads, sandwiches, or as a garnish.
* Radish Greens: Don’t throw away the radish tops! They’re edible and nutritious. Sauté them with garlic and olive oil, add them to soups, or use them in salads. They have a peppery bite similar to the radish root.
* Winter Radishes: Explore winter radish varieties like Daikon or Black Spanish. These take longer to mature but can be stored for months, providing fresh vegetables throughout the winter.
We’ve provided you with all the essential knowledge to embark on your radish-growing adventure. Now, it’s time to get your hands dirty and experience the joy of harvesting your own delicious radishes. We are confident that with this guide, you can master the art of radish planting.
We encourage you to try this DIY trick and share your experience with us. Post photos of your radish harvest on social media using #DIYRadishGarden and let us know what you learned along the way. We’re excited to see your gardening success! Happy planting!
Frequently Asked Questions (FAQ)
What is the best time of year to plant radishes?
Radishes are a cool-season crop, meaning they thrive in cooler temperatures. The best time to plant radishes is in early spring or late summer/early fall. In spring, plant as soon as the soil can be worked, typically 2-4 weeks before the last expected frost. For a fall harvest, plant 4-6 weeks before the first expected frost. Avoid planting radishes during the hottest months of summer, as they tend to bolt (go to seed) in high temperatures.
How much sunlight do radishes need?
Radishes need at least 6 hours of sunlight per day to grow well. Choose a location in your garden that receives full sun for optimal results. If you’re growing radishes in containers, make sure to place them in a sunny spot. If you don’t have a spot that gets 6 hours of direct sunlight, you can still grow radishes, but they may take longer to mature and the roots may be smaller.
What kind of soil is best for radishes?
Radishes prefer loose, well-draining soil that is rich in organic matter. Amend your soil with compost or well-rotted manure before planting to improve drainage and fertility. Avoid heavy clay soils, as they can hinder root development. The ideal soil pH for radishes is between 6.0 and 7.0. You can test your soil pH with a soil testing kit and amend it accordingly.
How often should I water radishes?
Radishes need consistent moisture to grow quickly and develop crisp, tender roots. Water regularly, especially during dry periods. Aim to keep the soil consistently moist but not waterlogged. Overwatering can lead to root rot. A good rule of thumb is to water deeply once or twice a week, depending on the weather conditions. Check the soil moisture regularly by sticking your finger into the soil. If the top inch feels dry, it’s time to water.
How long does it take for radishes to mature?
Radishes are one of the fastest-growing vegetables. Most varieties mature in just 20-30 days. Check the seed packet for the specific maturity time of the variety you’re growing. You can start harvesting radishes as soon as they reach a usable size. Don’t let them get too large, as they can become woody and bitter.
Why are my radishes cracking?
Cracking in radishes is usually caused by inconsistent watering. If the soil dries out and then is suddenly watered heavily, the radishes can absorb too much water too quickly, causing them to crack. To prevent cracking, water regularly and consistently, especially during dry periods. Mulching around the plants can also help to retain moisture in the soil.
Why are my radishes all tops and no roots?
Several factors can contribute to radishes producing lots of leaves but small or no roots. These include:
* Too much nitrogen: Excessive nitrogen in the soil can promote leafy growth at the expense of root development. Avoid using high-nitrogen fertilizers.
* Overcrowding: If the radishes are planted too close together, they may not have enough space to develop properly. Thin the seedlings to the recommended spacing.
* Poor soil: Compacted or nutrient-poor soil can hinder root growth. Amend your soil with compost or well-rotted manure before planting.
* Hot weather: High temperatures can cause radishes to bolt and focus their energy on seed production rather than root development. Plant radishes in the cooler months of spring or fall.
Can I eat radish leaves?
Yes, radish leaves are edible and nutritious! They have a peppery flavor similar to the radish root. You can use them in salads, soups, or sauté them with garlic and olive oil. Choose young, tender leaves for the best flavor. Avoid eating leaves that are wilted or discolored.
How do I store radishes after harvesting?
To store radishes, remove the leaves and wash the roots thoroughly. Place the radishes in a plastic bag or container lined with a damp paper towel. Store them in the refrigerator for up to 1-2 weeks. The leaves can also be stored separately in a plastic bag in the refrigerator for a few days.
What are some common pests and diseases that affect radishes?
Some common pests that can affect radishes include flea beetles, root maggots, and aphids. Flea beetles can chew small holes in the leaves. Root maggots can tunnel into the roots, causing them to rot. Aphids can suck the sap from the leaves, weakening the plants. Common diseases that can affect radishes include damping-off and white rust. Damping-off is a fungal disease that can kill seedlings. White rust is a fungal disease that causes white pustules on the leaves. Use organic pest control methods, such as insecticidal soap or neem oil, to control pests. Ensure good air circulation and avoid overwatering to prevent diseases.

Leave a Comment